Page 66 of 360

66 Safety and SecurityOccupant safetySelf-test BabySmart
TM
without special
child seat installed
After turning key in starter switch to
position1 or2, the
7
indicator lamp
located in the center console lights up for
approximately 6 seconds and then goes
out.
If the indicator lamp should not come on or
is continuously lit, the system is not func-
tioning. You must see an authorized Mer-
cedes-Benz Light Truck Center before
seating any child on the front passenger
seat.
More information can be found in the
“Practical hints” section (�page 244).
Warning!
G
The BabySmart
TM airbag deactivation sys-
tem will ONLY work with a special child seat
designed to operate with it. It will not work
with child seats which are not BabySmart
TM
compatible.
Never place anything between seat cushion
and child seat (e.g. pillow), since it reduces
the effectiveness of the deactivation sys-
tem. The bottom of the child seat must
make full contact with the passenger seat
cushion. An incorrectly mounted child seat
could cause injuries to the child in case of an
accident, instead of protecting the child.
Follow the manufacturer’s instructions for
installation of special child seats.
When using a BabySmart
TM compatible
child seat on the front passenger side seat,
the front passenger airbag will not deploy
only if the
7
indicator lamp remains il-
luminated.
Warning!
G
Please be sure to check the indicator every
time you use the special system child seat.
Should the light go out while the restraint is
installed, please check installation. If the
light remains out, do not use the
BabySmart
TM restraint to transport children
on the passenger seat until the system has
been repaired.
Warning!
G
Do not place powered-on laptops, cell
phones and like electronic devices on the
front passenger seat. Signals from such de-
vices may interfere with the BabySmart
TM
system. Such signal interference may cause
the
7
indicator lamp not to come on
during self-test or be continuously lit, indi-
cating that the system is not functioning.
Page 77 of 360

77 Safety and Security
Driving and safety systems
The ESP control switch is located in the up-
per center console.ESP on/off switch�
Press upper half of switch.
ESP is deactivated and the ESP warning
lamp
v
in the speedometer dial
comes on.Even if the ESP has been turned off, it is
still active in the following situations:
�
when braking
�
at vehicle speeds up to approximately
37 mph (60 km / h), if one wheel reach-
es the grip limit, e.g. when the street is
icy on one side
The brake is applied until the wheel re-
gains sufficient traction.
If one or more drive wheels are spinning,
the ESP warning lamp
v
in the instru-
ment cluster flashes, regardless of the
speed.
!Avoid spinning of a drive wheel for an
extended period of time with the ESP
switched off. This may cause serious
damage to the drivetrain which is not
covered by the Mercedes-Benz Limited
Warranty.iTurn ESP on immediately if the afore-
mentioned circumstances do not apply
anymore.
iIf the ESP is switched off, it will be au-
tomatically activated when exceeding a
vehicle speed of 37 mph (60 km / h) or
exceeding a severity threshold of side
acceleration.
Page 90 of 360
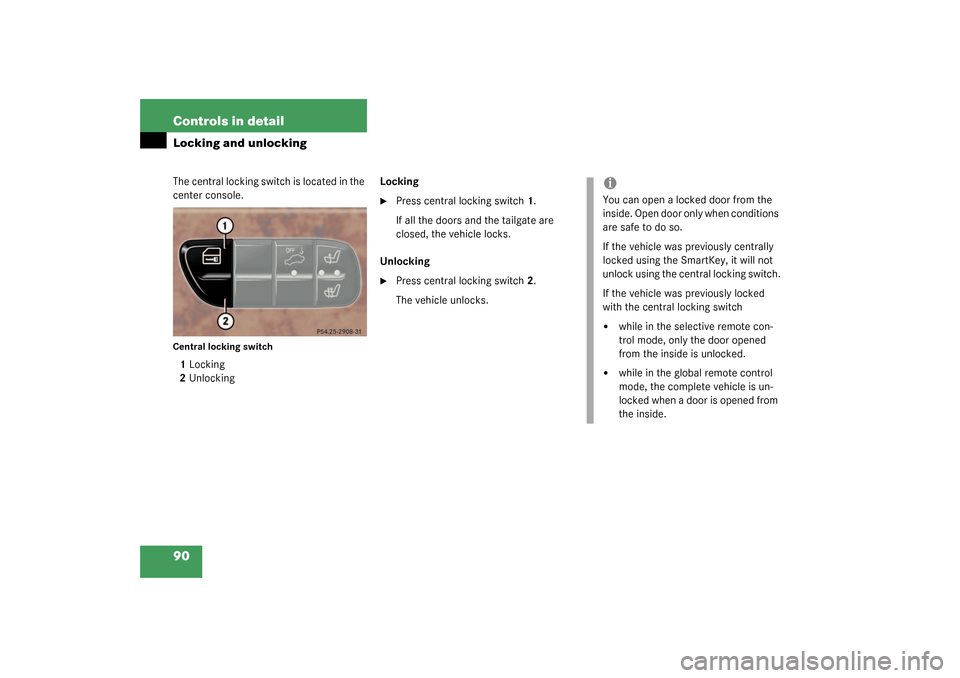
90 Controls in detailLocking and unlockingThe central locking switch is located in the
center console.Central locking switch1Locking
2UnlockingLocking
�
Press central locking switch 1.
If all the doors and the tailgate are
closed, the vehicle locks.
Unlocking
�
Press central locking switch 2.
The vehicle unlocks.
iYou can open a locked door from the
inside. Open door only when conditions
are safe to do so.
If the vehicle was previously centrally
locked using the SmartKey, it will not
unlock using the central locking switch.
If the vehicle was previously locked
with the central locking switch�
while in the selective remote con-
trol mode, only the door opened
from the inside is unlocked.
�
while in the global remote control
mode, the complete vehicle is un-
locked when a door is opened from
the inside.
Page 95 of 360

95 Controls in detail
Seats
Heated seats
Driver’s and front passenger seats
The switch is located in the center console.
1Normal heating
2Rapid heating�
Check that the ignition is switched on.
All the lamps in the instrument cluster
light up.Switching on seat heating
�
Press upper switch position1.
A red indicator lamp on the switch
lights up.
Switching on rapid seat heating
�
Press lower switch position2.
Both red indicator lamps on the switch
light up.Switching off seat heating
�
If one indicator lamp is on, press upper
switch position1.
�
If both indicator lamps are on, press
lower switch position2.
!If one or both of the lamps on the seat
heater switch are blinking, there is in-
sufficient voltage available as too many
electrical consumers are turned on.
The seat heater switches off automati-
cally.
The seat heater will switch back on
again automatically as soon as suffi-
cient voltage is available.
iThe system switches over to normal
heating mode after approximately five
minutes. Only one indicator lamp re-
mains lit. iThe seat heater will be automatically
switched off after approximately
30 minutes.
Page 99 of 360

99 Controls in detail
Memory function
Storing exterior rear view mirror park-ing position
For easier parking, you can adjust the pas-
senger-side exterior rear view mirror so
that you can see the right rear wheel as
soon as you engage reverse gearR.
You can store a parking position for the
passenger exterior rear view mirror for
each key using the memory switch.
For information about activating the park-
ing position see “Activating exterior rear
view mirror parking position”
(�page 148).1Adjustment button
2Driver’s side mirror
3Passenger side mirror
4Memory button
�
Stop the vehicle.
�
Switch ignition on (if not already on).
�
Press button3 in center console.
The passenger side exterior rear view
mirror is selected.
�
Adjust the exterior rear view mirror
with button1 so that you see the rear
wheel and the curb.
�
Press memory button4 on the door.
�
Within three seconds, press bottom of
adjustment button1 above the exterior
lamp switch.
The parking position is stored if the
mirror does not move.iIf the mirror does move, repeat the
above steps. After the setting is stored
you can move the mirror again.
Page 141 of 360
.
Gear range
Switching transfer case
The switch is loca")
141 Controls in detail
Transfer case
Transfer case
More information on off-road driving can
be found in the “Operation” section
(�page 203).
Gear range
Switching transfer case
The switch is located in the center console.1Transfer case indicator
2Gear range indicator
Transfer case indicator1 in the multifunc-
tion display shows the gear position of the
transfer case.
Switching from HIGH to LOW
H
HIGHRoad position
L
LOWOff-road position
This position is intended for
driving off-road and step gradi-
ents.
The transmission will not up-
shift automatically to the next
higher gear range when driving
at the rpm limit.The transfer case supports the
engine’s driving force (approx.
½ speed). Output is therefore
increased.
N
NeutralNo power is transmitted from
the engine to the drive axle.
!The shift procedure can only be per-
formed when:�
The engine is running.
�
The selector lever for the automatic
transmission is in positionN.
�
The vehicle speed does not exceed
25 mph (40 km/h).
Page 145 of 360
 differential lock
2Rear axle differential lock
3F")
145 Controls in detail
Differential locks
Switching differential locks on and off
The switch is located in the center console.
1Transfer case (center) differential lock
2Rear axle differential lock
3Front differential lock
4Engagement indicator lamps (yellow)
5Function indicator lamps (red)Switching differential locks on
Transfer case differential lock
�
Press switch1.
The yellow engagement indicator lamp
for the transfer case differential lock
lights up.
The
v
warning lamp lights up.
When the differential lock engagement
operation has been completed, the red
function indicator lamp lights up.The message
ABS NOT AVAILABLE –
DIFFERENTIAL LOCKED
appears in the
multifunction display.
The
v
and
-
warning lamps in
the instrument cluster come on.
Once the transfer case differential lock
is switched on, you can now, if needed,
�
switch on rear axle differential
lock2
or
�
switch on rear axle differential lock
and front differential lock 2 and 3.
iThe differential locks can only be
switched on in the sequence 1, 2, 3.
!To avoid damage to the transfer case
and differential locks:�
Engage differential locks only at low
speed (walking speed, not more
than 5 mph)
�
Do not engage differential locks if
the driving wheels are spinning
�
Do not engage on paved roads.
Page 179 of 360
179 Controls in detail
Useful features
Cup holder in rear passenger footwellParcel net in front passenger footwell
A small convenience parcel net is located
in the front passenger footwell. It is for
small and light items, such as road maps,
mail, etc.
Ashtrays
Center console ashtray
1Ashtray
2Cigarette lighter
3Cover plate
Opening ashtray�
Briefly push the cover plate3.
The ashtray opens automatically.
!Before folding the seat backrest for-
ward and the rear seat bench down, be
sure that all containers in the rear cup
holder are removed.
Warning!
G
Do not place heavy or fragile objects, or ob-
jects having sharp edges in the parcel net.
In an accident, during hard braking or sud-
den maneuvers, they could be thrown
around inside the vehicle and cause injury to
vehicle occupants.!When large objects are stored in the
parcel net, do not slide the seat fully
forward, it could damage them.