Page 139 of 360

139 Controls in detail
Automatic transmission
Accelerator position
Your driving style influences the transmis-
sion’s shifting behavior:
Less throttle Earlier upshifting
More throttle Later upshifting
Kickdown
Use kickdown when you want maximum
acceleration.�
Press the accelerator past the point of
resistance.
The transmission shifts into a lower
gear.
�
Ease on the accelerator when you have
reached the desired speed.
The transmission shifts up again.
!Coasting the vehicle, or driving for any
other reason with selector lever inN
can result in transmission damage that
is not covered by the Mercedes-Benz
Limited Warranty.Warning!
G
Getting out of your vehicle with the selector
lever not fully engaged in positionP is dan-
gerous. Also, positionP alone is not intend-
ed to or capable of preventing your vehicle
from moving, possibly hitting people or ob-
jects.
Always set the parking brake in addition to
shifting to positionP (
�page 50).
When parked on an incline, turn the front
wheels towards the road curb.
Warning!
G
When leaving the vehicle, always remove the
key from the starter switch, and lock the ve-
hicle. Do not leave children unattended in
the vehicle, or with access to an unlocked
vehicle. Children could move the selector le-
ver from positionP, which could result in an
accident and/or serious personal injury.
Page 140 of 360
140 Controls in detailAutomatic transmissionEmergency operation (Limp Home Mode)
If vehicle acceleration worsens or the
transmission no longer shifts, the trans-
mission is most likely operating in limp
home (emergency operation) mode. In this
mode, only 2nd gear and reverse gear can
be activated.�
Stop the vehicle.
�
Move selector lever toP.
�
Turn off the engine.
�
Wait at least ten seconds before re-
starting.
�
Restart the engine.
�
Move selector lever to positionD (for
2nd gear) orR.
�
Have the transmission checked at an
authorized Mercedes-Benz Light Truck
Center as soon as possible.
Page 141 of 360
.
Gear range
Switching transfer case
The switch is loca")
141 Controls in detail
Transfer case
Transfer case
More information on off-road driving can
be found in the “Operation” section
(�page 203).
Gear range
Switching transfer case
The switch is located in the center console.1Transfer case indicator
2Gear range indicator
Transfer case indicator1 in the multifunc-
tion display shows the gear position of the
transfer case.
Switching from HIGH to LOW
H
HIGHRoad position
L
LOWOff-road position
This position is intended for
driving off-road and step gradi-
ents.
The transmission will not up-
shift automatically to the next
higher gear range when driving
at the rpm limit.The transfer case supports the
engine’s driving force (approx.
½ speed). Output is therefore
increased.
N
NeutralNo power is transmitted from
the engine to the drive axle.
!The shift procedure can only be per-
formed when:�
The engine is running.
�
The selector lever for the automatic
transmission is in positionN.
�
The vehicle speed does not exceed
25 mph (40 km/h).
Page 142 of 360
 of the
transfer case switch.
Once the shift is complete, gear
positionL is displayed in the transfer
case indicator.
�
Put gear s")
142 Controls in detailTransfer case�
Press upper half1 (“LOW”) of the
transfer case switch.
Once the shift is complete, gear
positionL is displayed in the transfer
case indicator.
�
Put gear selector in D.
Switching from LOW to HIGH
�
Press lower half2 (“HIGH”) of the
transfer case switch.
Once the shift is complete, gear
positionH is displayed in the transfer
case indicator.
�
Put gear selector in D.
Messages in the multifunction display
If a shift was not completed and the multi-
function display shows one of the following
messages:
�
TC SHIFT CONDITIONS NOT FULFILLEDThe shift does not occur. At least one
shift condition was not met.
�
Repeat the shift procedure.
�
TC IN NEUTRAL The shift does not occur. The transfer
case is in neutral. The gear positionN
is displayed in the transfer case
indicator1.
�
Repeat the shift procedure.
�
TC SHIFT – CANCELLEDThe shift did not take place.
�
Repeat the shift procedure.
�
TRANSFER CASE – VISIT WORKSHOP!There is a malfunction in the system.
�
Have the vehicle checked at your au-
thorized Mercedes-Benz Light Truck
Center as soon as possible.
More information can be found in the
“Practical hints” section (
�page 266).
!The shift procedure can only be per-
formed when:�
The engine is running.
�
The selector lever for the automatic
transmission is in positionN.
�
The vehicle speed does not exceed
40 mph (70 km/h).
Warning!
G
If TC is in neutral, transmission positionP
will not hold vehicle. The parking brake must
be applied to hold vehicle in place.
iIf the SmartKey is in starter switch
position0 or1, an alarm will sound if
the transfer case is in positionN and
the driver’s door is opened.
Engage transfer case to gear position
HIGH or LOW.
Page 199 of 360

199 Operation
Driving instructions
After hard braking, it is advisable to drive
on for some time, rather than immediately
parking, so the air stream will cool down
the brakes faster.Driving off
Apply the brakes to test them briefly after
driving off. Perform this procedure only
when the road is clear of other traffic.
Warm up the engine smoothly. Do not
place full load on the engine until the oper-
ating temperature has been reached.
When starting off on a slippery surface, do
not allow one drive wheel to spin for an ex-
tended period with the ESP switched off.
Doing so may cause serious damage to the
drivetrain which is not covered by the
Mercedes-Benz Limited Warranty.
To ensure sufficient traction during
off-road driving, activate differential locks
as needed (
�page 145).
Parking
Warning!
G
If other than recommended brake pads are
installed, or other than recommended brake
fluid is used, the braking properties of the
vehicle can be degraded to an extent that
safe braking is substantially impaired. This
could result in an accident.!When driving down long and steep
grades, relieve the load on the brakes
by selecting gear range3,2 or1 on the
automatic transmission to use the en-
gine’s braking power (
�page 137).
This helps prevent overheating of the
brakes and reduces brake pad wear.
Warning!
G
Do not park this vehicle in areas where com-
bustible materials such as grass, hay or
leaves can come into contact with the hot
exhaust system, as these materials could be
ignited and cause a vehicle fire.
To reduce the risk of personal injury as a re-
sult of vehicle movement, before
turning off
the engine and leaving the vehicle always:
�
Keep right foot on brake pedal.
�
Pull the parking brake lever up as many
notches as possible.
�
Move the selector lever to positionP.
�
Slowly release brake pedal.
�
When parked on an incline, turn front
wheel towards the road curb.
�
Turn the key to starter switch position0
and remove.
�
Take the key and lock vehicle when leav-
ing.
Page 207 of 360
.
�
Drive downhill observing the same
rules as driving uphill (
�page 206).Driving t")
207 Operation
Driving instructions
Driving downhill�
Select gear range1 on the automatic
transmission (
�page 137).
�
Drive downhill observing the same
rules as driving uphill (
�page 206).Driving through water
119 in (48 cm)
�
Before driving through water, deter-
mine its depth.
It should not be deeper than approxi-
mately 19 in (48 cm).
�
Comply with the warnings
(�page 203) and rules for off-road
driving (
�page 204).
�
Switch off the exterior lamps as well as
the climate control.
�
Select gear range2 or1 on the auto-
matic transmission (
�page 137).
�
Enter the water only at a shallow spot,
driving at walking speed.
�
Do not stop vehicle immersed in water,
and do not shut off the engine.
There is a very high level of driving re-
sistance in water. The surface is slip-
pery and may not be firm, making
pulling away in water difficult and dan-
gerous.
�
Clean mud off the tire tread after driv-
ing through water.
�
To dry the brakes, apply pressure to the
brake pedal several times after leaving
the water.
!Only apply the service brake if the vehi-
cle travels straight downhill, i.e. in the
line of gravity.iThe special LOW RANGE – ABS setting
allows for precise and brief (cyclical)
blocking of the front wheels, permitting
them to dig into loose ground.
Remember that, when stopped, the
front wheels slide across a surface and
thus lose their ability to steer the vehi-
cle.
!Never accelerate before driving into
the water. The bow wave could force
water into the engine and auxiliary
equipment, thus damaging them.
Page 208 of 360
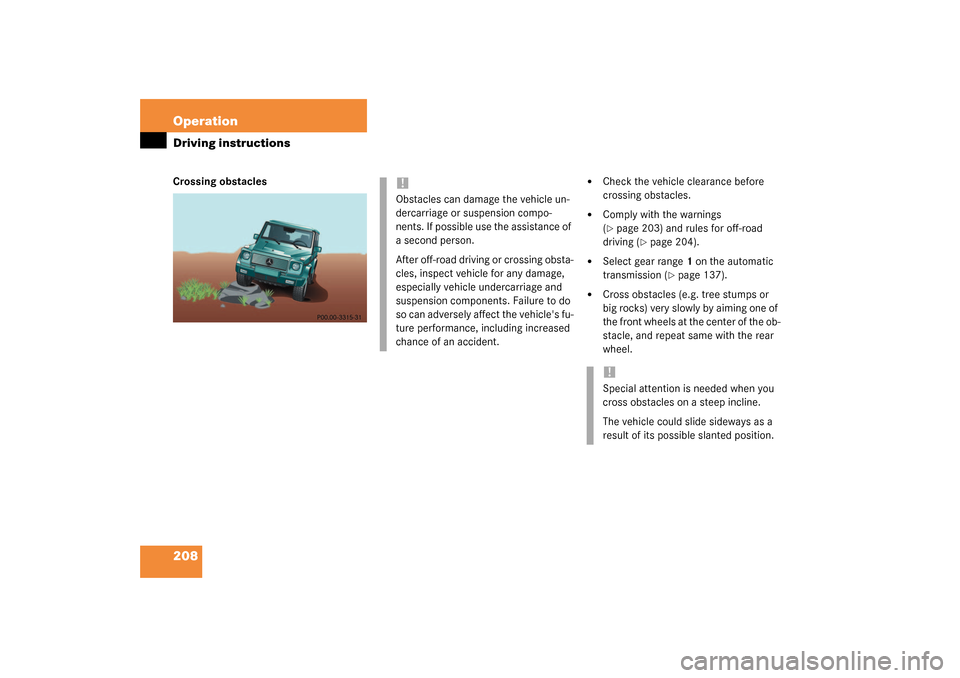
208 OperationDriving instructionsCrossing obstacles
�
Check the vehicle clearance before
crossing obstacles.
�
Comply with the warnings
(�page 203) and rules for off-road
driving (
�page 204).
�
Select gear range1 on the automatic
transmission (
�page 137).
�
Cross obstacles (e.g. tree stumps or
big rocks) very slowly by aiming one of
the front wheels at the center of the ob-
stacle, and repeat same with the rear
wheel.
!Obstacles can damage the vehicle un-
dercarriage or suspension compo-
nents. If possible use the assistance of
a second person.
After off-road driving or crossing obsta-
cles, inspect vehicle for any damage,
especially vehicle undercarriage and
suspension components. Failure to do
so can adversely affect the vehicle's fu-
ture performance, including increased
chance of an accident.
!Special attention is needed when you
cross obstacles on a steep incline.
The vehicle could slide sideways as a
result of its possible slanted position.
Page 209 of 360
 and rules for off-road
driving (
�page 204).
�
Select gear range")
209 Operation
Driving instructions
Ruts
�
Check the vehicle clearance before
driving in ruts.
�
Comply with the warnings
(�page 203) and rules for off-road
driving (
�page 204).
�
Select gear range1 on the automatic
transmission (
�page 137).
�
Drive slowly next to the ruts rather than
through them if at all possible.Returning from off-road driving
!A number of off-road tracks or other by-
roads have deep ruts. If the vehicle
does not have enough ground clear-
ance:�
it could be damaged
�
the underside of the vehicle may
come down on a surface and re-
main stuck
After off-road driving or crossing obsta-
cles, inspect vehicle for any damage,
especially vehicle undercarriage and
suspension components. Failure to do
so can adversely affect the vehicle's fu-
ture performance, including increased
chance of an accident.
Warning!
G
Never drive on pavement with activated dif-
ferential locks. Engaged front axle differen-
tial locks limits ability to move around
curves.
If you feel a sudden significant vibration or
ride disturbance, or you suspect that possi-
ble damage to your vehicle has occurred,
you should turn on the hazard warning flash-
ers, carefully slow down, and drive with cau-
ti o n to a n a r ea wh ic h i s a s a fe dis t an c e f ro m
the roadway.
Inspect the tires and under the vehicle for
possible damage. If the vehicle or tires ap-
pear unsafe, have it towed to the nearest
Mercedes-Benz Light Truck Center or tire
dealer for repairs.
Damage to the vehicle negatively influences
driving comfort and poses the risk of acci-
dent to you and other drivers.

If vehicle acceleration worsens or the
transmission no longer shifts, the trans-
mission is most likely operating in l")