Page 33 of 360
33 Getting started
Unlocking
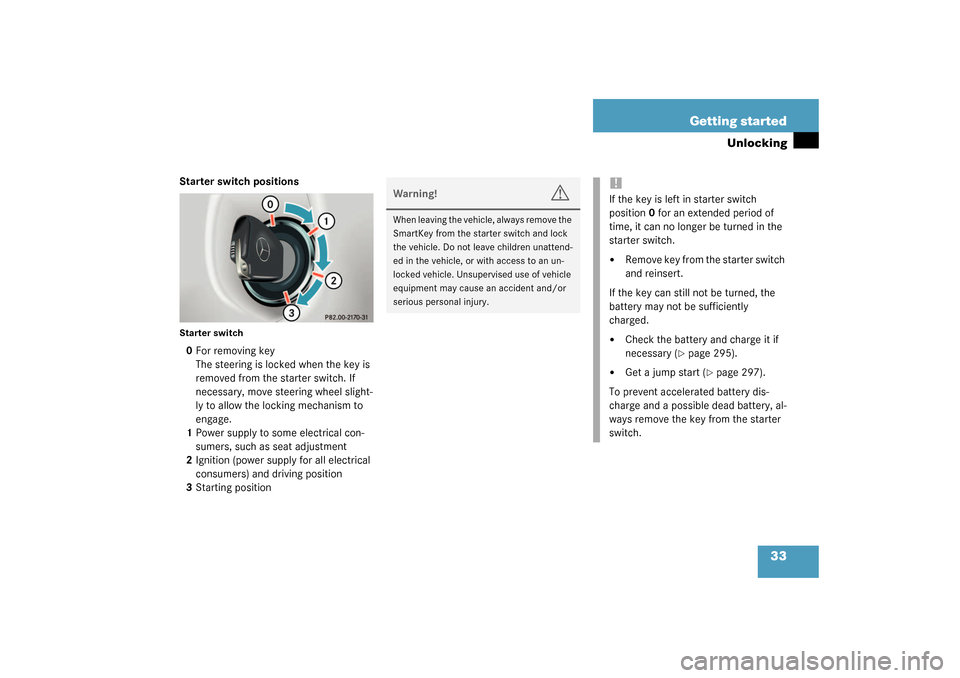
Starter switch positionsStarter switch0For removing key
The steering is locked when the key is
removed from the starter switch. If
necessary, move steering wheel slight-
ly to allow the locking mechanism to
engage.
1Power supply to some electrical con-
sumers, such as seat adjustment
2Ignition (power supply for all electrical
consumers) and driving position
3Starting position
Warning!
G
When leaving the vehicle, always remove the
SmartKey from the starter switch and lock
the vehicle. Do not leave children unattend-
ed in the vehicle, or with access to an un-
locked vehicle. Unsupervised use of vehicle
equipment may cause an accident and/or
serious personal injury.
!If the key is left in starter switch
position0 for an extended period of
time, it can no longer be turned in the
starter switch.�
Remove key from the starter switch
and reinsert.
If the key can still not be turned, the
battery may not be sufficiently
charged.
�
Check the battery and charge it if
necessary (
�page 295).
�
Get a jump start (
�page 297).
To prevent accelerated battery dis-
charge and a possible dead battery, al-
ways remove the key from the starter
switch.
Page 39 of 360
39 Getting started
Adjusting
�
Make sure that the ignition is switched
on.
All the lights in the instrument cluster
light up.
�
Press button2 for left mirror or
button3 for right mirror.
�
Push adjustment button1 up, down,
left or right according to the setting de-
sired.
More information can be found in the
“Controls in detail” section (
�page 99).
iThe memory function (
�page 97) can
be used to save the exterior mirror set-
tings together with the seat and steer-
ing wheel settings.
!If an exterior rear view mirror housing
is forcibly pushed forward or rearward,
reposition it by applying firm pressure
until it snaps into place. The mirror
housing is now properly positioned and
you can adjust the mirror normally.
Page 47 of 360
47 Getting started
Driving
Windshield wipers
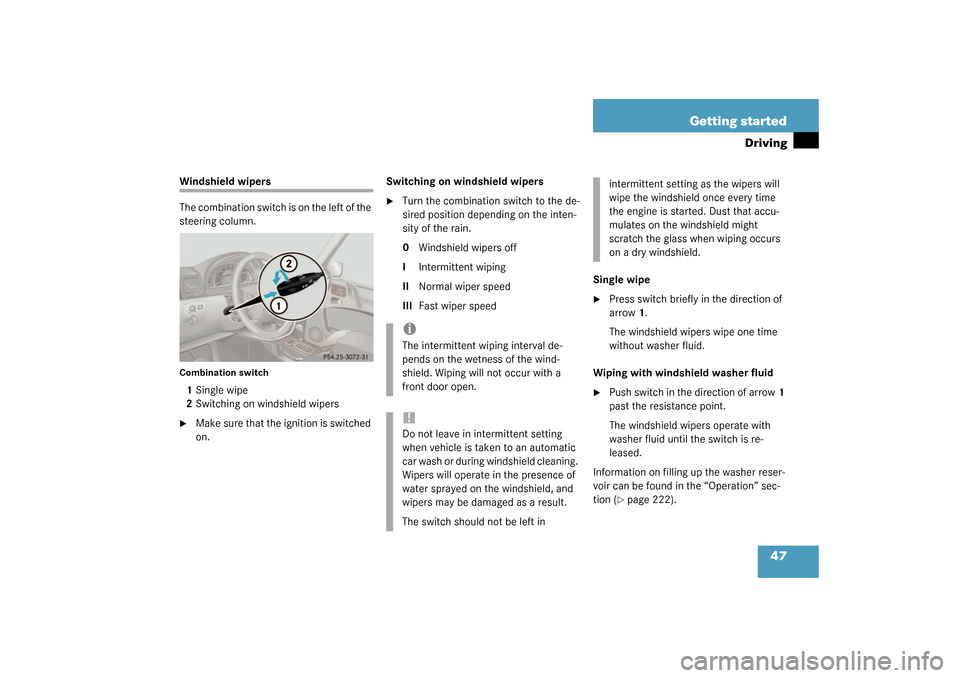
The combination switch is on the left of the
steering column.Combination switch1Single wipe
2Switching on windshield wipers �
Make sure that the ignition is switched
on.Switching on windshield wipers
�
Turn the combination switch to the de-
sired position depending on the inten-
sity of the rain.
0Windshield wipers off
IIntermittent wiping
IINormal wiper speed
IIIFast wiper speedSingle wipe
�
Press switch briefly in the direction of
arrow1.
The windshield wipers wipe one time
without washer fluid.
Wiping with windshield washer fluid
�
Push switch in the direction of arrow1
past the resistance point.
The windshield wipers operate with
washer fluid until the switch is re-
leased.
Information on filling up the washer reser-
voir can be found in the “Operation” sec-
tion (�page 222).
iThe intermittent wiping interval de-
pends on the wetness of the wind-
shield. Wiping will not occur with a
front door open.!Do not leave in intermittent setting
when vehicle is taken to an automatic
car wash or during windshield cleaning.
Wipers will operate in the presence of
water sprayed on the windshield, and
wipers may be damaged as a result.
The switch should not be left in
intermittent setting as the wipers will
wipe the windshield once every time
the engine is started. Dust that accu-
mulates on the windshield might
scratch the glass when wiping occurs
on a dry windshield.
Page 48 of 360
48 Getting startedDriving
Rear window wiper/washer
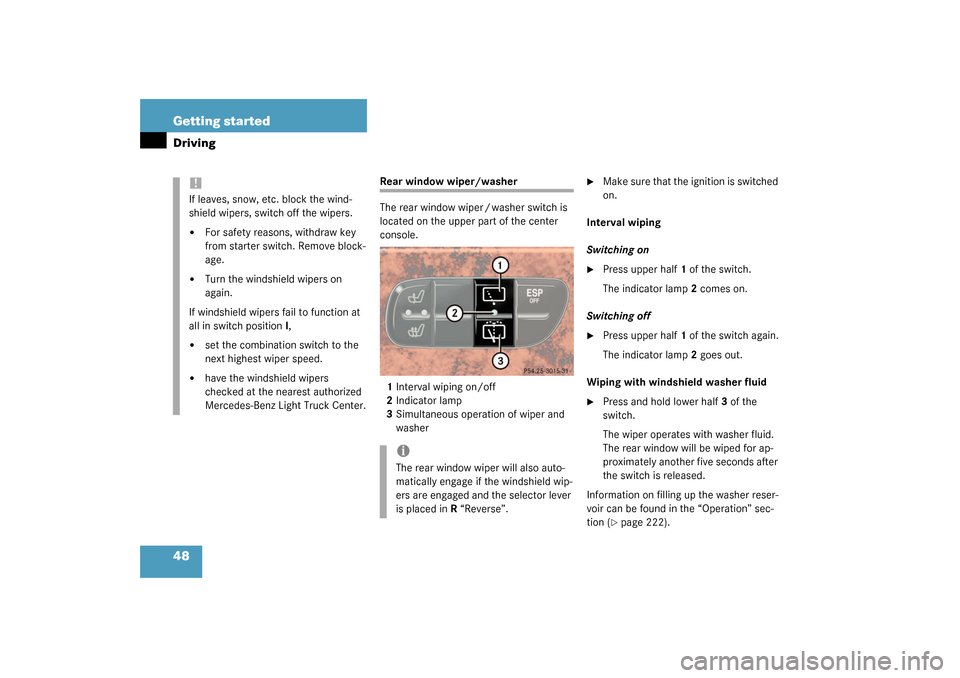
The rear window wiper / washer switch is
located on the upper part of the center
console.
1Interval wiping on/off
2Indicator lamp
3Simultaneous operation of wiper and
washer
�
Make sure that the ignition is switched
on.
Interval wiping
Switching on
�
Press upper half1 of the switch.
The indicator lamp2 comes on.
Switching off
�
Press upper half1 of the switch again.
The indicator lamp2 goes out.
Wiping with windshield washer fluid
�
Press and hold lower half3 of the
switch.
The wiper operates with washer fluid.
The rear window will be wiped for ap-
proximately another five seconds after
the switch is released.
Information on filling up the washer reser-
voir can be found in the “Operation” sec-
tion (�page 222).
!If leaves, snow, etc. block the wind-
shield wipers, switch off the wipers.�
For safety reasons, withdraw key
from starter switch. Remove block-
age.
�
Turn the windshield wipers on
again.
If windshield wipers fail to function at
all in switch positionI,
�
set the combination switch to the
next highest wiper speed.
�
have the windshield wipers
checked at the nearest authorized
Mercedes-Benz Light Truck Center.
iThe rear window wiper will also auto-
matically engage if the windshield wip-
ers are engaged and the selector lever
is placed inR “Reverse”.
Page 49 of 360
49 Getting started
Driving
Problems while driving
The engine runs erratically and misfires�
An ignition cable may be damaged.
�
The engine electronics may not be op-
erating properly.
�
Unburned gasoline may have entered
the catalytic converter and damaged it.
�
Give very little gas.
�
Have the problem repaired by an au-
thorized Mercedes-Benz Light Truck
Center as soon as possible.The coolant temperature is over 248°F
(120°C)
The coolant is too hot and is no longer
cooling the engine.
�
Stop the vehicle as soon as possible
and turn off the engine. Allow engine
and coolant to cool.
�
Check the coolant level and add cool-
ant if necessary (
�page 220).In case of accident
If the vehicle is leaking gasoline:
�
Do not start the engine under any cir-
cumstances.
�
Notify local fire and/or police authori-
ties.
If the extent of the damage cannot be de-
termined:
�
Notify an authorized Mercedes-Benz
Light Truck Center.
If no damage can be determined on the
�
major assemblies
�
fuel system
�
engine mount:
�
Start the engine in the usual manner.
iExcessive coolant temperatures trigger
a warning message in the multifunction
display (
�page 252).
Page 81 of 360
81 Safety and Security
Anti-theft systems
Arming tow-away alarm
When you lock your vehicle, the tow-away
alarm is automatically armed.
When you unlock your vehicle, the
tow-away protection disarms
automatically.
Disarming tow-away alarm
To prevent triggering the tow-away alarm
feature, switch off the tow-away alarm be-
fore towing the vehicle, or when parking on
a surface subject to movement, such as a
ferry or auto train.The switch is located on the center con-
sole.
1Tow-away alarm off switch
2Indicator lamp
�
Turn off the ignition and remove the
key.
�
Press upper half1 of the switch.
Indicator lamp2 in the switch lights up
briefly.
�
Lock your vehicle with the key.
The tow-away alarm remains disarmed un-
til you lock your vehicle again.
iYou cannot disarm the tow-away alarm
if the ignition is turned on.
Page 89 of 360
89 Controls in detail
Locking and unlocking
Automatic central locking
The doors and the tailgate automatically
lock when the ignition is switched on and
the wheels are turning at vehicle speeds of
approximately 9 mph (15 km/h) or more.
You can open a locked door from the in-
side. Open door only when conditions are
safe to do so.
You can deactivate the automatic locking
using the control system (
�page 127).
Locking and unlocking from the inside
You can lock or unlock the vehicle from in-
side using the central locking switches.
This can be useful, for example, if you want
to unlock the passenger door from the in-
side or want to lock the vehicle before
starting to drive.
The fuel filler flap cannot be locked or un-
locked with the central locking switch.
iThe doors unlock automatically after an
accident if the force of the impact ex-
ceeds a preset threshold.
The vehicle automatically locks when
the ignition is switched on and the
wheels are turning. You could therefore
lock yourself out when the vehicle�
is pushed
�
is on a test stand
Warning!
G
When leaving the vehicle, always remove the
key from the starter switch, and lock the ve-
hicle. Do not leave children unattended in
the vehicle, or with access to an unlocked
vehicle. Unsupervised use of vehicle equip-
ment may cause an accident and/or serious
personal injury.
Page 94 of 360
94 Controls in detailSeatsMulticontour seat*
Some models may be equipped with driv-
er’s multicontour seat. This seat has a
movable seat cushion and inflatable air
cushions built into the seat backrest to
provide additional lumbar and side sup-
port.
The seat cushion movement and amount of
seat backrest cushion height and curva-
ture can be continuously varied with regu-
lators on the right side of the seat after
turning the SmartKey in the starter switch
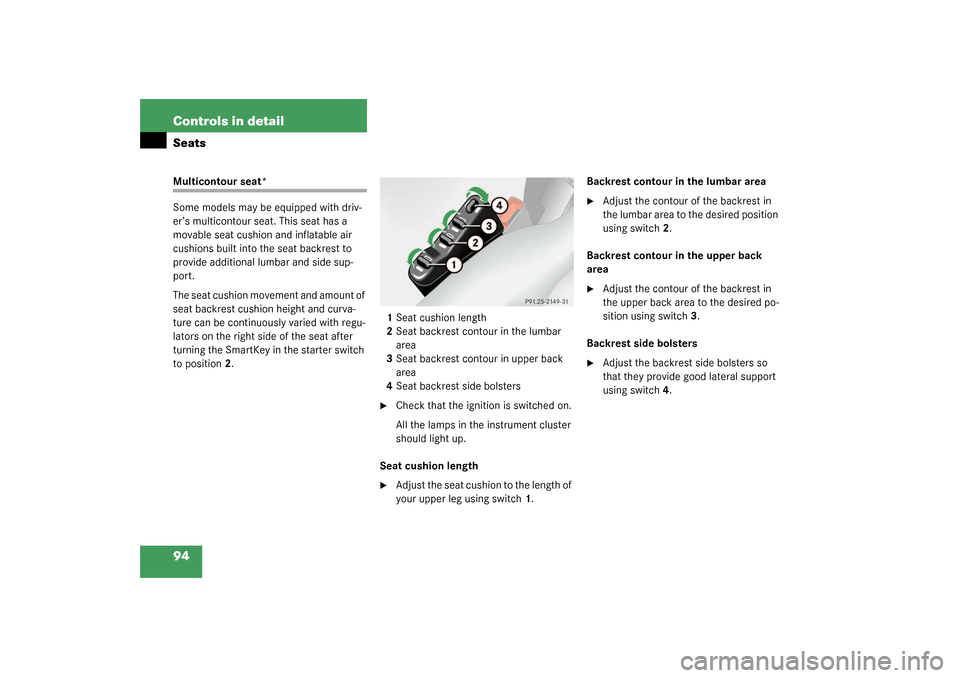
to position2.1Seat cushion length
2Seat backrest contour in the lumbar
area
3Seat backrest contour in upper back
area
4Seat backrest side bolsters
�
Check that the ignition is switched on.
All the lamps in the instrument cluster
should light up.
Seat cushion length
�
Adjust the seat cushion to the length of
your upper leg using switch 1.Backrest contour in the lumbar area
�
Adjust the contour of the backrest in
the lumbar area to the desired position
using switch 2.
Backrest contour in the upper back
area
�
Adjust the contour of the backrest in
the upper back area to the desired po-
sition using switch 3.
Backrest side bolsters
�
Adjust the backrest side bolsters so
that they provide good lateral support
using switch 4.