Page 202 of 399
 and 110 mph
(Canada:180 km/h)
�
the ESP is activated (
�page")
202 Controls in detailDriving systemsActivating Distronic
You can activate Distronic if:�
you are driving between 25 mph
(Canada:40 km/h) and 110 mph
(Canada:180 km/h)
�
the ESP is activated (
�page 75)
If Distronic has not been activated after
pressing the cruise control lever you will
see the message
---
in the multifunction
display.
In the following cases you cannot activate
Distronic:
�
Up to two minutes after starting the en-
gine
�
When you brake
�
If you have set the parking brake
�
If the gear selector lever is in
positionP, R or N
�
If the ESP is switched offSetting the current speed
�
Accelerate or decelerate to the desired
speed.
�
Briefly lift or depress the cruise control
lever.
Distronic is activated and the current
speed is set.
�
Remove your foot from the accelerator
pedal.Setting a higher speed
�
Briefly tip the cruise control lever in the
direction of arrow1 (
�page 201) to in-
crease vehicle speed in increments of 5
mph (Canada: 10 km/h).
The new speed is set.
The stored speed is displayed in the
multifunction display for approximately
five seconds (
�page 201), and one or
two segments around the stored speed
light up on the speedometer
(
�page 199).
iIf you do not take your foot off of the
accelerator completely, the following
message will appear in the multifunc-
tion display: Distronic override
. The distance to a
slower moving vehicle in front of you
will not be set. Your vehicle speed will
then be determined only by the accel-
erator pedal position.
iDepressing the accelerator pedal does
not deactivate Distronic. After brief ac-
celeration (e.g. for passing), cruise con-
trol will resume the last speed set.
Page 203 of 399
 to
decrease vehicle speed in increments
of 5 mph (Canada:")
203 Controls in detail
Driving systems
Setting a lower speed�
Briefly tip the cruise control lever in the
direction of arrow2 (
�page 201) to
decrease vehicle speed in increments
of 5 mph (Canada: 10 km/h).
The new speed is set.
The stored speed is displayed in the
multifunction display for approximately
five seconds (
�page 199), and one or
two segments around the stored speed
light up on the speedometer
(
�page 199).Fine adjustment in 1 mph
(Canada: 1 km/h) increments
Faster
�
Briefly tip the cruise control lever in the
direction of arrow4 (
�page 201).Resetting stored speeds
�
Briefly tip the cruise control lever in the
direction of arrow4 (
�page 201).
Distronic is set to the last stored
speed.
�
Remove your foot from the accelerator
pedal.
iWhen you use the cruise control lever
to decelerate, the transmission will au-
tomatically downshift if the rate of de-
celeration is too low.
Warning!
G
The speed stored in memory should only be
set again if prevailing road conditions per-
mit. Possible acceleration or deceleration
differences arising from returning to preset
speed could endanger yourself and others.
Page 210 of 399

210 Controls in detailDriving systemsThe following vehicle level settings can be
selected when the vehicle is stationary and
the engine is running:
The switch is located in the lower section
of the center console.
1Vehicle level control switch
2Indicator lamp
�
Briefly press switch1 to change from
"Normal" level to "Raised" level. When
vehicle is at "Raised" level, pressing the
switch will return the vehicle to "Nor-
mal" level.
Vehicle level when
stationary
Use for
Ride height increase
over normal
Automatic lowering
Indicator lamp (
�page 210)
Normal
Normal operation
None
Max. approx. 0.6 in (15 mm)
Lamp off
Raised
Driving with snow
chains or very
rough road sur-
face conditions
Approx. 1 in (25 mm)
Max. approx. 1 in (25 mm)
Lamp on
iAt a speed of approx. above 75 mph
(120 km/h) or if the speed amounts to
between 50 mph (80 km/h) and
75 mph (120 km/h) for approx. five
minutes the setting "Raised" is can-
celed. The message
Level selec.
canceled
appears in the multifunction
display.
If you do not drive in this speed range,
the "Raised" level remains stored even
if the key is removed from the ignition.
Page 219 of 399

219 Controls in detail
Loading
Removal of ski sack
For removal of the ski sack we recommend
that you contact an authorized Mer-
cedes-Benz Center.
Split rear bench seat*
To expand the trunk, you can fold down the
left and right rear seat backrests.
The two sections can be folded down sep-
arately to enlarge the trunk.
When transporting long items, the folding
front passenger seat* can be folded for-
ward, and you can remove the rear seat
cushions.
Warning!
G
Never drive vehicle with trunk open while
the ski sack is removed. Deadly carbon
monoxide (CO) gases may enter vehicle in-
terior, resulting in unconsciousness and
death.iTo prevent unauthorized persons from
access to the trunk, always close the
cover.
Warning!
G
When expanding the luggage compartment,
always fold the seat cushions fully forward.
Unless you are transporting cargo, the back-
rests must remain properly locked in the up-
right position.
In an accident, during hard braking or sud-
den maneuvers, loose items will be thrown
around inside the vehicle, and cause injury
to vehicle occupants unless the items are
securely fastened in the vehicle.
Always use the cargo tie down rings
(�page 225).
Page 223 of 399
223 Controls in detail
Loading
Expanding the cargo area*
Removing the rear seat cushions will pro-
vide you with a larger, flat cargo area.�
Fold the seat cushions and the back-
rests forward.
�
Remove the head restraints.
(Raise the seat backrest and fold the
head restraints forward.)
1Release catch
�
Press head restraint release catch1
and pull the head restraints out of the
guides.
�
Fold the backrest into the vertical posi-
tion.
1Release lever
�
Pull seat cushion release lever1 and
remove the seat cushion by pulling it
upward.
!Leave the seat cushion hinge in this po-
sition. The upholstery could be dam-
aged if you fold the hinge back.
Page 228 of 399
228 Controls in detailUseful features1Left cup holder
2Right cup holderStorage space under armrest
1Storage compartment
2Storage tray
Opening storage tray
�
Pull handle2.
Opening storage compartment
�
Pull handle1.
iThe cup holder can be removed for
cleaning. Clean the cup holder only
with clear, lukewarm water.
Make sure to insert the cup holder in
the guides when reinstalling it.
Warning!
G
When not in use, keep the cup holder closed
while traveling. Place only containers that fit
into the cup holder to prevent spills. Use lids
on open containers and do not fill containers
to a height where the contents, especially
hot liquids, could spill during vehicle maneu-
vers.
Page 231 of 399
231 Controls in detail
Useful features
Ashtrays
Center console ashtray
Opening ashtray�
Briefly press the marking on the bot-
tom of cover1.
The ashtray opens automatically.Removing ashtray insert
�
Secure vehicle from movement by set-
ting the parking brake. Move the selec-
tor lever to positionN.
Now you have more room to take out
the insert.
�
Push sliding button2 to the right and
hold.
�
Grip and remove insert from ashtray
frame.
Reinstalling ashtray insert
�
Install insert by pushing it back into
frame until it engages again.Rear seat ashtray
Opening ashtray
�
Briefly press the top of the ashtray.
The ashtray opens.
Warning!
G
Remove front ashtray only with vehicle
standing still. Set the parking brake to se-
cure vehicle from movement. Move gear se-
lector lever to positionN. With gear selector
lever in positionN turn off the engine.
Page 232 of 399
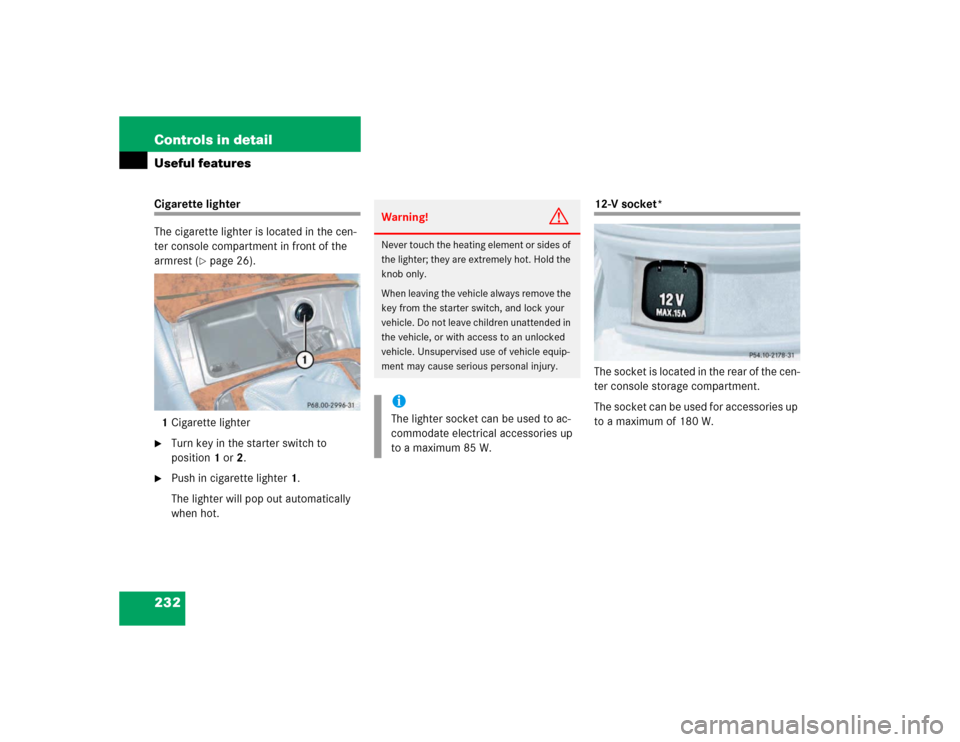
232 Controls in detailUseful featuresCigarette lighter
The cigarette lighter is located in the cen-
ter console compartment in front of the
armrest (
�page 26).
1Cigarette lighter
�
Turn key in the starter switch to
position1 or2.
�
Push in cigarette lighter1.
The lighter will pop out automatically
when hot.
12-V socket*
The socket is located in the rear of the cen-
ter console storage compartment.
The socket can be used for accessories up
to a maximum of 180 W.
Warning!
G
Never touch the heating element or sides of
the lighter; they are extremely hot. Hold the
knob only.
When leaving the vehicle always remove the
key from the starter switch, and lock your
vehicle. Do not leave children unattended in
the vehicle, or with access to an unlocked
vehicle. Unsupervised use of vehicle equip-
ment may cause serious personal injury.iThe lighter socket can be used to ac-
commodate electrical accessories up
to a maximum 85 W.