Page 162 of 354

159 Interior equipment
Te ch n i c a l
data Instruments
and controlsOperationDrivingInstrument
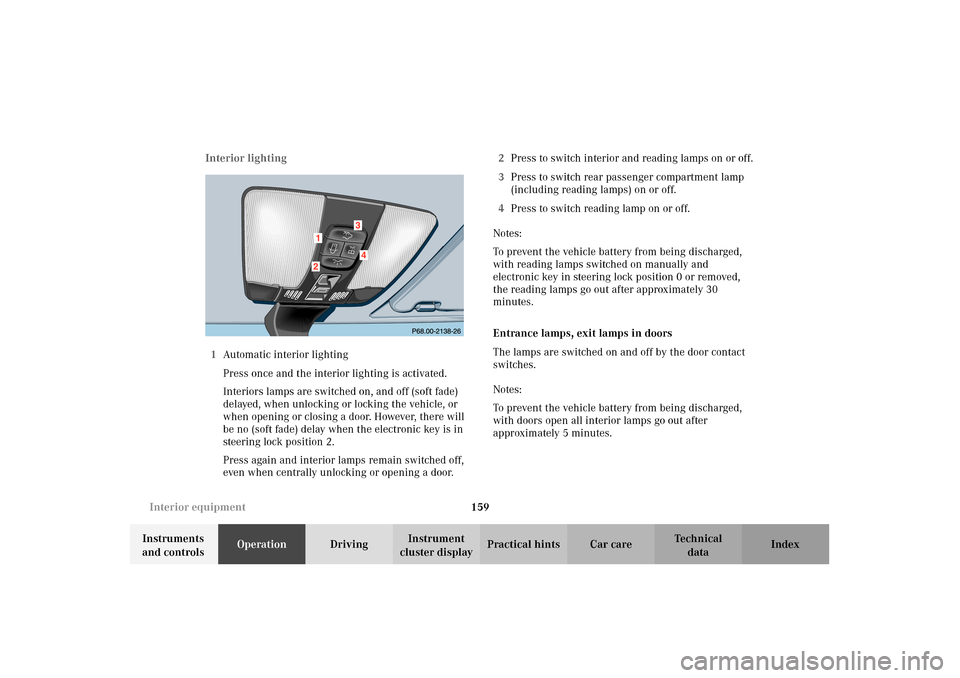
cluster displayPractical hints Car care Index Interior lighting
1Automatic interior lighting
Press once and the interior lighting is activated.
Interiors lamps are switched on, and off (soft fade)
delayed, when unlocking or locking the vehicle, or
when opening or closing a door. However, there will
be no (soft fade) delay when the electronic key is in
steering lock position 2.
Press again and interior lamps remain switched off,
even when centrally unlocking or opening a door.2Press to switch interior and reading lamps on or off.
3Press to switch rear passenger compartment lamp
(including reading lamps) on or off.
4Press to switch reading lamp on or off.
Notes:
To prevent the vehicle battery from being discharged,
with reading lamps switched on manually and
electronic key in steering lock position 0 or removed,
the reading lamps go out after approximately 30
minutes.
Entrance lamps, exit lamps in doors
The lamps are switched on and off by the door contact
switches.
Notes:
To prevent the vehicle battery from being discharged,
with doors open all interior lamps go out after
approximately 5 minutes.
Page 164 of 354
161 Interior equipment
Te ch n i c a l
data Instruments
and controlsOperationDrivingInstrument
cluster displayPractical hints Car care Index Sun visors
Swing sun visors down to protect against sun glare.
If sunlight enters through a side window, disengage
visor from inner mounting, pivot to the side and slide it
to the desired position.Illuminated vanity mirrors
With the visor engaged in its inner mounting, the lamp
is switched on by opening the cover.
The lamp goes out automatically after approximately
5minutes.
P68.00-2430-26
Wa r n i n g !
Do not use the vanity mirror while driving.
P68.60-2026-26
Page 167 of 354
164 Interior equipment
Te ch n i c a l
data Instruments
and controlsOperationDrivingInstrument
cluster displayPractical hints Car care Index
Storage compartment above ashtray
in center console
To o pen :
Touch bottom of cover slightly. The cover opens
automatically.Storage compartments in center console
To open compartment in armrest:
Lift lid with handle (4).
To open compartment under armrest:
Lift lid with handle (5).
To c l o s e :
Lower lid until it engages in lock.
P68.20-2260-26
Page 168 of 354

165 Interior equipment
Te ch n i c a l
data Instruments
and controlsOperationDrivingInstrument
cluster displayPractical hints Car care Index Cup holder in center console
To o pen cove r:
Touch top of cover (6) slightly. The cover opens
automatically.
To open cup holder:
Briefly press button (7). The cup holder opens
automatically.
To store cup holder:
Push button (7) down until cup holder engages. Close
cover (6).Note:
The right claw is adjustable to accommodate most
container sizes.
An additional second (smaller size) container can be
placed in the cup holder.
Spilling liquids (e.g. soda or coffee) could restrict the
movement of the claw. Refer to page 318 for cleaning the
cup holder.
Caution!
When not in use, keep the cup holder closed. Place only
containers that fit into the cup holder to prevent spills.
Use lids on open containers and do not fill containers to
a height where the contents, especially hot liquids,
could spill during vehicle maneuvers.
Wa r n i n g !
Keep compartment lids closed. This will help to
prevent stored objects from being thrown about
and injuring vehicle occupants during an accident
and sudden maneuver
Page 169 of 354
166 Interior equipment
Te ch n i c a l
data Instruments
and controlsOperationDrivingInstrument
cluster displayPractical hints Car care Index
Ashtrays
Center console, front
By touching the bottom of the cover lightly, the ashtray
opens automatically.
Prior to removing the ashtray insert, move the gear
selector lever to position “N”.To remove ashtray:
Push sliding knob (1) toward the right to eject the
insert.
To install ashtray:
Install insert into ashtray frame and push down to
engage.
Wa r n i n g !
Remove front ashtray only with vehicle standing
still. With the gear selector lever in position “N”,
turn off the engine and set the parking brake.
Otherwise the vehicle might move as a result of
unintended contact with the gear selector lever.
Page 171 of 354
168 Interior equipment
Te ch n i c a l
data Instruments
and controlsOperationDrivingInstrument
cluster displayPractical hints Car care Index
Lighter
Turn electronic key in steering lock to position 1 or 2.
Push in lighter (1); it will pop out automatically when
hot.The lighter socket can be used to accommodate
electrical accessories up to maximum 85 W.
Wa r n i n g !
Never touch the heating element or sides of the
lighter, they are extremely hot, hold at knob only.When leaving the vehicle, always remove the
electronic key from the steering lock. Do not leave
children unattended in the vehicle, or with access
to an unlocked vehicle. Unsupervised use of vehicle
equipment may cause an accident and/or serious
personal injury.
Page 181 of 354
178 Interior equipment
Te ch n i c a l
data Instruments
and controlsOperationDrivingInstrument
cluster displayPractical hints Car care Index
Cargo tie-down rings
Eight rings are located in the cargo compartment.
Additional two rings can be found ahead of the split rear
bench seat on the cross member.
Carefully secure cargo by applying even load on all
rings with rope of sufficient strength to hold down the
cargo.Parcel net in front passenger footwell
A small convenience parcel net is located in the front
passenger footwell. It is for small and light items, such
as road maps, mail, etc..
Wa r n i n g !
Do not place heavy or fragile objects, or objects
having sharp edges, in the parcel net.In an accident, during hard braking or sudden
maneuvers, they could be thrown around inside
the vehicle, and cause injury to vehicle occupants.
Page 185 of 354

182 Garage door opener
Te ch n i c a l
data Instruments
and controlsOperationDrivingInstrument
cluster displayPractical hints Car care Index
Rolling code programming:
To train a garage door opener (or other rolling code
devices) with the rolling code feature, follow these
instructions after completing the “Programming”
portion of this text. (A second person may make the
following training procedures quicker and easier.)
1. Locate training button on the garage door opener
motor head unit. Exact location and color of the
button may vary by garage door opener brand. If
there is difficulty locating the transmitting button,
reference to garage door opener operator’s manual.
2. Press “training” button on the garage door opener
motor head unit (which activated the “training
light”).
Note:
Following step 2, there are 30 seconds to initiate
step 3.3. Firmly press and release the programmed
integrated remote control transmit button. Press
and release same button a second time to complete
the training process. (Some garage door openers
may require you to do this procedure a third time to
complete the training.)
4. Confirm the garage door operation by pressing the
programmed button on the integrated remote
control transmitter.
Canadian programming:
During programming, your hand-held transmitter may
automatically stop transmitting. Continue to press and
hold the integrated remote control transmitter button
(note steps 2 through 4 in the “Programming” portion)
while you press and re-press (“cycle”) your hand-held
transmitter every two seconds until the frequency
signal has been learned. The indicator lamp will flash
slowly and then rapidly after several seconds upon
successful training.