2003 MERCEDES-BENZ E320 WAGON buttons
[x] Cancel search: buttonsPage 30 of 354
27 Central locking system
Te ch n i c a l
data Instruments
and controlsOperationDrivingInstrument
cluster displayPractical hints Car care Index Central locking system
Radio frequency and infrared remote control
The electronic key has an integrated radio frequency
and infrared remote control.
Due to the extended operational range of the remote
control, it could be possible to unintentionally lock or
unlock the vehicle by pressing the transmit button. If
one of the transmit buttons is pressed, the battery check
lamp lights up briefly – indicating that the batteries are
in order. See page 304 for checking batteries.
The vehicle doors, tailgate and fuel filler flap can be
centrally locked and unlocked via remote control.
Opening and closing the windows and sliding / pop-up
roof remotely can only be done with the infrared portion
of the remote control. Aim transmitter eye at a
receiver (6 or 7), press and hold transmit button Œ
or ‹.
If the electronic key is inserted in steering lock, the
vehicle cannot be locked or unlocked with the remote
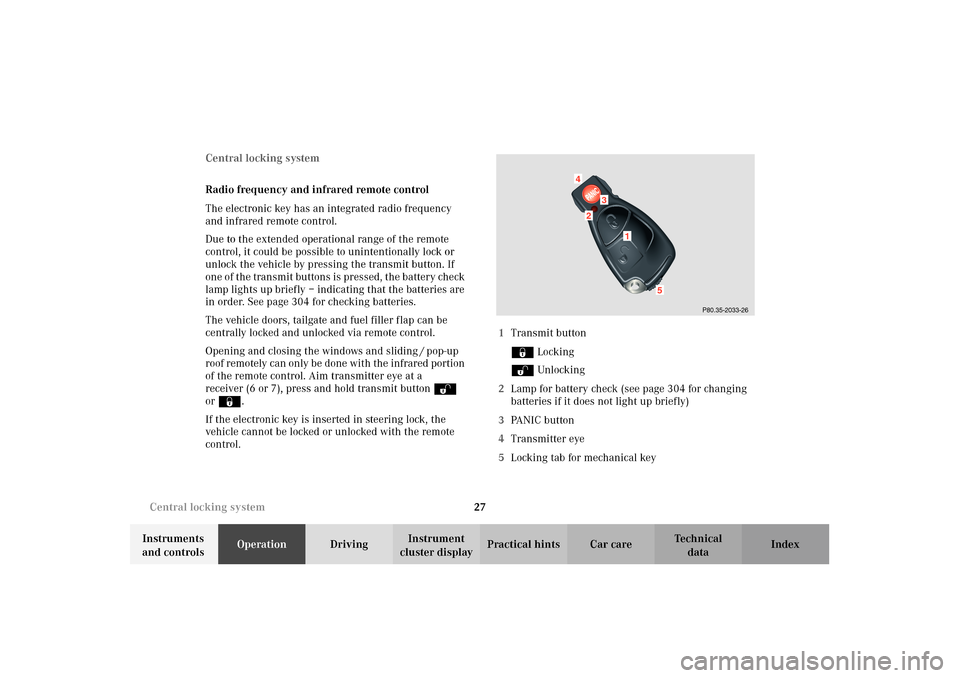
control.1Transmit button
‹ Locking
ΠUnlocking
2Lamp for battery check (see page 304 for changing
batteries if it does not light up briefly)
3PA N I C b u t t o n
4Transmitter eye
5Locking tab for mechanical key
P80.35-2033-26
2
1
4
3
5
Page 33 of 354
30 Central locking system
Te ch n i c a l
data Instruments
and controlsOperationDrivingInstrument
cluster displayPractical hints Car care Index
Choosing global or selective mode on remote control
Press and hold transmit buttons ‹ and Œ
simultaneously for five seconds to reprogram the
remote control. Battery check lamp will blink two times
indicating the completed mode change.
Opening and closing windows and
sliding / pop-up roof from outside
(summer opening / convenience feature)
Aim transmitter eye of remote control at a door receiver.
Summer opening:
Continue to press transmit button Πafter unlocking
the vehicle.
The windows and sliding / pop-up roof begin to open
after approximately 1 second.
To interrupt opening procedure, release transmit
button.
Convenience feature:
Continue to press transmit button ‹ after locking
the vehicle.The windows and sliding / pop-up roof begin to close
after approximately 1 second.
To interrupt closing procedure, release transmit button.
Ensure that all side windows and the sliding/pop-up
roof are properly closed before leaving the vehicle.
Note:
If the windows and sliding / pop-up roof cannot be
operated automatically by pressing the transmit button
of t he r emo te c ontr ol then it m ay be n ece ssar y to chan ge
the batteries in the electronic key (if ok, battery check
lamp in electronic key will light briefly when
transmitting), or to synchronize the remote control, see
page 304 and 306.
Wa r n i n g !
Never operate the windows or sliding / pop-up roof
if there is the possibility of anyone being harmed
by the opening or closing procedure.In case the procedure causes potential danger, the
procedure can be immediately halted by releasing
the remote control button. To reverse direction of
movement, press Œ for opening or ‹ for
closing.
Page 36 of 354
33 Central locking system
Te ch n i c a l
data Instruments
and controlsOperationDrivingInstrument
cluster displayPractical hints Car care Index If the vehicle has previously been locked from the
outside, opening a door from the inside will trigger the
alarm. When opening a door while the central locking
system is in the:
•selective unlocking mode, only that individual door
is unlocked. The remaining doors, the tailgate and
fuel filler flap remain locked.
•global unlocking mode, all doors, the tailgate and
fuel filler flap are unlocked.
Notes:
In case of a malfunction in the central locking system
the doors can be locked and unlocked individually.
To lock, push down lock buttons and turn mechanical
key in driver’s door lock to position 3. In addition lock
the tailgate.To unlock, pull inside door handles or turn mechanical
key in driver’s door lock to position 2.
Rear doors can only be opened from inside by first
pulling up on the door lock button.
When unlocking the driver’s door with the mechanical
key, the exterior lamps will flash and the alarm will
sound.
To cancel the alarm, insert the electronic key in the
steering lock or press buttonŒ or‹ on the
electronic key.
Page 47 of 354
44 Seats
Te ch n i c a l
data Instruments
and controlsOperationDrivingInstrument
cluster displayPractical hints Car care Index
Synchronizing head restraints
If the power supply was interrupted (battery
disconnected or empty), the head restraints are no
longer adjusted automatically.
To resynchronize the adjustment feature, turn
electronic key in steering lock to position 2, move the
seat completely forward and the head restraint fully
down, and hold respective buttons for approximately
two seconds.Caution!
Do not remove head restraints except when mounting
seat covers. For removal refer to Head Restraints, Front,
see page 48. Whenever restraints have been removed be
sure to reinstall them before driving.
Page 48 of 354

45 Seats
Te ch n i c a l
data Instruments
and controlsOperationDrivingInstrument
cluster displayPractical hints Car care Index Memory function
6Memory button
7Position buttonsStoring positions into memory
Three sets of seat / head restraint / steering wheel and
exterior rear view mirror positions may be programmed
into memory. After the seat / head restraint / steering
wheel and exterior rear view mirrors are positioned,
push memory button (6), release, and within 3 seconds
push position button “1”. A second and third set of
positions for the same seat / head restraint / steering
wheel and exterior rear view mirrors can be
programmed into memory by pushing first memory
button (6) and then “2”, respectively “3”.
Note:
For instructions on adjustment of steering wheel and
mirrors, see Page 81 and 82.
Wa r n i n g !
Do not activate the memory function while driving.
Activating the memory function while driving
could cause the driver to lose the control of the
vehicle.
76
P54.00-2075-26
Page 90 of 354
87 Instrument cluster
Te ch n i c a l
data Instruments
and controlsOperationDrivingInstrument
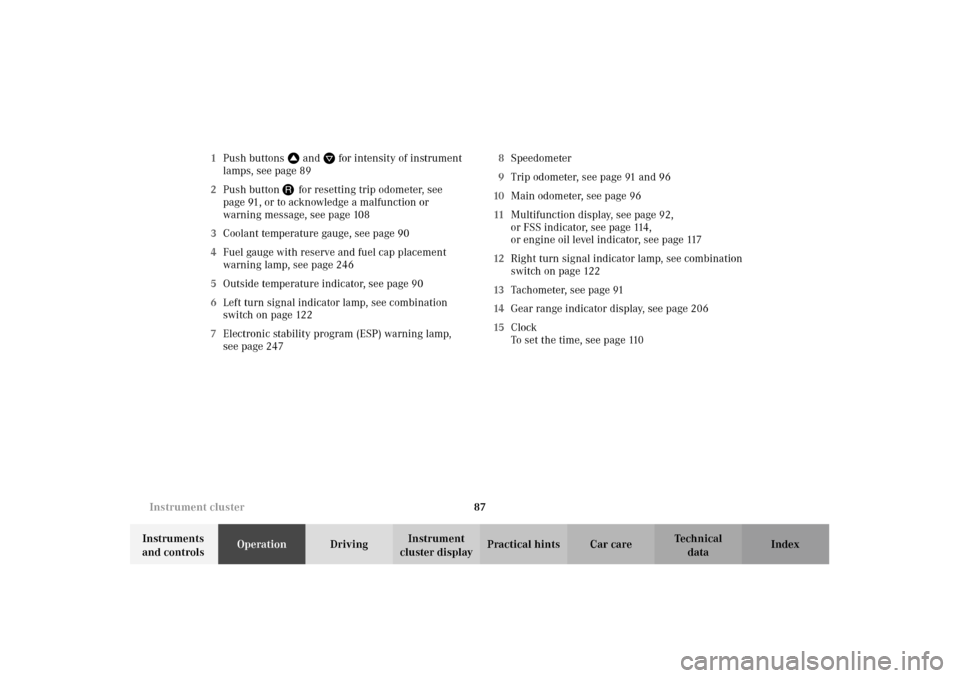
cluster displayPractical hints Car care Index 1Push buttonsVandWfor intensity of instrument
lamps, seepage89
2Push buttonJ for resetting trip odometer, see
page 91, or to acknowledge a malfunction or
warning message, see page 108
3Coolant temperature gauge, see page 90
4Fuel gauge with reserve and fuel cap placement
warning lamp, see page 246
5Outside temperature indicator, see page 90
6Left turn signal indicator lamp, see combination
switch on page 122
7Electronic stability program (ESP) warning lamp,
see page 2478Speedometer
9Trip odometer, see page 91 and 96
10Main odometer, see page 96
11Multifunction display, see page 92,
or FSS indicator, see page 114,
or engine oil level indicator, see page 117
12Right turn signal indicator lamp, see combination
switch on page 122
13Tachometer, see page 91
14Gear range indicator display, see page 206
15Clock
To set the time, see page 110
Page 96 of 354
93 Multifunction steering wheel, multifunction display
Te ch n i c a l
data Instruments
and controlsOperationDrivingInstrument
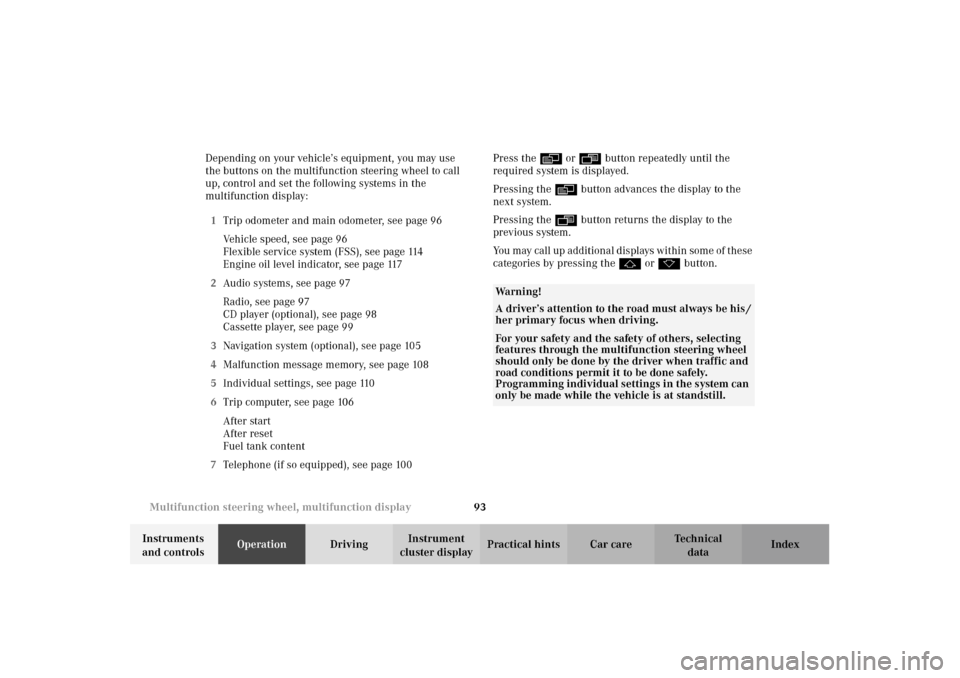
cluster displayPractical hints Car care Index Depending on your vehicle’s equipment, you may use
the buttons on the multifunction steering wheel to call
up, control and set the following systems in the
multifunction display:
1Trip odometer and main odometer, see page 96
Vehicle speed, see page 96
Flexible service system (FSS), see page 114
Engine oil level indicator, see page 117
2Audio systems, see page 97
Radio, see page 97
CD player (optional), see page 98
Cassette player, see page 99
3Navigation system (optional), see page 105
4Malfunction message memory, see page 108
5Individual settings, see page 110
6Trip computer, see page 106
After start
After reset
Fuel tank content
7Telephone (if so equipped), see page 100Press the è or ÿ button repeatedly until the
required system is displayed.
Pressing the è button advances the display to the
next system.
Pressing the ÿ button returns the display to the
previous system.
You may call up additional displays within some of these
categories by pressing the j or k button.
Wa r n i n g !
A driver’s attention to the road must always be his /
her primary focus when driving. For your safety and the safety of others, selecting
features through the multifunction steering wheel
should only be done by the driver when traffic and
road conditions permit it to be done safely.
Programming individual settings in the system can
only be made while the vehicle is at standstill.
Page 132 of 354
129 Automatic climate control
Te ch n i c a l
data Instruments
and controlsOperationDrivingInstrument
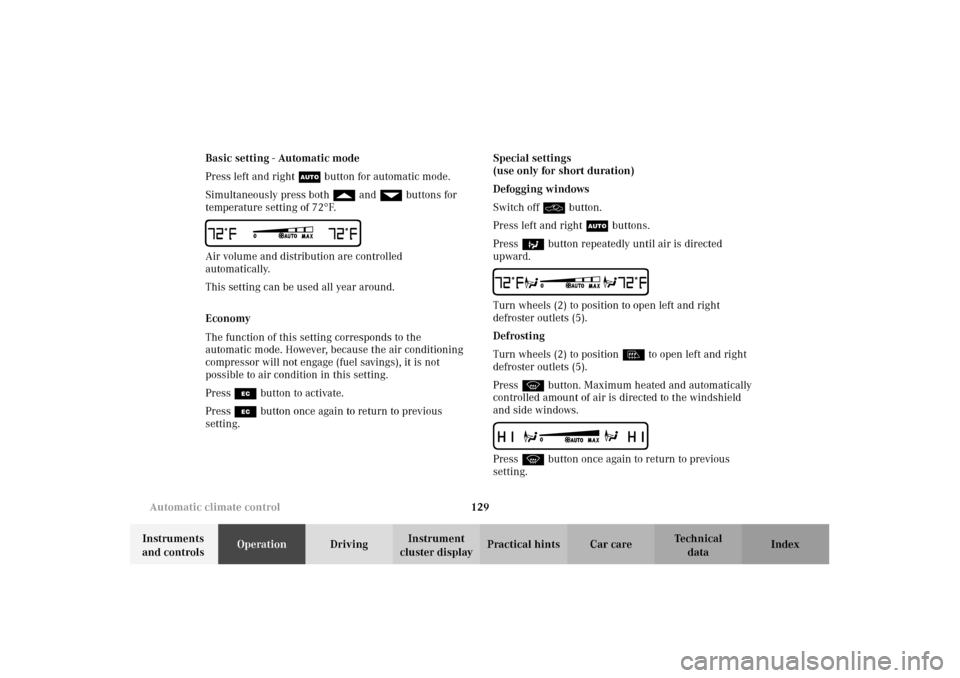
cluster displayPractical hints Car care Index Basic setting - Automatic mode
Press left and right U button for automatic mode.
Simultaneously press both f and g buttons for
temperature setting of 72
°F.
Air volume and distribution are controlled
automatically.
This setting can be used all year around.
Economy
The function of this setting corresponds to the
automatic mode. However, because the air conditioning
compressor will not engage (fuel savings), it is not
possible to air condition in this setting.
Press S button to activate.
Press S button once again to return to previous
setting.Special settings
(use only for short duration)
Defogging windows
Switch off O button.
Press left and right U buttons.
Press b button repeatedly until air is directed
upward.
Turn wheels (2) to position to open left and right
defroster outlets (5).
Defrosting
Turn wheels (2) to position l to open left and right
defroster outlets (5).
Press P button. Maximum heated and automatically
controlled amount of air is directed to the windshield
and side windows.Press P button once again to return to previous
setting.