Page 202 of 399

202 Controls in detailDriving systemsActivating Distronic
You can activate Distronic if:�
you are driving between 25 mph
(Canada:40 km/h) and 110 mph
(Canada:180 km/h)
�
the ESP is activated (
�page 75)
If Distronic has not been activated after
pressing the cruise control lever you will
see the message
---
in the multifunction
display.
In the following cases you cannot activate
Distronic:
�
Up to two minutes after starting the en-
gine
�
When you brake
�
If you have set the parking brake
�
If the gear selector lever is in
positionP, R or N
�
If the ESP is switched offSetting the current speed
�
Accelerate or decelerate to the desired
speed.
�
Briefly lift or depress the cruise control
lever.
Distronic is activated and the current
speed is set.
�
Remove your foot from the accelerator
pedal.Setting a higher speed
�
Briefly tip the cruise control lever in the
direction of arrow1 (
�page 201) to in-
crease vehicle speed in increments of 5
mph (Canada: 10 km/h).
The new speed is set.
The stored speed is displayed in the
multifunction display for approximately
five seconds (
�page 201), and one or
two segments around the stored speed
light up on the speedometer
(
�page 199).
iIf you do not take your foot off of the
accelerator completely, the following
message will appear in the multifunc-
tion display: Distronic override
. The distance to a
slower moving vehicle in front of you
will not be set. Your vehicle speed will
then be determined only by the accel-
erator pedal position.
iDepressing the accelerator pedal does
not deactivate Distronic. After brief ac-
celeration (e.g. for passing), cruise con-
trol will resume the last speed set.
Page 203 of 399

203 Controls in detail
Driving systems
Setting a lower speed�
Briefly tip the cruise control lever in the
direction of arrow2 (
�page 201) to
decrease vehicle speed in increments
of 5 mph (Canada: 10 km/h).
The new speed is set.
The stored speed is displayed in the
multifunction display for approximately
five seconds (
�page 199), and one or
two segments around the stored speed
light up on the speedometer
(
�page 199).Fine adjustment in 1 mph
(Canada: 1 km/h) increments
Faster
�
Briefly tip the cruise control lever in the
direction of arrow4 (
�page 201).Resetting stored speeds
�
Briefly tip the cruise control lever in the
direction of arrow4 (
�page 201).
Distronic is set to the last stored
speed.
�
Remove your foot from the accelerator
pedal.
iWhen you use the cruise control lever
to decelerate, the transmission will au-
tomatically downshift if the rate of de-
celeration is too low.
Warning!
G
The speed stored in memory should only be
set again if prevailing road conditions per-
mit. Possible acceleration or deceleration
differences arising from returning to preset
speed could endanger yourself and others.
Page 205 of 399

205 Controls in detail
Driving systems
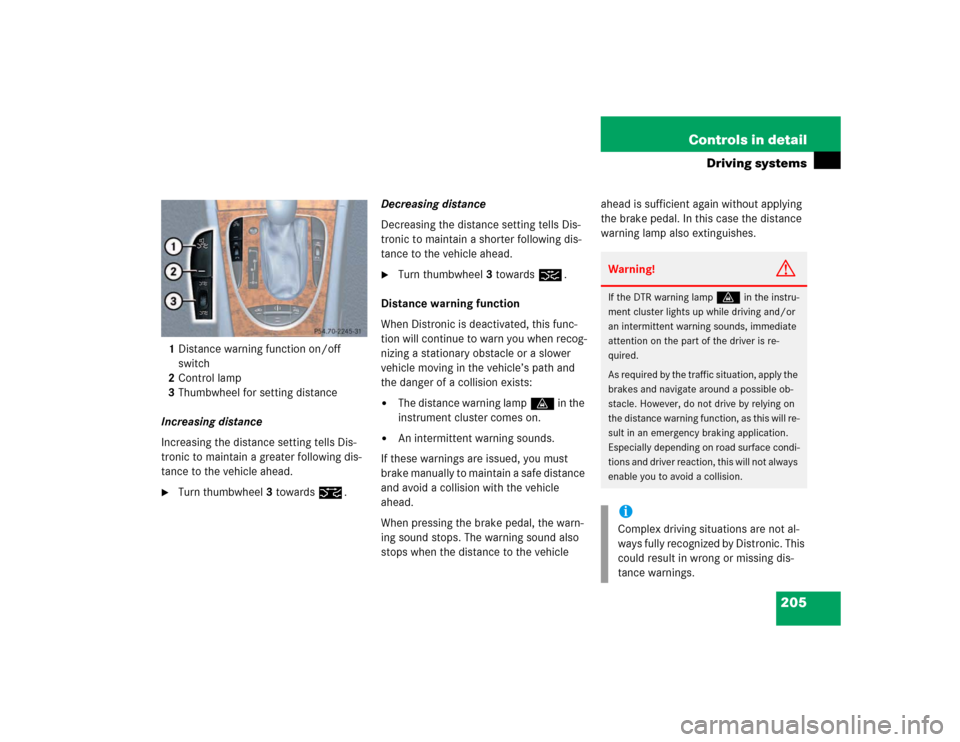
1Distance warning function on/off
switch
2Control lamp
3Thumbwheel for setting distance
Increasing distance
Increasing the distance setting tells Dis-
tronic to maintain a greater following dis-
tance to the vehicle ahead.�
Turn thumbwheel3 towards¯.Decreasing distance
Decreasing the distance setting tells Dis-
tronic to maintain a shorter following dis-
tance to the vehicle ahead.
�
Turn thumbwheel3 towards®.
Distance warning function
When Distronic is deactivated, this func-
tion will continue to warn you when recog-
nizing a stationary obstacle or a slower
vehicle moving in the vehicle’s path and
the danger of a collision exists:
�
The distance warning lampl in the
instrument cluster comes on.
�
An intermittent warning sounds.
If these warnings are issued, you must
brake manually to maintain a safe distance
and avoid a collision with the vehicle
ahead.
When pressing the brake pedal, the warn-
ing sound stops. The warning sound also
stops when the distance to the vehicle ahead is sufficient again without applying
the brake pedal. In this case the distance
warning lamp also extinguishes.
Warning!
G
If the DTR warning lamp
l
in the instru-
ment cluster lights up while driving and/or
an intermittent warning sounds, immediate
attention on the part of the driver is re-
quired.
As required by the traffic situation, apply the
brakes and navigate around a possible ob-
stacle. However, do not drive by relying on
the distance warning function, as this will re-
sult in an emergency braking application.
Especially depending on road surface condi-
tions and driver reaction, this will not always
enable you to avoid a collision.
iComplex driving situations are not al-
ways fully recognized by Distronic. This
could result in wrong or missing dis-
tance warnings.
Page 206 of 399

206 Controls in detailDriving systemsActivating�
Press button1.
Indicator lamp 2 on the button lights
up. A loudspeaker symbol appears in
the multifunction display (
�page 201).
Deactivating
�
Press button1.
Indicator lamp 2 on the button goes
out. No loudspeaker symbol appears in
the multifunction display.Driving with Distronic
This section describes a number of driving
situations where special precaution is re-
quired on the part of the driver. Be pre-
pared to brake in such situations. This will
deactivate the Distronic system.
Warning!
G
Distronic works to maintain the speed se-
lected by the driver unless a moving obsta-
cle proceeding directly ahead of it in the
same travel direction is detected (e.g. fol-
lowing another vehicle ahead of you at a dis-
tance set by Distronic). This means that:�
your vehicle can pass another vehicle af-
ter you change lanes
�
while in a sharp turn or if the vehicle in
front is in a sharp turn, Distronic could
lose sight of a vehicle traveling in front
of it, then your vehicle could accelerate
to the previously selected speed.
Distronic regulates only the distance be-
tween your vehicle and those directly ahead
of it, but does not register stationary objects
in the road, e.g.: �
a stopped vehicle in a traffic jam
�
a disabled vehicle
�
an oncoming vehicle
The driver must always be on the alert, ob-
serve all traffic and intercede as required by
steering or braking the vehicle.
Warning!
G
Distronic should not be used in snowy or icy
road conditions.
Page 213 of 399

213 Controls in detail
Driving systems
The Parktronic system monitors the sur-
roundings of your vehicle with six sensors
in the front bumper and four sensors in the
rear bumper.
1Sensors in the front bumperRange of the sensors
To function properly, the sensors must be
free of dirt, ice, snow and slush. Clean the
sensors regularly, being careful not to
scratch or damage the sensors.
Front sensors
Rear sensorsMinimum distance
If the system encounters an obstacle in
this range, all the warning lamps light up
and you hear a warning signal. If the obsta-
cle is closer than the minimum distance,
the actual distance may no longer be indi-
cated by the system.
Center
approx. 40 in (100 cm)
Corners
approx. 23 in (60 cm)
Center
approx. 48 in (120 cm)
Corners
approx. 32 in (80 cm)
!During parking maneuvers, pay special
attention to objects located above or
below the height of the sensors (e.g.
planters or trailer hitches). The Park-
tronic system will not detect such ob-
jects at close range and damage to
your vehicle or the object may result.
Ultrasonic signals from outside sourc-
es (e.g. truck air brakes or jackham-
mers) may impair the operation of the
Parktronic system.
Center
approx. 8 in (20 cm)
Corners
approx. 6 in (15 cm)
Page 214 of 399

214 Controls in detailDriving systemsWarning indicators
Visual signals indicate to the driver the rel-
ative distance between the sensors and an
obstacle. The warning indicator for the
front area is located above the center air
outlets in the dashboard. The warning indi-
cator for the rear area is integrated in the
rear trim.Front area warning indicator1Left side of the vehicle
2Right side of the vehicleEach warning indicator is divided into six
yellow and two red segments for either
side of the vehicle. The Parktronic system
is ready when the border around the indi-
cator is illuminated.
The position of the gear selector lever de-
termines which warning indicators will be
activated.As your vehicle approaches an object, one
or more segments will light up, depending
on the distance. When the eighth segment
lights up, you have reached the minimum
distance.
�
Front area: An intermittent acoustic
warning will sound as the seventh seg-
ment lights up and a constant acoustic
warning lasting a maximum of three
seconds will sound for the eighth seg-
ment.
�
Rear area: An intermittent acoustic
warning will sound when the first seg-
ment lights up. This signal quickens
with each additional segment lit. When
the eighth segment illuminates, the
acoustic warning becomes a constant
signal. The signal is canceled when the
selector lever is placed in position D
orP.
Selector lever po-
sition
Warning indicator
D
Front area activated
R or N
Rear area activated
P
Neither activated
Page 220 of 399
220 Controls in detailLoadingFolding the backrest forward
1Release handle�
Pull release handle1.
The seat cushion automatically springs
upward slightly.1Seat cushion
2Seat backrest
�
Grip the back of seat cushion1 and
fold forward.
�
Push the rear seat head restraints all
the way in.
�
Pull the handle in the trunk.
The seat backrest is released and the
head restraints fold back.
�
Fold the seat backrest forward.
Page 222 of 399
222 Controls in detailLoadingFolding front passenger seat*
Folding front passenger seat forward
1Release handle�
Press the right-hand side of release
handle1.
The handle folds out.
�
Pull the left-hand side of the release
handle.
The front passenger seat backrest is
released and can be folded forward.
�
Fold the backrest all the way forward.
�
Press the backrest lightly downward
until it is resting on the seat cushion.Folding front passenger seat back
1Release handle
�
Using release handle1, pull the back-
rest to its original position. Pull the
handle until the backrest has reached
an angle of approximatley 45°.
Warning!
G
Make sure that the backrest engages and
locks when folding it back into place.