Page 138 of 399
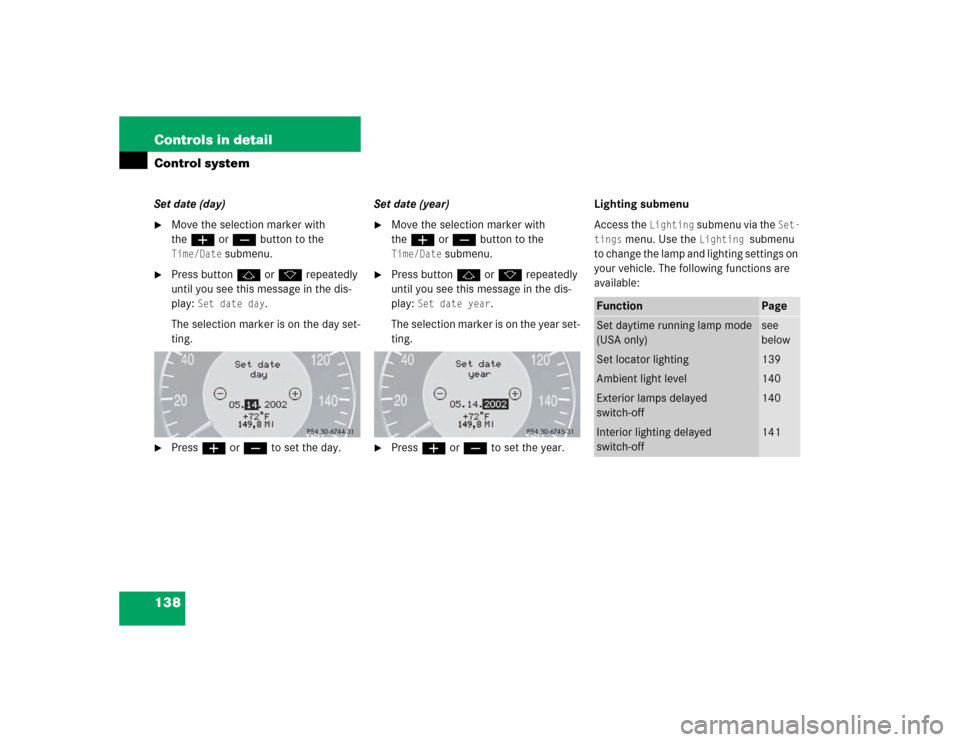
138 Controls in detailControl systemSet date (day)�
Move the selection marker with
theæ orç button to the Time/Date
submenu.
�
Press buttonj ork repeatedly
until you see this message in the dis-
play:
Set date day
.
The selection marker is on the day set-
ting.
�
Pressæ orç to set the day.Set date (year)
�
Move the selection marker with
theæ orç button to the Time/Date
submenu.
�
Press buttonj ork repeatedly
until you see this message in the dis-
play:
Set date year
.
The selection marker is on the year set-
ting.
�
Pressæ orç to set the year.Lighting submenu
Access the
Lighting
submenu via the
Set-
tings
menu. Use the
Lighting
submenu
to change the lamp and lighting settings on
your vehicle. The following functions are
available:
Function
Page
Set daytime running lamp mode
(USA only)
see
below
Set locator lighting
139
Ambient light level
140
Exterior lamps delayed
switch-off
140
Interior lighting delayed
switch-off
141
Page 139 of 399
�
Move the selection marker with
theæ orç button to the
Light-
ing
submenu.
�
Press buttonj ork repeatedly
unti")
139 Controls in detail
Control system
Setting daytime running lamp mode
(USA only)�
Move the selection marker with
theæ orç button to the
Light-
ing
submenu.
�
Press buttonj ork repeatedly
until you see this message in the dis-
play:
Lamp circuit headlamp
.
The selection marker is on the current
setting.
�
Pressæ orç to select manual
or daytime running lamp (constant)
mode. This function is not available in
countries where daytime running
lamps are mandatory.With daytime running lamp mode se-
lected and the exterior lamp switch at
position0, the following lamps will
come on automatically when the en-
gine is turned on:
�
Parking lamps and low beam head-
lamps
�
License plate lamps (in low ambient
light conditions) Setting locator lighting
During darkness, the following lamps will
come on when the locator lighting feature
is activated and the vehicle is unlocked by
remote control:
�
Parking lamps
�
Tail lamps
�
License plate lamps
�
Front fog lamps
The exterior lamp switch must be set to po-
sition U (
�page 112).
The locator lighting switches off when the
driver’s door is opened. It switches off au-
tomatically after a period of approximately
40 seconds.
�
Move the selection marker with
theæ orç button to the
Light-
ing
submenu.
�
Press buttonj ork repeatedly
until you see this message in the dis-
play:
Function Surround lighting
.
iIf you turn the exterior lamp switch to
another position, the corresponding
lamp(s) will switch on.
For safety reasons, resetting the Lighting
submenu to factory settings
(
�page 131) will not reset the daytime
running lamp mode.
In the display you will then see the mes-
sage:
Lighting
Page 140 of 399

140 Controls in detailControl system
The selection marker is on the current
setting.
�
Pressæ orç to select the de-
sired setting.
�
Turn the exterior lamp switch to posi-
tion U.
The locator lighting will be switched on
or off.
Ambient light level
Using this function, you can adjust the
brightness of the ambient lighting.
�
Move the selection marker with the
æ orç button to the
Lighting
submenu.
�
Press button j ork, repeatedly
until you see the message
Ambient
light Level
in the display
.
The selection marker is on the current
setting.
�
Press æ orç to select the
brightness of the lighting.
1 represents
the darkest setting and
5 represents
the brightest setting.
The ambient light is switched off below
setting
1 or above setting
5. The selec-
tion marker points to
off
.Setting night security illumination (Exte-
rior lamps delayed switch-off)
Use the
Headlamps delayed shut-off
function to set whether and for how long
you would like the exterior lamps to illumi-
nate during darkness after all doors are
closed. When the delayed switch-off fea-
ture is activated, the following lamps will
remain lit after you remove the key from
the starter switch:
�
Parking lamps
�
Tail lamps
�
License plate lamps
�
Front fog lamps
The exterior lamp switch must be set to po-
sition U (
�page 112).
iYou can reactivate this function within
ten minutes by opening a door.
If you do not open a door after remov-
ing the key, the lamps will automatical-
ly switch off after 60 seconds.
Page 141 of 399

141 Controls in detail
Control system
�
Move the selection marker with
theæ orç button to the
Light-
ing
submenu.
�
Press buttonj ork repeatedly
until you see this message in the dis-
play:
Headlamps delayed shut-off
.
The selection marker is on the current
setting.
�
Pressæ orç to select the de-
sired lamp-on period.
You can select:�
0 s
, the delayed switch-off feature
is deactivated.
�
15 s
, 30 s
, 45 s
or
60 s
, the delayed
switch-off feature is activated.
�
Turn the exterior lamp switch to posi-
tion U.You can temporarily deactivate the de-
layed switch-off feature:
�
Before leaving the vehicle, turn the key
in the starter switch to position0.
�
Then turn it to position2 and back
to0.
The delayed switch-off feature is deac-
tivated. It will reactivate as soon as you
reinsert the key in the starter switch.
For vehicles with KEYLESS-GO*:
�
Press the KEYLESS-GO start/stop but-
ton on the gear selector lever
(�page 33).Interior lighting delayed switch-off
Use this function to set whether and for
how long you would like the interior light-
ing to remain lit during darkness after the
key is removed from the starter switch.
�
Move the selection marker with
theæ orç button to the
Light-
ing
submenu.
�
Press buttonj ork repeatedly
until you see this message in the dis-
play:
Interior lamp delayed
shut-off
.
The selection marker is on the current
setting.
Page 157 of 399
 and for setting the rear view
mirrors (
�page 38) is found in the \"Get-
ting started\" section.")
157 Controls in detail
Good visibility
Good visibility
Information on the windshield wipers
(�page 47) and for setting the rear view
mirrors (
�page 38) is found in the "Get-
ting started" section.
Rear view mirror
Automatic antiglare rear view mirror
The reflection brightness of the exterior
rear view mirror on the driver’s side and
the inside rear view mirror will respond au-
tomatically to glare when:�
the ignition is switched on, and
�
incoming light from headlamps falls on
the sensor in the inside rear view mir-
rorThe rear view mirror will not react if
�
reverse gear is engaged
�
the interior lighting is turned onWarning!
G
The automatic antiglare function does not
react if incoming light is not aimed directly
at sensors in the inside rear view mirror.
The inside rear view mirror and the exterior
rear view mirror on the driver’s side do not
react.
Glare can endanger you and others.Warning!
G
In the case of an accident liquid electrolyte
may escape from the mirror housing if the
mirror glass breaks.
Electrolyte has an irritating effect. Do not al-
low the liquid to come into contact with
eyes, skin, clothing, or respiratory system.
In case it does, immediately flush affected
area with water, and seek medical help if
necessary.Warning!
G
Exercise care when using the passenger
side exterior rear view mirror. The mirror
surface is convex (outwardly curved surface
for a wider field of view). Objects in mirror
are closer than they appear. Check your in-
side rear view mirror or glance over your
shoulder before changing lanes.!Electrolyte drops coming into contact
with the vehicle paint finish can be
completely removed only while in the
liquid state by applying plenty of water.
Page 159 of 399
159 Controls in detail
Good visibility
1Sun visor
2Mounting�
Swing sun visor1 down when you ex-
perience glare. 1Sun visor
2Mirror cover
3Mirror lamp
4Vanity mirror
�
Make sure that the sun visor is properly
engaged in the mounting.
�
Lift the mirror cover to access the mir-
ror.
Lamp3 switches on.1Mounting
2Additional visor*
3Sun visor
If sunlight enters through a side window:
�
Disengage sun visor from mounting1.
�
Pivot sun visor to the side.
The sun visors are extendable.
�
Adjust the sun visors by pushing or
pulling in the direction of the arrows.
Page 160 of 399

160 Controls in detailGood visibility
Rear window sunshade*
The switch is located in the center console.�
Turn the key to starter switch position
1 or 2. Vehicles with KEYLESS-GO*:
press the start/stop button once or
twice.
�
Press the switch briefly at 1 to raise the
sunshade.
�
Press the switch briefly at 1 to lower
the sunshade.
Always raise the sunshade fully for its sup-
port against the window frame.
iIf sunlight enters through a side win-
dow, disengage sun visor from
mounting1 and pivot to the side.
Mirror lamp3 will switch off.
Warning!
G
When operating the rear window sunshade,
be sure that there is no danger of anyone be-
ing harmed by the raising or lowering proce-
dure.
The raising or lowering procedure can be im-
mediately halted by briefly pressing the up-
per or lower half of the switch.
Briefly press upper or lower half of the
switch again to raise or lower the rear win-
dow sunshade completely.Warning!
G
When leaving the vehicle, always remove the
SmartKey from starter switch, and lock your
vehicle. Do not leave children unattended in
the vehicle, or with access to an unlocked
vehicle. Unsupervised use of vehicle equip-
ment can cause serious personal injury.
Page 180 of 399

180 Controls in detailAutomatic climate control*Charcoal filter
An activated charcoal filter markedly re-
duces bad odors and removes pollutants
from air entering the passenger compart-
ment.
Activating�
Press buttone.
The indicator lamp on the button lights
up.
The system switches automatically to the
air recirculation mode if the carbon
monoxide (CO) or nitrogen oxide (NO
X)
concentration of the outside air increases
beyond a predetermined level.Deactivating
�
Press buttone.
The indicator lamp on the button goes
out.
The automatic air recirculation mode does
not function if economy mode AC
OFF
is se-
lected or if the outside temperature has
fallen below 41
°F(5
°C).
The activated charcoal filter should be
switched off when windows fog up on the
inside, or if the passenger compartment
needs to be quickly heated or cooled
down.
Rear window defroster
The rear window defroster uses a large
amount of power. To keep the battery
drain to a minimum, switch off the defrost-
er as soon as the rear window is clear. The
defroster is automatically deactivated af-
ter approximately 6 to 17 minutes of oper-
ation depending on the outside
temperature.
Activating�
Press buttonF.
The indicator lamp on the button
comes on.
Deactivating
�
Press buttonF again.
The indicator lamp on the button goes
out.
iIf you keep buttone pressed, the
side windows and the sliding/pop-up
roof* will be closed.
iIf you keep buttone pressed, the
side windows and the sliding/pop-up
roof* will be returned to their previous
position.