Page 106 of 399
106 Controls in detailSeatsActivating�
Press button4.
The indicator lamp in the button lights
up.
Deactivating
�
Press button4 again.
The indicator lamp in the button goes
out.Massage function (PULSE)
The massage function can help prevent
muscle tension during long drives.
�
Press button2.
The indicator lamp in button2 lights
up. The air cushions in the lumbar area
pulsate.
iYou can adjust the characteristics of
the dynamic driving seat using the con-
trol system (
�page 145).
iWhen the engine is turned off, the last
cushion setting is retained in memory,
and the cushion is automatically ad-
justed to this setting when the engine
is restarted.
iThe massage function turns off auto-
matically after approximately 5 min-
utes.
Page 109 of 399

109 Controls in detail
Memory function
Memory function
You can store up to three different settings
per key.
The following settings are saved for each
stored position:�
Driver’s seat and backrest position
�
Steering wheel position
�
Driver’s side exterior rear view mirror
position
�
Passenger side exterior rear view mir-
ror position
�
Front passenger seat position
These key-dependent memory settings
can be deactivated if desired
(
�page 110).
!Prior to operating the vehicle, the driv-
er should check and adjust the seat
height, seat position fore and aft, and
backrest angle if necessary, to ensure
adequate control, reach and comfort.
The head restraint should also be ad-
justed for proper height. Also see the
section on airbags (
�page 57) for
more information on proper seat posi-
tioning.
In addition, adjust the steering wheel to
ensure adequate control, reach, opera-
tion and comfort. Both the inside and
outside rear view mirrors should be ad-
justed for adequate rear vision.
Fasten seat belts. Infants and small
children should be seated in a properly
secured restraint system that complies
with U.S. Federal Motor Vehicle Safety
Standard 213 and Canadian Motor Ve-
hicle Safety Standard 213.
Warning!
G
Do not activate the memory function while
driving. Activating the memory function
while driving could cause the driver to lose
control of the vehicle.
Page 110 of 399

110 Controls in detailMemory functionThe memory button is located on the door.
MMemory button
1,2,3Stored positions�
Be sure that the ignition is switched on
or the relevant door is open and the
SmartKey is inserted in the starter
switch.
Storing positions into memory�
Adjust the seats, steering wheel and
rear view mirrors to the desired posi-
tion (
�page 34).
�
Press memory buttonM.
�
Release memory button and press
stored position button 1, 2 or 3 within
three seconds.
All the settings are stored at the select-
ed position.
Recalling positions from memory�
On memory button, press and hold
stored position button1, 2 or3 until
the seat, steering wheel and rear view
mirrors have fully moved to the stored
positions.iReleasing the button immediately
stops movement to the stored posi-
tions.Warning!
G
Do not operate the power seats using the
memory button if the backrest is in an ex-
cessively reclined position. Doing so could
cause damage to front or rear seats.
First move backrest to an upright position.
Page 143 of 399

143 Controls in detail
Control system
Convenience submenu
Access the
Convenience
submenu via the
Settings
menu. Use the
Convenience
sub-
menu to change the settings for a number
of convenience features. The following
functions are available:
Activating easy-entry/exit feature*
Use this function to activate and deacti-
vate the easy-entry/exit feature. When the
feature is activated, the steering wheel and
driver’s seat will move back to facilitate ex-
iting when you
�
remove the key from the starter switch
�
open the driver’s door
However, the engine must be turned off.After entering the vehicle, the steering
wheel and seat will move into the position
stored in memory when
�
the driver’s door is closed
�
you put the key in the starter switch
�
you press the appropriate stored posi-
tion button on the memory switch
(�page 110).
�
Move the selection marker with
theæ orç button to
the
Convenience
submenu.
�
Press buttonj ork repeatedly
until you see this message in the dis-
play:
Function Easy-entry feature
.
The selection marker is on the current
setting.
Function
Page
Activate easy-entry/exit feature
see
below
Set key dependency
144
Set parking position for exterior
rear view mirror
144
Warning!
G
You must ensure that no one can become
trapped or injured by the moving steering
wheel and the driver’s seat when the
easy-entry/exit feature is in operation and
the driver’s door is being opened or the key
is removed from the starter switch. Do not
leave children unattended in the vehicle, or
with access to an unlocked vehicle. Unsu-
pervised use of vehicle equipment may
cause serious personal injury.
Do not leave children unattended in the ve-
hicle, or with access to an unlocked vehicle.
Children could open the driver’s door and
unintentionally activate the easy-entry/exit
feature, which could result in an accident or
serious injury.
iTo cancel seat/steering wheel move-
ment, do one of the following:�
Press seat adjustment switch
(�page 35).
�
Move the steering column stalk
(�page 38).
�
Press the memory switch
(�page 110).
Page 144 of 399

144 Controls in detailControl system�
Pressæ orç to change the
easy-entry/exit setting.
The following settings are available for the
easy-entry/exit feature:Setting key dependency
Use this function to set whether the mem-
ory settings for the seats, the steering
wheel and the mirrors should be stored
separately for each key (
�page 86).
�
Move the selection marker with
theæ orç button to
the
Convenience
submenu.
�
Press buttonj ork repeatedly
until you see this message in the dis-
play:
Key-dependent
.
The selection marker is on the current
setting.
�
Pressæ orç to set key depen-
dency to
on or
off
. Setting parking position for exterior rear
view mirror
Use the
Mirror adjustment parking aid
function to select whether the passen-
ger-side exterior rear view mirror should be
turned downward during parking maneu-
vers (when reverse gear is engaged)
(
�page 111).
The exterior rear view mirror will return to
its previous position when you
�
shift out of reverse (after 10 seconds)
�
exceed a speed of 6 mph (10 km/h),
regardless of which gear is engaged
�
press the driver’s side mirror button
(immediately) (
�page 28).
off
The easy-entry/ex-
it feature is deacti-
vated.
Steering col.
Only the steering
column is moved.
Steer. col. + seat
Both the steering
column and the
seat are moved.
Page 145 of 399

145 Controls in detail
Control system
�
Move the selection marker with
theæ orç button to
the
Convenience
submenu.
�
Press buttonj ork repeatedly
until you see this message in the dis-
play:
Mirror adjustment parking aid
.
The selection marker is on the current
setting.
�
Pressæ orç to switch function on or
off
.
Dynamic seat* submenu
Access the Dynamic Seat
submenu via the
Settings
menu. Use the
Dynamic Seat
submenu to change the settings for the dy-
namic seats. The following functions are
available:Adjusting the dynamic seat
The function dynamic seat adjustment lets
you determine the way the seat adjusts
while driving.
�
Move the selection marker with
theæ orç button to the Dynamic Seat
submenu.
�
Press buttonj ork repeatedly
until you see this message in the dis-
play:
Dyn. Multi-cont. Seat, driver
for the driver seat or Dyn. Multi-cont. Seat, fr. pass. for the passenger seat.
The selection marker is on the current
setting.
�
Pressæ orç to switch function Level 1
or
Level 2
.
Trip computer menu
Use the trip computer menu to call up sta-
tistical data on your vehicle. The following
information is available:
Function
Page
Adjust driver seat
141
Adjust passenger seat
141
Function
Page
Fuel consumption statistics after
start
see
below
Fuel consumption statistics
since last reset
146
Call up range (distance to empty)
147
Page 163 of 399
163 Controls in detail
Climate control
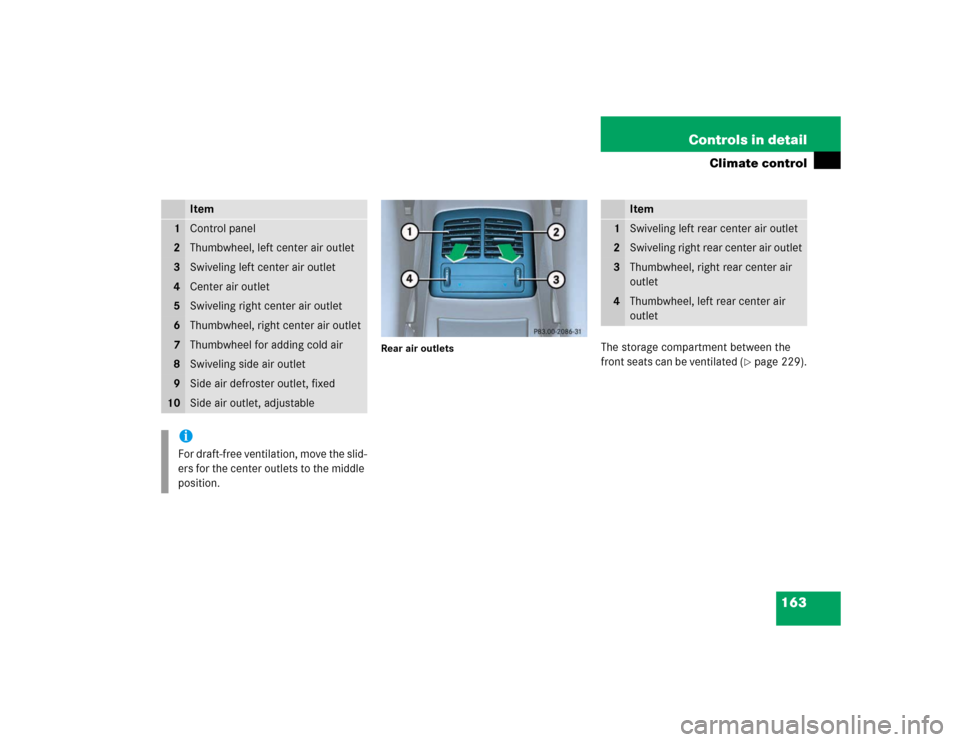
Rear air outlets
The storage compartment between the
front seats can be ventilated (
�page 229).
Item
1
Control panel
2
Thumbwheel, left center air outlet
3
Swiveling left center air outlet
4
Center air outlet
5
Swiveling right center air outlet
6
Thumbwheel, right center air outlet
7
Thumbwheel for adding cold air
8
Swiveling side air outlet
9
Side air defroster outlet, fixed
10
Side air outlet, adjustableiFor draft-free ventilation, move the slid-
ers for the center outlets to the middle
position.
Item
1
Swiveling left rear center air outlet
2
Swiveling right rear center air outlet
3
Thumbwheel, right rear center air
outlet
4
Thumbwheel, left rear center air
outlet
Page 302 of 399

302 Practical hintsWhat to do if …Display
Possible cause
Suggested solution
@
Stop, car too low!
The car level control is malfunctioning.
Avoid excessive steering input. The fend-
er or tires could otherwise be damaged.
Listen for scraping noises.
Do not drive faster than 50 mph
(80 km/h).�
Drive to the side of the road and se-
lect a higher vehicle level. Depending
on the type of malfunction, this may
raise the vehicle’s level.
There is otherwise danger of an acci-
dent.
Visit workshop!
The system is functional only to a limited
extent.
The system display or the system is mal-
functioning.
�
Do not drive faster than 50 mph
(80 km/h).
�
Have the vehicle checked at an au-
thorized Mercedes-Benz Center.
(
Backrest
,
rear right
not locked
The rear seat backrest is not engaged.
�
Adjust the rear seat backrest until it
is fully engaged in position.
(
Backrest
,
rear left
not locked
The rear seat backrest is not engaged.
�
Adjust the rear seat backrest until it
is fully engaged in position.