Page 23 of 399

warning lamp
288
3
Speedometer
4
Multifunction display
with:Basic display with")
23 At a glance
Instrument cluster
Item
Page
1
LLeft turn signal indi-
cator lamp
2
vElectronic Stability
Program (ESP)
warning lamp
288
3
Speedometer
4
Multifunction display
with:Basic display with outside
temperature display
126
Status indicator with mal-
function warning messageTrip odometer
119
5
lDistance warning
lamp
1
1Vehicles without Distronic*: Warning lamp without
function. It illuminates with key in starter switch
position 2. It should go out when the engine is run-
ning.
289
6
KRight turn signal in-
dicator lamp
Item
Page
7
Coolant temperature dis-
play with:•Coolant tempera-
ture warning lamp
292
8
Tachometer with:1Supplemental
restraint system
indicator lamp
290
-Antilock Brake Sys-
tem (ABS) malfunc-
tion indicator lamp
289
warning lamp
293
AHigh beam head-
lamp indicator
115
9
Main odometer with:�
Selector lever position
43
�
Program mode
155
Item
Page
10
Clock with:;Brake warning
lamp, except
Canada
291
3Brake warning
lamp, Canada only
291
?Engine malfunction
indicator lamp
293
11
Fuel display with:AFuel reserve warn-
ing lamp
293
12
Reset knob for:�
Resetting trip
odometer
119
�
Adjusting instrument
cluster illumination
118
�
Confirming new time
settings
136
Page 125 of 399
125 Controls in detail
Control system
Menus, submenus and functions
Menu 1
Menu 2
Menu 3
Menu 4
Menu 5
Menu 6
Menu 7
Menu 8
Commands/submenusStandard dis-
play
AUDIO
NAVI*
Distronic*
Malfunction
memory
Settings
Trip computer
Telephone
Digital speed-
ometer
Select radio
station
Activate
route guid-
ance
Call up set-
tings
Call up malfunc-
tion messages
Reset to factory
settings
Fuel consumption
statistics after
start
Load phone
book
Call up FSS
PLUS
Operate CD
player*
Instrument clus-
ter submenu
Fuel consumption
statistics since
the last reset
Search for
name in
phone book
Check tire pres-
sure*
Operate cas-
sette player
Time/Date sub-
menu
Call up range
Check engine oil
level
Lighting sub-
menuVehicle sub-
menuConvenience
submenuDynamic driving
seat* submenu
Page 131 of 399
 for")
131 Controls in detail
Control system
Resetting all settings
You can reset all the functions of all sub-
menus to the factory settings.�
Press the reset knob in the instrument
cluster (
�page 22) for approximately
three seconds.
In the display you will see the request
to press the reset knob again to con-
firm.
�
Press the reset knob again.
The functions of all the submenus will
reset to factory settings.Submenus in the Settings menu
�
Press buttonk orj.
In the display you see the collection of
the submenus.
�
Press buttonç.
The selection marker moves to the next
submenu.
The submenus are arranged by hierarchy.
Scroll down with theç button, scroll up
with theæ button.
Move within the submenus with thek
orj button to the individual functions.
The settings themselves are made with
buttonæ orç.Resetting the functions of a submenu
For each submenu you can reset all the
functions to the factory settings.
�
Move to a function in the submenu.
�
Press the reset knob (
�page 22) in the
instrument cluster for approximately
three seconds.
In the display you will see the request
to press the reset knob again to con-
firm.
�
Press the reset knob again.
All functions of the submenu will reset
to factory settings.
iThe settings you have changed will not
be reset unless you confirm the action
by pressing the reset knob a second
time.
Page 132 of 399
132 Controls in detailControl systemThe table below shows what settings can
be changed within the various menus. De-
tailed instructions on making individual
settings can be found on the following pag-
es.INSTRUMENT CLUSTER
TIME/DATE
LIGHTING
VEHICLE
Select temperature display
mode
Set time (hours)
Set daytime running lamp mode
(USA only)
Set automatic locking
Select speedometer display
mode
Set time (minutes)
Set locator lighting
Select language
Set date (month)
Ambient lighting
Select display (speed display or
outside temperature) for status
line
Set date (day)
Exterior lamps delayed
switch-off
Tire pressure unit display*
Set date (year)
Interior lighting delayed
switch-off
Page 136 of 399
 for basic display�
Move the selection marker with
theæ orç button to the
Instr.
cluster
submenu.
�")
136 Controls in detailControl systemSelecting display (speed display or out-
side temperature) for basic display�
Move the selection marker with
theæ orç button to the
Instr.
cluster
submenu.
�
Press buttonj ork repeatedly
until you see this message in the dis-
play:
Basic display
.
The selection marker is on the current
setting.
�
Pressæ orç to select the dis-
play permanently shown in the multi-
function display.Tire pressure display*
Use this function to set the unit for the tire
pressure display.
�
Move the selection marker with the
æ or ç button to the
Instr,
cluster
submenu.
�
Press button jor k repeatedly
until you see this message in the dis-
play:
Display unit Tire pressure
.
The selection marker is on the current
setting.
�
Press æ or ç to select the de-
sired tire pressure unit.Time/Date submenu
Access the
Time/Date
submenu via the
Settings
menu. Use the
Time/Date
sub-
menu to change the time and date display
settings. The following functions are avail-
able:
Function
Page
Set time (hours)
137
Set time (minutes)
137
Set date (month)
137
Set date (day)
138
Set date (year)
138
Page 138 of 399
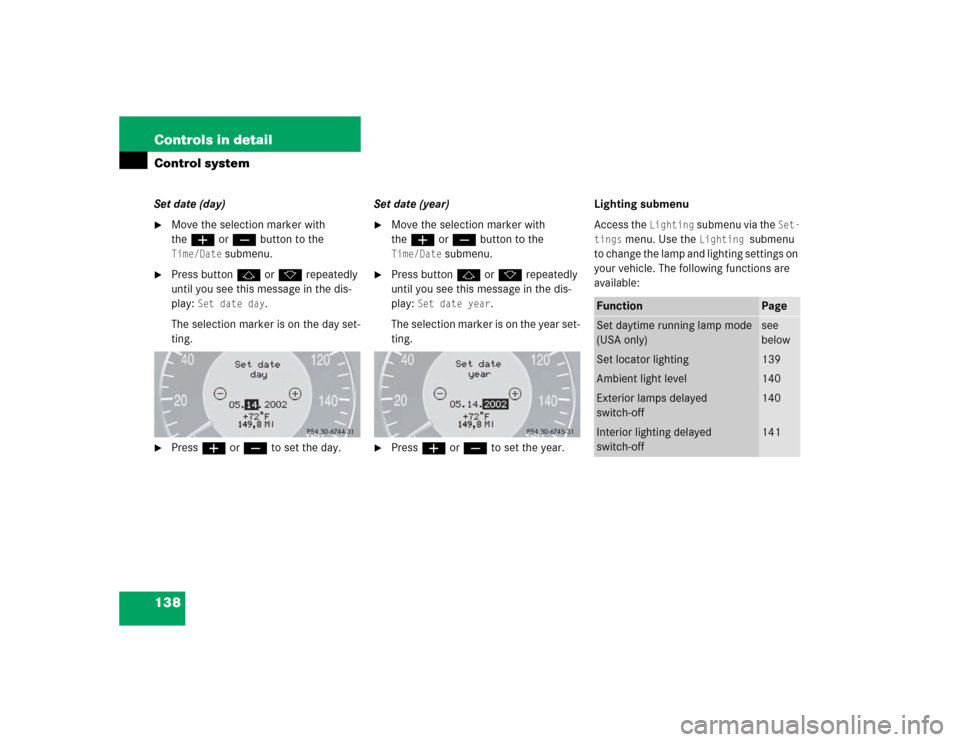
138 Controls in detailControl systemSet date (day)�
Move the selection marker with
theæ orç button to the Time/Date
submenu.
�
Press buttonj ork repeatedly
until you see this message in the dis-
play:
Set date day
.
The selection marker is on the day set-
ting.
�
Pressæ orç to set the day.Set date (year)
�
Move the selection marker with
theæ orç button to the Time/Date
submenu.
�
Press buttonj ork repeatedly
until you see this message in the dis-
play:
Set date year
.
The selection marker is on the year set-
ting.
�
Pressæ orç to set the year.Lighting submenu
Access the
Lighting
submenu via the
Set-
tings
menu. Use the
Lighting
submenu
to change the lamp and lighting settings on
your vehicle. The following functions are
available:
Function
Page
Set daytime running lamp mode
(USA only)
see
below
Set locator lighting
139
Ambient light level
140
Exterior lamps delayed
switch-off
140
Interior lighting delayed
switch-off
141
Page 139 of 399
�
Move the selection marker with
theæ orç button to the
Light-
ing
submenu.
�
Press buttonj ork repeatedly
unti")
139 Controls in detail
Control system
Setting daytime running lamp mode
(USA only)�
Move the selection marker with
theæ orç button to the
Light-
ing
submenu.
�
Press buttonj ork repeatedly
until you see this message in the dis-
play:
Lamp circuit headlamp
.
The selection marker is on the current
setting.
�
Pressæ orç to select manual
or daytime running lamp (constant)
mode. This function is not available in
countries where daytime running
lamps are mandatory.With daytime running lamp mode se-
lected and the exterior lamp switch at
position0, the following lamps will
come on automatically when the en-
gine is turned on:
�
Parking lamps and low beam head-
lamps
�
License plate lamps (in low ambient
light conditions) Setting locator lighting
During darkness, the following lamps will
come on when the locator lighting feature
is activated and the vehicle is unlocked by
remote control:
�
Parking lamps
�
Tail lamps
�
License plate lamps
�
Front fog lamps
The exterior lamp switch must be set to po-
sition U (
�page 112).
The locator lighting switches off when the
driver’s door is opened. It switches off au-
tomatically after a period of approximately
40 seconds.
�
Move the selection marker with
theæ orç button to the
Light-
ing
submenu.
�
Press buttonj ork repeatedly
until you see this message in the dis-
play:
Function Surround lighting
.
iIf you turn the exterior lamp switch to
another position, the corresponding
lamp(s) will switch on.
For safety reasons, resetting the Lighting
submenu to factory settings
(
�page 131) will not reset the daytime
running lamp mode.
In the display you will then see the mes-
sage:
Lighting
Page 142 of 399
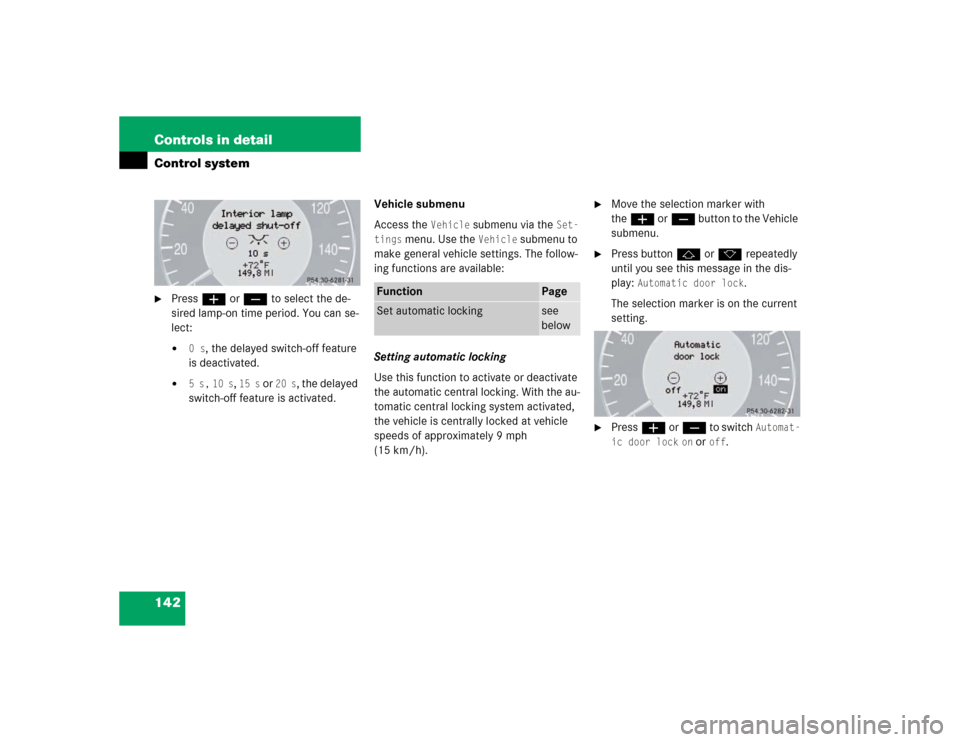
142 Controls in detailControl system�
Pressæ orç to select the de-
sired lamp-on time period. You can se-
lect:�
0 s
, the delayed switch-off feature
is deactivated.
�
5 s,
10 s
, 15 s
or
20 s
, the delayed
switch-off feature is activated.Vehicle submenu
Access the
Vehicle
submenu via the
Set-
tings
menu. Use the
Vehicle
submenu to
make general vehicle settings. The follow-
ing functions are available:
Setting automatic locking
Use this function to activate or deactivate
the automatic central locking. With the au-
tomatic central locking system activated,
the vehicle is centrally locked at vehicle
speeds of approximately 9 mph
(15 km/h).
�
Move the selection marker with
theæ orç button to the Vehicle
submenu.
�
Press buttonj ork repeatedly
until you see this message in the dis-
play:
Automatic door lock
.
The selection marker is on the current
setting.
�
Pressæ orç to switch
Automat-
ic door lock
on or
off
.
Function
Page
Set automatic locking
see
below