Page 51 of 354
48 Seats
Te ch n i c a l
data Instruments
and controlsOperationDrivingInstrument
cluster displayPractical hints Car care Index
Front seat head restraints
Removal:
Push button (1) up to bring the power adjustable head
restraint to its highest position.
Pull out head restraint completely with both hands.Installation:
Push button (1) of the power adjustable head restraint
up for approximately 5 seconds.
Insert the head restraint and push it down to the stop.
Adjust head restraint to the desired position.
For positioning of head restraints, see page 42 and 49.
1
P82.40-2009-26
Wa r n i n g !
For your protection, drive only with properly
positioned head restraints. Adjust head restraint to support the back of the
head approximately at ear level.Do not drive the vehicle without the seat head
restraints. Head restraints are intended to help
reduce injuries during an accident.
Page 52 of 354

49 Seats
Te ch n i c a l
data Instruments
and controlsOperationDrivingInstrument
cluster displayPractical hints Car care Index Rear seat head restraints
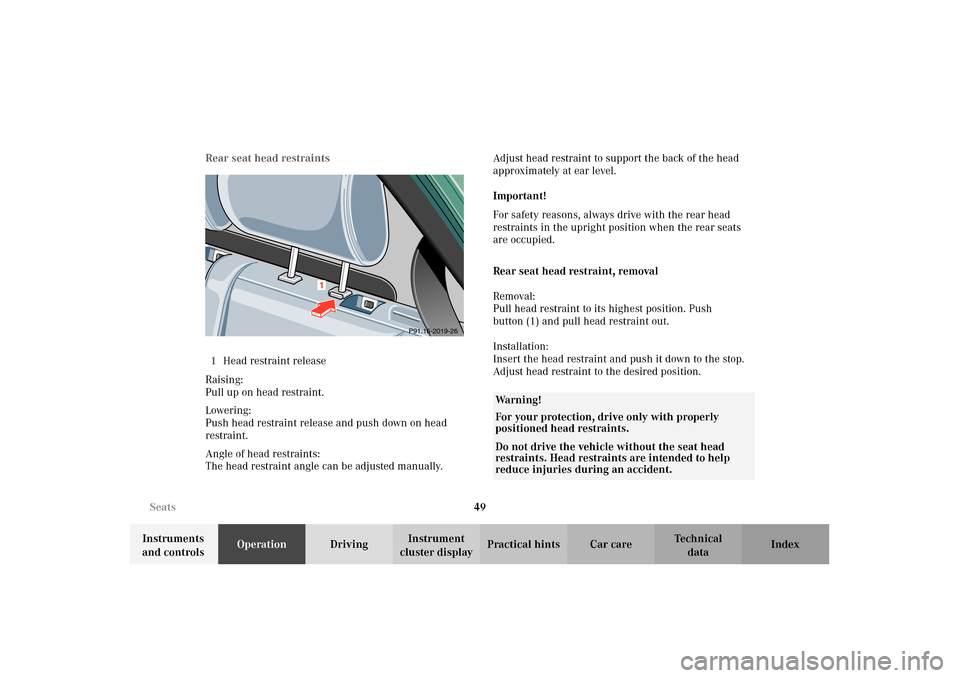
1Head restraint release
Raising:
Pull up on head restraint.
Lowering:
Push head restraint release and push down on head
restraint.
Angle of head restraints:
The head restraint angle can be adjusted manually.Adjust head restraint to support the back of the head
approximately at ear level.
Important!
For safety reasons, always drive with the rear head
restraints in the upright position when the rear seats
are occupied.
Rear seat head restraint, removal
Removal:
Pull head restraint to its highest position. Push
button (1) and pull head restraint out.
Installation:
Insert the head restraint and push it down to the stop.
Adjust head restraint to the desired position.
1
P91.16-2019-26
Wa r n i n g !
For your protection, drive only with properly
positioned head restraints.Do not drive the vehicle without the seat head
restraints. Head restraints are intended to help
reduce injuries during an accident.
Page 53 of 354
50 Seats
Te ch n i c a l
data Instruments
and controlsOperationDrivingInstrument
cluster displayPractical hints Car care Index
Rear seat head restraint, storageFor improved rear vision, the head restraint for the rear
bench center seat can be removed if the seat is not
occupied.
To do so, remove head restraint (1) and store in
bracket (2) under seat cushion.
1
2
P91.16-2069-26
Page 54 of 354

51 Seats
Te ch n i c a l
data Instruments
and controlsOperationDrivingInstrument
cluster displayPractical hints Car care Index Multicontour seat (optional)
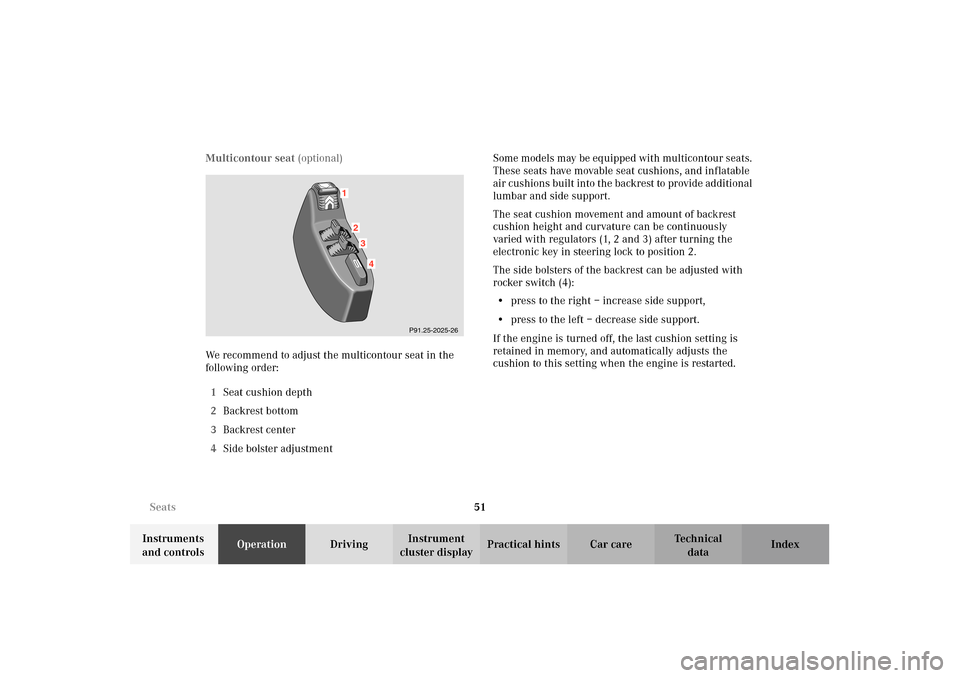
We recommend to adjust the multicontour seat in the
following order:
1Seat cushion depth
2Backrest bottom
3Backrest center
4Side bolster adjustmentSome models may be equipped with multicontour seats.
These seats have movable seat cushions, and inflatable
air cushions built into the backrest to provide additional
lumbar and side support.
The seat cushion movement and amount of backrest
cushion height and curvature can be continuously
varied with regulators (1, 2 and 3) after turning the
electronic key in steering lock to position 2.
The side bolsters of the backrest can be adjusted with
rocker switch (4):
•press to the right – increase side support,
•press to the left – decrease side support.
If the engine is turned off, the last cushion setting is
retained in memory, and automatically adjusts the
cushion to this setting when the engine is restarted.
1
234
P91.25-2025-26
Page 55 of 354
52 Seats
Te ch n i c a l
data Instruments
and controlsOperationDrivingInstrument
cluster displayPractical hints Car care Index
Seat heater
The seat heaters can be switched on with the electronic
key in steering lock positions 1 or 2.Notes:
When in operation, the seat heater consumes a large
amount of electrical power. It is not advisable to use the
seat heater longer than necessary.
The seat heaters may automatically switch off if too
many power consumers are switched on at the same
time, or if the battery charge is low. When this occurs,
the indicator lamp in the switch will blink (both
indicator lamps blink during rapid seat heating mode).
The seat heaters will switch on again automatically as
soon as sufficient voltage is available.
If the blinking of the indicator lamps is distracting to
you, the seat heaters can be switched off.
Page 56 of 354
53 Seats
Te ch n i c a l
data Instruments
and controlsOperationDrivingInstrument
cluster displayPractical hints Car care Index Ve h i c l e s w i t h o u t s e a t v e n t i l a t i o n
The front seat heater switches are located in the center
console.Press switch to turn on seat heater:
1Normal seat heating mode. One indicator lamp in
the switch lights up.
2Rapid seat heating mode. Both indicator lamps in
the switch light up.
After approximately 5 minutes in the rapid seat
heating mode, the seat heater automatically
switches to normal operation and only one indicator
lamp will stay on.
Turning off seat heater:
If one indicator lamp is on, press upper half of switch.
If both indicator lamps are on, press lower half of
switch.
If left on, the seat heater automatically turns off after
approximately 30 minutes of operation.
P54.25-2036-26
12
Page 57 of 354
54 Seats
Te ch n i c a l
data Instruments
and controlsOperationDrivingInstrument
cluster displayPractical hints Car care Index
Ve h i c l e s w i t h s e a t v e n t i l a t i o n (optional)
The front seat heater switches are located in the center
console.Rapid heating mode:
Press button (3) once.
Both red indicator lamps above the button light up.
The system switches over to normal heating mode
automatically after approximately 5 minutes.
Normal heating mode:
Press button (3) twice.
One red indicator lamp above the button lights up.
The seat heater will be automatically switched off after
approximately 30 minutes.
Turning off the heater:
Press the button (3) again.
The indicator lamps go out. The seat heater is switched
off.
Page 58 of 354
55 Seats
Te ch n i c a l
data Instruments
and controlsOperationDrivingInstrument
cluster displayPractical hints Car care Index Seat ventilation (optional)
The front seat ventilation switches are located in the
center console.
Turn the electronic key in steering lock to position 1
or 2.Level 3 ventilation setting (maximum):
Press button (1).
Three blue indicator lamps beside the button light up.
Level 2 ventilation setting (middle):
Press button (1) again.
Two blue indicator lamps beside the button light up.
Level 1 ventilation setting (minimum):
Press button (1) again.
One blue indicator lamp beside the button lights up.
Turning off seat ventilation:
If one blue indicator lamp is on, press button (1) once.
If two blue indicator lamps are on, press button (1)
twice.
If three blue indicator lamps are on, press button (1)
three times.