Page 102 of 399
.
Easy-entry/exit feature*
With the easy-entry/exit feature activated,")
102 Controls in detailSeats
SeatsInformation on seat adjustment can be
found in the "Getting started" section
(�page 35).
Easy-entry/exit feature*
With the easy-entry/exit feature activated,
the steering wheel tilts upwards and the
driver’s seat moves to the rear.
This allows easier entry into and exit from
the vehicle when the driver’s door is
opened. However, the engine must be
turned off.
When the SmartKey is inserted in the start-
er switch and the driver’s door is closed,
the steering wheel and the driver’s seat re-
turn to their last set positions.You can activate the following functions:
�
Steering column:
Only the steering column is adjusted.
�
Steering column and seat:
The steering column and the seat are
adjusted.
The easy-entry/exit feature can be
switched on or off in the individual setting
menu
Convenience
- Easy-entry feature
activate
(�page 143).
Warning!
G
You must ensure that no one can become
trapped or injured by the moving steering
wheel and driver’s seat when the
easy-entry / exit feature is activated, the
driver’s door is being opened and the engine
is turned off or the SmartKey removed from
the starter switch. Do not leave children un-
attended in the vehicle, or with access to an
unlocked vehicle. Unsupervised use of vehi-
cle equipment may cause serious personal
injury.
iTo cancel seat/steering wheel move-
ment, do one of the following:�
Press seat adjustment switch
(�page 28).
�
Move steering column stalk
(�page 38).
�
Press the memory switch
(�page 28).
ProCarManuals.com
Page 104 of 399
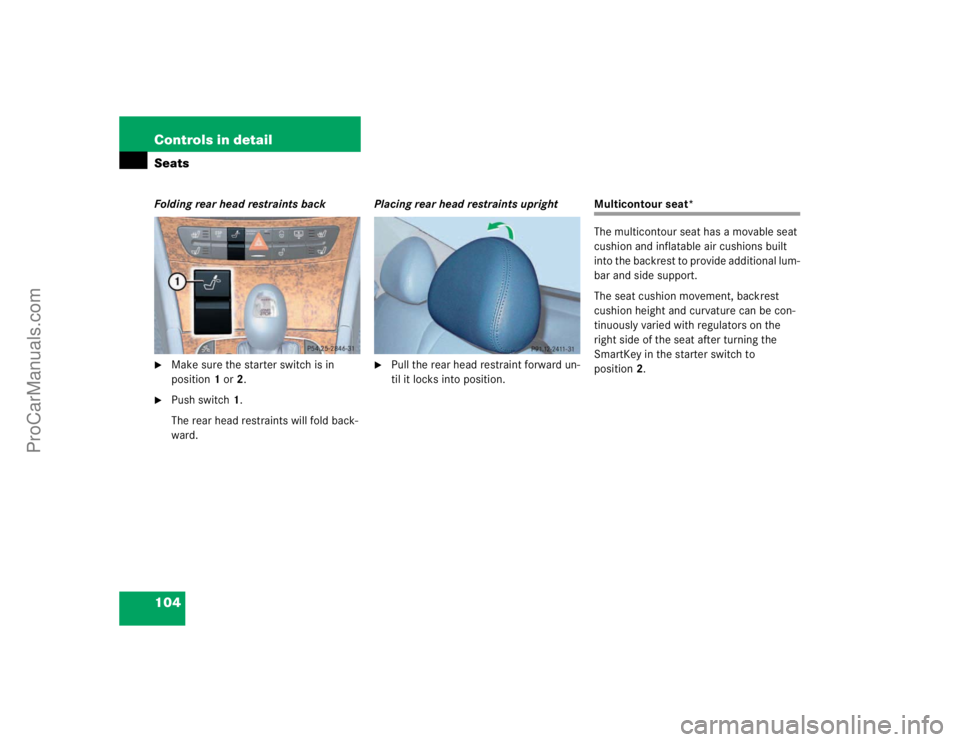
104 Controls in detailSeatsFolding rear head restraints back�
Make sure the starter switch is in
position1 or2.
�
Push switch1.
The rear head restraints will fold back-
ward.Placing rear head restraints upright
�
Pull the rear head restraint forward un-
til it locks into position.
Multicontour seat*
The multicontour seat has a movable seat
cushion and inflatable air cushions built
into the backrest to provide additional lum-
bar and side support.
The seat cushion movement, backrest
cushion height and curvature can be con-
tinuously varied with regulators on the
right side of the seat after turning the
SmartKey in the starter switch to
position2.
ProCarManuals.com
Page 116 of 399

116 Controls in detailLightingInterior lighting
The controls are located in the overhead
control panel.
1Switch for reading lamp, left
2Switch for rear compartment lighting
3Switch for automatic function
4Switch for interior lighting in front
5Switch for reading lamp, right
6Ambient lighting
7Interior lighting8Reading lamps
Activating automatic control
�
Press button3.
Interior lamps are switched on in dark-
ness, when�
unlocking the vehicle
�
opening a door
�
removing the SmartKey from the
starter switch
The interior lamps are switched off follow-
ing an adjustable time delay (
�page 141).Deactivating automatic control
�
Press button3.
The interior lighting remains switched
off, even when�
centrally unlocking the vehicle
�
opening a door
�
removing the SmartKey from the
starter switch
Manual control
Switching rear interior lights on and off
�
Press button2.
The lights in the rear passenger com-
partment go on.
�
Press button2 again.
The lights in the rear passenger com-
partment go out.
iIf the door remains open, the interior
lamps switch off automatically after ap-
proximately five minutes when the key
is removed or in starter switch
position0.
An interior lamp switched on manually
does not go out automatically.
ProCarManuals.com
Page 118 of 399
.
The instru")
118 Controls in detailInstrument cluster
Instrument clusterA full view illustration of the instrument
cluster can be found in the "At a glance"
section of this manual (
�page 22).
The instrument cluster is activated when
you
�
open a door
�
turn on the ignition
�
press the reset knob (
�page 22)
�
switch on the exterior lamps
You can change the instrument cluster set-
tings in the instrument cluster submenu of
the control system (
�page 134).
Instrument cluster illumination
Use the reset knob (
�page 22) to adjust
the illumination brightness for the instru-
ment cluster.To brighten illumination
�
Turn the reset knob in the instrument
cluster clockwise (
�page 22).
The instrument cluster illumination will
brighten.
To dim illumination
�
Turn the reset knob in the instrument
cluster counterclockwise (
�page 22).
The instrument cluster illumination will
dim.
iThe instrument cluster illumination is
dimmed or brightened automatically to
suit ambient light conditions.
The instrument cluster illumination will
also be adjusted automatically when
you switch on the vehicle’s exterior
lamps.
ProCarManuals.com
Page 132 of 399
132 Controls in detailControl systemThe table below shows what settings can
be changed within the various menus. De-
tailed instructions on making individual
settings can be found on the following pag-
es.INSTRUMENT CLUSTER
TIME/DATE
LIGHTING
VEHICLE
Select temperature display
mode
Set time (hours)
Set daytime running lamp mode
(USA only)
Set automatic locking
Select speedometer display
mode
Set time (minutes)
Set locator lighting
Select language
Set date (month)
Ambient lighting
Select display (speed display or
outside temperature) for status
line
Set date (day)
Exterior lamps delayed
switch-off
Tire pressure unit display*
Set date (year)
Interior lighting delayed
switch-off
ProCarManuals.com
Page 137 of 399
137 Controls in detail
Control system
Set time (hours)�
Move the selection marker with
theæ orç button to the Time/Date
submenu.
�
Press buttonj ork repeatedly
until you see this message in the dis-
play:
Clock, hours
.
The selection marker is on the hour set-
ting.
�
Pressæ orç to set the hour.
�
Confirm by pressing reset knob.Set time (minutes)
�
Move the selection marker with
theæ orç button to the Time/Date
submenu.
�
Press buttonj ork repeatedly
until you see this message in the dis-
play:
Clock, minutes
.
The selection marker is on the minute
setting.
�
Pressæ orç to set the minutes.
�
Confirm by pressing reset knob.Set date (month)
�
Move the selection marker with
theæ orç button to the Time/Date
submenu.
�
Press buttonj ork repeatedly
until you see this message in the dis-
play:
Set date month
.
The selection marker is on the month
setting.
�
Pressæ orç to set the month.
ProCarManuals.com
Page 139 of 399
�
Move the selection marker with
theæ orç button to the
Light-
ing
submenu.
�
Press buttonj ork repeatedly
unti")
139 Controls in detail
Control system
Setting daytime running lamp mode
(USA only)�
Move the selection marker with
theæ orç button to the
Light-
ing
submenu.
�
Press buttonj ork repeatedly
until you see this message in the dis-
play:
Lamp circuit headlamp
.
The selection marker is on the current
setting.
�
Pressæ orç to select manual
or daytime running lamp (constant)
mode. This function is not available in
countries where daytime running
lamps are mandatory.With daytime running lamp mode se-
lected and the exterior lamp switch at
position0, the following lamps will
come on automatically when the en-
gine is turned on:
�
Parking lamps and low beam head-
lamps
�
License plate lamps (in low ambient
light conditions) Setting locator lighting
During darkness, the following lamps will
come on when the locator lighting feature
is activated and the vehicle is unlocked by
remote control:
�
Parking lamps
�
Tail lamps
�
License plate lamps
�
Front fog lamps
The exterior lamp switch must be set to po-
sition U (
�page 112).
The locator lighting switches off when the
driver’s door is opened. It switches off au-
tomatically after a period of approximately
40 seconds.
�
Move the selection marker with
theæ orç button to the
Light-
ing
submenu.
�
Press buttonj ork repeatedly
until you see this message in the dis-
play:
Function Surround lighting
.
iIf you turn the exterior lamp switch to
another position, the corresponding
lamp(s) will switch on.
For safety reasons, resetting the Lighting
submenu to factory settings
(
�page 131) will not reset the daytime
running lamp mode.
In the display you will then see the mes-
sage:
Lighting
ProCarManuals.com
Page 142 of 399
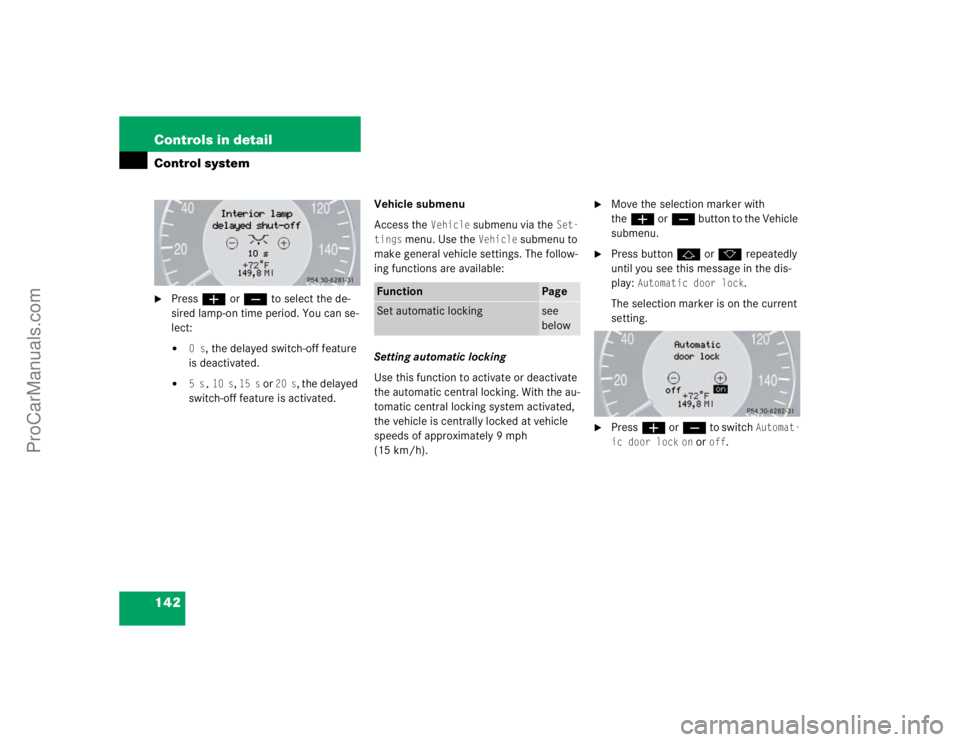
142 Controls in detailControl system�
Pressæ orç to select the de-
sired lamp-on time period. You can se-
lect:�
0 s
, the delayed switch-off feature
is deactivated.
�
5 s,
10 s
, 15 s
or
20 s
, the delayed
switch-off feature is activated.Vehicle submenu
Access the
Vehicle
submenu via the
Set-
tings
menu. Use the
Vehicle
submenu to
make general vehicle settings. The follow-
ing functions are available:
Setting automatic locking
Use this function to activate or deactivate
the automatic central locking. With the au-
tomatic central locking system activated,
the vehicle is centrally locked at vehicle
speeds of approximately 9 mph
(15 km/h).
�
Move the selection marker with
theæ orç button to the Vehicle
submenu.
�
Press buttonj ork repeatedly
until you see this message in the dis-
play:
Automatic door lock
.
The selection marker is on the current
setting.
�
Pressæ orç to switch
Automat-
ic door lock
on or
off
.
Function
Page
Set automatic locking
see
below
ProCarManuals.com