Page 338 of 399

338 Practical hintsFlat tire
Flat tirePreparing the vehicle�
Park the vehicle as far as possible from
moving traffic on a hard surface.
�
Turn on the hazard warning flashers.
�
Engage the steering wheel lock in the
straight-ahead position and set the
parking brake.
�
Move the selector lever toP.
�
Have any passenger exit the vehicle at
a safe distance from the roadway.
Mounting the spare wheel
Preparing the vehicle
Prepare the vehicle as described under
"Preparing the vehicle" on this page.�
Take the spare wheel out of the trunk
(�page 324).
Lifting the vehicle
�
Prevent the vehicle from rolling away
by blocking wheels with wheel chocks
(not included) or other sizable objects.
When changing wheel on a level surface:
�
Place one chock in front of and one be-
hind the wheel that is diagonally oppo-
site to the wheel being changed.When changing wheel on a hill:
�
Place chocks on the downhill side
blocking both wheels of the other axle.
�
Take the two-piece wheel wrench and
the jack out of the trunk (
�page 326).
Assemble wheel wrench.
Warning!
G
The jack is designed exclusively for jacking
up the vehicle at the jack take-up brackets
built into either side of the vehicle. To help
avoid personal injury, use the jack only to lift
the vehicle during a wheel change. Never
get beneath the vehicle while it is supported
by the jack. Keep hands and feet away from
the area under the lifted vehicle. Always
firmly set parking brake and block wheels
before raising vehicle with jack.
Do not disengage parking brake while the
vehicle is raised. Be certain that the jack is
ProCarManuals.com
Page 340 of 399

340 Practical hintsFlat tire
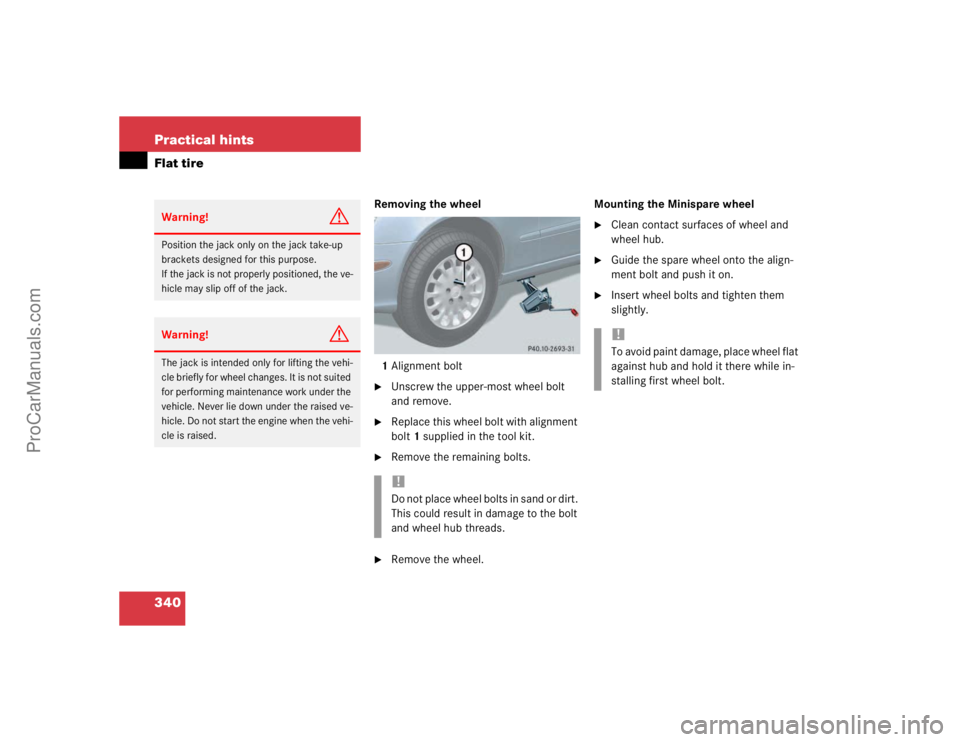
Removing the wheel
1Alignment bolt�
Unscrew the upper-most wheel bolt
and remove.
�
Replace this wheel bolt with alignment
bolt1 supplied in the tool kit.
�
Remove the remaining bolts.
�
Remove the wheel.Mounting the Minispare wheel
�
Clean contact surfaces of wheel and
wheel hub.
�
Guide the spare wheel onto the align-
ment bolt and push it on.
�
Insert wheel bolts and tighten them
slightly.
Warning!
G
Position the jack only on the jack take-up
brackets designed for this purpose.
If the jack is not properly positioned, the ve-
hicle may slip off of the jack.Warning!
G
The jack is intended only for lifting the vehi-
cle briefly for wheel changes. It is not suited
for performing maintenance work under the
vehicle. Never lie down under the raised ve-
hicle. Do not start the engine when the vehi-
cle is raised.
!Do not place wheel bolts in sand or dirt.
This could result in damage to the bolt
and wheel hub threads.
!To avoid paint damage, place wheel flat
against hub and hold it there while in-
stalling first wheel bolt.
ProCarManuals.com
Page 341 of 399

341 Practical hints
Flat tire
�
Unscrew the alignment bolt, install last
wheel bolt and tighten slightly.In the case of a flat tire, you may tempo-
rarily use the Minispare* wheel when ob-
serving the following restrictions:
�
Do not exceed a vehicle speed of
50 mph (80km/h).
�
Drive to the nearest tire repair facility
to have the flat tire repaired or re-
placed as appropriate.
�
Do not operate vehicle with more than
one spare wheel mounted.
Warning!
G
Always replace wheel bolts that are dam-
aged or rusted.
Never apply oil or grease to wheel bolts.
Damaged wheel hub threads should be re-
paired immediately. Do not continue to drive
under these circumstances! Contact an au-
thorized Mercedes-Benz Center or call
Roadside Assistance.
Incorrect mounting bolts or improperly
tightened mounting bolts can cause the
wheel to come off. This could cause an acci-
dent. Be sure to use the correct mounting
bolts.
Warning!
G
Use only genuine equipment
Mercedes-Benz wheel bolts. They are identi-
fied by the Mercedes star. Other wheel bolts
may come loose.
Do not tighten the wheel bolts when the ve-
hicle is raised. Otherwise the vehicle could
tip over.
Warning!
G
The dimensions of the Minispare* wheel are
different from those of the road wheels. As
a result, the vehicle handling characteristics
change when driving with a Minispare*
wheel mounted.
The spare wheel should only be used tempo-
rarily, and replaced with a regular road
wheel as quick as possible.
ProCarManuals.com
Page 342 of 399
342 Practical hintsFlat tireLowering the vehicle�
Lower vehicle by turning crank coun-
terclockwise until vehicle is resting ful-
ly on its own weight.
�
Remove the jack.
1-5 Wheel bolts
�
Tighten the five wheel bolts evenly, fol-
lowing the diagonal sequence illustrat-
ed (1 to 5), until all bolts are tight.
Observe a tightening torque of 96 ft lb
(130 Nm).
�
Before storing the jack in the trunk, it
should be fully collapsed.Warning!
G
Have the tightening torque checked after
changing a wheel. The wheels could come
loose if they are not tightened to a torque of
96 ft lb (130 Nm).iWrap the faulty wheel in the protective
film that comes with the spare wheel
and put the wheel in the trunk.
You can also place the faulty wheel
down into the spare wheel well. In this
case, you must stow the holder from
the spare wheel well in the trunk.
Do not activate the tire inflation pres-
sure monitor until the depressurized
tire is no longer in the vehicle.
ProCarManuals.com
Page 362 of 399
362 Technical dataRims and tiresMinispare wheel
Sport package
E320 / E500
Rim
4J x 17 ET 34
Wheel offset
1.34 (34 mm)
Tire
T 155/70 R 17
1
1Must not be used with snow chains.
E320*/ E500*
Same-sized
tiresRims
(light alloy)
8J x 17 ET 38
Wheel offset
1.5 in (38 mm)
Summer tires
(radial-ply tires)
245/45 R 17 95 H
1
Winter tires
(radial-ply tires)
245/45 R 17 95 M+S
1
1Must not be used with snow chains.
ProCarManuals.com
Page 387 of 399

387 Index
Exterior rear view mirrors
Adjusting 39
Parking position for 144
F
Fahrenheit
Setting temperature units 134
Fastening the seat belts 40
Fine adjustment
Cruise control 196
Distronic* 203
First aid kit 324
Flat tire 338
Spare wheel 338
Flexible Service System (FSS) 275, 377
Fog lamp, rear 114
Fog lamps, front 114
Messages in display 316
Replacing bulbs 332
Switching on 114
Front airbags 60
Front lamps 332
Messages in display 313
Replacing bulbs 334
Switching on 112
Front seat head restraints
Power seat 103Front seats
Heater* 107
FSS (Flexible Service System) 275, 377
Fuel 260
Premium unleaded gasoline 260
Fuel consumption statistics
After start 146
Since last reset 146
Fuel filler flap 259
Locking 259
Unlocking 259
Fuel reserve tank
Message in display 313, 323
Fuel tank
Filler flap 259
Fuels, coolants, lubricants etc. 366
Functions (control system) 125
Resetting 131
Fuse chart 353
Fuses 352
Fuse chart 353
Fuse extractor 353
Spare fuses 353G
Garage door opener 27, 243
Erasing in remote control 246
Integrated remote control 244
Rolling code programming 245
Gasoline see Fuel 260
Gear range 377
Automatic transmission 153
Limiting 153
Shifting into optimal 152
Gear range limit
Canceling 152
Gear selector lever
Position 154
Global
Locking 87
Locking with KEYLESS-GO* 91
Unlocking 87
Unlocking with KEYLESS-GO* 91
Global Positioning System (GPS) 377
Glove box 226
Closing 226
Opening 226
Good visibility 157
GPS 377
GPS see COMAND* 243
ProCarManuals.com
Page 395 of 399

395 Index
Submenus 131
Shift lock 379
Shifting
Gear selector lever positions 154
Into optimal gear range (automatic
transmission) 152
Side impact airbags 61
Side marker lamps 332, 336
Side windows
Automatic opening 184
Closing 184, 185
Closing with KEYLESS-GO* 92
Closing with SmartKey 185
Opening 184, 185
Opening fully 184
Opening with SmartKey 185
Stopping 185
Synchronizing power windows 186
Signal strength (telephone*) 148
Simultaneous wiping and washing
Windshield wipers 48
Single wipe 48
Ski sack* 216
Removing 219
Unfolding and loading 216
Unloading and folding 218Sliding/pop-up roof* 187
Closing 187
Closing with KEYLESS-GO* 92
Closing with SmartKey 188, 192
Opening 187
Opening with SmartKey 188, 192
Stopping 188
Synchronizing 189
Sliding/pop-up roof* or panorama slid-
ing/pop-up roof*
Emergency operations 331
SmartKey
Locking and unlocking 86
Opening and closing the slid-
ing/pop-up roof* with 188, 192
Opening and closing windows
with 185
Unlocking with 30
SmartKey with KEYLESS-GO*
Global locking and unlocking 91
Locking the vehicle 92
Loss of 93
Remote controls 89
Unlocking with 32
Snow chains 274
Spare fuses 353Spare parts service 356
Spare wheel 324
Speed
Resetting stored speed in
Distronic* 203
Saving current 195
Speed settings
Cruise control 196
Distronic* 202, 203
Speedometer
Displaying gear range 153
Displays 199
Settings units 134
Speedometer display mode
Selecting 134
Split rear bench seat 219
Sporty driving style 212
SRS 63, 379
Indicator lamp 290
Standing lamps 112
Replacing bulbs 335
Starter switch 31
Positions 31
Starting difficulties 44
Starting position 31
Starting the engine 43
ProCarManuals.com