Page 97 of 394
.
Easy-entry/exit feature
With the easy-entry/exit feature activated,
th")
97 Controls in detail
Seats
Seats
Information on seat adjustment can be
found in the “Getting started” section
(�page 34).
Easy-entry/exit feature
With the easy-entry/exit feature activated,
the steering wheel tilts upwards and the
driver’s seat moves to the rear.
This allows easier entry into and exit from
the vehicle when the driver’s door is
opened. However, the engine must be
turned off.
When the SmartKey is inserted in the start-
er switch or you have pressed the KEY-
LESS-GO* start/stop button once and the
driver’s door is closed, the steering wheel
and the driver’s seat return to their last set
positions.You can activate the following functions:
�
Steering column:
Only the steering column is adjusted.
�
Steering column and seat:
Both the steering column and the seat
are adjusted.
The easy-entry/exit feature can be
switched on or off in the Convenience sub-
menu of the control system (
�page 133).
Head restraints
Information on head restraint adjustment
can be found in the “Getting started” sec-
tion (
�page 36).
Warning!
G
You must ensure that no one can become
trapped or injured by the moving steering
wheel and driver’s seat when the
easy-entry / exit feature is activated, the
driver’s door is being opened, and the en-
gine is turned off or the SmartKey removed
from the starter switch. Do not leave chil-
dren unattended in the vehicle, or with ac-
cess to an unlocked vehicle. Unsupervised
use of vehicle equipment may cause an ac-
cident and/or serious personal injury.
Warning!
G
For your protection, drive only with properly
positioned head restraints.
Adjust head restraint to support the back of
the head approximately at ear level.
Do not drive the vehicle without the seat
head restraints. Head restraints are intend-
ed to help reduce injuries during an acci-
dent.iTilt the seat backrest to the rear for
easier removal and installation of the
head restraints.
Page 98 of 394
98 Controls in detailSeatsFront seat head restraints, power seat
Removing front head restraints�
Press switch1 upwards and hold until
the head restraint is fully extended.
�
Pull out head restraint.Installing front head restraints:
�
Press switch1 upwards and hold for
about five seconds.
�
Push the head restraint down until it
engages.
�
Adjust head restraint to desired posi-
tion.
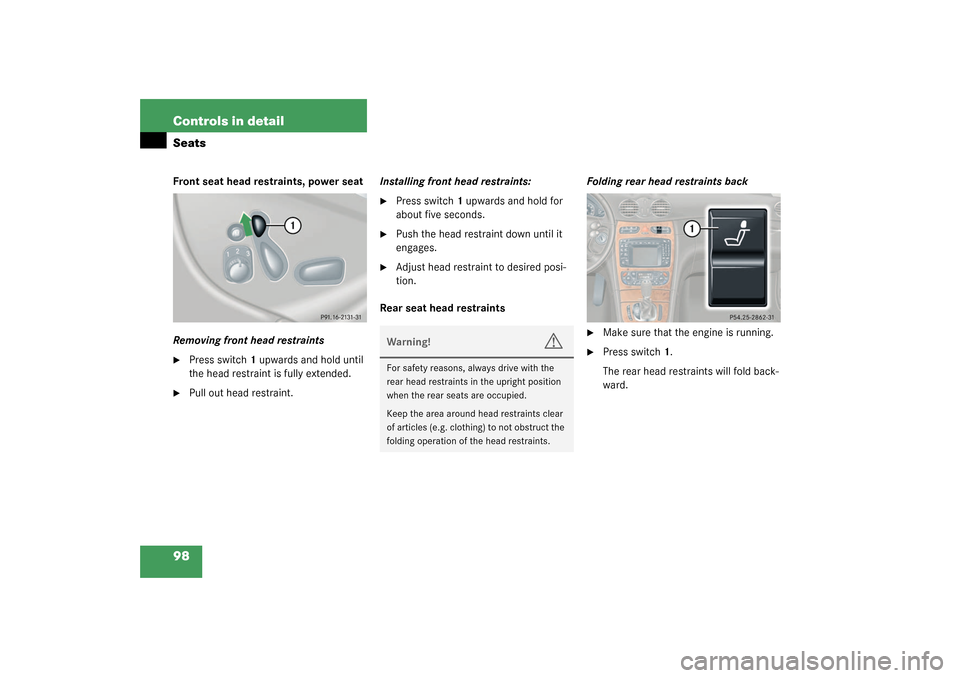
Rear seat head restraintsFolding rear head restraints back
�
Make sure that the engine is running.
�
Press switch1.
The rear head restraints will fold back-
ward.
Warning!
G
For safety reasons, always drive with the
rear head restraints in the upright position
when the rear seats are occupied.
Keep the area around head restraints clear
of articles (e.g. clothing) to not obstruct the
folding operation of the head restraints.
Page 102 of 394

102 Controls in detailMemory function
Memory function
The memory button and stored position
switch are located on the door.
You can store up to three different settings
per SmartKey or SmartKey with KEY-
LESS-GO*.
The following settings are saved for each
stored position:�
Driver’s seat, backrest and restraint
position
�
Settings for multicontour seat*
�
Steering wheel position
�
Driver’s side exterior rear view mirror
position
�
Passenger side exterior rear view mir-
ror position
These key dependent memory settings can
be deactivated if desired (
�page 135).1Memory button
2Stored position button
�
Be sure that the ignition is switched on
or the relevant door is open and the
SmartKey is inserted in the starter
switch.
!Prior to operating the vehicle, the driv-
er should check and adjust the seat
height, seat position fore and aft, and
seat backrest angle if necessary, to en-
sure adequate control, reach and com-
fort. The head restraint should also be
adjusted for proper height. Also see air-
bag section (
�page 57) for proper seat
positioning.
In addition, adjust the steering wheel to
ensure adequate control, reach, opera-
tion and comfort. Both the inside and
outside rear view mirrors should be ad-
justed for adequate rear vision.
Fasten seat belts. Infants and small
children should be seated in a properly
secured restraint system that complies
with U.S. Federal Motor Vehicle Safety
Standards 213 and 225 and Canadian
Motor Vehicle Safety Standards 213
and 210.2.
Warning!
G
Do not activate the memory function while
driving. Activating the memory function
while driving could cause the driver to lose
control of the vehicle.
Page 103 of 394
.
�
Turn button2 to selected memory p")
103 Controls in detail
Memory function
Storing positions into memory�
Adjust the seats, steering wheel and
rear view mirrors to the desired posi-
tion (
�page 34).
�
Turn button2 to selected memory po-
sition.
�
Press memory button1.
�
Release memory button and push
button2 within three seconds.
All the settings are stored at the select-
ed position.
Recalling positions from memory�
Turn button2 to selected memory po-
sition.
�
Press and hold button2 until the seat,
steering wheel and rear view mirrors
have fully moved to the stored posi-
tions.
Storing parking position
For easier parking you can adjust the pas-
senger exterior rear view mirror so that you
can see the right rear wheel as soon as you
engage reverse gearR.
The exterior rear view mirror returns to its
previously stored driving position:�
10 seconds after you put the gear se-
lector lever out of positionR
�
immediately once you exceed a speed
of approx. 6 mph (10 km/h)
�
immediately when you press the button
for driver’s side mirror
iReleasing the button immediately
stops movement to the stored posi-
tions.Warning!
G
Do not operate the power seats using the
memory button if the seat backrest is in an
excessively reclined position. Doing so
could cause damage to front or rear seats.
First move the seat backrest to an upright
position.
iThe mirror parking position feature
(�page 135) must be activated and
the passenger side exterior rear view
mirror (
�page 38) must be selected at
the time in order for the system to re-
call the stored mirror position when re-
verse gearR is engaged.
Page 105 of 394
.
Exterior lamp switch
The exterior l")
105 Controls in detail
Lighting
Lighting
For notes on how to switch on the head-
lamps and use the turn signals, see the
“Getting started” section (
�page 46).
Exterior lamp switch
The exterior lamp switch is located on the
dashboard to the left of the steering wheel.
M
Off
U
Automatic headlamp mode
C
Parking lamps (also side marker
lamps, tail lamps, license plate
lamps, instrument panel lamps)
Canada only: When engine is run-
ning, the low beam is also switched
on.
B
Low beam plus parking lamps or
high beam headlamps (combination
switch pushed forward).
ˆ
Standing lamps, right (turn left one
stop)
‚
Standing lamps, left (turn left two
stops)
iIf you remove the key and open the
driver’s door while the parking lamps or
low beam headlamps are switched on,
then �
a warning sounds
�
$
appears in the multifunction
display
�
the message
Turn off lamps!
ap-
pears in the multifunction display
iWith the daytime running lamp mode
activated and the engine running, the
low beam headlamps cannot be
switched off manually.
Page 106 of 394

106 Controls in detailLightingManual headlamp mode
The low beam headlamps and parking
lamps can be switched on and off with the
exterior lamp switch. For exterior lamp
switch, see above.
Automatic headlamp mode
The parking lamps, low beam headlamps
and license plate lamps switch on and off
automatically depending on the brightness
of the ambient light.�
Turn the exterior lamp switch to
U
.Daytime running lamp mode
�
Turn exterior lamp switch to
position
M
or
U
.
When the engine is running, the low beam
headlamps are automatically switched on.
In low ambient light conditions the parking
lamps will also switch on.
Canada only
When you shift from a driving position to
positionN orP, the low beam switches off
(with a three-minute delay).
For nighttime driving you should turn the
exterior lamp switch to position
B
to
permit activation of the high beam head-
lamps.
iWith the daytime running lamp mode
activated, the low beam headlamps will
not be switched off automatically.iFront fog lamps and rear fog lamp can
not be switched on manually with exte-
rior lamp switch in position
U
. To
activate the fog lamps, turn exterior
lamp switch to position
B
.
Warning!
G
In automatic headlamp mode, the head-
lamps will not be automatically switched on
under foggy conditions. To minimize risk to
you and to others, activate headlamps by
turning exterior lamp switch to
B
.
The driver is responsible for the operation of
the vehicle’s lights at all times. The automat-
ic headlamp feature is only an aid to the driv-
er. Switch on the vehicle lights manually
when driving or when traffic conditions re-
quire you to do so.
iIf you drive in countries where vehicles
drive on the other side of the road than
the country where the vehicle is regis-
tered, you must have the headlamps
modified for symmetrical low beams.
Relevant information can be obtained
at your authorized Mercedes-Benz Cen-
ter.
Page 108 of 394
.
�
Push the combination switch in
direction1.
The high beam symbol is illuminat")
108 Controls in detailLightingSwitching on high beams�
Turn exterior lamp switch to
position
B
or to
U
(
�page 105).
�
Push the combination switch in
direction1.
The high beam symbol is illuminated on
the instrument cluster.
High beam flasher
�
Pull the combination switch briefly in
direction2.
Hazard warning flasher
The hazard warning flasher can be activat-
ed with the ignition switched on or off. It is
activated automatically when an airbag is
deployed.
The switch is located on the center con-
sole.
1Hazard warning flasher switchSwitching on the hazard warning
flasher
�
Press the hazard warning flasher
switch.
All turn signals will blink.
Switching off the hazard warning
flasher
�
Press hazard warning flasher switch
again.iWith the hazard warning flasher acti-
vated and the combination switch set
for either left or right turn, only the re-
spective left or right turn signals will
operate when the key in the starter
switch is in position1 or2.iIf the hazard warning flasher has been
activated automatically, press the haz-
ard warning flasher switch twice.
Page 112 of 394

112 Controls in detailInstrument clusterCoolant temperature displayDuring severe operating conditions and
stop-and-go city traffic, the coolant tem-
perature may rise close to 120°C.
The engine should not be operated with
the coolant temperature above 120°C. Do-
ing so may cause serious engine damage
which is not covered by the
Mercedes-Benz Limited Warranty.
Trip odometer
Make sure you are viewing the trip odome-
ter display (
�page 114).
�
Press the button
è
or
ÿ
on the
multifunction steering wheel repeated-
ly until the trip odometer appears if it is
not displayed.
�
Press and hold reset knob1 on the in-
strument cluster (
�page 111) until the
trip odometer is reset.
Warning!
G
�
Driving when your engine is badly over-
heated can cause some fluids which
may have leaked into the engine com-
partment to catch fire. You could be se-
riously burned.
�
Steam from an overheated engine can
cause serious burns and can occur just
by opening the engine hood. Stay away
from the engine if you see or hear steam
coming from it.
Turn off the engine, get out of the vehicle
and do not stand near the vehicle until it
cools down.
iExcessive coolant temperatures trigger
a warning in the multifunction display.