Page 108 of 394

108 Controls in detailLightingSwitching on high beams�
Turn exterior lamp switch to
position
B
or to
U
(
�page 105).
�
Push the combination switch in
direction1.
The high beam symbol is illuminated on
the instrument cluster.
High beam flasher
�
Pull the combination switch briefly in
direction2.
Hazard warning flasher
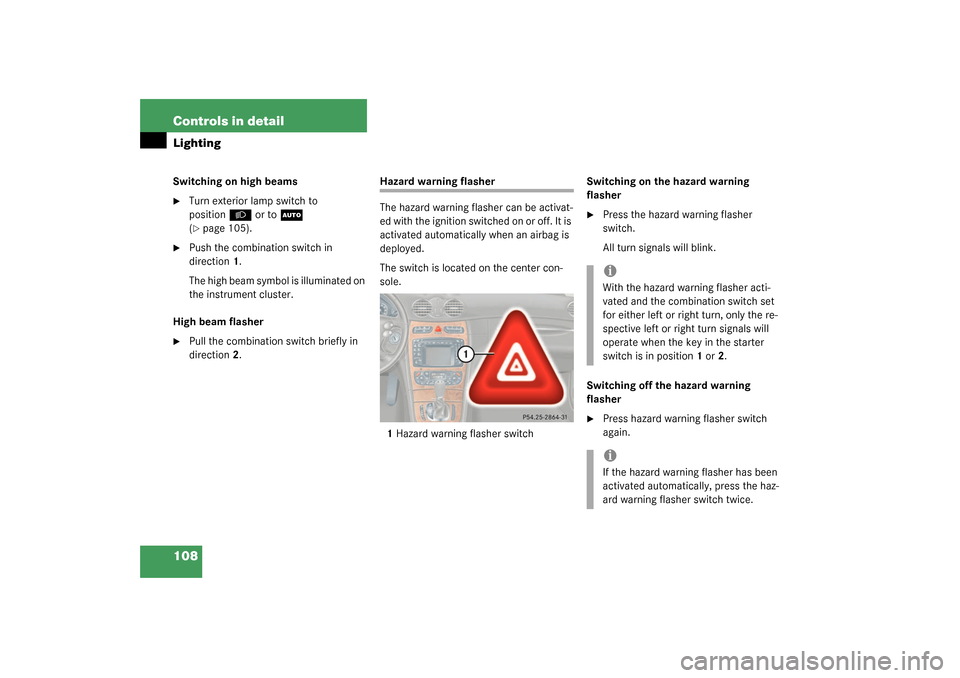
The hazard warning flasher can be activat-
ed with the ignition switched on or off. It is
activated automatically when an airbag is
deployed.
The switch is located on the center con-
sole.
1Hazard warning flasher switchSwitching on the hazard warning
flasher
�
Press the hazard warning flasher
switch.
All turn signals will blink.
Switching off the hazard warning
flasher
�
Press hazard warning flasher switch
again.iWith the hazard warning flasher acti-
vated and the combination switch set
for either left or right turn, only the re-
spective left or right turn signals will
operate when the key in the starter
switch is in position1 or2.iIf the hazard warning flasher has been
activated automatically, press the haz-
ard warning flasher switch twice.
Page 298 of 394

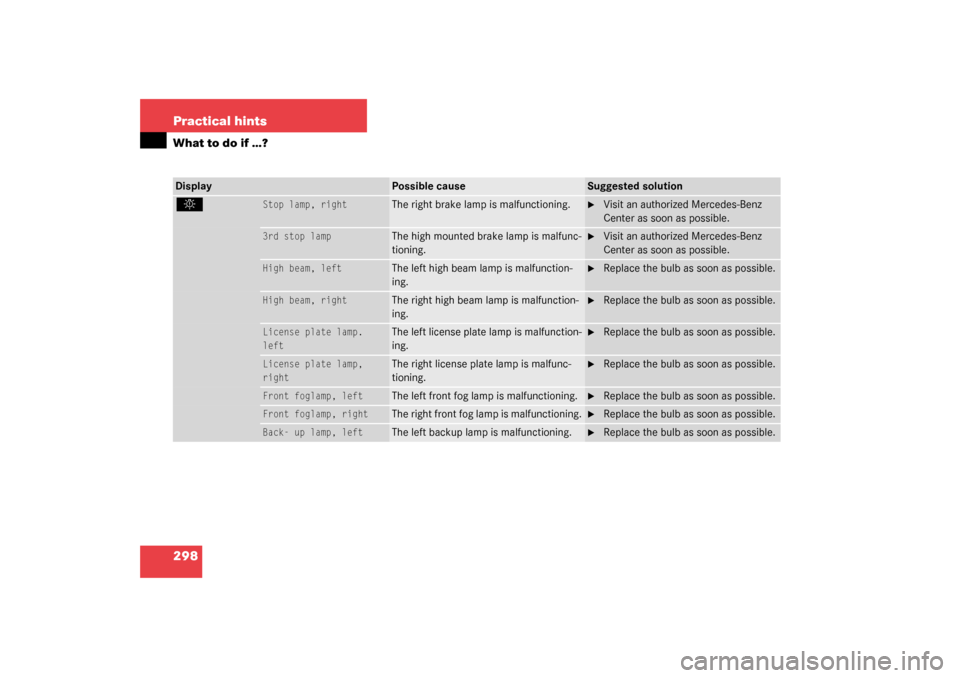
298 Practical hintsWhat to do if …?Display
Possible cause
Suggested solution
.
Stop lamp, right
The right brake lamp is malfunctioning.
�
Visit an authorized Mercedes-Benz
Center as soon as possible.
3rd stop lamp
The high mounted brake lamp is malfunc-
tioning.
�
Visit an authorized Mercedes-Benz
Center as soon as possible.
High beam, left
The left high beam lamp is malfunction-
ing.
�
Replace the bulb as soon as possible.
High beam, right
The right high beam lamp is malfunction-
ing.
�
Replace the bulb as soon as possible.
License plate lamp.
left
The left license plate lamp is malfunction-
ing.
�
Replace the bulb as soon as possible.
License plate lamp,
right
The right license plate lamp is malfunc-
tioning.
�
Replace the bulb as soon as possible.
Front foglamp, left
The left front fog lamp is malfunctioning.
�
Replace the bulb as soon as possible.
Front foglamp, right
The right front fog lamp is malfunctioning.
�
Replace the bulb as soon as possible.
Back- up lamp, left
The left backup lamp is malfunctioning.
�
Replace the bulb as soon as possible.
Page 317 of 394

317 Practical hints
Replacing bulbs
Front lamps Rear lamps Notes on bulb replacement
Lamp
Type
1
Low beam
1
1Vehicles with Bi-Xenon headlamps* do not replace
the Bi-Xenon bulbs yourself.
H7 (55 W)
Bi-Xenon*
D2S-35 W
2
High beam
H7 (55 W)
Parking and stand-
ing lamps
W 5 W
3
Additional turn sig-
nal lamps
LED
4
Turn signal lamp
1156 NA
5
Side marker lamp
W 5 W
6
Fog lamp
HB4/9006
(55 W)
Lamp
Type
7
Rear fog lamp, driv-
er’s side
P 21/4 W
Turn signal lamp
P 21 W
Brake lamp
P 21 W
Backup lamp
P 21 W
Tail, parking and
standing lamp, side
marker
P 21/4 W
W 5 W
8
High mounted brake
lamp
LED
9
License plate lamps
C 5 W
Warning!
G
Keep bulbs out of reach of children.
Bulbs and bulb sockets can be very hot. Al-
low the lamp to cool down before changing
a bulb.
Halogen lamps contain pressurized gas. A
bulb can explode if you:�
touch or move it when hot
�
drop the bulb
�
scratch the bulb
Wear eye and hand protection.
Because of high voltage in xenon lamps, it is
dangerous to replace the bulb or repair the
lamp and its components. We recommend
that you have such work done by a qualified
technician.
Page 318 of 394
318 Practical hintsReplacing bulbs�
Only use 12 volt bulbs of the same type
and with the specified watt rating.
�
Switch lights off before changing a bulb
to prevent short circuits.
�
Always use a clean lint-free cloth when
handling bulbs.
�
Your hands should be dry and free of oil
and grease.
�
If the newly installed bulb does not light
up, visit an authorized Mercedes-Benz
Center.
�
Have the LEDs and bulbs for the follow-
ing lamps replaced by an authorized
Mercedes-Benz Center.�
Additional turn signal lamps in the
exterior rear view mirrors
�
High mounted brake lamp
�
Bi-Xenon* lamps
�
Front fog lamps
Replacing bulbs for front lamps
Front lamps halogen-type
1Housing cover for low beam lamp
2Housing cover for high beam lamp3Bulb socket for turn signal lamp
4Low beam bulb
5High beam bulb
6Parking and standing lamp
Page 319 of 394

319 Practical hints
Replacing bulbs
Low beam and high beam bulb�
Switch off the lights.
�
Open the hood (
�page 253).
�
Turn housing cover1 or 2 counter-
clockwise and remove.
�
Turn bulb holder 4 or 5 with the bulb
counterclockwise and remove.
�
Press the bulb backwards and turn
counterclockwise out of the bulb hold-
er.
�
Press the new bulb into the holder and
twist it clockwise.
�
Place the bulb holder back into the
lamp and turn it clockwise.
�
Place the corresponding housing cov-
ers back on and turn them clockwise.Front turn signal lamp bulb
�
Switch off the lights.
�
Open the hood (
�page 253).
�
Twist bulb socket3 counterclockwise
and pull out.
�
Push bulb into socket, turn counter-
clockwise and remove.
�
Insert new bulb in socket, push in and
twist clockwise.
�
Reinsert bulb socket in lamp and twist
clockwise.Parking and standing lamp bulb
�
Switch off the lights.
�
Open the hood (
�page 253).
�
Turn housing cover2 counterclockwise
and remove.
�
Pull out the bulb socket with the bulb.
�
Pull the bulb out of the bulb socket.
�
Insert a new bulb in the socket.
�
Reinstall the bulb socket.
�
Align housing cover and click into
place.
Page 320 of 394
320 Practical hintsReplacing bulbsFront lamps Bi-Xenon*-type
1Bulb socket for turn signal lamp
2Housing cover for high beam lamp
3Housing cover for Bi-Xenon* lamp4High beam bulb
5Parking and standing lampHigh beam bulb
�
Switch off the lights.
�
Open the hood (
�page 253).
�
Turn housing cover2 counterclockwise
and remove.
�
Turn bulb holder 4 with the bulb coun-
terclockwise and remove.
�
Press the bulb backwards and turn
counterclockwise out of the bulb hold-
er.
�
Press the new bulb into the holder and
twist it clockwise.
�
Place the bulb holder back into the
lamp and turn it clockwise.
�
Place the housing cover 2 back on and
turn them clockwise.
Warning!
G
Do not remove the cover 3 for the Bi-Xenon*
headlamp. Because of high voltage in xenon
lamps, it is dangerous to replace the bulb or
repair the lamp and its components. We rec-
o mme nd t h at y ou ha ve s uc h w o rk do n e by a
qualified technician.
Page 361 of 394

361 Technical terms
ABS
(A
ntilock B
rake S
ystem)
Prevents the wheels from locking up
during braking so that the vehicle can
continue to be steered.
Alignment bolt
Metal pin with thread. The centering
pin is an aid used when changing a tire
to align the wheel with the wheel hub.BabySmart
TM
airbag deactivation
system
This system detects if a special system
compatible child restraint seat is in-
stalled on the front passenger seat. The
system will automatically deactivate
the passenger front airbag when such a
seat is properly installed (indicator
lamp
7
in the center console lights
up). See your authorized
Mercedes-Benz Center for availability.
BabySmartTM
compatible child seats
Special restraint system for children.
The sensor system for the passenger
seat prevents deployment of the pas-
senger side airbag if a BabySmart
TM
compatible child seat is installed.BAS
(B
rake A
ssist S
ystem)
System for potentially reducing braking
distances in emergency braking situa-
tions. The system is activated when it
senses an emergency based on how
fast the brake is applied.
Bi-Xenon headlamps*
Headlamps which use an electric arc as
the light source and produce a more in-
tense light than filament headlamps.
Bi-Xenon headlamps produce low
beam and high beam.
Page 367 of 394

367 Index
A
ABS 23, 74, 361
ABS control 75
Malfunction indicator lamp 277
Messages in display 284
Warning lamp 277
Accelerator position, automatic transmis-
sion 146
Accident
In case of 49
Activating
Air conditioning (cooling) 163
Air recirculation mode 160
Anti-theft alarm system 80
Automatic climate control 155
Central locking (control system) 133
Charcoal filter 161
Distance warning function* 205
Distronic* 201
Easy-entry/exit feature 133
ESP 78
Exterior headlamps 46
Exterior lamps 106
Front and rear fog lamp 106
Hazard warning flasher 108
Headlamps 46High beams 108
Ignition 31
Ignition with KEYLESS-GO* start/stop
button 33
Immobilizer 51, 79
Rear window defroster 162
Residual heat 163
Seat heater* 101
Tow-away alarm 81
Windshield wipers 48
Activating steering wheel gearshift control
147
Downshifting 148
Upshifting 147
Adding
Coolant 257
Engine oil 255
Additional turn signals 317
Adjustable air vents, rear passenger com-
partment 164Adjusting 34
Air distribution 158
Air volume 159
Backrest tilt 36
Exterior rear view mirror 38
Head restraint height 36
Head restraint tilt 36
Inside rear view mirror 38
Instrument cluster illumination 111
Mirrors 38
Multicontour seat* 100
Seat cushion depth 100
Seat cushion tilt 36
Seat fore and aft adjustment 35
Seat height 35
Seats 34
Steering column height 38
Steering column length 38
Steering wheel 37
Air conditioning (cooling)
Turning off 163
Turning on 163
Air conditioning refrigerant 353
Air distribution
Adjusting 158