Page 5 of 394

Contents
Automatic transmission ..................... 141
One-touch gearshifting................. 142
Gear ranges ................................. 143
Gear selector lever position ......... 144
Program mode selector switch..... 145
Accelerator position ..................... 146
Emergency operation
(Limp Home Mode) ...................... 146
Steering wheel gearshift control
(Speedshift) and manual
shift program CLK 55 AMG .......... 146
Good visibility .................................... 149
Rear view mirror........................... 149
Parking position ........................... 150
Windshield wipers ........................ 151
Headlamp cleaning system* ........ 151
Sun visors .................................... 152
Rear window sunshade* .............. 153
Automatic climate control ................. 154
Setting the temperature ............... 157
Adjusting air distribution .............. 158
Adjusting air volume .................... 159
Maximum cooling MAXCOOL ....... 159
Defrosting .................................... 159
Air recirculation mode.................. 160
Charcoal filter .............................. 161Rear window defroster .................. 162
Air conditioning............................. 163
Residual heat and ventilation* ...... 163
Rear passenger compartment
adjustable air vents....................... 164
Audio system ...................................... 165
Audio and telephone, operation .... 165
Operating safety ........................... 165
Operating and display elements.... 166
Button and soft key operation....... 168
Operation ...................................... 168
Radio mode................................... 171
Cassette mode.............................. 174
CD changer* operating mode ....... 178
Telephone* operation ................... 182
Power windows .................................. 187
Opening and closing the windows. 187
Synchronizing power windows ...... 189
Sliding/pop-up roof* .......................... 190
Opening and closing the
sliding/pop-up roof....................... 190
Synchronizing the
sliding / pop-up roof ...................... 192
Driving systems .................................. 193
Cruise control ............................... 193
Distronic* ..................................... 196PARKTRONIC system* .................. 208
Loading .............................................. 212
Roof rack ...................................... 212
Ski sack* ...................................... 212
Split rear bench seat .................... 215
Loading instructions ..................... 217
Cargo tie-down rings..................... 218
Useful features ................................... 219
Interior storage spaces ................. 219
Ashtrays........................................ 223
Cigarette lighter ............................ 224
Floormats* ................................... 225
Telephone* ................................... 226
Tele Aid ......................................... 227
Garage door opener ...................... 235
Page 26 of 394
26 At a glanceCenter consoleLower part
Item
Page
1
KEYLESS-GO* start/stop
button
33
2
Storage compartment
221
3
Thumbwheel for setting
distance in Distronic*
203
4
Distance warning func-
tion* on/off switch
204
Item
Page
5
Program mode selector for
automatic transmission
145,
147
6
Selector lever for
automatic transmission
141
Page 219 of 394
219 Controls in detail
Useful features
Useful features
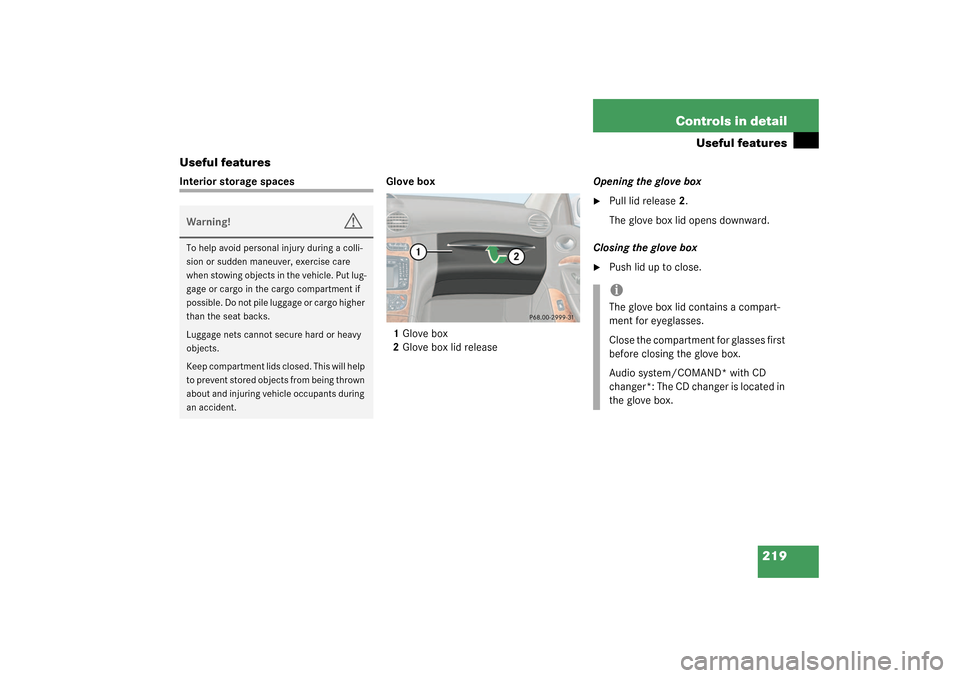
Interior storage spaces Glove box
1Glove box
2Glove box lid releaseOpening the glove box
�
Pull lid release2.
The glove box lid opens downward.
Closing the glove box
�
Push lid up to close.
Warning!
G
To help avoid personal injury during a colli-
sion or sudden maneuver, exercise care
when stowing objects in the vehicle. Put lug-
gage or cargo in the cargo compartment if
possible. Do not pile luggage or cargo higher
than the seat backs.
Luggage nets cannot secure hard or heavy
objects.
Keep compartment lids closed. This will help
to prevent stored objects from being thrown
about and injuring vehicle occupants during
an accident.
iThe glove box lid contains a compart-
ment for eyeglasses.
Close the compartment for glasses first
before closing the glove box.
Audio system/COMAND* with CD
changer*: The CD changer is located in
the glove box.
Page 221 of 394
221 Controls in detail
Useful features
Opening cup holder�
Push front of sliding compartment1.
The cup holder slides out.
Closing cup holder
�
Push sliding compartment1 back until
it engages.Armrest storage space
Opening compartment in armrest
�
Lift armrest by handle1.
Closing
�
Lower armrest until it locks into place.Opening telephone compartment
�
Lift armrest by pushing button2 or 3.
Closing telephone compartment
�
Lower armrest until it locks into place.
Locking compartment
�
Remove the mechanical key from the
SmartKey (
�page 310).
�
Turn the compartment lock to
position5.
Unlocking compartment
�
Turn the compartment lock to
position4.
�
Insert the mechanical key in the Smart-
Key.
!Do not store any items between the
telephone holder and the cover for the
blower. Otherwise these items could
be damaged when the holder is closed.
Use the space in the front door pocket
for stowing.
Page 222 of 394
222 Controls in detailUseful featuresChanging inclination of armrest�
Pull up on armrest.
Lowering armrest
�
Pull handle1 to lower armrest.Storage bags
Storage bags are located on the rear side
of the front seats.Parcel net in front passenger footwell
A small convenience parcel net is located
in the front passenger footwell. It is for
small and light items, such as road maps,
mail, etc.
Warning!
G
Do not place heavy or fragile objects, or ob-
jects having sharp edges, in the storage
bags.
In an accident, during hard braking or sud-
den maneuvers, they could be thrown
around inside the vehicle, and cause injury
to vehicle occupants.
Warning!
G
Do not place heavy or fragile objects, or ob-
jects having sharp edges, in the parcel net.
In an accident, during hard braking or sud-
den maneuvers, they could be thrown
around inside the vehicle, and cause injury
to vehicle occupants.
Page 305 of 394
305 Practical hints
Where will I find...?
Where will I find...?
First aid kit
The first aid kit is stored in left hand side of
the trunk.�
Loosen Velcro fastener1.
�
Remove first aid kit2.
Vehicle tool kit
The vehicle tool kit is stored in the com-
partment underneath the trunk floor.
The following is included:�
Towing eye bolt
�
Alignment bolt
�
Wheel wrench
�
Vehicle jack
�
Wheel boltsRemoving the vehicle tool kit
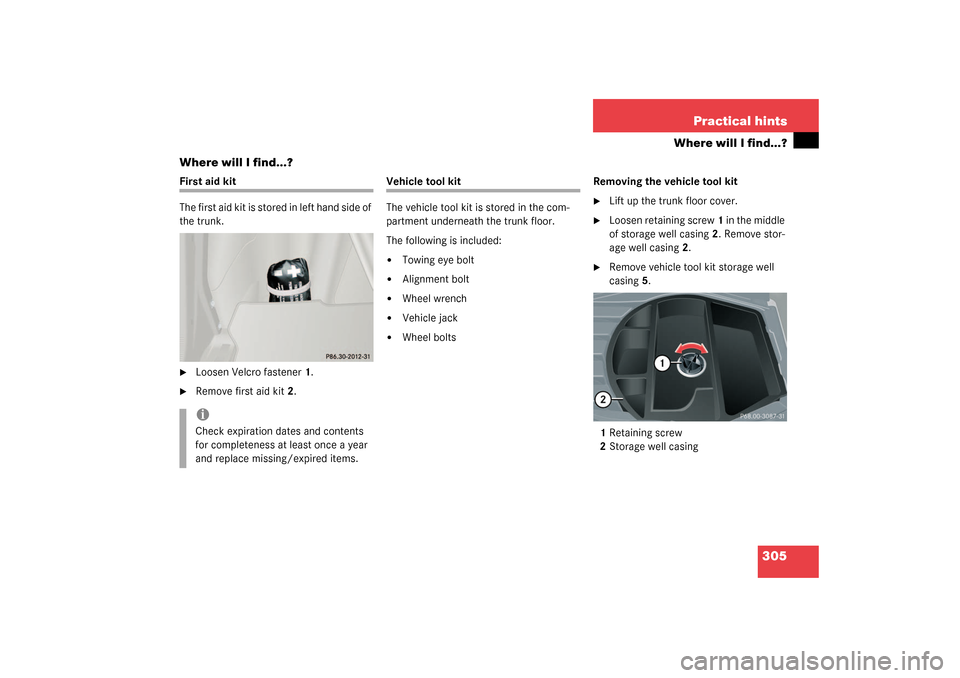
�
Lift up the trunk floor cover.
�
Loosen retaining screw 1 in the middle
of storage well casing2. Remove stor-
age well casing2.
�
Remove vehicle tool kit storage well
casing5.
1Retaining screw
2Storage well casing
iCheck expiration dates and contents
for completeness at least once a year
and replace missing/expired items.
Page 306 of 394

306 Practical hintsWhere will I find...?3Arrow
4Minispare wheel
5Vehicle tool kit storage well casing
6Vehicle tool kit
Wheel wrench
Vehicle jackVehicle jackThe vehicle jack is stored in the space un-
derneath the trunk floor together with the
vehicle tool kit in the vehicle tool kit stor-
age well casing.
�
Remove the vehicle jack from its com-
partment.
�
Push the crank handle up.
iArrow3 on vehicle tool kit storage well
casing5 must point in the direction of
travel. Otherwise you cannot place the
storage well casing on top and secure
the Minispare wheel with retaining
screw 1 (
�page 305).
Warning!
G
The jack is designed exclusively for jacking
up the vehicle at the jack take-up brackets
built into both sides of the vehicle. To help
avoid personal injury, use the jack only to lift
the vehicle during a wheel change. Never
get beneath the vehicle while it is supported
by the jack. Keep hands and feet away from
the area under the lifted vehicle. Always
firmly set parking brake and block wheels
before raising vehicle with jack.
Do not disengage parking brake while the
vehicle is raised. Be certain that the jack is
always vertical (plumb line) when in use, es-
pecially on hills. Always try to use the jack
on a level surface. Make sure that the jack
arm is fully seated in the jack take-up brack-
et. Always lower the vehicle onto sufficient
capacity jackstands before working under
the vehicle.
Page 307 of 394
307 Practical hints
Where will I find...?
�
Turn the crank handle clockwise until it
engages (operational position).
Before storing the vehicle jack in its com-
partment:
�
It should be fully collapsed
�
The handle must be folded in (storage
position)
Minispare wheel
The Minispare wheel is located in the com-
partment underneath the trunk floor.
1Vehicle tool kit
Wheel wrench
Jack
2Arrow
3Minispare wheel
4Vehicle tool kit storage well casingRemoving the Minispare wheel
�
Lift trunk floor cover and engage trunk
floor handle in upper edge of trunk.
�
Loosen the retaining screw
(�page 305) in the middle of storage
well casing. Remove the storage well
casing.
�
Remove vehicle tool kit storage well
casing4.
�
Remove Minispare wheel3.