Page 92 of 394
92 Controls in detailLocking and unlockingOpening the doors from the inside
You can open a locked door from the in-
side. Open door only when conditions are
safe to do so.
1Inside door handle
2Locking knob�
Pull on door handle1.
If door was locked, locking knob2 will
move up.
Opening the trunk from the inside
You can open the trunk using the trunk lid
release switch.
1Remote trunk lid release switch with in-
dicator lamp�
Push remote trunk lid release switch 1.
The trunk opens. The indicator lamp
comes on. It remains lit until you close
the trunk again.
iIf you open a door, the side windows on
that side of the vehicle will lower slight-
ly. The windows close again when you
close the door.iIf the vehicle has previously been
locked from the outside with the re-
mote control, opening a door from the
inside will trigger the alarm.
To cancel the alarm, do one of the
following:�
Press button
‹
or
Œ
on the
Smart Key.
�
Insert the SmartKey in the starter
switch.
Page 149 of 394
 and for setting the rear view
mirrors (
�page 38) is found in the “Get-
ting started” secti")
149 Controls in detail
Good visibility
Good visibility
Information on the windshield wipers
(�page 47) and for setting the rear view
mirrors (
�page 38) is found in the “Get-
ting started” section.
Rear view mirror
Automatic antiglare rear view mirror
The reflection brightness of the exterior
rear view mirror on the driver’s side and
the inside rear view mirror will respond au-
tomatically to glare when�
the ignition is switched on, and
�
incoming light from headlamps falls on
the sensor in the inside rear view mir-
ror.
The rear view mirror will not react if
�
reverse gear is engaged
�
the interior lighting is turned on
Warning!
G
The automatic antiglare function does not
react if incoming light is not aimed directly
at sensors in the inside rear view mirror.
The inside rear view mirror and the exterior
rear view mirror on the driver’s side do not
react, for example, if the rear window sun
shade* is in raised position.
Glare can endanger you and others.Warning!
G
In the case of an accident liquid electrolyte
may escape from the mirror housing if the
mirror glass breaks.
Electrolyte has an irritating effect. Do not al-
low the liquid to come into contact with
eyes, skin, clothing, or respiratory system.
In case it does, immediately flush affected
area with water, and seek medical help if
necessary.
Warning!
G
Exercise care when using the passenger
side exterior rear view mirror. The mirror
surface is convex (outwardly curved surface
for a wider field of view). Objects in mirror
are closer than they appear. Check your in-
side rear view mirror or glance over your
shoulder before changing lanes.!Electrolyte drops coming into contact
with the vehicle paint finish can be
completely removed only while in the
liquid state by applying plenty of water.
Page 152 of 394
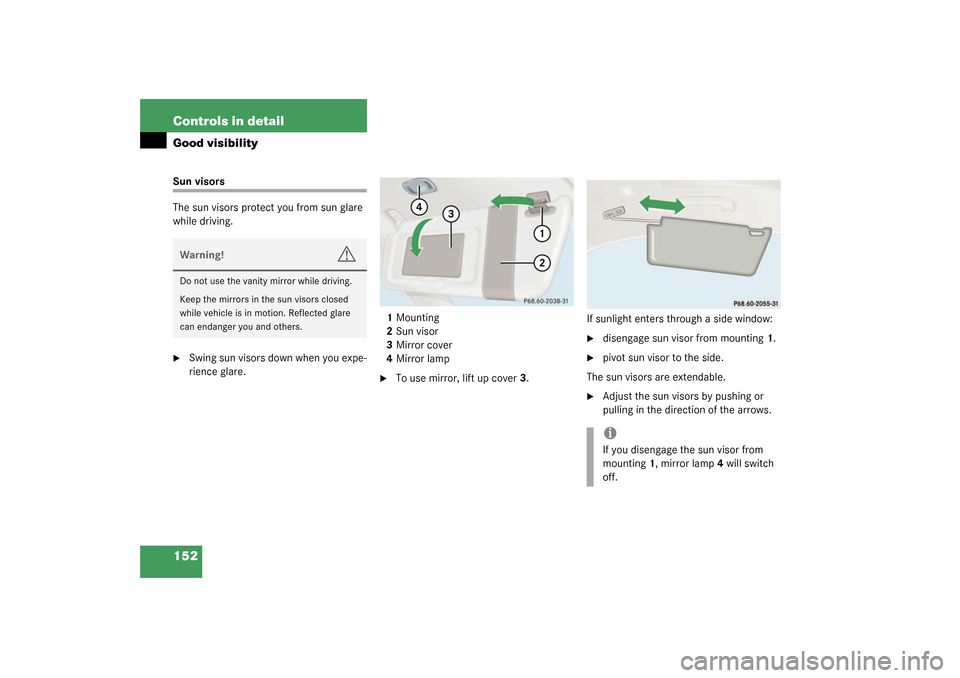
152 Controls in detailGood visibilitySun visors
The sun visors protect you from sun glare
while driving.�
Swing sun visors down when you expe-
rience glare.1Mounting
2Sun visor
3Mirror cover
4Mirror lamp
�
To use mirror, lift up cover3.If sunlight enters through a side window:
�
disengage sun visor from mounting1.
�
pivot sun visor to the side.
The sun visors are extendable.
�
Adjust the sun visors by pushing or
pulling in the direction of the arrows.
Warning!
G
Do not use the vanity mirror while driving.
Keep the mirrors in the sun visors closed
while vehicle is in motion. Reflected glare
can endanger you and others.
iIf you disengage the sun visor from
mounting1, mirror lamp4 will switch
off.
Page 153 of 394

153 Controls in detail
Good visibility
Rear window sunshade*
The switch is located in the center console.�
Turn the key to starter switch position
1 or 2. Vehicles with KEYLESS-GO*:
press the start/stop button once or
twice.
�
Press the switch briefly at 1 to raise the
sunshade.
�
Press the switch briefly at 2 to lower
the sunshade.
Always raise the sunshade fully for its sup-
port against the window frame.
Warning!
G
When operating the rear window sunshade,
ma ke s ur e th a t th er e is no da nge r o f an y o ne
being harmed by the raising or lowering pro-
cedure.
The raising or lowering procedure can be im-
mediately halted by briefly pressing the up-
per or lower half of the switch.
Briefly press upper or lower half of the
switch again to raise or lower the rear win-
dow sunshade completely.
Warning!
G
When leaving the vehicle, always remove the
SmartKey from starter switch, and lock your
vehicle. Do not leave children unattended in
the vehicle, or with access to an unlocked
vehicle. Unsupervised use of vehicle equip-
ment may cause an accident and⁄or serious
personal injury.
Page 155 of 394

155 Controls in detail
Automatic climate control
Automatic climate control panel
Item
1
Left side air vent, adjustable
2
Left center air vent, adjustable
3
Air volume control for center air
vents
4
Right center air vent, adjustable
5
Right side air vent, adjustable
6
Automatic climate control panel
7
Air volume control for far right air
vent
8
Thumbwheel for lowering tempera-
ture, center and side air vents
9
Air volume control for far left air
ventiFor draft-free ventilation, move the slid-
ers for the center air vents to the mid-
dle position.
Item
1
Temperature control, left, lowering
2
Temperature control, left, raising
3
Left-side air distribution (automatic
or manual operation)
4
Activated charcoal filter
5
Display
6
Right-side air distribution (automat-
ic or manual operation)
7
Temperature control, right, raising
8
Temperature control, right,
lowering
9
Rear window defroster
10
AC cooling on/offResidual heat/ventilation
11
Air volume control
12
Automatic climate control on/off
(complete system)
13
Air recirculation
14
Defrosting
Page 156 of 394

156 Controls in detailAutomatic climate controlThe automatic climate control is operation-
al whenever the engine is running. You can
operate the climate control system in ei-
ther the automatic or manual mode. The
system cools or heats the interior depend-
ing on the selected interior temperature
and the current outside temperature.
Nearly all dust particles, pollutants and
odors are filtered out before outside air en-
ters the passenger compartment through
the air distribution system.
The air conditioning will not engage (no
cooling) if the economy mode AC
OFF
is se-
lected (
�page 163).
Warning!
G
Follow the recommended settings for heat-
ing and cooling given on the following pag-
es. Otherwise the windows could fog up,
impairing visibility and endangering you and
others.
iIf the vehicle interior is hot, ventilate
the interior before driving off.
Keep the air intake grille in front of the
windshield free of snow and debris.
Do not obstruct air flow by placing ob-
jects on the air flow-through exhaust
slots below the rear window.
Page 158 of 394
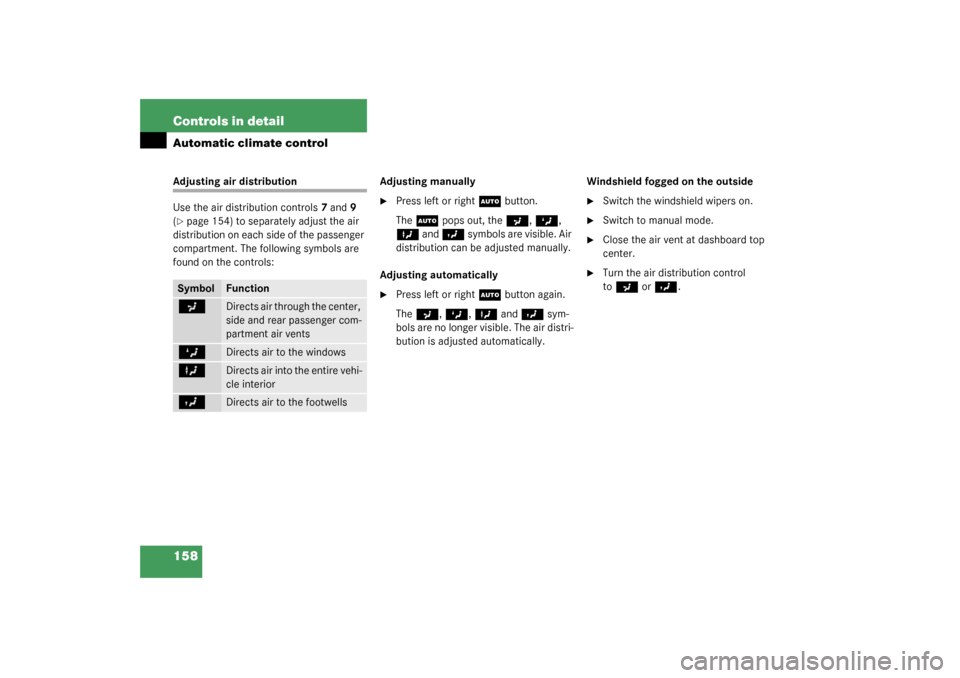
158 Controls in detailAutomatic climate controlAdjusting air distribution
Use the air distribution controls7 and 9
(�page 154) to separately adjust the air
distribution on each side of the passenger
compartment. The following symbols are
found on the controls:Adjusting manually
�
Press left or right
U
button.
The
U
pops out, the
a
, Z
,
X
and
Y
symbols are visible. Air
distribution can be adjusted manually.
Adjusting automatically
�
Press left or right
U
button again.
The
a
, Z
, X
and
Y
sym-
bols are no longer visible. The air distri-
bution is adjusted automatically.Windshield fogged on the outside
�
Switch the windshield wipers on.
�
Switch to manual mode.
�
Close the air vent at dashboard top
center.
�
Turn the air distribution control
to
a
or
Y
.
Symbol
Function
a
Directs air through the center,
side and rear passenger com-
partment air vents
Z
Directs air to the windows
X
Directs air into the entire vehi-
cle interior
Y
Directs air to the footwells
Page 159 of 394

159 Controls in detail
Automatic climate control
Adjusting air volume
Adjusting manually
Seven blower speeds are available.�
Press left
M
or right
Q
s i d e o f a i r
volume control switch until the re-
quested blower speed is attained.
The display
Auto
disappears and the
automatic mode is switched off. The
selected blower speed is shown in the
display.
Adjusting automatically
�
Press left or right
U
button until it
clicks in.
The
a
, Z
, X
and
Y
sym-
bols are no longer visible. The air vol-
ume is adjusted automatically.
Maximum cooling MAXCOOL
If the left and right air distribution controls
as well as the airflow volume control are
set to
U
and there is a high need for
cooling, the display “MAXCOOL” appears.
This provides the fastest possible cooling
of the vehicle interior (when windows and
sliding/pop-up roof are closed).
Defrosting
Activating�
Press button
P
(�page 155).
The indicator lamp on the button lights
up.
Switch off air recirculation, if selected.
�
Press button
,
(�page 155).
The indicator lamp on the button goes
out.
�
Close center air vents.
�
Adjust side air vents upwards.
Deactivating
�
Press button
P
(�page 155).
The indicator lamp on the button goes
out. Defrosting is turned off.
iThese settings should only be selected
for a short time.