Page 243 of 394

243 Operation
Driving instructions
After hard braking, it is advisable to drive
on for some time, rather than immediately
parking, so that the air stream can cool
down the brakes faster.
Driving off
Apply the brakes to test them briefly after
driving off. Perform this procedure only
when the road is clear of other traffic.
Warm up the engine gradually. Do not
place full load on the engine until the oper-
ating temperature has been reached.
When starting off on a slippery surface, do
not allow one drive wheel to spin for an ex-
tended period. Doing so may cause serious
damage to the drive train which is not cov-
ered by the Mercedes-Benz Limited War-
ranty.
Parking
Warning!
G
If other than recommended brake pads are
installed, or other than recommended brake
fluid is used, the braking properties of the
vehicle can be degraded to an extent that
safe braking is substantially impaired. This
could result in an accident.!When driving down long and steep
grades, relieve the load on the brakes
by shifting into a lower gear to use the
engine’s braking power. This helps pre-
vent overheating of the brakes and re-
duces brake pad wear.
!Simultaneously depressing the acceler-
ator pedal and applying the brake re-
duces engine performance and causes
premature brake wear and drivetrain
wear.
!Set the parking brake whenever park-
ing or leaving the vehicle. In addition,
move selector lever to positionP.
In addition, when parking on hills, turn
front wheels towards the road curb.Warning!
G
Do not park this vehicle in areas where com-
bustible materials such as grass, hay or
leaves can come into contact with the hot
exhaust system, as these materials could be
ignited and cause a vehicle fire.
Page 244 of 394
 are required by
law. These indicators are located in six
places on the tread circumference and be-
come visible at a tread depth o")
244 OperationDriving instructions
Tires
Tread wear indicators (TWI) are required by
law. These indicators are located in six
places on the tread circumference and be-
come visible at a tread depth of approxi-
mately
1⁄16 in (1.5 mm), at which point the
tire is considered worn and should be re-
placed.The tread wear indicator appears as a solid
band across the tread.
Specified tire pressures must be main-
tained. This applies particularly if the tires
are subjected to extreme operating condi-
tions (e.g. high speeds, heavy loads, high
ambient temperatures).
Warning!
G
To reduce the risk of personal injury as a re-
sult of inadvertent vehicle movement, be-
fore turning off the engine and leaving the
vehicle always:�
Keep right foot firmly on brake pedal.
�
Firmly depress parking brake pedal.
�
Move the selector lever to positionP.
�
Slowly release brake pedal.
�
When parked on an incline, turn front
wheels towards the road curb.
�
Turn the key to starter switch position0
and remove, or press KEYLESS-GO*
start/stop button (vehicles with
KEYLESS-GO*).
�
Take the key or the SmartKey with
KEYLESS-GO* (if so equipped) with you
and lock vehicle when leaving.
Warning!
G
If you feel a sudden significant vibration or
ride disturbance, or you suspect that possi-
ble damage to your vehicle has occurred,
you should turn on the hazard warning flash-
ers, carefully slow down, and drive with cau-
ti o n t o an a re a wh ic h i s a s a fe dis ta n c e f ro m
the road.
Inspect the tires and the vehicle underbody
for possible damage. If the vehicle or tires
appear unsafe, have it towed to the nearest
Mercedes-Benz Center or tire dealer for re-
pairs.
Warning!
G
Do not allow your tires to wear down too far.
As tread depth approaches
1⁄16 in (1.5 mm),
the adhesion properties on a wet road are
sharply reduced.
Depending upon the weather and/or road
surface (conditions), the tire traction varies
widely.
Page 251 of 394

251 Operation
At the gas station
At the gas station
The fuel filler flap is located on the
right-hand side of the vehicle towards the
rear. Locking/unlocking the vehicle with
the remote control or the SmartKey with
KEYLESS-GO* automatically locks/un-
locks the fuel filler flap.
�
Remove the key from the starter
switch.
�
Open the fuel filler flap by pushing at
the point indicated by the arrow.
The fuel filler flap springs open.
�
Turn the fuel cap to the left and hold on
to it until possible pressure is released.
�
Take off the cap and set it in the recess
on the fuel filler flap.
To prevent fuel vapors from escaping
into open air, fully insert filler nozzle
unit.
�
Only fill your tank until the filler nozzle
unit cuts out – do not top up or overfill.
�
Replace the fuel cap by turning it to the
right.
You will hear when the fuel cap is tight-
ened.
�
Close the fuel filler flap.
Warning!
G
Gasoline is highly flammable and poisonous.
It burns violently and can cause serious inju-
ry. Whenever you are around gasoline, avoid
inhaling fumes and skin contact, extinguish
all smoking materials. Never allow sparks,
flame or smoking materials near gasoline!
Warning!
G
Overfilling of the fuel tank may create pres-
sure in the system which could cause a gas
discharge. This could cause the gas to spray
back out when removing the fuel pump noz-
zle, which could cause personal injury.iOnly use premium unleaded gasoline
with a minimum Posted Octane Rating
of 91 (average of 96 RON / 86 MON).
Information on gasoline quality can
normally be found on the fuel pump.
More information on gasoline can be
found in the Factory Approved Service
Products pamphlet.
Page 270 of 394

270 OperationVehicle carePaintwork, painted body components
Mercedes-Benz approved Paint Care
should be applied when water drops on the
paint surface do not “bead up”, normally
every 3 to 5 months, depending on climate
and washing detergent used.
Mercedes-Benz approved Paint Cleaner
should be applied if the paint surface
shows signs of embedded dirt (i.e. loss of
gloss).
Do not apply any of these products or wax
if your vehicle is parked in the sun or if the
hood is still hot.
Use the appropriate MB-Touch-Up Stick
for quick and provisional repairs of minor
paint damage (i.e. chips from stones, vehi-
cle doors, etc.).Engine cleaning
Prior to cleaning the engine compartment
make sure to protect electrical compo-
nents and connectors from contact with
water and cleaning agents.
Corrosion protection, such as MB Anticor-
rosion Wax, should be applied to the en-
gine compartment after every engine
cleaning. Before applying, all control link-
age bushings and joints should be lubricat-
ed. The poly-V-belt and all pulleys should
be protected from any wax. Vehicle washing
Do not use hot water or wash your vehicle
in direct sunlight. Only use a mild car wash
detergent, such as Mercedes-Benz ap-
proved Car Shampoo.
Thoroughly spray the vehicle with a dif-
fused jet of water. Direct only a very weak
spray towards the ventilation intake. Use
plenty of water and rinse the sponge and
chamois frequently.
Rinse with clear water and thoroughly dry
with a chamois. Do not allow cleaning
agents to dry on the finish.
Due to the width of the vehicle, fold in out-
side mirrors prior to running the vehicle
through an automatic car wash to prevent
damage to the mirrors.
In the winter, thoroughly remove all traces
of road salt as soon as possible.
When washing the underbody, do not for-
get to clean the inner sides of the wheels.
Page 275 of 394
275 Practical hints
What to do if …?
Where will I find...?
Unlocking/locking in an emergency
Opening/closing in an emergency
Replacing bulbs
Replacing wiper blades
Flat tire
Battery
Jump starting
Towing the vehicle
Fuses
Page 305 of 394
305 Practical hints
Where will I find...?
Where will I find...?
First aid kit
The first aid kit is stored in left hand side of
the trunk.�
Loosen Velcro fastener1.
�
Remove first aid kit2.
Vehicle tool kit
The vehicle tool kit is stored in the com-
partment underneath the trunk floor.
The following is included:�
Towing eye bolt
�
Alignment bolt
�
Wheel wrench
�
Vehicle jack
�
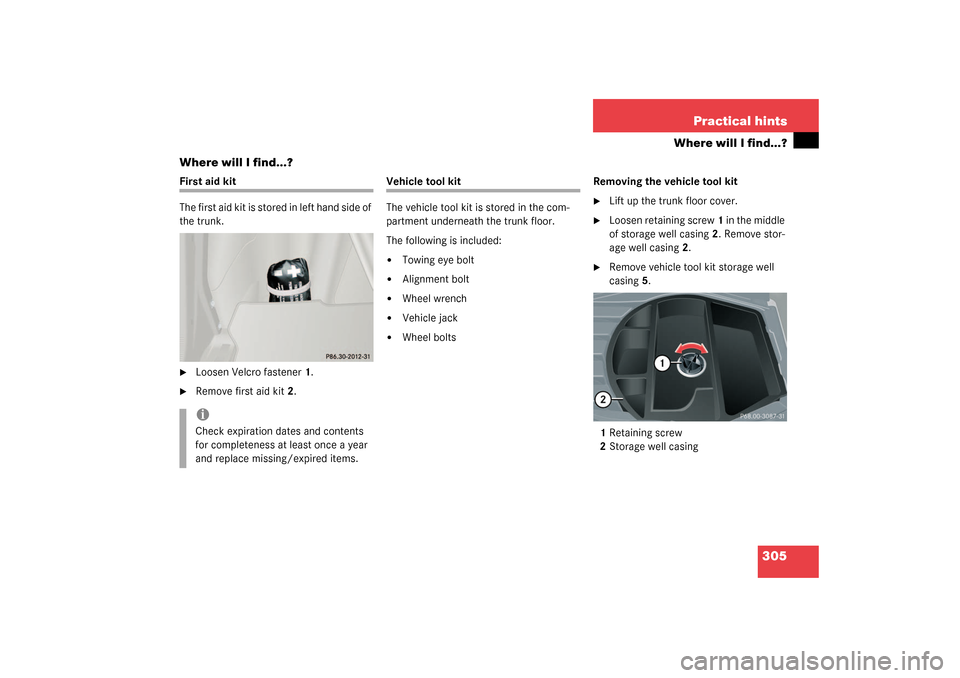
Wheel boltsRemoving the vehicle tool kit
�
Lift up the trunk floor cover.
�
Loosen retaining screw 1 in the middle
of storage well casing2. Remove stor-
age well casing2.
�
Remove vehicle tool kit storage well
casing5.
1Retaining screw
2Storage well casing
iCheck expiration dates and contents
for completeness at least once a year
and replace missing/expired items.
Page 313 of 394
 side facing up.
�
Return battery compartment into h")
313 Practical hints
Unlocking/locking in an emergency
�
Using a lint-free cloth, insert new bat-
teries under the contact spring with the
plus (+) side facing up.
�
Return battery compartment into hous-
ing until it locks into place.
Fuel filler flap
1Release lever�
Remove the right side trim panel in the
trunk.
�
Reach inside in direction of arrow 2.
�
Turn release knob 1 clockwise as far as
it will go.
The fuel filler flap can be opened.Manually unlocking the transmission
selector lever
In case of power failure, the transmission
selector lever can be manually unlocked,
e.g. to tow the vehicle.�
Open the storage compartment in front
of the center armrest.
�
Take out cover 1.
�
Insert a pin into the opening of
division2 and pry the division out.
�
Insert a tool3 (e.g. screwdriver) into
the opening.
�
Perform the following two steps simul-
taneously:�
Push pin3 forward in the direction
of the arrow.
�
Move selector lever from
positionP.
�
Reinstall the division and cover after re-
moving the tool from the opening.iThe selector lever is locked again when
moving it to positionP.
Page 321 of 394
.
�
Twist bulb socket1 counterclockwise
and pull out.
�
Push bulb into socket, turn")
321 Practical hints
Replacing bulbs
Front turn signal lamp bulb�
Switch off the lights.
�
Open the hood (
�page 253).
�
Twist bulb socket1 counterclockwise
and pull out.
�
Push bulb into socket, turn counter-
clockwise and remove.
�
Insert new bulb in socket, push in and
twist clockwise.
�
Reinsert bulb socket in lamp and twist
clockwise.Parking and standing lamp bulb
�
Switch off the lights.
�
Open the hood (
�page 253).
�
Turn housing cover2 counterclockwise
and remove.
�
Pull out the bulb socket with the bulb.
�
Pull the bulb out of the bulb socket.
�
Insert a new bulb in the socket.
�
Reinstall the bulb socket.
�
Align housing cover and click into
place.
Side marker lamp bulb�
Switch off the lights.
�
Carefully slide lamp towards rear.
�
Remove front end first.
�
Twist bulb socket counterclockwise
and pull out.
�
Pull bulb out of the bulb socket.
�
Insert new bulb in socket.
�
Reinstall bulb socket, push in and twist
clockwise.
�
To reinstall lamp, set rear end in
bumper and let front end snap into
place.