Page 108 of 384

108 Controls in detailLighting
LightingFor notes on how to switch on the head-
lamps and use the turn signals, see the
“Getting started” section (
�page 46).
Exterior lamp switch
The exterior lamp switch is located on the
dashboard to the left of the steering wheel.
M
Off
U
Automatic headlamp mode
C
Parking lamps (also side marker
lamps, tail lamps, license plate
lamps, instrument panel lamps)
Canada only: When engine is run-
ning, the low beams are also
switched on.
B
Low beam plus parking lamps or
high beam headlamps (combination
switch pushed forward).
ˆ
Standing lamps, right (turn left one
stop)
‚
Standing lamps, left (turn left two
stops)
iIf you remove the key and open the
driver’s door while the parking lamps or
low beam headlamps are switched on,
then �
a warning sounds
�
$
appears in the multifunction
display
�
the message
TURN OFF LIGHTS!
ap-
pears in the multifunction display
iWith the daytime running lamp mode
activated and the engine running, the
low beam headlamps cannot be
switched off manually.
Page 109 of 384

109 Controls in detail
Lighting
Manual headlamp mode
The low beam headlamps and parking
lamps can be switched on and off with the
exterior lamp switch. For exterior lamp
switch, see (
�page 108).
Automatic headlamp mode
The parking lamps, low beam headlamps
and license plate lamps switch on and off
automatically depending on the brightness
of the ambient light.
�
Turn the exterior lamp switch to
U
.
iWith the daytime running lamp mode
activated, the low beam headlamps will
not switch off automatically.
iFront fog lamps and rear fog lamp can
not be switched on manually with exte-
rior lamp switch in position
U
. To
activate the fog lamps, turn exterior
lamp switch to position
B
and pull
the exterior lamp switch to first or sec-
ond stop (
�page 110).
Warning!
G
In automatic headlamp mode, the head-
lamps will not be automatically switched on
under foggy conditions. To minimize risk to
you and to others, activate headlamps by
turning exterior lamp switch to
B
.
The driver is responsible for the operation of
the vehicle’s lights at all times. The automat-
ic headlamp feature is only an aid to the driv-
er. Switch on the vehicle lights manually
when driving or when traffic conditions re-
quire you to do so.
iIf you drive in countries where vehicles
drive on the other side of the road than
the country where the vehicle is regis-
tered, you must have the headlamps
modified for symmetrical low beams.
Relevant information can be obtained
at your authorized Mercedes-Benz Cen-
ter.
Page 110 of 384

110 Controls in detailLightingDaytime running lamp mode�
Turn exterior lamp switch to
position
M
or
U
.
When the engine is running, the low beam
headlamps are automatically switched on.
In low ambient light conditions the parking
lamps will also switch on.
Canada only
When you shift from a driving gear to
positionN orP, the low beam switches off
(with a three-minute delay).
For nighttime driving you should turn the
exterior lamp switch to position
B
to
permit activation of the high beam head-
lamps.
USA only
The high beam headlamps can also be ac-
tivated when driving with the daytime run-
ning lamp mode activated and exterior
lamp switch in position
M
.To activate the daytime running lamp
mode, see “Setting daytime running lamp
mode” (
�page 136).
Locator lighting and night security illu-
mination
Locator lighting and night security illumi-
nation are described in the control system
section under “Setting locator lighting”
(
�page 136) and “Setting night security il-
lumination” (
�page 137).
Switching on front fog lamps
�
Make sure that the low beam head-
lamps are switched on.
�
Pull out exterior lamp switch to first
stop.
The green indicator lamp
‡
in the
lamp switch lights up.Switching on rear fog lamp
�
Make sure that the low beam head-
lamps are switched on.
�
Pull out exterior lamp switch to second
stop.
The yellow indicator lamp
†
in the
lamp switch lights up.
iSee notes on the exterior lamp switch
(�page 108).
iFog lamps will operate with the parking
lamps and / or the low beam head-
lamps on. Fog lamps should only be
used in conjunction with low beam
headlamps. Consult your State or Prov-
ince Motor Vehicle Regulations regard-
ing permissible lamp operation.
Page 111 of 384

111 Controls in detail
Lighting
Combination switch
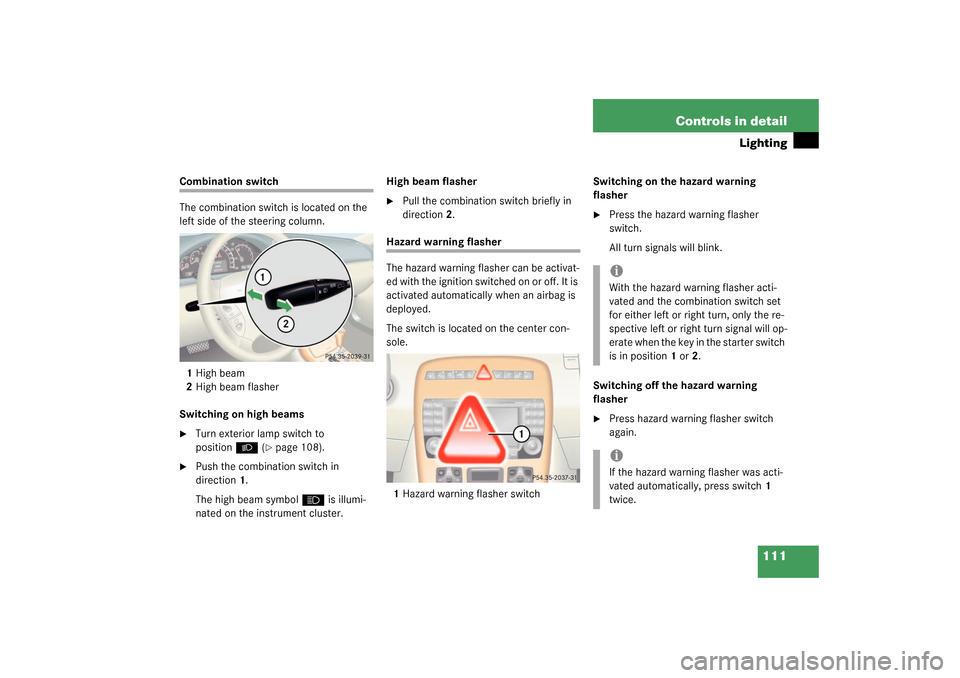
The combination switch is located on the
left side of the steering column.
1High beam
2High beam flasher
Switching on high beams�
Turn exterior lamp switch to
position
B
(�page 108).
�
Push the combination switch in
direction1.
The high beam symbol
A
is illumi-
nated on the instrument cluster.High beam flasher
�
Pull the combination switch briefly in
direction2.
Hazard warning flasher
The hazard warning flasher can be activat-
ed with the ignition switched on or off. It is
activated automatically when an airbag is
deployed.
The switch is located on the center con-
sole.
1Hazard warning flasher switchSwitching on the hazard warning
flasher
�
Press the hazard warning flasher
switch.
All turn signals will blink.
Switching off the hazard warning
flasher
�
Press hazard warning flasher switch
again.iWith the hazard warning flasher acti-
vated and the combination switch set
for either left or right turn, only the re-
spective left or right turn signal will op-
erate when the key in the starter switch
is in position 1 or 2.iIf the hazard warning flasher was acti-
vated automatically, press switch1
twice.
Page 112 of 384
112 Controls in detailLightingInterior lighting
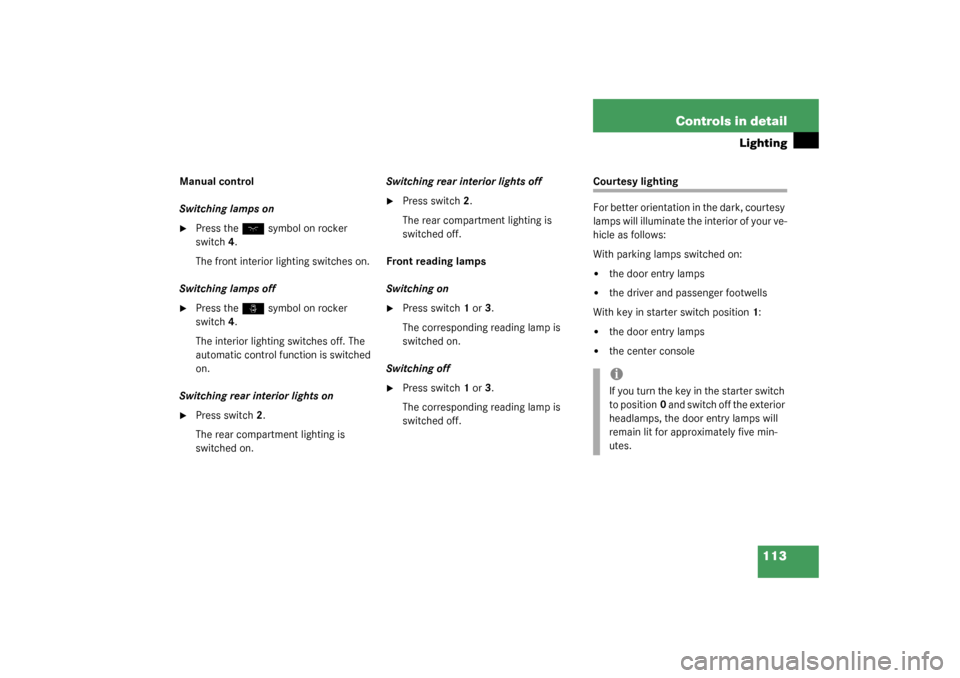
The controls are located in the overhead
control panel.
1Left front reading lamp
2Rear interior lights
3Right front reading lamp
4Rocker switch for automatic control
systemAutomatic control
Activating
�
Press the rocker switch to the center
position 4.
Interior lamps are switched on in dark-
ness, when�
the vehicle is unlocked
�
a door is opened
�
the key is removed from the starter
switch
The interior lamps are switched off after a
set time (�page 138).Deactivating
�
Press the
ñ
symbol on rocker
switch 4.
The interior lighting remains switched
off in darkness, even when you
�
unlock the vehicle
�
open a door
�
remove the key from the starter
switch
iIf the door remains open, the interior
lamps switch off automatically after ap-
proximately five minutes.
Page 113 of 384

113 Controls in detail
Lighting
Manual control
Switching lamps on�
Press the
ð
symbol on rocker
switch 4.
The front interior lighting switches on.
Switching lamps off
�
Press the
ñ
symbol on rocker
switch 4.
The interior lighting switches off. The
automatic control function is switched
on.
Switching rear interior lights on
�
Press switch2.
The rear compartment lighting is
switched on.Switching rear interior lights off
�
Press switch2.
The rear compartment lighting is
switched off.
Front reading lamps
Switching on
�
Press switch 1 or 3.
The corresponding reading lamp is
switched on.
Switching off
�
Press switch 1 or 3.
The corresponding reading lamp is
switched off.
Courtesy lighting
For better orientation in the dark, courtesy
lamps will illuminate the interior of your ve-
hicle as follows:
With parking lamps switched on:�
the door entry lamps
�
the driver and passenger footwells
With key in starter switch position1:
�
the door entry lamps
�
the center consoleiIf you turn the key in the starter switch
to position0 and switch off the exterior
headlamps, the door entry lamps will
remain lit for approximately five min-
utes.
Page 114 of 384

114 Controls in detailInstrument cluster
Instrument clusterA full view illustration of the instrument
cluster can be found in the “At a glance”
section of this manual (
�page 22).
The instrument cluster is activated when
you
�
open a door
�
turn on the ignition
�
press the reset button
J
(�page 22)
�
switch on the exterior lamps
You can change the instrument cluster set-
tings in the Instrument cluster submenu of
the control system (
�Seite 134).
Instrument cluster illumination
1Knob for adjusting instrument cluster
illumination
Use knob1 to adjust the illumination
brightness for the instrument cluster.
�
Press the knob1.
The knob will pop out.
To brighten illumination
�
Turn the knob1 clockwise.
The instrument cluster illumination will
brighten.
To dim illumination
�
Turn the knob1 in the instrument clus-
ter counterclockwise.
The instrument cluster illumination will
dim.
iThe instrument cluster illumination is
dimmed or brightened automatically to
suit ambient light conditions.
The instrument cluster illumination will
also be adjusted automatically when
you switch on the vehicle’s exterior
lamps.
Page 121 of 384
121 Controls in detail
Control system
Menus, submenus and functions
Menu 1
Menu 2
Menu 3
Menu 4
Menu 5
Menu 6
Menu 7
Menu 8
Commands / submenusStandard dis-
play
AUDIO
Telephone
NAVI
Distronic*
Trip computer
Malfunction
memory
Settings
Call up FSS
Select radio
station
Load phone
book
Activate
route guid-
ance
Call up set-
tings
Fuel consumption
statistics after
start
Call up malfunc-
tion messages
Reset to factory
settings
Check tire pres-
sure*
Operate CD
player
Search for
name in
phone book
Fuel consumption
statistics since
the last reset
Instrument clus-
ter submenu
Check engine oil
level
Call up range
Lighting sub-
menu
Digital speed-
ometer
Vehicle sub-
menuConvenience
submenu
iThe headings used in the menus table
are designed to facilitate navigation
within the system and are not neces-
sarily identical to those shown in the
control system displays.
The first function displayed in each
menu will automatically show you
which part of the system you are in.