Page 304 of 384

304 Practical hintsReplacing bulbsReplacing bulbs for front lamps
1Housing cover for high beam flasher
bulb, parking and standing lamp2Electrical connector for high beam
flasher housing bulb
3Parking and standing lamp
4Bulb socket for turn signal lamp
5Low beam and high beam (Bi-Xenon)
housing cover
High beam flasher bulb
�
Switch off the lights.
�
Open the hood (
�page 237).
�
Press ends of housing cover1 tab to-
gether and remove cover.
�
Press connector2 downward.
�
Remove connector2 with the bulb.
�
Insert the new bulb so that the base lo-
cates in the recess on the holder.
�
From below, press connector2 with
bulb upward onto the reflector.
�
Align housing cover1 and click into
place.
Front turn signal bulb
�
Switch off the lights.
�
Open the hood (
�page 237).
�
Twist bulb socket4 counterclockwise
and pull out.
�
Push bulb into socket, turn counter-
clockwise and remove.
�
Insert new bulb in socket, push in and
twist clockwise.
�
Reinsert bulb socket in lamp and twist
clockwise.
Warning!
G
Do not remove the cover for the Bi-Xenon
headlamp. Because of high voltage in xenon
lamps, it is dangerous to replace the bulb or
repair the lamp and its components. We rec-
ommend that you have such work done by a
qualified technician at an authorized Mer-
cedes-Benz Center.
Page 305 of 384
.
�
Press ends of housing cover1 tab to-
gether and remove cover.
�
Pull out the")
305 Practical hints
Replacing bulbs
Parking and standing lamp bulb�
Switch off the lights.
�
Open the hood (
�page 237).
�
Press ends of housing cover1 tab to-
gether and remove cover.
�
Pull out the bulb socket with the bulb.
�
Pull the bulb out of the bulb socket.
�
Insert a new bulb in the socket.
�
Reinstall the bulb socket.
�
Align housing cover and click into
place.Side marker lamp bulb
�
Switch off the lights.
�
Carefully slide lamp towards rear.
�
Remove front end first.
�
Twist bulb socket counterclockwise
and pull out.
�
Pull bulb out of the bulb socket.
�
Insert new bulb in socket.
�
Reinstall bulb socket, push in and twist
clockwise.
�
To reinstall lamp, set rear end in
bumper and let front end snap into
place.
Replacing bulbs for rear lamps
Tail lamp assemblies
1Backup lamp (black socket)
2Turn signal lamp (white socket)
3Tail, standing and parking lamp (red
socket)
4Driver’s side: tail, parking and rear fog
lamp
Passenger’s side: tail and parking lamp
(red socket)
Page 306 of 384
306 Practical hintsReplacing bulbs�
Switch off the lights.
�
Open trunk.
�
Turn lock counterclockwise and move
the trim to the side.
�
Turn bulb socket counterclockwise and
pull out.
�
Gently twist bulb counterclockwise and
pull out of bulb holder.
�
Insert new bulb into the holder and turn
it clockwise.
�
Reinstall bulb socket.
The bulb socket should audibly click.
�
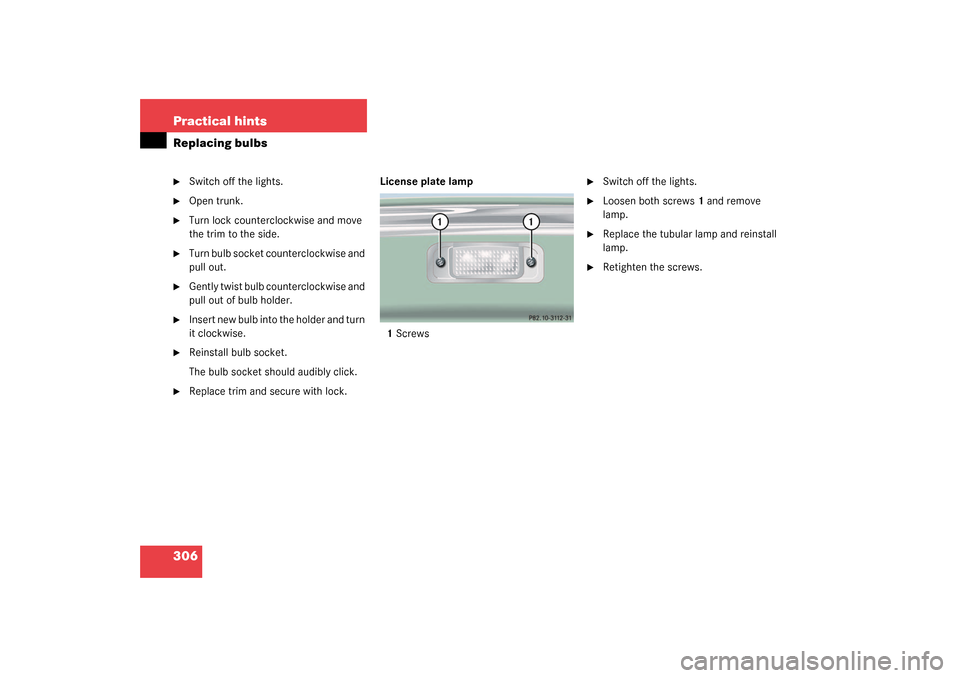
Replace trim and secure with lock. License plate lamp
1Screws
�
Switch off the lights.
�
Loosen both screws1 and remove
lamp.
�
Replace the tubular lamp and reinstall
lamp.
�
Retighten the screws.
Page 311 of 384

311 Practical hints
Flat tire
Removing the wheel
1Alignment bolt�
Unscrew upper-most wheel bolt and re-
move.
�
Replace this wheel bolt with alignment
bolt1 supplied in the tool kit.
�
Remove the remaining bolts.
�
Remove the wheel.Mounting the new wheel
�
Clean contact surfaces of wheel and
wheel hub.
�
Guide the spare wheel onto the align-
ment bolt and push it on.
�
Insert wheel bolts and tighten them
slightly.
�
Unscrew the alignment bolt, install last
wheel bolt and tighten slightly.
!Do not place wheel bolts in sand or dirt.
This could result in damage to the bolt
and wheel hub threads.
!To avoid paint damage, place wheel flat
against hub and hold it there while in-
stalling first wheel bolt.Warning!
G
Always replace wheel bolts that are dam-
aged or rusted.
Never apply oil or grease to wheel bolts.
Damaged wheel hub threads should be re-
paired immediately. Do not continue to drive
under these circumstances! Contact an au-
thorized Mercedes-Benz Center or call
Roadside Assistance.
Incorrect mounting bolts or improperly
tightened mounting bolts can cause the
wheel to come off. This could cause an acci-
dent. Make sure you are using the correct
mounting bolts.
Warning!
G
Use only genuine equipment
Mercedes-Benz wheel bolts. They are identi-
fied by the Mercedes star. Other wheel bolts
may come loose.
Do not tighten the wheel bolts when the ve-
hicle is raised. Otherwise the vehicle could
tip over.
Page 317 of 384
.
�
Make sure that the two vehicles do not
touch.
�
Turn off all electric")
317 Practical hints
Jump starting
The battery is located on the right side of
the trunk under the battery cover
(�page 313).
�
Make sure that the two vehicles do not
touch.
�
Turn off all electrical consumers.
�
Apply parking brake.
�
Shift gear selector lever to positionP.
�
Open the trunk lid.
�
Remove battery cover.
�
Connect positive terminals 1 and3 of
the batteries with the jumper cable.
Clamp cable to charged battery3 first.1Positive terminal of discharged battery
2Negative terminal of discharged bat-
tery
3Positive terminal of charged battery
4Negative terminal of charged battery
�
Start engine of the vehicle with the
charged battery and run at idle speed.
�
Connect negative terminals 2 and4 of
the batteries with the jumper cable.
Clamp cable to charged battery4 first.
�
Start the engine of the disabled vehi-
cle.
You can now turn on the electrical con-
sumers. Do not turn on the lights under
any circumstances.
�
Remove the jumper cables first from
negative terminals2 and4 and then
from positive terminals1 and3.
You can now turn on the lights.
�
Have the battery checked at the near-
est authorized Mercedes-Benz Center.
Warning!
G
Keep flames or sparks away from battery.
Do not smoke.
Observe all safety instructions and precau-
tions when handling automotive batteries
(�page 243).
!Never invert the terminal connections.
!Do not tow-start the vehicle.
Page 323 of 384
323 Practical hintsFuses
Opening�
Open the passenger door.
�
Using the flat of your hand, press on
the middle of the cover.
The edge of cover1 lifts up slightly
from the dashboard.
�
Insert flat, blunt object into the edge of
the cover as a lever.
�
Loosen cover1 from the dashboard us-
ing lever.
�
Using your hands, pull cover1 in the di-
rection of the arrow and remove.Closing
�
Press cover1 back on.
Fuse box in the rear passenger
compartment
1CoverOpening
�
Pull cover1 away from fuse box
(arrow).
�
Remove cover rearward.
Closing
�
Press cover back on until it engages.
!Do not use sharp objects such as a
screw driver to open the fuse box in the
dashboard, as this could damage it.
Page 332 of 384
332 Technical dataRims and TiresSame size tires
CL 500
(except Sport Package*)
CL 600
(except Sport Package*)
CL 55 AMG
Rims (light alloy)
7½J x17 H2
8J x18 H2
1
1For use with snow chains contact an authorized Mercedes-Benz Center
8J x18 H2 or 8½J x18 EH2
2
2Must not be used with snow chainsWheel offset
1.81 in (46 mm)
1.73 in (44 mm)
1.73 in (44 mm)
Summer tires (radial-ply tires)
-
245 / 45 R18 96Y
1
-
All season tires (radial-ply tires)
225 / 55 R17 97H M+S AS
-
-
Winter tires (radial-ply tires)
225 / 55 R17 97H M+S
245 / 45 R18 100V XL M+S
1 or
245 / 45 R18 96H M+S
1
245 / 45 R18 100V XL M+S or
245 / 45 R18 96H M+S
Page 333 of 384
333 Technical data
Rims and Tires
Mixed size tiresSpare wheel
CL 500 and CL 600 (Sport Package*)
CL 55 AMG
Front axle
AMG light alloy rims
8½J x 18 EH2
1
1Must not be used with snow chains
8½J x 18 EH2
1
Wheel offset
1.73 in (44 mm)
1.73 in (44 mm)
Summer tires (radial-ply tires)
245 / 45 R18 100Y XL
245 / 45 R18 100Y XL
1
Rear axle
AMG light alloy rims
9J x 18 EH2
1
9J x 18 EH2
1
Wheel offset
1.73 in (44 mm)
1.73 in (44 mm)
Summer tires (radial-ply tires)
265 / 40 R18 101Y XL
1 or 265/40 R18 97Y
1265 / 40 R18 101Y XL
1
CL 500 (except Sport Package)
CL 600 (except Sport Package*)
CL 500 and CL 600 (Sport Package*)
CL 55 AMG
Rims (light alloy)
7½J x 17 H2
8J x 18 H2
Wheel offset
2.0 in (51 mm)
1.73 in (44 mm)
Summer tires (radial-ply tires)
-
245 / 45 R18 96Y
All season tires (radial-ply tires)
225 / 55 R17 97H M+S AS
-


CL 600
(except Sport Package*)
CL 55 AMG
Rims (light alloy)
7½J x17 H2
8J x18 H2
1
1For use with snow chains contact a")

CL 55 AMG
Front axle
AMG light alloy rims
8½J x 18 EH2
1
1Must not be used with snow chains
8½J x 18")