Page 296 of 384

296 Practical hintsWhere will I find...?Vehicle jack
To prepare the vehicle jack for use�
Remove the vehicle jack from the spare
wheel well under the trunk floor.
�
Push the crank handle up.
�
Turn the crank handle clockwise until it
engages (operational position).
Storing the vehicle jack in the trunk
�
Retract the vehicle jack arm to the
base of the vehicle jack.
�
Push the crank handle up.
�
Turn the crank handle counterclock-
wise to the end of the stop (storage po-
sition).Spare wheel
Removing the spare wheel
�
Take out vehicle tool kit tray 2.
�
Turn the luggage bowl 3 counterclock-
wise.
�
Remove the spare wheel 4.
Storing the spare wheel
�
Place spare wheel 4 in wheel well and
secure it with luggage bowl 3.
�
Turn the luggage bowl 3 clockwise to
its stop.
�
Place vehicle tool kit tray 2 in luggage
bowl 3.
Warning!
G
The jack is designed exclusively for jacking
up the vehicle at the jack take-up brackets
built into both sides of the vehicle. To help
avoid personal injury, use the jack only to lift
the vehicle during a wheel change. Never
get beneath the vehicle while it is supported
by the jack. Keep hands and feet away from
the area under the lifted vehicle. Always
firmly set parking brake and block wheels
before raising vehicle with jack.
Do not disengage parking brake while the
vehicle is raised. Be certain that the jack is
always vertical (plumb line) when in use, es-
pecially on hills. Always try to use the jack
on level surface. Make sure that the jack
arm is fully seated in the jack take-up brack-
et. Always lower the vehicle onto sufficient
capacity jackstands before working under
the vehicle.
Page 298 of 384

298 Practical hintsUnlocking/locking in an emergencyUnlocking the trunk
If you are unable to unlock the trunk with
the SmartKey, open the trunk with the me-
chanical key as follows:Trunk lock�
Insert the mechanical key into the
trunk lid lock.
�
Turn the key counterclockwise to
position1.
�
Press trunk lid lock2.
The trunk lid swings open.
Locking the vehicle
If you are unable to lock the vehicle with
the SmartKey, lock it with the mechanical
key as follows:�
Close the passenger door and the trunk
lid.
�
Press the central locking switch in the
center console (
�page 95).
�
Check to see whether the locking knob
on the passenger door is still visible. If
necessary push it down manually.
�
Lock the driver’s door with the me-
chanical key.
�
Lock the trunk lid if necessary with the
mechanical key (
�page 90).
!The trunk lid swings open automatical-
ly. Always make sure that there is suffi-
cient overhead clearance. A minimum
height clearance of 6.1 ft (1.90 m) is re-
quired to open the trunk lid. iUnlocking your vehicle with the me-
chanical key will trigger the anti-theft
alarm system. To cancel the alarm, do
one of the following:�
Press button
Œ
or
‹
on the
SmartKey.
�
Insert the key in the starter switch.
�
If KEYLESS-GO* card present,
press the KEYLESS-GO* start/stop
button (
�page 33).
Page 300 of 384
300 Practical hintsUnlocking/locking in an emergencyKEYLESS-GO* card
1Battery cover
Replacement batteries: Lithium, type
CR 2025 or equivalent.�
Pry open cover 1 (e.g. by using a nar-
row blade screw driver).
�
Remove the batteries.
�
Install new batteries as indicated by
the “+” and “–” markings in the KEY-
LESS-GO card.
�
Replace battery cover 1.
Fuel filler flap
In an emergency, the fuel filler flap can
only be opened from the trunk. The release
knob is located on the right-hand side in
the trunk.
1Release knob
�
Open the trunk with the mechanical
key (
�page 298).
�
Remove the battery cover and the trim
inside the trunk on the right-hand side.
�
Pull release knob 1 (arrow) flap.
The fuel filler flap can be opened.
Page 306 of 384
306 Practical hintsReplacing bulbs�
Switch off the lights.
�
Open trunk.
�
Turn lock counterclockwise and move
the trim to the side.
�
Turn bulb socket counterclockwise and
pull out.
�
Gently twist bulb counterclockwise and
pull out of bulb holder.
�
Insert new bulb into the holder and turn
it clockwise.
�
Reinstall bulb socket.
The bulb socket should audibly click.
�
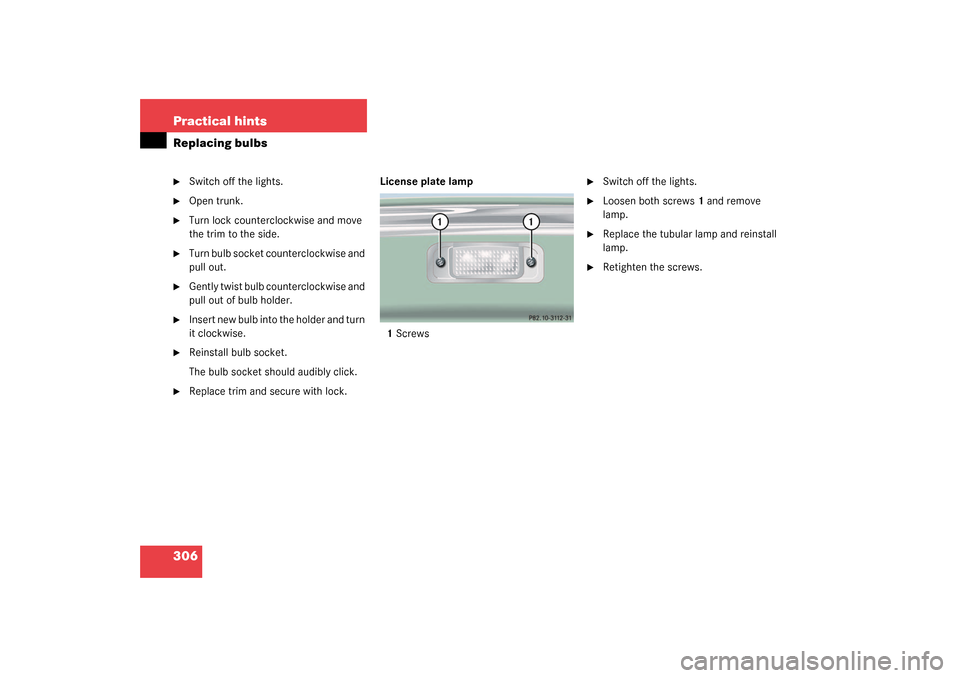
Replace trim and secure with lock. License plate lamp
1Screws
�
Switch off the lights.
�
Loosen both screws1 and remove
lamp.
�
Replace the tubular lamp and reinstall
lamp.
�
Retighten the screws.
Page 309 of 384
.
Preparing the vehicle
�
Take vehicle tool kit tray and vehicle
jack out of trunk.
�
Take")
309 Practical hints
Flat tire
More information can be found in the
“Technical data” section (
�page 333).
Preparing the vehicle
�
Take vehicle tool kit tray and vehicle
jack out of trunk.
�
Take the spare wheel out of wheel well
(�page 296).
Lifting the vehicle
�
Prevent the vehicle from rolling away
by blocking wheels with wheel chocks
(not included) or other sizable, heavy
objects.
When changing wheel on a level surface:
�
Place one chock in front of and one be-
hind the wheel that is diagonally oppo-
site to the wheel being changed.
When changing wheel on a hill:
�
Place chocks behind the downhill sides
of both wheels of the axle not being
worked on.
�
Take the two-piece wheel wrench out
of the vehicle tool kit tray. Assemble
wheel wrench.
�
On wheel to be changed, loosen but do
not yet remove the wheel bolts (ap-
proximately one full turn with wrench).
The tube openings are located directly be-
hind the front wheel housings and in front
of the rear wheel housings.
Warning!
G
The jack is designed exclusively for jacking
up the vehicle at the jack take-up brackets
built into both sides of the vehicle. To help
avoid personal injury, use the jack only to lift
the vehicle during a wheel change. Never
get beneath the vehicle while it is supported
by the jack. Keep hands and feet away from
the area under the lifted vehicle. Always
firmly set parking brake and block wheels
before raising vehicle with jack.
Do not disengage parking brake while the
vehicle is raised. Be certain that the jack is
always vertical (plumb line) when in use, es-
pecially on hills. Always try to use the jack
on level surface. Make sure that the jack
arm is fully seated in the jack take-up brack-
et. Always lower the vehicle onto sufficient
capacity jackstands before working under
the vehicle.
��
Page 312 of 384

312 Practical hintsFlat tireLowering the vehicle�
Lower vehicle by turning crank coun-
terclockwise until vehicle is resting ful-
ly on its own weight.
�
Remove the jack.
1-5 Wheel bolts
�
Tighten the five wheel bolts evenly, fol-
lowing the diagonal sequence illustrat-
ed (1 to 5), until all bolts are tight.
Observe a tightening torque of
110 ft lb (150 Nm).
�
Before storing the jack in the trunk, it
should be fully collapsed, with handle
folded in.
�
Place the wheel bolt wrench, alignment
bolt and jack back in the vehicle tool kit
in the trunk and close the covering lid.Replacing jack support tube cover
�
Slide tongue of cover under the upper
edge of the tube opening.
�
Applying even pressure, press cover
until it snaps into place. Be careful not
to damage the locking tabs or clamp
the plastic retaining strap.
Warning!
G
Have the tightening torque checked after
changing a wheel. The wheels could come
loose if they are not tightened to a torque of
110 ft lb (150 Nm).
!You can also screw the faulty wheel
down into the spare wheel well in the
trunk.
Do not activate the tire inflation pres-
sure monitor* until the depressurized
tire is no longer in the vehicle.
Page 314 of 384

314 Practical hintsBatteryThe battery is located in the trunk under
the right hand wheel well cover panel.
1Battery cover
2Locking knob
3Negative terminal
4Cover over positive terminal
Disconnecting the battery�
Turn off all electrical consumers.
�
Depress the parking brake firmly or
move the gear selector lever to posi-
tion P.
�
Open the trunk lid (
�page 88) or
(
�page 89).
�
Turn locking knob 2 and remove bat-
tery cover 1.
�
Detach negative terminal 3 of the bat-
tery with the 10 mm open-end wrench
from the vehicle tool kit.
�
Remove cover 4 from the positive ter-
minal.
�
Disconnect the battery positive lead.
Removing the battery�
Remove the screw securing the bat-
tery.
�
Remove the battery support and brack-
et. Take out the battery.
Charging and reinstalling the battery�
Charge battery in accordance with the
instructions of the battery charger
manufacturer.
�
Reinstall the charged battery. Follow
the previously described steps in re-
verse order.Warning!
G
Never charge a battery while still installed in
the vehicle. Gases may escape during charg-
ing and cause explosions that may result in
paint damage, corrosion or personal injury.
Page 317 of 384
.
�
Make sure that the two vehicles do not
touch.
�
Turn off all electric")
317 Practical hints
Jump starting
The battery is located on the right side of
the trunk under the battery cover
(�page 313).
�
Make sure that the two vehicles do not
touch.
�
Turn off all electrical consumers.
�
Apply parking brake.
�
Shift gear selector lever to positionP.
�
Open the trunk lid.
�
Remove battery cover.
�
Connect positive terminals 1 and3 of
the batteries with the jumper cable.
Clamp cable to charged battery3 first.1Positive terminal of discharged battery
2Negative terminal of discharged bat-
tery
3Positive terminal of charged battery
4Negative terminal of charged battery
�
Start engine of the vehicle with the
charged battery and run at idle speed.
�
Connect negative terminals 2 and4 of
the batteries with the jumper cable.
Clamp cable to charged battery4 first.
�
Start the engine of the disabled vehi-
cle.
You can now turn on the electrical con-
sumers. Do not turn on the lights under
any circumstances.
�
Remove the jumper cables first from
negative terminals2 and4 and then
from positive terminals1 and3.
You can now turn on the lights.
�
Have the battery checked at the near-
est authorized Mercedes-Benz Center.
Warning!
G
Keep flames or sparks away from battery.
Do not smoke.
Observe all safety instructions and precau-
tions when handling automotive batteries
(�page 243).
!Never invert the terminal connections.
!Do not tow-start the vehicle.