Page 309 of 384

309 Practical hints
Flat tire
More information can be found in the
“Technical data” section (
�page 333).
Preparing the vehicle
�
Take vehicle tool kit tray and vehicle
jack out of trunk.
�
Take the spare wheel out of wheel well
(�page 296).
Lifting the vehicle
�
Prevent the vehicle from rolling away
by blocking wheels with wheel chocks
(not included) or other sizable, heavy
objects.
When changing wheel on a level surface:
�
Place one chock in front of and one be-
hind the wheel that is diagonally oppo-
site to the wheel being changed.
When changing wheel on a hill:
�
Place chocks behind the downhill sides
of both wheels of the axle not being
worked on.
�
Take the two-piece wheel wrench out
of the vehicle tool kit tray. Assemble
wheel wrench.
�
On wheel to be changed, loosen but do
not yet remove the wheel bolts (ap-
proximately one full turn with wrench).
The tube openings are located directly be-
hind the front wheel housings and in front
of the rear wheel housings.
Warning!
G
The jack is designed exclusively for jacking
up the vehicle at the jack take-up brackets
built into both sides of the vehicle. To help
avoid personal injury, use the jack only to lift
the vehicle during a wheel change. Never
get beneath the vehicle while it is supported
by the jack. Keep hands and feet away from
the area under the lifted vehicle. Always
firmly set parking brake and block wheels
before raising vehicle with jack.
Do not disengage parking brake while the
vehicle is raised. Be certain that the jack is
always vertical (plumb line) when in use, es-
pecially on hills. Always try to use the jack
on level surface. Make sure that the jack
arm is fully seated in the jack take-up brack-
et. Always lower the vehicle onto sufficient
capacity jackstands before working under
the vehicle.
��
Page 310 of 384
310 Practical hintsFlat tire1Jack support tube cover�
Move cover1 toward rear by pressing
at point indicated by arrow.
�
Remove cover1 carefully to avoid
damage to the locking tabs.1Jack arm
2Jack support tube hole
3Crank
�
Insert jack arm1 fully into tube hole2
up to the stop.
�
Keeping jack in this position, turn
crank3 clockwise until the jack base
meets the ground. Make sure the jack
is vertical (plumb line).
�
Continue to turn the crank until the tire
is a maximum of 1.2 in (3 cm) from the
ground.
Warning!
G
Insert the jack arm fully into the jack sup-
port tube hole up to the stop. Otherwise the
vehicle may fall from the jack and cause per-
sonal injury or damage to the vehicle.
Warning!
G
The jack is intended only for lifting the vehi-
cle briefly for wheel changes. It is not suited
for performing maintenance work under the
vehicle.�
Never start the engine when the vehicle
is raised.
�
Never lie down under the raised vehicle.
Page 311 of 384

311 Practical hints
Flat tire
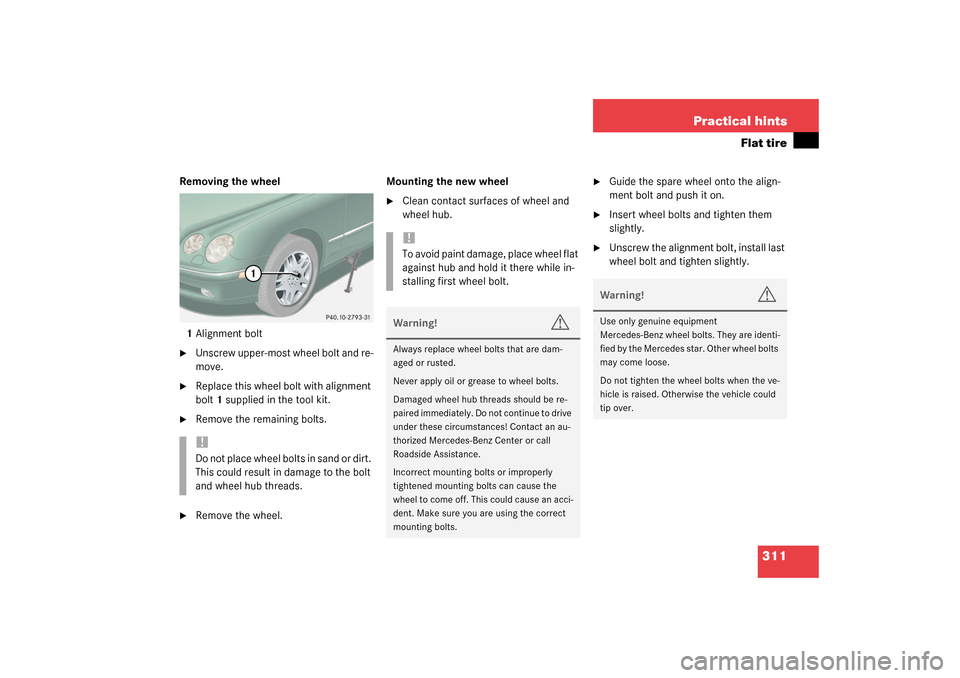
Removing the wheel
1Alignment bolt�
Unscrew upper-most wheel bolt and re-
move.
�
Replace this wheel bolt with alignment
bolt1 supplied in the tool kit.
�
Remove the remaining bolts.
�
Remove the wheel.Mounting the new wheel
�
Clean contact surfaces of wheel and
wheel hub.
�
Guide the spare wheel onto the align-
ment bolt and push it on.
�
Insert wheel bolts and tighten them
slightly.
�
Unscrew the alignment bolt, install last
wheel bolt and tighten slightly.
!Do not place wheel bolts in sand or dirt.
This could result in damage to the bolt
and wheel hub threads.
!To avoid paint damage, place wheel flat
against hub and hold it there while in-
stalling first wheel bolt.Warning!
G
Always replace wheel bolts that are dam-
aged or rusted.
Never apply oil or grease to wheel bolts.
Damaged wheel hub threads should be re-
paired immediately. Do not continue to drive
under these circumstances! Contact an au-
thorized Mercedes-Benz Center or call
Roadside Assistance.
Incorrect mounting bolts or improperly
tightened mounting bolts can cause the
wheel to come off. This could cause an acci-
dent. Make sure you are using the correct
mounting bolts.
Warning!
G
Use only genuine equipment
Mercedes-Benz wheel bolts. They are identi-
fied by the Mercedes star. Other wheel bolts
may come loose.
Do not tighten the wheel bolts when the ve-
hicle is raised. Otherwise the vehicle could
tip over.
Page 312 of 384

312 Practical hintsFlat tireLowering the vehicle�
Lower vehicle by turning crank coun-
terclockwise until vehicle is resting ful-
ly on its own weight.
�
Remove the jack.
1-5 Wheel bolts
�
Tighten the five wheel bolts evenly, fol-
lowing the diagonal sequence illustrat-
ed (1 to 5), until all bolts are tight.
Observe a tightening torque of
110 ft lb (150 Nm).
�
Before storing the jack in the trunk, it
should be fully collapsed, with handle
folded in.
�
Place the wheel bolt wrench, alignment
bolt and jack back in the vehicle tool kit
in the trunk and close the covering lid.Replacing jack support tube cover
�
Slide tongue of cover under the upper
edge of the tube opening.
�
Applying even pressure, press cover
until it snaps into place. Be careful not
to damage the locking tabs or clamp
the plastic retaining strap.
Warning!
G
Have the tightening torque checked after
changing a wheel. The wheels could come
loose if they are not tightened to a torque of
110 ft lb (150 Nm).
!You can also screw the faulty wheel
down into the spare wheel well in the
trunk.
Do not activate the tire inflation pres-
sure monitor* until the depressurized
tire is no longer in the vehicle.
Page 331 of 384
331 Technical data
Rims and Tires
Rims and Tires
Use only tires and rims which have been
specifically developed for your vehicle and
tested and approved by Mercedes-Benz.
Other tires and rims can have detrimental
effects, such as�
poor handling characteristics
�
increased noise
�
increased fuel consumption
!Moreover, tires and rims not approved
by Mercedes-Benz may, under load, ex-
hibit dimensional variations and differ-
ent tire deformation characteristics
that could cause them to come into
contact with the vehicle body or axle
parts. Damage to the tires or the vehi-
cle can be the result.
iFurther information on tires and rims is
available at any authorized
Mercedes-Benz Center. A tire inflation
pressure table is located on the fuel fill-
er cap of the vehicle. The tire pressure
should be checked regularly and
should only be adjusted on cold tires.
Follow tire manufacturer’s mainte-
nance recommendation included with
vehicle.
Page 346 of 384

346 Technical dataConsumer informationTemperature
The temperature grades are A (the high-
est), B, and C, representing the tire’s resis-
tance to the generation of heat and its
ability to dissipate heat when tested under
controlled conditions on a specified indoor
laboratory test wheel. Sustained high tem-
perature can cause the material of the tire
to degenerate and reduce tire life, and ex-
cessive temperature can lead to sudden
tire failure. Grade C corresponds to a level
of performance which all passenger car
tires must meet under the Federal Motor
Vehicle Safety Standard No. 109. Grades B
and A represent higher levels of perfor-
mance on the laboratory test wheel than
the minimum required by law.
Warning
G
The temperature grade for this tire is estab-
lished for a tire that is properly inflated and
not overloaded. Excessive speed, underin-
flation, or excessive loading, either sepa-
rately or in combination, can cause
excessive heat build-up and possible tire
failure.
Page 354 of 384

354 IndexAir conditioner (cooling)
Turning off 166
Air pressure see Tire inflation
pressure 247
Air recirculation mode 163
Activating 163
Deactivating 164
Air vents, rear passenger compartment
Adjustable 168
Air volume
Adjusting 162
AIRBAG OFF indicator lamp 269
Airbags 55
BabySmart
TM deactivation
system 65, 347
Children 56
Front 59
Passenger 59
Safety guidelines 58
Side impact 59
Window curtain 59
Alarm
Audible 70, 77
Canceling 77
Visual 77Alarm system
Anti-theft 77
Anti-theft alarm system
indicator lamp 25
Alignment bolt 311
Alignment bolt (vehicle tool kit) 295, 347
Antiglare
Automatic 151
Antilock brake system (ABS) 347
Antilock Brake System see ABS 23
Anti-theft alarm system
Activating 77
Canceling alarm 77
Deactivating 77
Anti-theft systems 76
Anti-theft alarm system 77
Anti-theft alarm system indicator
lamp 25
Immobilizer 76
Tow-away alarm 78
Armrest
Storage compartment in front of 200,
201
Storage compartment in front of
armrest 200
Ashtray 206At the gas station 235
ATF (automatic transmission fluid) 242
AUDIO menu 122
Selecting radio station 122
Audio system
CD mode 123
Automatic antiglare for rear view
mirror 151
Automatic central locking
Activating/deactivating (control
system) 139
Automatic climate control 157
Air recirculation mode 163
Defrosting 162
Rear window defroster 165
Setting the temperature 160
Automatic headlamp mode 109
Automatic lighting control
Activating 112
Deactivating 112
Automatic locking when driving 94
Page 356 of 384

356 IndexBulbs, replacing 302
Additional turn signals 302
Backup lamps 303
Brake lamps 303
Fog lamps 302
Front lamps 302
High beam 302
High mounted brake lamp 303
License plate lamps 303, 306
Low beam 302
Parking lamps 302, 303, 305
Rear fog lamp 303, 305
Side marker lamps 302, 305
Standing lamps 302, 303, 305
Tail lamp assemblies 303, 305
Turn signal lamps 302, 303
C
CAC (Customer Assistance Center) 347
California
Important notice 11
Calling up
Distronic* settings 128
Range (distance to empty) 130
Service indicator 255
CAN system 347
Cargo tie-down hooks 198Catalytic converter 232
CD changer* 123
CD mode 123
CD player
Operating 123
Center console 25
AIRBAG OFF indicator lamp 269
Lower part 26
Upper part 25
Centigrade
Setting temperature units 134
Central locking
Automatic 94
From inside 95
Switch 95
Switching on/off (control
system) 139
Unlocking from inside 95
Central locking switch 95
Changing
Batteries (KEYLESS-GO* card) 300
Batteries (SmartKey) 299
Key setting 140
KEYLESS-GO* card setting 84
Vehicle level 192
Changing CDs 123Charcoal filter 164
Activating 164
Deactivating 164
Charging
Vehicle battery 314
CHECK ENGINE malfunction indicator
lamp 268
Checking
Batteries (KEYLESS-GO* card) 85
Coolant level 242
Oil level 236, 238
Oil level with the oil dipstick 240
Tire inflate pressure 236
Vehicle lighting 236
Vehicle lock status
(KEYLESS-GO* card) 86
Child safety 63
Airbags 56
Infant and child restraint systems 60,
63
LATCH child seat mounts 68
Child safety switch see Blocking of rear
window operation 69
Cigarette lighter 207