Page 302 of 384
302 Practical hintsReplacing bulbs
Replacing bulbsSafe vehicle operation depends on proper
exterior lighting and signaling. It is there-
fore essential that all bulbs and lamp as-
semblies are in good working order at all
times.
Correct headlamp adjustment is extremely
important. Have headlamps checked and
readjusted at regular intervals and when a
bulb has been replaced. See your autho-
rized Mercedes-Benz Center for headlamp
adjustment.
Bulbs Front lamps
iBack-up bulbs will be brought into use
when the following lamps malfunction:�
Turn signal lamps
�
Brake lamps
�
Parking lamps
�
Tail lamps
Lamp
Type
1
Additional turn sig-
nal lamps
LED
2
Turn signal lamp
1156 A
3
High beam flasher
H7-55 W
4
Side marker lamp
W 5 W
5
Fog lamp
HB4-55 W
6
Parking and stand-
ing lamps
H 6 W
7
Low beam and high
beam
Xenon
1
D2S-35 W
1Bi-Xenon headlamps: For safety reasons (high volt-
age), do not replace the xenon bulb yourself. See
your authorized Mercedes-Benz Center.
Page 303 of 384

303 Practical hints
Replacing bulbs
Rear lamps Notes on bulb replacement
�
Use only 12 volt bulbs of the same type
and with the specified watt rating.
�
Switch lights off before changing a bulb
to prevent short circuits.
�
Always use a clean lint-free cloth when
handling bulbs.
�
Your hands should be dry and free of oil
and grease.
�
If the newly installed bulb does not light
up, visit an authorized Mercedes-Benz
Center.
�
Have the LEDs and bulbs for the follow-
ing lamps replaced by an authorized
Mercedes-Benz Center:�
Additional turn signal lamps in the
exterior rear view mirrors
�
Bi-Xenon lamps
�
Front fog lamps
�
High mounted brake lamp
�
Brake lamp
�
Rear side marker
Lamp
Type
8
High mounted brake
lamp
LED
9
Brake lamp
LED
10
Tail, parking and
standing lamp
P 21/4 W
Side marker lamp
LED
11
Backup lamp
P 21 W
12
License plate lamps
C 5 W
13
Rear fog lamp,
driver’s side
P 21/4 W
14
Turn signal lamp
PY 21 W
Warning!
G
Keep bulbs out of reach of children.
Bulbs and bulb sockets can get very hot. Al-
low the lamp to cool down before changing
a bulb.
Halogen lamps contain pressurized gas. A
bulb can explode if you�
touch or move it when hot
�
drop the bulb
�
scratch the bulb
Wear eye and hand protection.
Because of high voltage in Bi-Xenon lamps,
it is dangerous to replace the bulb or repair
the lamp and its components. We recom-
mend that you have such work done by a
qualified technician.
Page 304 of 384

304 Practical hintsReplacing bulbsReplacing bulbs for front lamps
1Housing cover for high beam flasher
bulb, parking and standing lamp2Electrical connector for high beam
flasher housing bulb
3Parking and standing lamp
4Bulb socket for turn signal lamp
5Low beam and high beam (Bi-Xenon)
housing cover
High beam flasher bulb
�
Switch off the lights.
�
Open the hood (
�page 237).
�
Press ends of housing cover1 tab to-
gether and remove cover.
�
Press connector2 downward.
�
Remove connector2 with the bulb.
�
Insert the new bulb so that the base lo-
cates in the recess on the holder.
�
From below, press connector2 with
bulb upward onto the reflector.
�
Align housing cover1 and click into
place.
Front turn signal bulb
�
Switch off the lights.
�
Open the hood (
�page 237).
�
Twist bulb socket4 counterclockwise
and pull out.
�
Push bulb into socket, turn counter-
clockwise and remove.
�
Insert new bulb in socket, push in and
twist clockwise.
�
Reinsert bulb socket in lamp and twist
clockwise.
Warning!
G
Do not remove the cover for the Bi-Xenon
headlamp. Because of high voltage in xenon
lamps, it is dangerous to replace the bulb or
repair the lamp and its components. We rec-
ommend that you have such work done by a
qualified technician at an authorized Mer-
cedes-Benz Center.
Page 305 of 384
.
�
Press ends of housing cover1 tab to-
gether and remove cover.
�
Pull out the")
305 Practical hints
Replacing bulbs
Parking and standing lamp bulb�
Switch off the lights.
�
Open the hood (
�page 237).
�
Press ends of housing cover1 tab to-
gether and remove cover.
�
Pull out the bulb socket with the bulb.
�
Pull the bulb out of the bulb socket.
�
Insert a new bulb in the socket.
�
Reinstall the bulb socket.
�
Align housing cover and click into
place.Side marker lamp bulb
�
Switch off the lights.
�
Carefully slide lamp towards rear.
�
Remove front end first.
�
Twist bulb socket counterclockwise
and pull out.
�
Pull bulb out of the bulb socket.
�
Insert new bulb in socket.
�
Reinstall bulb socket, push in and twist
clockwise.
�
To reinstall lamp, set rear end in
bumper and let front end snap into
place.
Replacing bulbs for rear lamps
Tail lamp assemblies
1Backup lamp (black socket)
2Turn signal lamp (white socket)
3Tail, standing and parking lamp (red
socket)
4Driver’s side: tail, parking and rear fog
lamp
Passenger’s side: tail and parking lamp
(red socket)
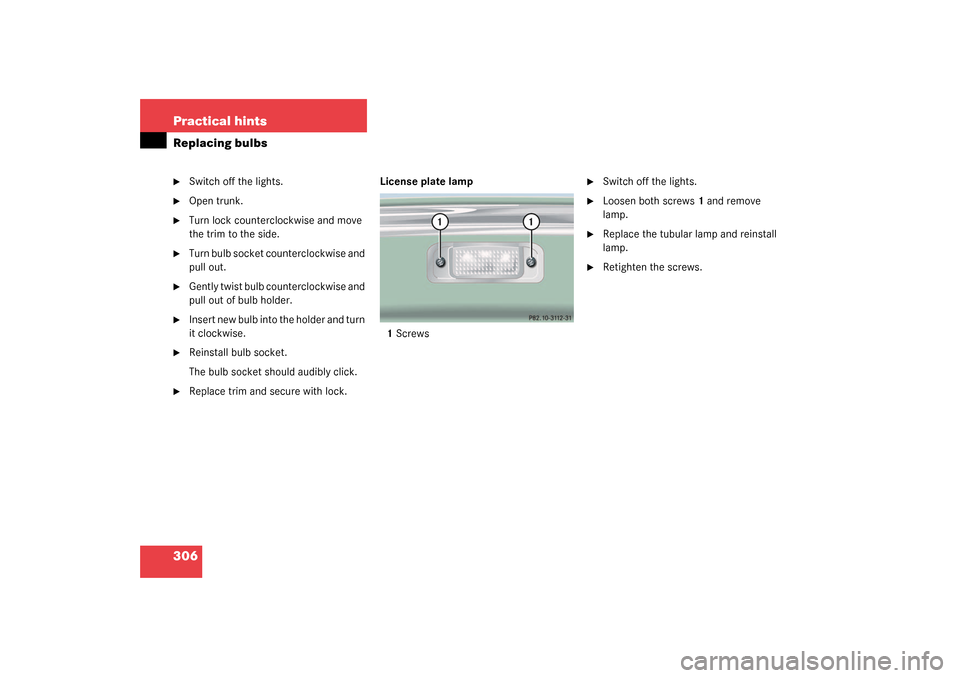
Page 306 of 384
306 Practical hintsReplacing bulbs�
Switch off the lights.
�
Open trunk.
�
Turn lock counterclockwise and move
the trim to the side.
�
Turn bulb socket counterclockwise and
pull out.
�
Gently twist bulb counterclockwise and
pull out of bulb holder.
�
Insert new bulb into the holder and turn
it clockwise.
�
Reinstall bulb socket.
The bulb socket should audibly click.
�
Replace trim and secure with lock. License plate lamp
1Screws
�
Switch off the lights.
�
Loosen both screws1 and remove
lamp.
�
Replace the tubular lamp and reinstall
lamp.
�
Retighten the screws.
Page 355 of 384
")
355 Index
Automatic transmission 143
Accelerator position 148
Activating steering wheel gearshift
control 149
Deactivating steering wheel
gearshift control 150
Emergency operation (Limp Home
Mode) 148
Fluid level 242
Gear ranges 145
Gear selector lever position 146
Gear shifting malfunctions 148
Kickdown 148
One-touch gearshifting 144
Program mode selector switch 147
Selector lever position 143
Starting the engine 43
Steering wheel gearshift control
(Speedshift) and manual shift pro-
gram S 55 AMG 149
Transmission fluid 242
Winter program mode 147, 149
Auxiliary cup holder 204
Inserting 204
Removing 205B
BabySmart
TM
Airbag deactivation system 65, 347
Compatible child seats 65, 347
Self-test 66
Backrest supports
Lumbar region 99
Shoulder region 99
Backup lamps 303, 305
Bulbs 303
BAS 73, 347
Messages in display 273, 283
Batteries, KEYLESS-GO* card
Changing 300
Check lamp 85
Checking 85
Batteries, SmartKey
Changing 299
Check lamp 81
Checking 82
Batteries, SmartKey with KEYLESS-GO*
Checking 82
Battery discharged
Jump starting 316Battery, vehicle 243, 313
Charging 314
Disconnecting 314
Reconnecting 315
Reinstalling 314
Removing 314
Bi-Xenon headlamps 347
Block heater* 253
Blocking
Rear window operation 69
Brake assist system (BAS) 347
Brake fluid 236, 340
Brake lamp bulbs 303
Brake lamp, high mounted 303
Brake pads
Message in display 275
Brakes 226
Warning lamp 267
Break-in period 224
Page 356 of 384

356 IndexBulbs, replacing 302
Additional turn signals 302
Backup lamps 303
Brake lamps 303
Fog lamps 302
Front lamps 302
High beam 302
High mounted brake lamp 303
License plate lamps 303, 306
Low beam 302
Parking lamps 302, 303, 305
Rear fog lamp 303, 305
Side marker lamps 302, 305
Standing lamps 302, 303, 305
Tail lamp assemblies 303, 305
Turn signal lamps 302, 303
C
CAC (Customer Assistance Center) 347
California
Important notice 11
Calling up
Distronic* settings 128
Range (distance to empty) 130
Service indicator 255
CAN system 347
Cargo tie-down hooks 198Catalytic converter 232
CD changer* 123
CD mode 123
CD player
Operating 123
Center console 25
AIRBAG OFF indicator lamp 269
Lower part 26
Upper part 25
Centigrade
Setting temperature units 134
Central locking
Automatic 94
From inside 95
Switch 95
Switching on/off (control
system) 139
Unlocking from inside 95
Central locking switch 95
Changing
Batteries (KEYLESS-GO* card) 300
Batteries (SmartKey) 299
Key setting 140
KEYLESS-GO* card setting 84
Vehicle level 192
Changing CDs 123Charcoal filter 164
Activating 164
Deactivating 164
Charging
Vehicle battery 314
CHECK ENGINE malfunction indicator
lamp 268
Checking
Batteries (KEYLESS-GO* card) 85
Coolant level 242
Oil level 236, 238
Oil level with the oil dipstick 240
Tire inflate pressure 236
Vehicle lighting 236
Vehicle lock status
(KEYLESS-GO* card) 86
Child safety 63
Airbags 56
Infant and child restraint systems 60,
63
LATCH child seat mounts 68
Child safety switch see Blocking of rear
window operation 69
Cigarette lighter 207
Page 361 of 384

361 Index
F
Fahrenheit
Setting temperature units 134
Fastening the seat belts 40
Fine adjustment
Cruise control 178
Distronic* 185
First aid kit 295
Flat tire 308
Lowering the vehicle 312
Mounting the Spare wheel 308
Preparing the vehicle 308, 309
Flexible Service System (FSS) 254, 349
Fog lamp, rear 110, 303
Replacing bulb 305
Fog lamps
Replacing bulbs 302
Fog lamps, front
Messages in display 287
Switching on 110
Folding
Exterior rear view mirrors 152
Front airbags 59Front lamps
Messages in display 286– 287
Replacing bulbs 302, 304
Switching on 108
Front seat
Head restraints 97
Head restraints installing 97
Head restraints removing 97
FSS (Flexible Service System) 254, 349
Fuel 235
Fuel reserve warning lamp 268
Premium unleaded gasoline 235
Reserve warning lamp 23
Fuel consumption statistics
After start 129
Since last reset 129
Fuel filler flap 235
Locking 235
Opening 300
Unlocking 235
Fuel reserve tank
Message in display 284
Fuel tank
Filler flap 235
Fuels, coolants, lubricants etc. 337Functions (control system) 119, 121
Resetting 132
Fuse box 322, 324
Fuse chart 295
Fuses 322
Fuse box in dashboard 322
F us e box in engi ne comp ar tme nt 3 24
Fuse box in passenger
compartment 322
Fuse box in the rear passenger
compartment 323
Fuse chart 295
Fuse extractor 295
Spare fuses 295
G
Garage door opener 27, 217
Erasing in remote control 220
Integrated remote control 218
Rolling code programming 219
Gasoline see Fuel 235
Gear range 349
Automatic transmission 145
Limiting 145
Shifting into optimal 144
Gear range limit
Canceling 144