Page 218 of 384

218 Controls in detailUseful features
Programming or reprogramming the in-
tegrated remote control�
Turn key in the starter switch to
position1 or2.
�
Hold the end of the hand-held transmit-
ter of the device you wish to train
approximately 2 to 5 inches (5 cm to
12 cm) away from the surface of the in-
tegrated remote control located on the
inside rear view mirror, keeping the in-
dicator lamp in view.
�
Using both hands, simultaneously push
the hand-held transmitter button and
the desired integrated remote trunk lid
switch. Do not release the buttons until
completing next step.
Warning!
G
When programming a garage door opener,
the door moves up or down.
When programming or operating the remote
control, make sure there is no possibility of
anyone being injured by the moving door.iCertain types of garage door openers
are incompatible with the integrated
opener. If you should experience diffi-
culties with programming the transmit-
ter, contact your authorized
Mercedes-Benz Center, or call
Mercedes-Benz Customer Assistance
Center (in the USA only) at
1-800-FOR-MERCedes, or Customer
Service (in Canada) at
1-800-387-0100.
iFor operation in the USA only: This de-
vice complies with Part 15 of the
FCC Rules. Operation is subject to the
following two conditions:
(1) This device may not cause harmful
interference.
(2) This device must accept any inter-
ference received, including interfer-
ence that may cause undesired
operation.
Any unauthorized modification to this
device could void the user’s authority
to operate the equipment.
Page 231 of 384
.
Standing water
Passenger compartmentDriving abroad
Abroad, there is a widely-spread
Mercedes-Benz service netwo")
231 Operation
Driving instructions
For more information on winter driving
(�page 252).
Standing water
Passenger compartmentDriving abroad
Abroad, there is a widely-spread
Mercedes-Benz service network at your
disposal. If you plan to drive into areas
which are not listed in the index of your
Mercedes-Benz Center directory, you
should request pertinent information from
your authorized Mercedes-Benz Center.
Warning!
G
If the vehicle becomes stuck in snow, make
sure that snow is kept clear of the exhaust
pipe and from around the vehicle with the
engine running. Otherwise, deadly carbon
monoxide (CO) gases may enter vehicle in-
terior resulting in unconsciousness and
death.
To assure sufficient fresh air ventilation,
open a window slightly on the side of the ve-
hicle not facing the wind.Warning!
G
The outside temperature indicator is not de-
signed to serve as an ice-warning device and
is therefore unsuitable for that purpose. In-
dicated temperatures just above the freez-
ing point do not guarantee that the road
surface is free of ice.
!Do not drive through flooded areas or
water of unknown depth.
If you must drive through standing wa-
ter, drive slowly to prevent water from
entering the passenger compartment
or the engine compartment. Water in
these areas could cause damage to
electrical components or wiring of the
engine or transmission, or could result
in water being ingested by the engine
through the air intake causing severe
internal engine damage. Any such dam-
age is not covered by the
Mercedes-Benz Limited Warranty.
Warning!
G
Always fasten items being carried as secure-
ly as possible.
In an accident, during hard braking or sud-
den maneuvers, loose items will be thrown
around inside the vehicle, and cause injury
to vehicle occupants unless the items are
securely fastened in the vehicle.
The trunk is the preferred place to carry ob-
jects.
Page 294 of 384

294 Practical hintsWhat to do if …?ì
FUNCTION
NOT AVAILABLE!
This display appears if button
ì
or
í
on the multifunction steering wheel is
pressed and the vehicle is not equipped
with a telephone.
Ê
TRUNK OPEN!
This message will appear whenever the
trunk lid is open.
�
Close the trunk lid.
W
WASHER FLUID
CHECK LEVEL!
The fluid level has dropped to about
1/3 of
total reservoir capacity.
�
Add washer fluid (
�page 244).
Î
CRUISE CONTROL
VISIT WORKSHOP!
Cruise control or Distronic* is malfunction-
ing.
�
Have cruise control or Distronic*
checked by an authorized
Mercedes-Benz Center.
_
ENTRY POSITION
DO NOT DRIVE!
Seat, mirrors and steering wheel have not
yet moved to their preset driving positions.
�
Wait until the seat, mirrors and steer-
ing wheel have moved to their driving
positions.
The message will disappear.
±
DISPLAY MALFUNCTION
VISIT WORKSHOP!
Certain electronic systems are unable to
relay information to the control system.
The following systems may have failed:�
Coolant temperature display
�
Tachometer
�
Cruise control display
�
Have the electronic systems
checked by an authorized
Mercedes-Benz Center.
Display
Possible cause
Possible solution
Page 295 of 384

295 Practical hints
Where will I find...?
Where will I find...?
First aid kit
The first aid kit is stored in the rear center
armrest.�
Fold rear arm rest down1.
�
Press handle1 upwards.
�
Fold lid2 up.
�
Remove first aid kit.Vehicle jack, vehicle tool kit, luggage
bowl, spare wheel
The spare wheel, the vehicle tool kit and
the luggage bowl are stored in the com-
partment underneath the trunk floor.
1Vehicle jack
2Vehicle tool kit
3Luggage bowl
4Spare wheel�
Lift up the trunk floor cover and engage
trunk floor handle in upper edge of
trunk.
You can now remove the tools and ac-
cessories.The vehicle tool kit includes:
�
One pair of universal pliers
�
Two open-end wrenches
�
One hex-socket wrench
�
One interchangeable slot/Phillips
screwdriver
�
One towing eye bolt
�
One wheel wrench
�
One alignment bolt
�
One fuse extractor
�
One fuse chart for the main fuse box
�
Spare fuses
iCheck expiration dates and contents
for completeness at least once a year
and replace missing/expired items.
!To prevent damage, always disengage
trunk floor handle from trunk edge and
lower trunk floor before closing the
trunk lid.
Page 298 of 384

298 Practical hintsUnlocking/locking in an emergencyUnlocking the trunk
If you are unable to unlock the trunk with
the SmartKey, open the trunk with the me-
chanical key as follows:Trunk lock�
Insert the mechanical key into the
trunk lid lock.
�
Turn the key counterclockwise to
position1.
�
Press trunk lid lock2.
The trunk lid swings open.
Locking the vehicle
If you are unable to lock the vehicle with
the SmartKey, lock it with the mechanical
key as follows:�
Close the passenger door and the trunk
lid.
�
Press the central locking switch in the
center console (
�page 95).
�
Check to see whether the locking knob
on the passenger door is still visible. If
necessary push it down manually.
�
Lock the driver’s door with the me-
chanical key.
�
Lock the trunk lid if necessary with the
mechanical key (
�page 90).
!The trunk lid swings open automatical-
ly. Always make sure that there is suffi-
cient overhead clearance. A minimum
height clearance of 6.1 ft (1.90 m) is re-
quired to open the trunk lid. iUnlocking your vehicle with the me-
chanical key will trigger the anti-theft
alarm system. To cancel the alarm, do
one of the following:�
Press button
Œ
or
‹
on the
SmartKey.
�
Insert the key in the starter switch.
�
If KEYLESS-GO* card present,
press the KEYLESS-GO* start/stop
button (
�page 33).
Page 300 of 384
300 Practical hintsUnlocking/locking in an emergencyKEYLESS-GO* card
1Battery cover
Replacement batteries: Lithium, type
CR 2025 or equivalent.�
Pry open cover 1 (e.g. by using a nar-
row blade screw driver).
�
Remove the batteries.
�
Install new batteries as indicated by
the “+” and “–” markings in the KEY-
LESS-GO card.
�
Replace battery cover 1.
Fuel filler flap
In an emergency, the fuel filler flap can
only be opened from the trunk. The release
knob is located on the right-hand side in
the trunk.
1Release knob
�
Open the trunk with the mechanical
key (
�page 298).
�
Remove the battery cover and the trim
inside the trunk on the right-hand side.
�
Pull release knob 1 (arrow) flap.
The fuel filler flap can be opened.
Page 306 of 384
306 Practical hintsReplacing bulbs�
Switch off the lights.
�
Open trunk.
�
Turn lock counterclockwise and move
the trim to the side.
�
Turn bulb socket counterclockwise and
pull out.
�
Gently twist bulb counterclockwise and
pull out of bulb holder.
�
Insert new bulb into the holder and turn
it clockwise.
�
Reinstall bulb socket.
The bulb socket should audibly click.
�
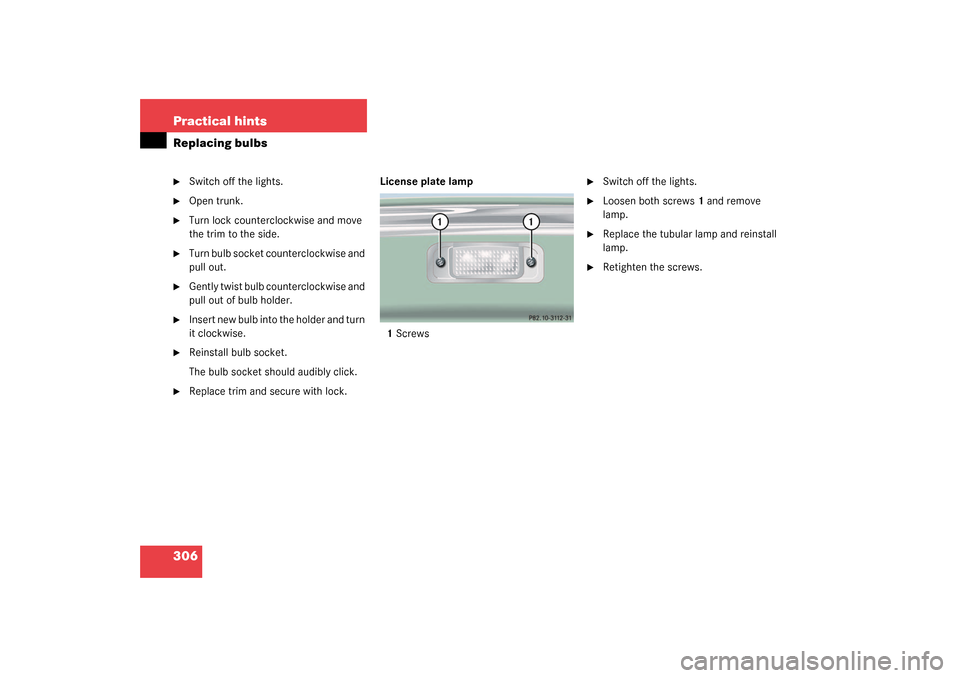
Replace trim and secure with lock. License plate lamp
1Screws
�
Switch off the lights.
�
Loosen both screws1 and remove
lamp.
�
Replace the tubular lamp and reinstall
lamp.
�
Retighten the screws.
Page 309 of 384
.
Preparing the vehicle
�
Take vehicle tool kit tray and vehicle
jack out of trunk.
�
Take")
309 Practical hints
Flat tire
More information can be found in the
“Technical data” section (
�page 333).
Preparing the vehicle
�
Take vehicle tool kit tray and vehicle
jack out of trunk.
�
Take the spare wheel out of wheel well
(�page 296).
Lifting the vehicle
�
Prevent the vehicle from rolling away
by blocking wheels with wheel chocks
(not included) or other sizable, heavy
objects.
When changing wheel on a level surface:
�
Place one chock in front of and one be-
hind the wheel that is diagonally oppo-
site to the wheel being changed.
When changing wheel on a hill:
�
Place chocks behind the downhill sides
of both wheels of the axle not being
worked on.
�
Take the two-piece wheel wrench out
of the vehicle tool kit tray. Assemble
wheel wrench.
�
On wheel to be changed, loosen but do
not yet remove the wheel bolts (ap-
proximately one full turn with wrench).
The tube openings are located directly be-
hind the front wheel housings and in front
of the rear wheel housings.
Warning!
G
The jack is designed exclusively for jacking
up the vehicle at the jack take-up brackets
built into both sides of the vehicle. To help
avoid personal injury, use the jack only to lift
the vehicle during a wheel change. Never
get beneath the vehicle while it is supported
by the jack. Keep hands and feet away from
the area under the lifted vehicle. Always
firmly set parking brake and block wheels
before raising vehicle with jack.
Do not disengage parking brake while the
vehicle is raised. Be certain that the jack is
always vertical (plumb line) when in use, es-
pecially on hills. Always try to use the jack
on level surface. Make sure that the jack
arm is fully seated in the jack take-up brack-
et. Always lower the vehicle onto sufficient
capacity jackstands before working under
the vehicle.
��