Page 63 of 376

63 Safety and Security
Occupant safety
Warning!
G
Damaged seat belts or belts that were highly
stressed in an accident must be replaced
and their anchoring points must also be
checked.
Only use seat belts which have been ap-
proved by Mercedes-Benz.
Do not make any modifications to the seat
b e l t s . T h i s c a n l e a d t o u n i n t e n d e d a c t i v a t i o n
or to failure.
Have all work carried out only by an autho-
rized Mercedes-Benz Center.
Warning!
G
USE SEAT BELTS PROPERLY�
Seat belts can only work when used
properly. Never wear seat belts in any
other way than as described in this sec-
tion, as that could result in serious inju-
ries in case of an accident.
�
Each occupant should wear their seat
belt at all times, because seat belts help
reduce the likelihood of and potential
severity of injuries in accidents, includ-
ing rollovers. The integrated restraint
system includes SRS (driver airbag,
front passenger airbag, side impact air-
bags, head protection window curtain
airbags for side windows), ETD (seat belt
emergency tensioning device), and front
seat knee bolsters. The system is de-
signed to enhance the protection of-
fered to properly belted occupants in
certain frontal (front airbags) and side
(side impact airbags and window curtain
airbags) impacts which exceed preset
deployment thresholds.
�
Never wear the shoulder belt under your
arm, against your neck or off your shoul-
der. In a crash, your body would move
too far forward. That would increase the
chance of head and neck injuries. The
belt would also apply too much force to
the ribs or abdomen, which could se-
verely injure internal organs such as
your liver or spleen.
�
Never wear belts over rigid or breakable
objects in or on your clothing, such as
eyeglasses, pens, keys etc., as these
might cause injuries.
�
Position the lap belt as low as possible
on your hips and not across the abdo-
men. If the belt is positioned across your
abdomen, it could cause serious injuries
in a crash.
�
Never use a seat belt for more than one
person at a time. Do not fasten a seat
belt around a person and another per-
son or other objects.
�
Belts should not be worn twisted. In a
crash, you wouldn’t have the full
Page 71 of 376

71 Safety and Security
Occupant safety
Blocking of rear door window operation
The override switch is located on the door
control panel of the driver’s door.
1Override switch�
Slide override switch1 to the right.
The rear door windows can no longer
be operated using the switch located in
the rear doors.For more information on power windows,
see the “Controls in detail” section
(
�page 187).
iOperation of the rear door windows
with the switches located on the door
control panel of the driver’s door is still
possible.Warning!
G
Activate the override switch when children
are riding in the back seats of the vehicle.
The children may otherwise injure them-
selves, e.g. by becoming trapped in the win-
dow opening.
When leaving the vehicle, always remove the
key from the starter switch, and lock the ve-
hicle. Do not leave children unattended in
the vehicle, or with access to an unlocked
vehicle. Unsupervised use of vehicle equip-
ment can cause an accident and/or serious
personal injury.
Page 83 of 376
83 Controls in detail
Locking and unlocking
Seats
Memory function*
Lighting
Instrument cluster
Control system
Manual transmission
Automatic transmission*
Good visibility
Climate control
Automatic climate control*
Audio system
Power windows
Sliding/pop-up roof*
Driving systems
Loading
Useful features
Page 84 of 376

84 Controls in detailLocking and unlockingIn the “Controls in detail” section you will
find detailed information on how to oper-
ate the equipment installed on your vehi-
cle. If you are already familiar with the
basic functions of your vehicle, this section
will be of particular interest to you.
To quickly familiarize yourself with the ba-
sic functions of the vehicle, refer to the
“Getting started” section of this manual.
The corresponding page numbers are giv-
en at the beginning of each segment.
Locking and unlockingInformation on locking and unlocking can
be found in the “Getting started” section
on (
�page 30) and (
�page 51).
Keys
Your vehicle comes supplied with two
SmartKeys with remote controls and a re-
movable mechanical key. The locking tabs
for the mechanical key portion of the two
keys are a different color to help distin-
guish each key unit.
The SmartKey provides an extended oper-
ating range. To prevent theft, however, it is
advisable to only unlock the vehicle when
you are in close proximity to it.
The Smartkey centrally locks and unlocks:�
the doors
�
the trunk
�
the fuel filler flap
SmartKey with remote control1‹
Lock button
2
Š
Unlock button for the trunk lid
3Mechanical key locking tab
4
Œ
Unlock button
5Battery check lamp
6
Â
Panic button* (
�page 72).
iYou can also open and close the power
windows (
�page 188) and slid-
ing/pop-up roof* (
�page 191) using
the SmartKey.
Page 144 of 376
 and for setting the rear view
mirrors (
�page 39) is found in the “Get-
ting started” section")
144 Controls in detailGood visibility
Good visibilityInformation on the windshield wipers
(�page 48) and for setting the rear view
mirrors (
�page 39) is found in the “Get-
ting started” section.
Rear view mirror
Inside rear view mirror, antiglare
position
Tilt the mirror to the antiglare night posi-
tion using the lever at its lower edge.
Automatic antiglare rear view mirror*
The reflection brightness of the exterior
rear view mirror on the driver’s side and
the inside rear view mirror will respond au-
tomatically to glare when�
the ignition is switched on, and
�
incoming light from headlamps falls on
the sensor in the inside rear view mir-
ror.The rear view mirror will not react if
�
reverse gear is engaged
�
the interior lighting is turned onWarning!
G
The automatic antiglare function does not
react if incoming light is not aimed directly
at sensors in the inside rear view mirror.
The inside rear view mirror and the exterior
rear view mirror on the driver’s side do not
react, for example, if the rear window sun-
shade is in raised position.
Glare can endanger you and others.
Warning!
G
In the case of an accident liquid electrolyte
may escape from the mirror housing if the
mirror glass breaks.
Electrolyte has an irritating effect. Do not al-
low the liquid to come into contact with
eyes, skin, clothing, or respiratory system.
In case it does, immediately flush affected
area with water, and seek medical help if
necessary.Warning!
G
Exercise care when using the passenger
side exterior rear view mirror. The mirror
surface is convex (outwardly curved surface
for a wider field of view). Objects in mirror
are closer than they appear. Check your in-
side rear view mirror or glance over your
shoulder before changing lanes.
Page 146 of 376
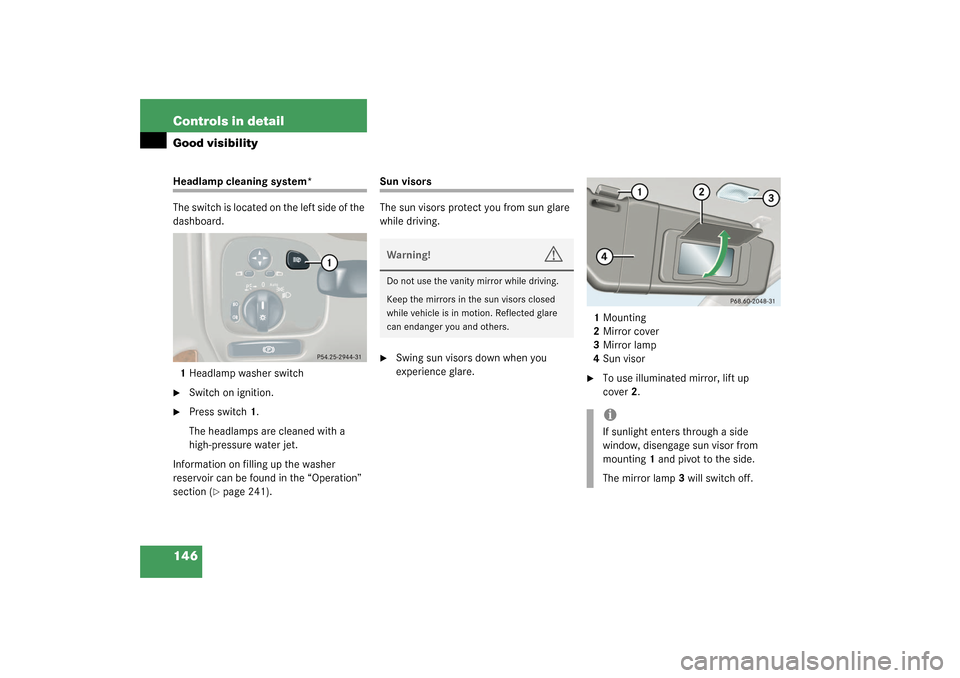
146 Controls in detailGood visibilityHeadlamp cleaning system*
The switch is located on the left side of the
dashboard.
1Headlamp washer switch�
Switch on ignition.
�
Press switch1.
The headlamps are cleaned with a
high-pressure water jet.
Information on filling up the washer
reservoir can be found in the “Operation”
section (
�page 241).
Sun visors
The sun visors protect you from sun glare
while driving.�
Swing sun visors down when you
experience glare.1Mounting
2Mirror cover
3Mirror lamp
4Sun visor
�
To use illuminated mirror, lift up
cover2.
Warning!
G
Do not use the vanity mirror while driving.
Keep the mirrors in the sun visors closed
while vehicle is in motion. Reflected glare
can endanger you and others.
iIf sunlight enters through a side
window, disengage sun visor from
mounting1 and pivot to the side.
The mirror lamp3 will switch off.
Page 147 of 376

147 Controls in detail
Good visibility
Rear window sunshade*
The switch is located in the center console.�
Turn the key to starter switch
position1 or2.
�
Press the switch briefly at1 to raise the
sunshade.
�
Press the switch briefly at2 to lower
the sunshade.
Always raise the sunshade fully for its sup-
port against the window frame.
Warning!
G
When operating the rear window sunshade,
ma ke s ur e th a t th er e is no da nge r o f an y o ne
being harmed by the raising or lowering pro-
cedure.
The raising or lowering procedure can be im-
mediately halted by briefly pressing the up-
per or lower half of the switch.
Briefly press upper or lower half of the
switch again to raise or lower the rear win-
dow sunshade completely.
Warning!
G
When leaving the vehicle, always remove the
SmartKey from starter switch, and lock your
vehicle. Do not leave children unattended in
the vehicle, or with access to an unlocked
vehicle. Unsupervised use of vehicle equip-
ment can cause an accident and/or serious
personal injury.
Page 149 of 376
149 Controls in detail
Climate control
Climate control panel
The storage compartment between the
front seats can be ventilated (
�page 155).
Information about “Rear passenger com-
partment adjustable air vents”
(
�page 155).
Item
1
Air volume control for left center air
vent
2
Left center air vent, adjustable
3
Right center air vent, adjustable
4
Air volume control for right center
air vent
5
Air volume control for side air vent
6
Side air vent, adjustable
7
Side defroster vent, fixed
8
Climate control paneliFor draft-free ventilation, move the slid-
ers for the center air vents to the mid-
dle position.
Item
1
Air volume control
2
Left-side temperature control
3
Right-side temperature control
4
Air distribution control switch
5
Rear window defroster
6
AC cooling on/off (AC
OFF
)
7
Air distribution and air volume
(automatic)
8
Air recirculation
9
Defrosting