Page 227 of 370
.
2Brake fluid (f")
233 Operation
At the gas station
Check regularly and before a long trip
1Coolant level
More information on the coolant level
can be found in the “Operation” section
(
�page 238).
2Brake fluid (fuse box cover removed)
More information on brake fluid can be
found in the “Technical data” section
(�page 330).
3Windshield washer and headlamp
cleaning system
For more information on refilling the
reservoir, see the “Operation” section
(�page 240).Engine oil level
More information on engine oil can be
found in the “Operation” section
(
�page 235).
Opening hood (
�page 234).
Coolant
For normal replenishing, use water (pota-
ble water quality). More information on
coolant can be found in the “Operation”
section (
�page 238).
Vehicle lighting
Check function and cleanliness. For more
information on replacing light bulbs, see
the “Practical hints” section (
�page 292).
Exterior lamp switch (
�page 98).
Tire inflation pressure
More information on tire inflation pressure
can be found in the “Operation” section
(
�page 242).
iUse only premium unleaded gasoline
with a minimum Posted Octane Rating
of 91 (average of 96 RON / 86 MON).
Information on gasoline quality can
normally be found on the fuel pump.
More information on gasoline can be
found in the Factory Approved Service
Products pamphlet.
Flexible Fuel Vehicles: MY 2003
Mercedes-Benz C320 models, except
those equipped with manual transmis-
sion or 4MATIC*.
More information on Flexible Fuel Vehi-
cles can be found in the “Technical Da-
ta” section (
�page 332).
iLeaving the engine running and the fuel
cap open can cause the
?
lamp to
illuminate.
See also “Practical hints” section
(
�page 258).
S203 MY03_A.book Page 233 Tuesday, January 28, 2003 2:22 PM
Page 241 of 370
.
�
Press button
k
or
j
on the mul-
tifunction steeri")
247 Operation
Maintenance
Calling up the service indicator�
Switch ignition on.
The standard display of the control sys-
tem appears (
�page 112).
�
Press button
k
or
j
on the mul-
tifunction steering wheel until the FSS
indicator appears in the multifunction
display.
Resetting the service indicator
In the event that the service on your vehi-
cle is not carried out by an authorized
Mercedes-Benz Center, you can reset the
service indicator yourself.�
Switch ignition on.
The standard display of the control sys-
tem appears (
�page 112).
�
Press button
k
or
j
on the mul-
tifunction steering wheel until the FSS
indicator appears in the multifunction
display.
�
Press the reset knob for about four
seconds.
This message appears in the tachome-
ter:DO YOU WANT TO RESET SERVICE INTER-
VAL? CONFIRM BY PRESSING RESET (R)
BUTTON
�
To confirm, hold down the reset knob
until you hear a signal.The service indicator now displays the
reset interval.
iIf the battery is disconnected, the days
of disconnection will not be included in
the count shown by the service indica-
tor. To arrive at the true service dead-
line, you will need to subtract these
days from the days shown in the ser-
vice indicator.
Do not confuse the service indicator
with the engine oil level indicator
:
.
iIf the service indicator was inadvertent-
ly reset, have a Mercedes-Benz Center
correct it.
Only reset if the proper service has
been performed. Resetting the system
without performing the proper service
as called for by the FSS will cause the
FSS to incorrectly determine the next
service interval which will result in en-
gine damage not covered by the
Mercedes-Benz Limited Warranty.
S203 MY03_A.book Page 247 Tuesday, January 28, 2003 2:22 PM
Page 244 of 370

250 OperationVehicle careEngine cleaning
Prior to cleaning the engine compartment
make sure to protect electrical compo-
nents and connectors from the intrusion of
water and cleaning agents.
Corrosion protection, such as MB Anticor-
rosion Wax should be applied to the engine
compartment after every engine cleaning.
Before applying, all control linkage bush-
ings and joints should be lubricated. The
poly-V-belt and all pulleys should be pro-
tected from any wax.
Vehicle washing
Do not use hot water or wash your vehicle
in direct sunlight. Use only a mild car wash
detergent, such as Mercedes-Benz ap-
proved Car Shampoo.Thoroughly spray the vehicle with a dif-
fused jet of water. Direct only a very weak
spray towards the ventilation intake. Use
plenty of water and rinse the sponge and
chamois frequently.
Rinse with clear water and thoroughly dry
with a chamois. Do not allow cleaning
agents to dry on the finish.
Due to the width of the vehicle, fold in out-
side mirrors prior to running the vehicle
through an automatic car wash to prevent
damage to the mirrors.
In the winter, thoroughly remove all traces
of road salt as soon as possible.
When washing the underbody, do not for-
get to clean the inner sides of the wheels.Ornamental moldings
For regular cleaning and care of very dirty
chrome-plated parts, use a chrome clean-
er.
Headlamps, tail lamps, turn signal
lenses
Use a mild car wash detergent, such as
Mercedes-Benz approved Car Shampoo,
with plenty of water.
To prevent scratches, never apply strong
force and use only a soft, non-scratchy
cloth when cleaning the lenses. Do not at-
tempt to wipe dirty lenses with a dry cloth
or sponge.S203 MY03_A.book Page 250 Tuesday, January 28, 2003 2:22 PM
Page 247 of 370
253 Practical hints
What to do if …
Where will I find ...?
Unlocking/locking in an emergency
Opening/closing in an emergency
Replacing bulbs
Replacing wiper blades
Flat tire
Battery
Jump starting
Towing the vehicle
Fuses
S203 MY03_A.book Page 253 Tuesday, January 28, 2003 2:22 PM
Page 274 of 370
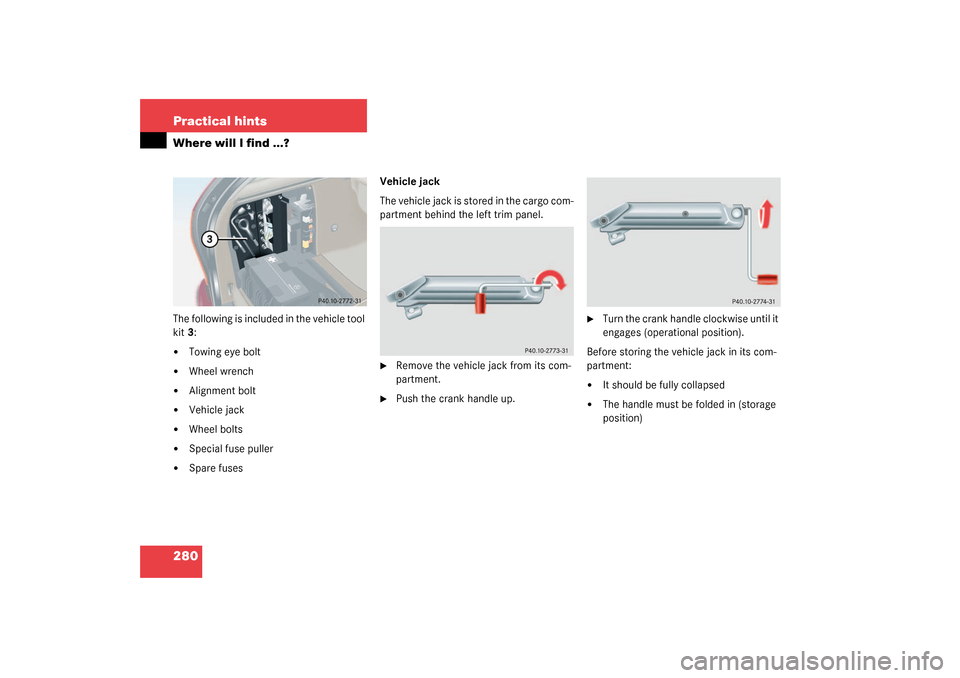
280 Practical hintsWhere will I find ...?The following is included in the vehicle tool
kit3:�
Towing eye bolt
�
Wheel wrench
�
Alignment bolt
�
Vehicle jack
�
Wheel bolts
�
Special fuse puller
�
Spare fusesVehicle jack
The vehicle jack is stored in the cargo com-
partment behind the left trim panel.
�
Remove the vehicle jack from its com-
partment.
�
Push the crank handle up.
�
Turn the crank handle clockwise until it
engages (operational position).
Before storing the vehicle jack in its com-
partment:
�
It should be fully collapsed
�
The handle must be folded in (storage
position)
S203 MY03_A.book Page 280 Tuesday, January 28, 2003 2:22 PM
Page 308 of 370
314 Practical hintsFuses
FusesFuse box in passenger compartmentOpening
�
Pull cover1 open with a screw driver or
similar tool.
�
Remove cover rearward.
Closing
�
Attach the cover in the front.
�
Fold the cover in until it engages.
Fuse chart
The fuse chart is found in the fuse box in
the passenger compartment. The amper-
ages of the fuses are also given there.
Fuse box in engine compartment
The fuse box is located in the engine com-
partment on the left-hand side.
1Screw
2Cover
3Retainer
Removing/installing cover�
Twist screws1 90° counterclockwise.
�
Pull up cover2.
�
Slide out retainer3 and remove cover
by pulling towards front.
�
Install cover2 in reverse order.
iOnly install fuses that have been tested
and approved by Mercedes-Benz and
that have the specified amperage rat-
ing.
Never attempt to repair or bridge a
blown fuse. Have the cause determined
and remedied by an authorized
Mercedes-Benz Center.
S203 MY03_A.book Page 314 Tuesday, January 28, 2003 2:22 PM
Page 309 of 370
315 Practical hintsFuses
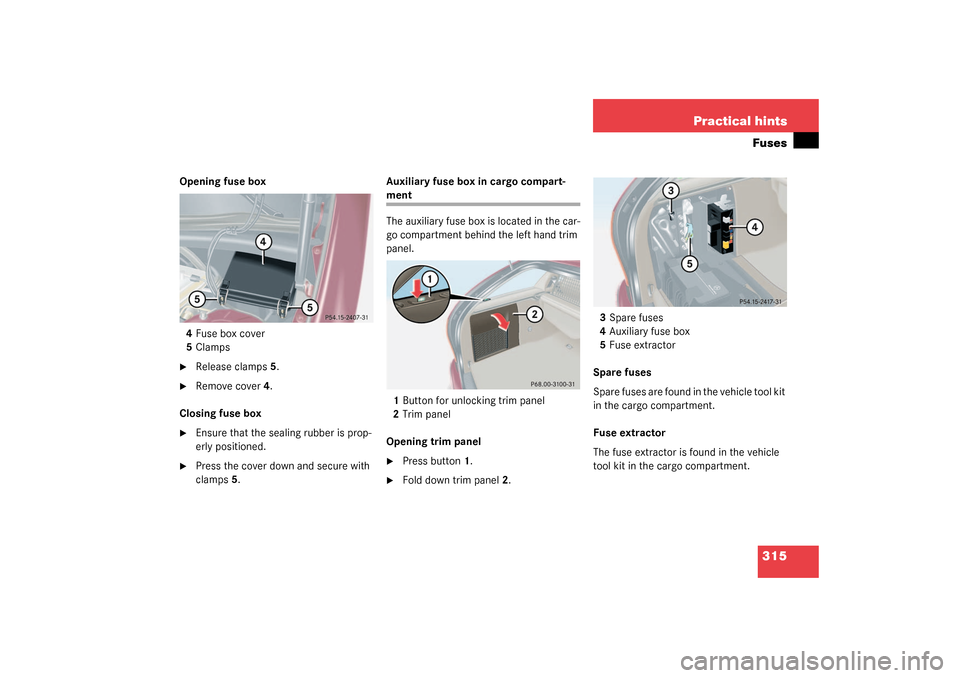
Opening fuse box
4Fuse box cover
5Clamps�
Release clamps5.
�
Remove cover4.
Closing fuse box
�
Ensure that the sealing rubber is prop-
erly positioned.
�
Press the cover down and secure with
clamps5.Auxiliary fuse box in cargo compart-
ment
The auxiliary fuse box is located in the car-
go compartment behind the left hand trim
panel.
1Button for unlocking trim panel
2Trim panel
Opening trim panel�
Press button1.
�
Fold down trim panel2.3Spare fuses
4Auxiliary fuse box
5Fuse extractor
Spare fuses
Spare fuses are found in the vehicle tool kit
in the cargo compartment.
Fuse extractor
The fuse extractor is found in the vehicle
tool kit in the cargo compartment.
S203 MY03_A.book Page 315 Tuesday, January 28, 2003 2:22 PM
Page 341 of 370

347 Index
Gear shifting malfunctions 140
Kickdown 140
Manual shifting 136
One-touch gearshifting 136
Program mode selector switch 139
Selector lever position 135
Starting with 44
Transmission fluid 237
Winter program mode 139
Auxiliary fuse box 315
B
BabySmart
TM
Airbag deactivation system 67
Compatible child seats 67
Self-test 67
BabySmart
TM airbag deactivation
system 339
BabySmartTM compatible child
seats 339
Backrest
Folding forward 199
Folding rearward 200
Backrest tilt 33
Backup lamps 293, 298
Bulbs 293BAS 75, 339
Messages in display 262
Batteries, electronic key
Checking 86
Batteries, SmartKey
Changing 287
Check lamp 85
Checking 86
Battery discharged
Jump starting 308
Battery, vehicle 239, 305
Charging 306
Disconnecting 306
Messages in display 278
Reconnecting 307
Reinstalling 306
Removing 306
Bi-Xenon headlamps* 339
Bi-Xenon type
Front lamp bulbs 295
Block heater 245
Blocking
Rear door window operation 71
Bolts
For Minispare wheel 284
For spare wheel 282Brake assist system (BAS) 339
Brake fluid 233, 330
Brake lamp bulbs 293
Brake lamp, high mounted 293
Brake pads
Message in display 263
Brakes 224
Break-in period 222
Bulbs, replacing 292
Additional turn signals 292
Backup lamps 293
Brake lamps 293
Fog lamps 292
Front lamps 292
High beam 292
High mounted brake lamp 293
License plate lamps 293, 298
Low beam 292
Parking lamps 292, 293, 295, 296
Rear fog lamp 293
Rear fog lamps 297
Side marker lamps 292, 297
Standing lamps 292, 293, 295, 296
Tail lamp assemblies 293, 297
Turn signal lamps 292, 293
S203 MY03_A.book Page 347 Tuesday, January 28, 2003 2:22 PM