Page 244 of 370

250 OperationVehicle careEngine cleaning
Prior to cleaning the engine compartment
make sure to protect electrical compo-
nents and connectors from the intrusion of
water and cleaning agents.
Corrosion protection, such as MB Anticor-
rosion Wax should be applied to the engine
compartment after every engine cleaning.
Before applying, all control linkage bush-
ings and joints should be lubricated. The
poly-V-belt and all pulleys should be pro-
tected from any wax.
Vehicle washing
Do not use hot water or wash your vehicle
in direct sunlight. Use only a mild car wash
detergent, such as Mercedes-Benz ap-
proved Car Shampoo.Thoroughly spray the vehicle with a dif-
fused jet of water. Direct only a very weak
spray towards the ventilation intake. Use
plenty of water and rinse the sponge and
chamois frequently.
Rinse with clear water and thoroughly dry
with a chamois. Do not allow cleaning
agents to dry on the finish.
Due to the width of the vehicle, fold in out-
side mirrors prior to running the vehicle
through an automatic car wash to prevent
damage to the mirrors.
In the winter, thoroughly remove all traces
of road salt as soon as possible.
When washing the underbody, do not for-
get to clean the inner sides of the wheels.Ornamental moldings
For regular cleaning and care of very dirty
chrome-plated parts, use a chrome clean-
er.
Headlamps, tail lamps, turn signal
lenses
Use a mild car wash detergent, such as
Mercedes-Benz approved Car Shampoo,
with plenty of water.
To prevent scratches, never apply strong
force and use only a soft, non-scratchy
cloth when cleaning the lenses. Do not at-
tempt to wipe dirty lenses with a dry cloth
or sponge.S203 MY03_A.book Page 250 Tuesday, January 28, 2003 2:22 PM
Page 265 of 370

271 Practical hints
What to do if …
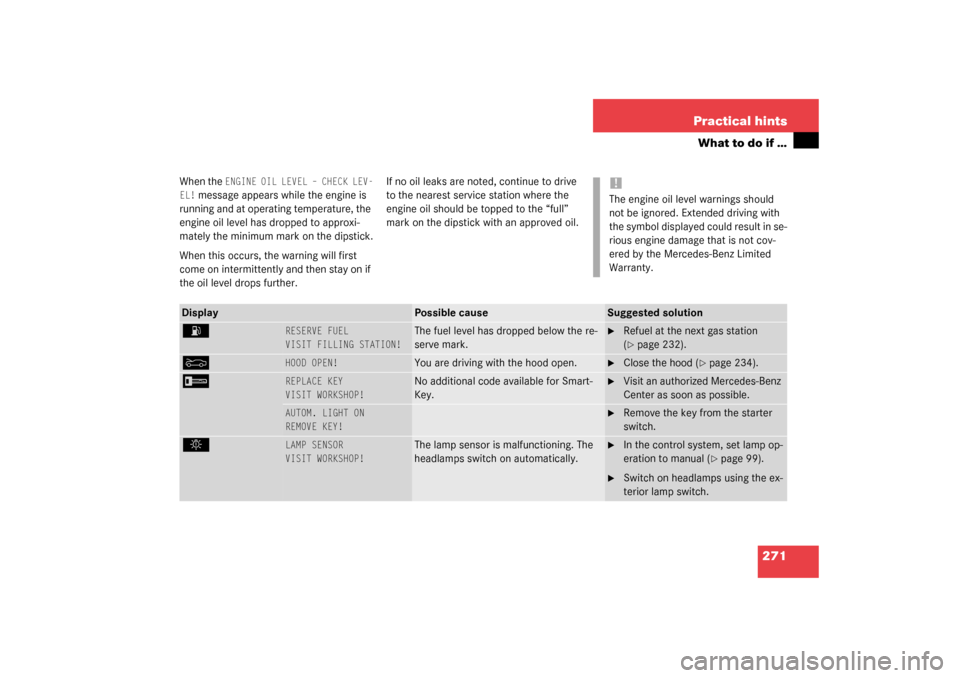
When the
ENGINE OIL LEVEL – CHECK LEV-
EL!
message appears while the engine is
running and at operating temperature, the
engine oil level has dropped to approxi-
mately the minimum mark on the dipstick.
When this occurs, the warning will first
come on intermittently and then stay on if
the oil level drops further.If no oil leaks are noted, continue to drive
to the nearest service station where the
engine oil should be topped to the “full”
mark on the dipstick with an approved oil.
!The engine oil level warnings should
not be ignored. Extended driving with
the symbol displayed could result in se-
rious engine damage that is not cov-
ered by the Mercedes-Benz Limited
Warranty.
Display
Possible cause
Suggested solution
A
RESERVE FUEL
VISIT FILLING STATION!
The fuel level has dropped below the re-
serve mark.
�
Refuel at the next gas station
(�page 232).
Y
HOOD OPEN!
You are driving with the hood open.
�
Close the hood (
�page 234).
I
REPLACE KEY
VISIT WORKSHOP!
No additional code available for Smart-
Key.
�
Visit an authorized Mercedes-Benz
Center as soon as possible.
AUTOM. LIGHT ON
REMOVE KEY!
�
Remove the key from the starter
switch.
.
LAMP SENSOR
VISIT WORKSHOP!
The lamp sensor is malfunctioning. The
headlamps switch on automatically.
�
In the control system, set lamp op-
eration to manual (
�page 99).
�
Switch on headlamps using the ex-
terior lamp switch.
S203 MY03_A.book Page 271 Tuesday, January 28, 2003 2:22 PM
Page 286 of 370
292 Practical hintsReplacing bulbs
Replacing bulbsSafe vehicle operation depends on proper
exterior lighting and signaling. It is there-
fore essential that all bulbs and lamp as-
semblies are in good working order at all
times.
Correct headlamp adjustment is extremely
important. Have headlamps checked and
readjusted at regular intervals and when a
bulb has been replaced. See your autho-
rized Mercedes-Benz Center for headlamp
adjustment.
Bulbs Front lamps
iBackup bulbs will be brought into use
when the following lamps malfunction:�
Standing lamps
�
Tail lamps
Lamp
Type
1
Additional turn
signal
LED
2
Turn signal lamp
Halogen
Turn signal lamp
Bi-Xenon*
1156 A
2357 A
3
Low beam Halogen
Low and high beam*
H7 (55 W)
Bi-Xenon*
4
High beam
H7 (55 W)
Parking and
standing lamps
W5W
5
Fog lamp
HB4/9006
(55 W)
6
Side marker lamp
W5W
S203 MY03_A.book Page 292 Tuesday, January 28, 2003 2:22 PM
Page 288 of 370

294 Practical hintsReplacing bulbsReplacing bulbs for front lamps
Halogen headlamps
1Bulb socket for turn signal lamp
2Headlamp cover for high beam head-
lamp and for parking and standing
lamp
3Headlamp cover for low beam head-
lamp4Low beam bulb
5High beam bulb
6Bulb socket for parking and standing
lamp
Low and high beam bulb
�
Switch off the lights.
�
Open the hood (
�page 234).
�
Press the clamp and remove headlamp
cover2 or 3.
�
Pull electrical connector off.
�
Unclip the retainer springs and take out
the bulb.
�
Insert the new bulb so that the base
locates in the recess on the holder.
�
Clip the retainer springs and plug the
connector onto the bulb.
�
Align headlamp cover2 or 3 and click
into place.
Front turn signal lamp bulb
�
Switch off the lights.
�
Open the hood (
�page 234).
�
Twist bulb socket1 counterclockwise
and pull out.
�
Push bulb into socket, turn counter-
clockwise and remove.
�
Insert new bulb in socket, push in and
twist clockwise.
�
Reinsert bulb socket in lamp and twist
clockwise.
S203 MY03_A.book Page 294 Tuesday, January 28, 2003 2:22 PM
Page 289 of 370

295 Practical hints
Replacing bulbs
Parking and standing lamp bulb�
Switch off the lights.
�
Open the hood (
�page 234).
�
Press the clamp and remove headlamp
cover2.
�
Pull out the bulb socket6 with the
bulb.
�
Pull the bulb out of the bulb socket.
�
Insert a new bulb in the socket.
�
Reinstall the bulb socket.
�
Align headlamp cover2 and click into
place.Bi-Xenon* headlamps
1Bulb socket for turn signal lamp
2Headlamp cover for high beam bulb,
parking and standing lamp
3Headlamp cover for Bi-Xenon lamp4High beam headlamp bulb
5Bayonet socket for high beam head-
lamp bulb
6Bulb socket for parking and standing
lamp
High beam bulb
�
Switch off the lights.
�
Open the hood (
�page 234).
�
Press the clamp and remove headlamp
cover2.
�
Pull electrical connector4 off.
Warning!
G
Do not remove the cover3 for the Bi-Xenon
headlamp. Because of high voltage in
Bi-Xenon lamps, it is dangerous to replace
the bulb or repair the lamp and its compo-
nents. We recommend that you have such
work done by a qualified technician.
��
S203 MY03_A.book Page 295 Tuesday, January 28, 2003 2:22 PM
Page 290 of 370

296 Practical hintsReplacing bulbs�
Twist bayonet socket5 counterclock-
wise to the stop (do not remove).
�
Pull the bulb out of the socket.
�
Insert the new bulb so that the base lo-
cates in the recess in the bayonet
socket5.
�
Twist bayonet socket clockwise until
you hear it snap into place.
�
Plug the connector onto the bulb.
�
Align headlamp cover2 and click into
place.Front turn signal lamp bulb
�
Switch off the lights.
�
Open the hood (
�page 234).
�
Twist bulb socket1 counterclockwise
and pull out.
�
Push bulb into socket, turn counter-
clockwise and remove.
�
Insert new bulb in socket, push in and
twist clockwise.
�
Reinsert bulb socket in lamp and twist
clockwise.Parking and standing lamp bulb
�
Switch off the lights.
�
Open the hood (
�page 234).
�
Press the clamp and remove headlamp
cover2.
�
Pull out the bulb socket6 with the
bulb.
�
Pull the bulb out of the bulb socket.
�
Insert a new bulb in the socket.
�
Reinstall the bulb socket.
�
Align headlamp cover2 and click into
place.
S203 MY03_A.book Page 296 Tuesday, January 28, 2003 2:22 PM
Page 323 of 370

329 Technical data
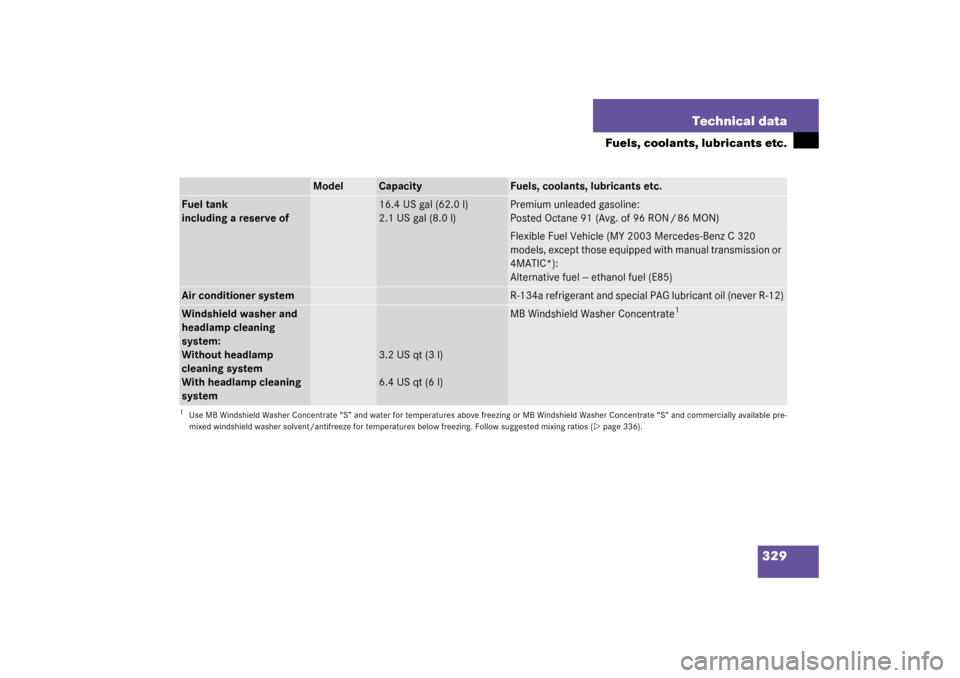
Fuels, coolants, lubricants etc.
Model
Capacity
Fuels, coolants, lubricants etc.
Fuel tank
including a reserve of
16.4 US gal (62.0 l)
2.1 US gal (8.0 l)
Premium unleaded gasoline:
Posted Octane 91 (Avg. of 96 RON / 86 MON)Flexible Fuel Vehicle (MY 2003 Mercedes-Benz C 320
models, except those equipped with manual transmission or
4MATIC*):
Alternative fuel -- ethanol fuel (E85)
Air conditioner system
R-134a refrigerant and special PAG lubricant oil (never R-12)
Windshield washer and
headlamp cleaning
system:
Without headlamp
cleaning system
With headlamp cleaning
system
3.2 US qt (3 l)
6.4 US qt (6 l)
MB Windshield Washer Concentrate
1
1Use MB Windshield Washer Concentrate “S” and water for temperatures above freezing or MB Windshield Washer Concentrate “S” and commercially available pre-
mixed windshield washer solvent/antifreeze for temperatures below freezing. Follow suggested mixing ratios (
�page 336).
S203 MY03_A.book Page 329 Tuesday, January 28, 2003 2:22 PM
Page 330 of 370

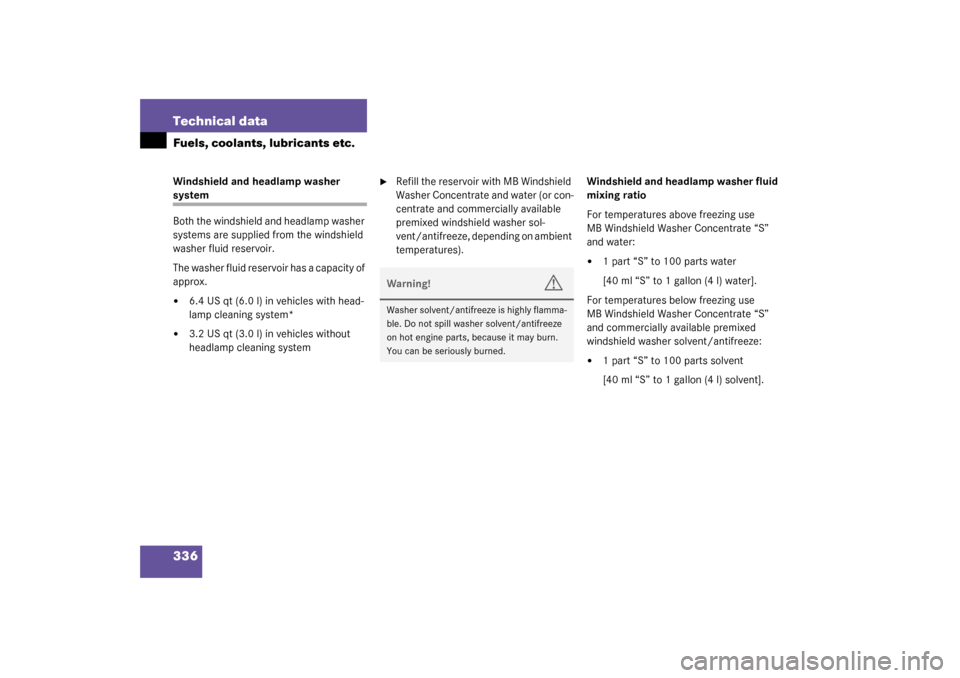
336 Technical dataFuels, coolants, lubricants etc.Windshield and headlamp washer system
Both the windshield and headlamp washer
systems are supplied from the windshield
washer fluid reservoir.
The washer fluid reservoir has a capacity of
approx.�
6.4 US qt (6.0 l) in vehicles with head-
lamp cleaning system*
�
3.2 US qt (3.0 l) in vehicles without
headlamp cleaning system
�
Refill the reservoir with MB Windshield
Washer Concentrate and water (or con-
centrate and commercially available
premixed windshield washer sol-
vent/antifreeze, depending on ambient
temperatures).Windshield and headlamp washer fluid
mixing ratio
For temperatures above freezing use
MB Windshield Washer Concentrate “S”
and water:
�
1 part “S” to 100 parts water
[40 ml “S” to 1 gallon (4 l) water].
For temperatures below freezing use
MB Windshield Washer Concentrate “S”
and commercially available premixed
windshield washer solvent/antifreeze:
�
1 part “S” to 100 parts solvent
[40 ml “S” to 1 gallon (4 l) solvent].
Warning!
G
Washer solvent/antifreeze is highly flamma-
ble. Do not spill washer solvent/antifreeze
on hot engine parts, because it may burn.
You can be seriously burned.
S203 MY03_A.book Page 336 Tuesday, January 28, 2003 2:22 PM