Page 4 of 376

ContentsSafety and Security........................... 55
Occupant safety................................... 56
Airbags ........................................... 57
Seat belts ....................................... 61
Children in the vehicle .................... 65
Blocking of rear door window
operation ........................................ 71
Panic alarm* .................................. 72
Activating ....................................... 72
Deactivating ................................... 72
Driving safety systems ......................... 73
ABS ................................................ 73
BAS ................................................ 74
ESP ................................................. 75
Four wheel electronic traction
system (4MATIC*) with the ESP ..... 78
Anti-theft systems................................ 79
Immobilizer..................................... 79
Anti-theft alarm system .................. 79
Tow-away alarm ............................. 80
Controls in detail............................... 83
Locking and unlocking ......................... 84
Keys ............................................... 84
Opening the doors from the inside . 87
Opening the trunk from the inside . 88
Opening the trunk .......................... 88
Closing the trunk............................ 89
Trunk lid emergency release .......... 89
Separately locking the trunk .......... 90
Separately unlocking the trunk ...... 91
Automatic central locking .............. 91
Locking and unlocking
from the inside ............................... 92
Seats ................................................... 93
Easy-entry/exit feature* ................ 93
Head restraints .............................. 94
Multicontour seat* ......................... 96
Heated seats* ................................ 97
Memory function* ............................... 98
Storing positions into memory ....... 99
Recalling positions from memory ... 99
Storing exterior rear view mirror
parking position ........................... 100Lighting ............................................. 101
Exterior lamp switch .................... 101
Combination switch ..................... 104
Hazard warning flasher ................ 104
Interior lighting ............................ 105
Door entry lamps ......................... 106
Trunk lamp ................................... 106
Instrument cluster ............................. 107
Instrument cluster illumination .... 107
Coolant temperature display ........ 108
Trip odometer .............................. 109
Tachometer .................................. 109
Outside temperature indicator ..... 110
Control system .................................. 111
Multifunction display.................... 111
Multifunction steering wheel........ 112
Menus .......................................... 114
Standard display menu ................ 116
AUDIO menu ................................ 116
NAVI menu ................................... 118
Malfunction memory menu .......... 118
Settings menu .............................. 119
Trip computer menu..................... 132
TEL menu* ................................... 134
Manual transmission ......................... 137
Shifting into reverse ..................... 137
Page 28 of 376
28 At a glanceDoor control panel
Door control panel
Item
Page
1
Door handle
87
2
Memory function (for stor-
ing seat, mirror and steer-
ing wheel settings)
98
3
Seat adjustment*
32,
34, 93
4
Switches for opening/clos-
ing front door windows
187
5
Switch for rear door win-
dow override
71
6
Switches for opening/clos-
ing rear door windows
187
7
Remote trunk lid release
switch
88
Page 198 of 376
198 Controls in detailLoading�
Wrap strap4 around ski sack and arm-
rest.
�
Close clasp5 (arrows) and pull strap
tight to immobilize skis.
�
Connect snap hook6 of front strap to
eye7 located on center tunnel in front
of rear seat bench.Unloading and folding
�
Loosen strap, open clasp by pressing
tabs8 together (arrows).
�
Unload skis.
�
Close flap in trunk.
�
Disconnect snap hook6 from eye7.
�
Fold and flatten ski sack lengthwise
and place folded ski sack inside recess
of backrest.
��
Page 199 of 376
199 Controls in detail
Loading
�
Close ski sack compartment cover1.
Removal of ski sack
For removal of the ski sack we recommend
that you contact an authorized
Mercedes-Benz Center.
Split rear bench seat*
The two sections can be folded down sep-
arately to enlarge the cargo area.
Warning!
G
Never drive vehicle with trunk lid open while
the ski sack is removed. Deadly carbon
monoxide (CO) gases may enter vehicle in-
terior, resulting in unconsciousness and
death.iTo prevent unauthorized persons from
access to the trunk, always close the
cover.
Warning!
G
When expanding the luggage area, always
fold the seat cushions fully forward.
Unless you are transporting cargo, the back-
rests must remain properly locked in the up-
right position.
In an accident, during hard braking or sud-
den maneuvers, loose items will be thrown
around inside the vehicle, and cause injury
to vehicle occupants unless the items are
securely fastened in the vehicle.
Page 200 of 376
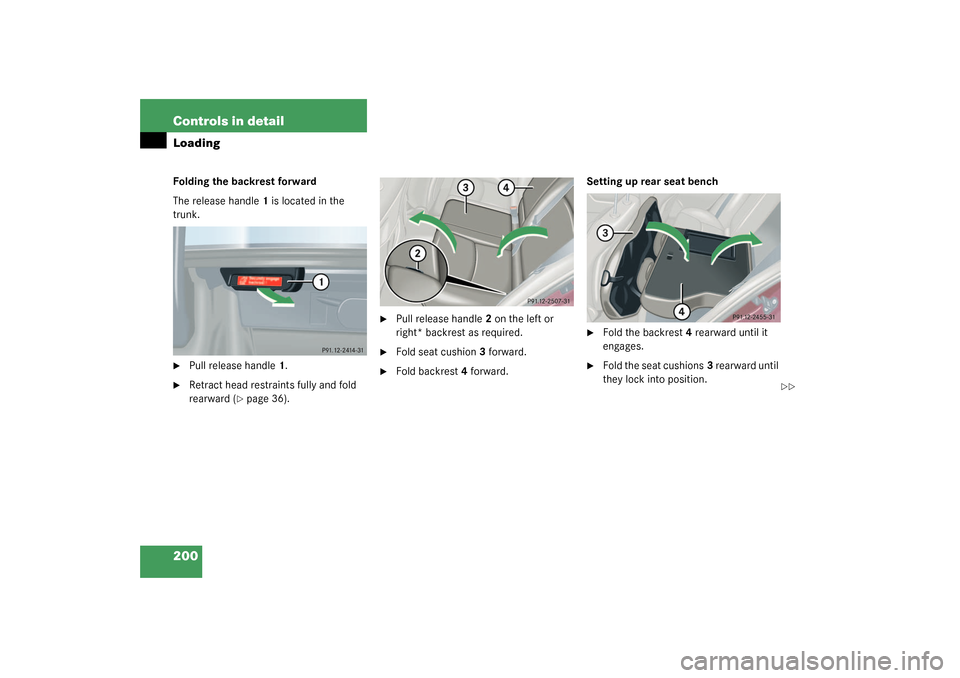
200 Controls in detailLoadingFolding the backrest forward
The release handle1 is located in the
trunk.�
Pull release handle1.
�
Retract head restraints fully and fold
rearward (
�page 36).
�
Pull release handle2 on the left or
right* backrest as required.
�
Fold seat cushion3 forward.
�
Fold backrest4 forward.Setting up rear seat bench
�
Fold the backrest4 rearward until it
engages.
�
Fold the seat cushions3 rearward until
they lock into position.
��
Page 201 of 376
201 Controls in detail
Loading
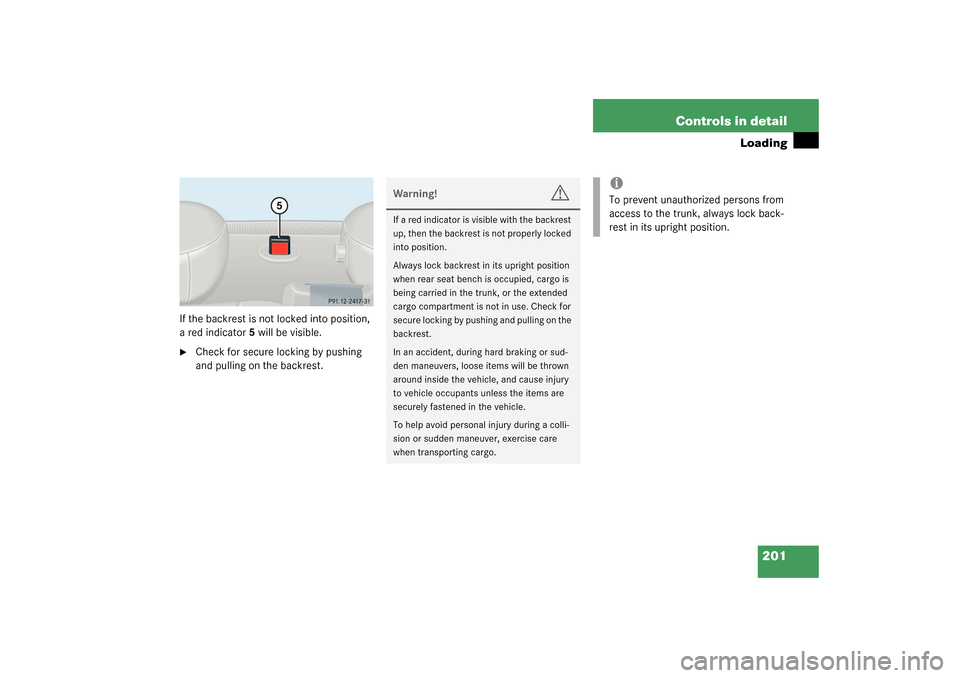
If the backrest is not locked into position,
a red indicator5 will be visible.�
Check for secure locking by pushing
and pulling on the backrest.
Warning!
G
If a red indicator is visible with the backrest
up, then the backrest is not properly locked
into position.
Always lock backrest in its upright position
when rear seat bench is occupied, cargo is
being carried in the trunk, or the extended
cargo compartment is not in use. Check for
secure locking by pushing and pulling on the
backrest.
In an accident, during hard braking or sud-
den maneuvers, loose items will be thrown
around inside the vehicle, and cause injury
to vehicle occupants unless the items are
securely fastened in the vehicle.
To help avoid personal injury during a colli-
sion or sudden maneuver, exercise care
when transporting cargo.
iTo prevent unauthorized persons from
access to the trunk, always lock back-
rest in its upright position.
Page 202 of 376

202 Controls in detailLoadingLoading instructions
The total load weight including vehicle oc-
cupants and luggage/cargo should not ex-
ceed the vehicle capacity weight indicated
on the certification tag which can be found
on the left door pillar.
The handling characteristics of a fully load-
ed vehicle depend greatly on the load dis-
tribution. It is therefore recommended to
load the vehicle according to the illustra-
tions shown, with the heaviest items being
placed towards the front of the vehicle.Always place items being carried against
front or rear seat backrests, and fasten
them as securely as possible.
The heaviest portion of the cargo should al-
ways be kept as low as possible since it in-
fluences the handling characteristics of
the vehicle.
Warning!
G
Always fasten items being carried as secure-
ly as possible.
In an accident, during hard braking or sud-
den maneuvers, loose items will be thrown
around inside the vehicle and can cause in-
jury to vehicle occupants unless the items
are securely fastened in the vehicle.
To help avoid personal injury during a colli-
sion or sudden maneuver, exercise care
when transporting cargo.
Never drive vehicle with trunk open. Deadly
carbon monoxide (CO) gases may enter ve-
hicle interior resulting in unconsciousness
and death.iThe trunk is the preferred place to carry
objects.
The enlarged cargo area should only be
used for items which do not fit in the
trunk alone.
Page 280 of 376

280 Practical hintsWhere will I find ...?�
Remove vehicle tool kit storage well
casing5.
3Arrow
4Minispare wheel
5Vehicle tool kit storage well casing
6Vehicle tool kit
Wheel wrench
Vehicle jackVehicle jackVehicles with full size tire spare wheel
The vehicle jack is stored in the space
underneath the trunk floor together with
the vehicle tool kit in the storage tray
(
�page 281).
Vehicles with Minispare wheel
The vehicle jack is stored in the space
underneath the trunk floor together with
the vehicle tool kit in the vehicle tool kit
storage well casing (
�page 279).
Storage position�
Remove the vehicle jack from its
compartment.
iArrow3 on vehicle tool kit storage well
casing5 must point in the direction of
travel. Otherwise you cannot place the
storage well casing on top and secure
the Minispare wheel with retaining
screw1 (
�page 279).
Warning!
G
The jack is designed exclusively for jacking
up the vehicle at the jack take-up brackets
built into both sides of the vehicle. To help
avoid personal injury, use the jack only to lift
the vehicle during a wheel change. Never
get beneath the vehicle while it is supported
by the jack. Keep hands and feet away from
the area under the lifted vehicle. Always
firmly set parking brake and block wheels
before raising vehicle with jack.
Do not disengage parking brake while the
vehicle is raised. Be certain that the jack is
always vertical (plumb line) when in use,
e s p e c i a l l y o n h i l l s . A l w a y s t r y t o u s e t h e j a c k
on level surface. Make sure that the jack
arm is fully seated in the jack take-up
bracket. Always lower the vehicle onto
sufficient capacity jackstands before
working under the vehicle.
��