Page 15 of 370
21 At a glance
Cockpit
Item
Page
1
Combination switch�
Turn signals
47
�
Windshield wipers
48
�
High beam
47
2
Cruise control lever
190
3
Instrument cluster
22,
104
4
Multifunction steering
wheel
24,
108
5
Lever for voice control
system*, see separate
operating instructions
6
Overhead control panel
27
7
Opening glove box
203
8
Glove box
203
Item
Page
9
Center console
25
10
Starter switch
31, 44
11
Horn
12
Steering wheel adjustment
handle (manual)
37
13
Steering wheel adjustment
stalk (electrical)*
37
14
Hood lock release
234
15
Parking brake pedal
46
16
Door control panel
28
17
Parking brake release
51
18
Exterior lamp switch
47, 98
19
Exterior rear view mirror
adjustment
38, 97
20
Headlamp washer switch
143
S203 MY03_A.book Page 21 Tuesday, January 28, 2003 2:22 PM
Page 17 of 370

23 At a glance
Instrument cluster
Item
Page
1
Left turn signal indicator
lamp
2
Speedometer
3
Right turn signal indicator
lamp
4
Fuel gauge with:Fuel reserve warning lamp
258
5
<
Seat belt nonusage
warning lamp
258
1
Supplemental re-
straint system indi-
cator lamp
56,
256
6
Multifunction display
with:Trip odometer
105
Main odometer
Item
Page
Selector lever position
44,
138
Program mode
139
Outside temperature
display
106
Digital clock
118
7
?
Engine malfunction
indicator lamp
258
v
Electronic Stability
Program (ESP)
warning lamp
75,
254
A
High beam head-
lamp indicator
47,
101
E
Indicator lamp with-
out function
1
1The indicator lamp illuminates briefly when you
turn the key in the starter switch to position2.
DTRIndicator lamp with-
out function
1
Item
Page
8
-
Antilock Brake Sys-
tem (ABS) malfunc-
tion indicator lamp
73,
255
;
Brake warning
lamp, except Cana-
da
46,
257
3
Brake warning
lamp, Canada only
9
Tachometer
10
Reset knob:�
Resetting trip odome-
ter
105
�
Resetting individual
settings
116
�
Instrument cluster illu-
mination
104
S203 MY03_A.book Page 23 Tuesday, January 28, 2003 2:22 PM
Page 24 of 370
30 Getting startedUnlockingThe “Getting started” section provides an
overview of the vehicle’s most basic func-
tions. First-time Mercedes-Benz owners
should pay special attention to the infor-
mation given here.
If you are already familiar with the basic
functions described here, the “Controls in
detail” section will help you with further in-
formation. The corresponding page refer-
ences are at the end of each segment.
UnlockingUnlocking with the SmartKeySmartKey with remote control1‹
Lock button
2
Œ
Unlock button
3
Â
Panic button (
�page 72)
�
Press unlock button
Œ
on the key.
All turn signal lamps blink once. The
locking knobs in the doors move up.
�
Get in the vehicle and insert the key in
the starter switch.
More information can be found in the
“Controls in detail” section (
�page 84).
iCanada only:
Only vehicles equipped with an
anti-theft alarm system* have
SmartKeys with integrated panic
button*3.
S203 MY03_A.book Page 30 Tuesday, January 28, 2003 2:22 PM
Page 41 of 370

47 Getting started
Driving
More information on driving can be found
in the “Operation” section (
�page 223).
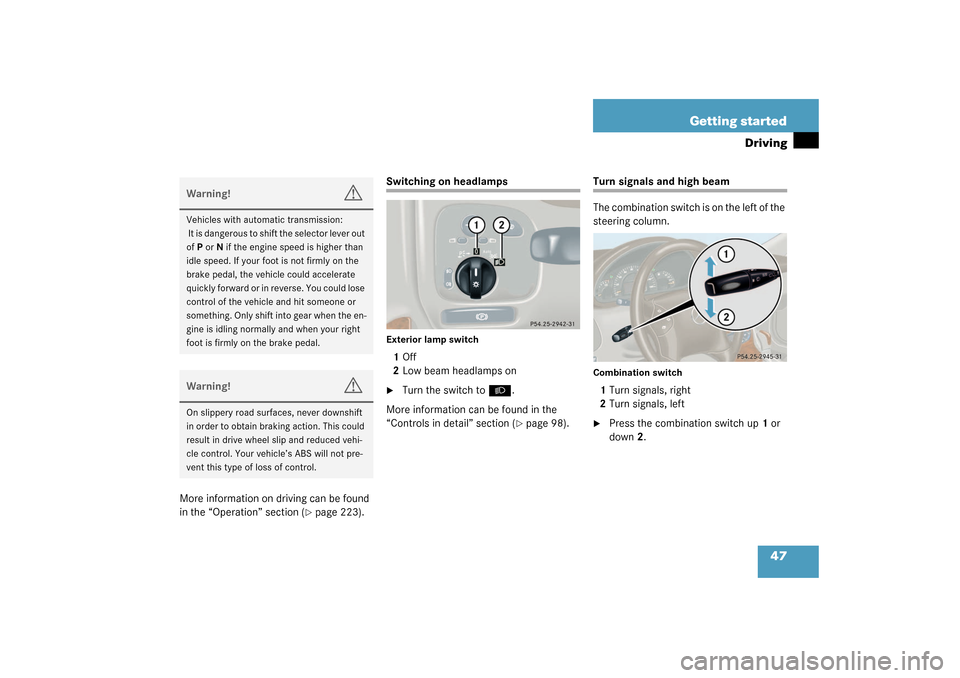
Switching on headlampsExterior lamp switch1Off
2Low beam headlamps on�
Turn the switch to
B
.
More information can be found in the
“Controls in detail” section (�page 98).
Turn signals and high beam
The combination switch is on the left of the
steering column.Combination switch1Turn signals, right
2Turn signals, left�
Press the combination switch up1 or
down2.
Warning!
G
Vehicles with automatic transmission:
It is dangerous to shift the selector lever out
ofP or N if the engine speed is higher than
idle speed. If your foot is not firmly on the
brake pedal, the vehicle could accelerate
quickly forward or in reverse. You could lose
control of the vehicle and hit someone or
something. Only shift into gear when the en-
gine is idling normally and when your right
foot is firmly on the brake pedal.Warning!
G
On slippery road surfaces, never downshift
in order to obtain braking action. This could
result in drive wheel slip and reduced vehi-
cle control. Your vehicle’s ABS will not pre-
vent this type of loss of control.
S203 MY03_A.book Page 47 Tuesday, January 28, 2003 2:22 PM
Page 42 of 370

48 Getting startedDrivingHigh beam�
Push the combination switch forward.
The high beam symbol
A
in the
instrument cluster lights up.
More information can be found in the
“Controls in detail” section (
�page 101).
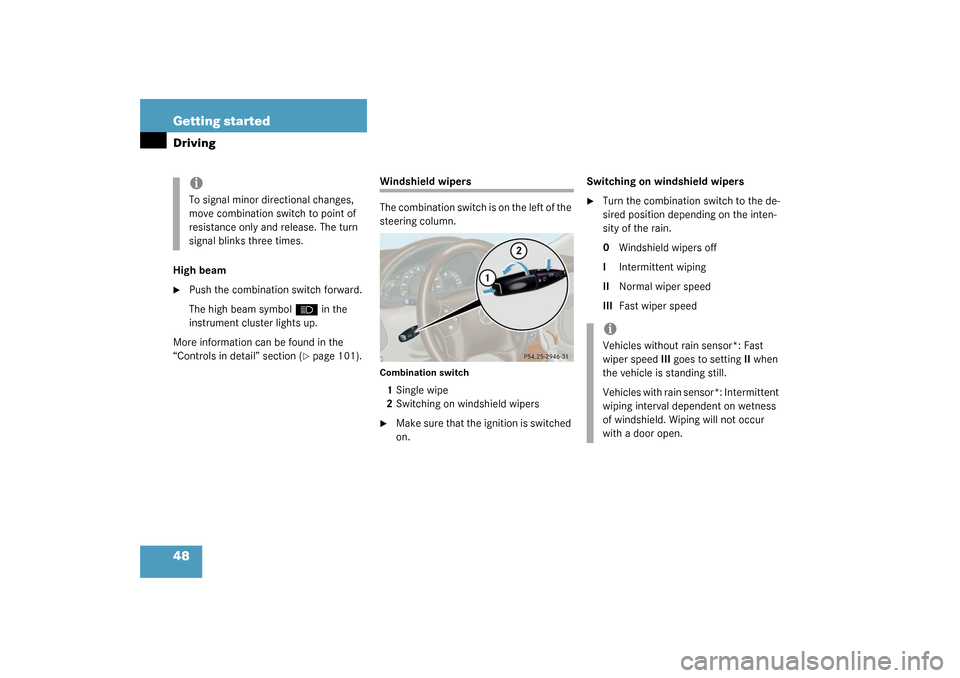
Windshield wipers
The combination switch is on the left of the
steering column.Combination switch1Single wipe
2Switching on windshield wipers �
Make sure that the ignition is switched
on.Switching on windshield wipers
�
Turn the combination switch to the de-
sired position depending on the inten-
sity of the rain.
0Windshield wipers off
IIntermittent wiping
IINormal wiper speed
IIIFast wiper speed
iTo signal minor directional changes,
move combination switch to point of
resistance only and release. The turn
signal blinks three times.
iVehicles without rain sensor*: Fast
wiper speed III goes to setting II when
the vehicle is standing still.
Vehicles with rain sensor*: Intermittent
wiping interval dependent on wetness
of windshield. Wiping will not occur
with a door open.
S203 MY03_A.book Page 48 Tuesday, January 28, 2003 2:22 PM
Page 73 of 370

79 Safety and Security
Anti-theft systems
Anti-theft systems
Immobilizer
The immobilizer prevents unauthorized
persons from starting your vehicle.
Activating�
Removing the key from the starter
switch activates the immobilizer.
Deactivating
�
Inserting the key in the starter switch
deactivates the immobilizer.
Anti-theft alarm system*
Once the alarm system has been armed, a
visual and audible alarm is triggered when
someone opens�
a door
�
the tailgate
�
the hood.
The alarm system will also be triggered
when
�
someone attempts to raise the vehicle
�
the vehicle is opened with the mechan-
ical key.Arming the alarm system
The alarm system is armed after locking
the vehicle with the remote control. The
turn signal lamps blink three times to indi-
cate that the alarm system is activated.
A red lamp in the switch for the tow-away
alarm will blink after approximately
10 seconds when the alarm system is
completely armed.
iIn case the engine cannot be started
(yet the vehicle’s battery is charged),
the system is not operational. Contact
an authorized Mercedes-Benz Center
or call 1-800-FOR-MERCedes (in the
USA), or 1-800-387-0100 (in Canada).
iIf the alarm stays on for more than
20 seconds, an emergency call is initi-
ated automatically by the Tele Aid* sys-
tem (
�page 211) provided Tele Aid*
service was subscribed to and properly
activated, and that necessary cellular
service and GPS coverage are avail-
able.
iIf the turn signal lamps do not blink
three times, the tow-away sensor* is
malfunctioning or one of the following
elements may not be properly closed:�
a door
�
the tailgate
�
the hood
Close the respective element and lock
the vehicle again.
S203 MY03_A.book Page 79 Tuesday, January 28, 2003 2:22 PM
Page 74 of 370

80 Safety and SecurityAnti-theft systemsDisarming the alarm system
The alarm system is disarmed when you
unlock your vehicle with the remote con-
trol. The turn signal lamps blink once to in-
dicate that the alarm system is
deactivated.
Canceling the alarm�
Insert the key in the starter switch.
or
�
Press the
Œ
or
‹
button.
Tow-away alarm*
Once the tow-away alarm is armed, a visual
and audible alarm will be triggered when
someone attempts to raise the vehicle.Arming tow-away alarm
When you lock your vehicle, the tow-away
alarm is automatically armed after about
30 seconds.
When you unlock your vehicle, the tow-
away protection disarms automatically.
iThe alarm system will rearm automati-
cally after approximately 40 seconds if
one of a door or the tailgate is not
opened.
iThe tow-away protection alarm is trig-
gered, for example, if the vehicle is lift-
ed on one side.
If the alarm stays on for more than
20 seconds, an emergency call is initi-
ated automatically by the Tele Aid* sys-
tem (
�page 211) provided Tele Aid*
service was subscribed to and properly
activated, and that necessary cellular
service and GPS coverage are avail-
able.
S203 MY03_A.book Page 80 Tuesday, January 28, 2003 2:22 PM
Page 79 of 370

85 Controls in detail
Locking and unlocking
Factory setting
Global unlocking�
Press button
Œ
.
All turn signal lamps blink once. The
locking knobs in the doors move up.
The vehicle will lock again automatically
within approximately 40 seconds of un-
locking if neither door nor tailgate is
opened, the SmartKey is not inserted in
the starter switch, or the central locking
switch is not activated.Global locking
�
Press button
‹
.
All turn signal lamps blink three times.
The locking knobs in the doors move
down.
Selective setting
If you frequently travel alone, you may wish
to reprogram the key so that
pressing
Œ
only unlocks the driver’s
door and the fuel filler flap.
�
Press and hold buttons
Œ
and
‹
simultaneously for about five seconds
until battery check lamp4 blinks twice.
The key will then function as follows:
Unlocking driver’s door and fuel filler
flap
�
Press button
Œ
once.
Global unlocking
�
Press button
Œ
twice.
Global locking
�
Press button
‹
.Restoring to factory setting
�
Press and hold buttons
Œ
and
‹
simultaneously for about six seconds
until battery check lamp4 blinks twice.
iYou can also open and close the power
windows (
�page 186) and slid-
ing/pop-up roof (
�page 188) using
the SmartKey.
!To prevent possible malfunction, avoid
exposing the key to high levels of elec-
tromagnetic radiation.
Warning!
G
When leaving the vehicle, always remove the
key from the starter switch, and lock the ve-
hicle. Do not leave children unattended in
the vehicle, or with access to an unlocked
vehicle. It is possible for children to open a
locked door from the inside, which could re-
sult in an accident and/or serious injury.
S203 MY03_A.book Page 85 Tuesday, January 28, 2003 2:22 PM