Page 242 of 376

242 OperationTires and wheels
Tires and wheelsSee your authorized Mercedes-Benz Cen-
ter for information on tested and recom-
mended rims and tires for summer and
winter operation. They can also offer ad-
vice concerning tire service and purchase.
Retread tires are not tested or recom-
mended by Mercedes-Benz, since previous
damage cannot always be recognized on
retreads. Mercedes-Benz can therefore
not assure the operating safety of the vehi-
cle when such tires are used.
See your authorized Mercedes-Benz Cen-
ter for information on tested and recom-
mended rims and tires for summer and
winter operation.
Important guidelines�
Use only sets of tires and rims of the
same type and make.
�
Tires must be of the correct size for the
rim.
�
Break in new tires for approximately
60 miles (100 km) at moderate
speeds.
�
Regularly check the tires and rims for
damage.
�
If vehicle is heavily loaded, check tire
pressure and correct as required.
�
Do not allow your tires to wear down
too far. Adhesion properties on wet
roads are sharply reduced at tread
depths under
1/8in (3 mm).
�
When replacing individual tires, you
should mount new tires on the front
wheels first (on vehicles with
same-sized wheels all around).
Warning!
G
Replace rims or tires with the same designa-
tion, manufacturer and type as shown on the
original part. See your authorized
Mercedes-Benz Center for further informa-
tion. If incorrectly sized rims and tires are
mounted:�
The wheel brakes or suspension compo-
nents can be damaged
�
The correct operating clearance of the
wheels and the tires are no longer guar-
anteed
Warning!
G
Worn, old tires can cause accidents. If the
tire tread is badly worn, or if the tires have
sustained damage, replace them.
When replacing rims, use only genuine
Mercedes-Benz wheel bolts specified for the
particular rim type. Failure to do so can re-
sult in the bolts loosening and possibly an
accident.
Page 244 of 376

244 OperationTires and wheelsKeep this in mind when checking tire pres-
sure where the temperature is different
from the outside temperature.
Tire temperature and tire pressure are also
increased while driving, depending on the
driving speed and the tire load.
Check the spare tire periodically for condi-
tion and inflation. Spare tires will age and
b e c o m e w o r n o v e r t i m e e v e n i f n e v e r u s e d ,
and thus should be inspected and replaced
when necessary.
Rotating wheels
On vehicles with the same wheel size all
around, wheels can be rotated every 3 000
to 6 000 miles (5 000 to 10 000 km), or
sooner if necessary, according to the de-
gree of tire wear. The same direction of tire
rotation must be retained.Rotate the wheels before the characteris-
tic tire wear pattern becomes visible
(shoulder wear on front wheels and tread
center wear on rear wheels).
Thoroughly clean the inner side of the
wheels after each rotation. Check and en-
sure proper tire inflation pressure.
Warning!
G
Follow recommended inflation pressures.
Do not overinflate tires. Overinflated tires
can result in sudden deflation (blowout) be-
cause they are more likely to become punc-
tured or damaged by road debris, potholes,
etc.
Do not underinflate tires. Underinflated tires
wear unevenly, adversely affect handling
and fuel economy, and are more likely to fail
from being overheated.
Do not overload the tires by exceeding the
specified vehicle capacity weight (as indicat-
ed by the label on the pillar in the driver’s
door opening). Overloading the tires can
overheat them, possibly causing a blowout.Warning!
G
Rotate front and rear wheels only if they are
of the same size.
Warning!
G
Have the tightening torque checked after
changing a wheel. Wheels could become
loose if not tightened with a torque of
80 ft.lb. (110 Nm).
Use only genuine Mercedes-Benz wheel
bolts specified for your vehicle's rims.
Page 279 of 376
279 Practical hints
Where will I find ...?
Where will I find ...?
First aid kit
The first aid kit is stored in the trunk on the
left side secured by a velcro strap.�
Unfasten velcro strap.
�
Remove first aid kit.
Vehicle tool kit
The following is included:�
Vehicle tool kit
�
Towing eye bolt
�
Wheel wrench
�
Alignment bolt
�
Vehicle jack
�
Wheel bolts
�
Special fuse extractor
�
Spare fusesRemoving the vehicle tool kit
Vehicles with full size tire spare wheel
The vehicle tool kit is stored in the space
underneath the trunk floor in the storage
tray (
�page 281).
Vehicles with Minispare wheel
�
Lift up the trunk floor cover.
�
Loosen retaining screw1 in the middle
of storage well casing2.
�
Remove storage well casing2.
1Retaining screw
2Storage well casing
iCheck expiration dates and contents
for completeness at least once a year
and replace missing/expired items.
��
Page 282 of 376
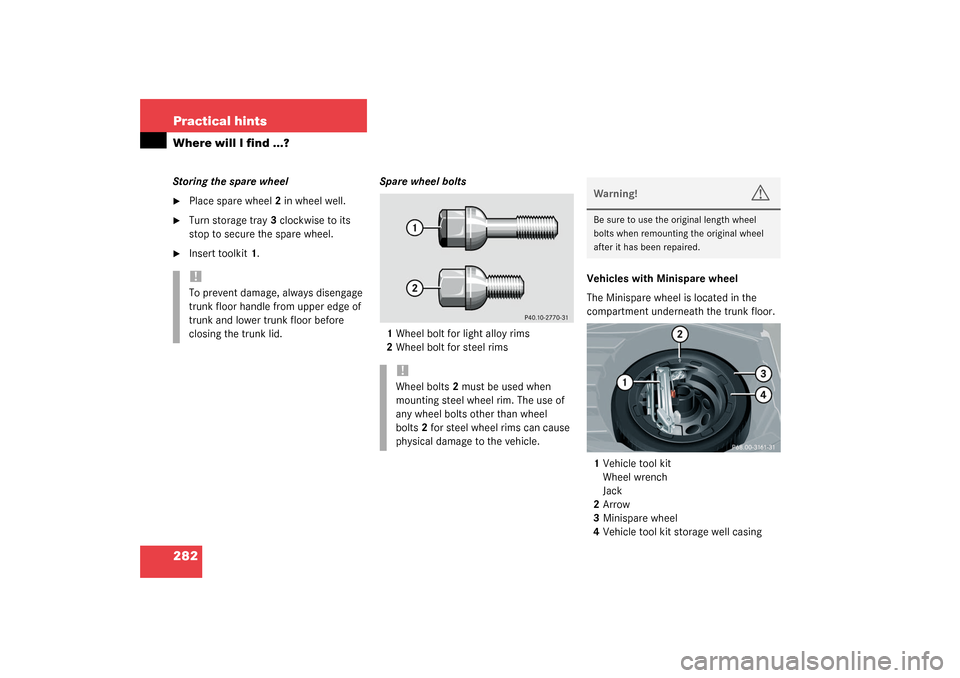
282 Practical hintsWhere will I find ...?Storing the spare wheel�
Place spare wheel2 in wheel well.
�
Turn storage tray3 clockwise to its
stop to secure the spare wheel.
�
Insert toolkit1.Spare wheel bolts
1Wheel bolt for light alloy rims
2Wheel bolt for steel rimsVehicles with Minispare wheel
The Minispare wheel is located in the
compartment underneath the trunk floor.
1Vehicle tool kit
Wheel wrench
Jack
2Arrow
3Minispare wheel
4Vehicle tool kit storage well casing!To prevent damage, always disengage
trunk floor handle from upper edge of
trunk and lower trunk floor before
closing the trunk lid.
!Wheel bolts2 must be used when
mounting steel wheel rim. The use of
any wheel bolts other than wheel
bolts2 for steel wheel rims can cause
physical damage to the vehicle.
Warning!
G
Be sure to use the original length wheel
bolts when remounting the original wheel
after it has been repaired.
Page 284 of 376
284 Practical hintsWhere will I find ...?In the case of a flat tire, you may
temporarily use the Minispare wheel when
observing the following restrictions:�
Do not exceed a vehicle speed of
50 mph (80 km/h).
�
Drive to the nearest tire repair facility
to have the flat tire repaired or
replaced as appropriate.
�
Do not operate vehicle with more than
one Minispare wheel mounted.Minispare wheel bolts
1Wheel bolt for light alloy rims
2Wheel bolt for Minispare wheel or other
steel rims
!Wheel bolts2 must be used when
mounting the Minispare wheel. The use
of any wheel bolts other than wheel
bolts2 for the Minispare wheel can
cause physical damage to the vehicle.
Warning!
G
Be sure to use the original length wheel
bolts when remounting the original wheel
after it has been repaired.
Page 298 of 376
298 Practical hintsFlat tireWheel cover on vehicles with steel rims
(Canada only)�
O n w h e e l t o b e c h a n g e d , r e m o v e w h e e l
cover by reaching into two openings of
the wheel cover and pulling away from
the wheel.
�
On wheel to be changed, loosen but do
not yet remove the wheel bolts
(approximately one full turn with
wrench). The jack take-up brackets are located di-
rectly behind the front wheel housings and
in front of the rear wheel housings.
�
Place jack on firm ground.
�
Position jack1 under the take-up
bracket2 so that it is always vertical
(plumb-line) as seen from the side,
even if the vehicle is parked on an
incline.
�
Jack up the vehicle until the wheel is a
maximum of 1.2 in (3 cm) from the
ground. Never start engine while
vehicle is raised.
Page 299 of 376
299 Practical hints
Flat tire
Removing the wheel
1Alignment bolt�
Unscrew upper-most wheel bolt and
remove.
�
Replace this wheel bolt with the
alignment bolt1 supplied in the tool
kit.
�
Remove the remaining bolts.
�
Remove the wheel.Mounting the new wheel
1Wheel bolt for light alloy rims
2Wheel bolt for Minispare wheel or other
steel rims
�
Clean contact surfaces of wheel and
wheel hub.
�
Guide the spare wheel onto the
alignment bolt and push it on.
�
Insert wheel bolts and tighten them
slightly.
!Do not place wheel bolts in sand or dirt.
This could result in damage to the bolt
and wheel hub threads.
!Wheel bolts2 must be used when
mounting steel wheel rims or the
Minispare wheel. The use of any wheel
bolts other than wheel bolts2 for steel
wheel rims or the Minispare wheel can
cause physical damage to the vehicle. !To avoid paint damage, place wheel flat
against hub and hold it there while
installing first wheel bolt.
��
Page 300 of 376

300 Practical hintsFlat tire
�
Unscrew the alignment bolt, install last
wheel bolt and tighten slightly.Minispare wheel
Warning!
G
Always replace wheel bolts that are
damaged or rusted.
Never apply oil or grease to wheel bolts.
Damaged wheel hub threads should be
repaired immediately. Do not continue to
drive under these circumstances! Contact
an authorized Mercedes-Benz Center or call
Roadside Assistance.
Incorrect mounting bolts or improperly
tightened mounting bolts can cause the
wheel to come off. This could cause an
accident. Be sure to use the correct mount-
ing bolts.
Warning!
G
Use only genuine equipment
Mercedes-Benz wheel bolts. They are identi-
fied by the Mercedes star. Other wheel bolts
may come loose.
Do not tighten the wheel bolts when the
vehicle is raised. Otherwise the vehicle
could tip over.
Warning!
G
The dimensions of the Minispare wheel are
different from those of the road wheels. As
a result, the vehicle handling characteristics
change when driving with a Minispare wheel
mounted.
The spare wheel should only be used
temporarily, and replaced with a regular
road wheel as quick as possible.