Page 262 of 376

262 Practical hintsWhat to do if …Display
Possible cause
Suggested solution
-
ABS SYSTEM
VISIT WORKSHOP!
The ABS has detected a malfunction and
has switched off. The ESP and the BAS
are also deactivated. The brake system is
still functioning normally but without the
ABS available.
�
Continue driving with added caution.
Wheels will lock in hard braking
reducing steering capability.
�
Have the system checked at an
authorized Mercedes-Benz Center as
soon as possible.
Failure to follow these instructions
increases the risk of accident.
DISPLAY DEFECTIVE
VISIT WORKSHOP!
The ABS or the ABS display is
malfunctioning.
�
Continue driving with added caution.
Wheels will lock in hard braking
reducing steering capability.
�
Have the system checked at an
authorized Mercedes-Benz Center as
soon as possible.
Failure to follow these instructions
increases the risk of accident.
BAS
BRAKE ASSIST
NOT AVAILABLE!
The charging voltage has fallen below ten
volts and the BAS has switched off.
�
When the voltage is above this value
again, the BAS is operational again.
�
If necessary, have the generator and
battery checked.
Page 269 of 376
269 Practical hints
What to do if …
ESP
ESP
NOT AVAILABLE!
The ESP is deactivated because of a
malfunction or interrupted power supply.
The ABS might not be operational.
�
With vehicle stationary and the engine
running, turn the steering wheel
completely to the left and then to the
right to synchronize the ESP.
If the ESP message does not go out:
�
Continue driving with added caution.
�
Visit an authorized Mercedes-Benz
Center as soon as possible.
Failure to follow these instructions
increases the risk of accident.
The self-diagnosis has not been
completed.
The display will clear itself after driving a
short distance at more than 12 mph
(20 km/h).
The charging voltage has fallen below ten
volts and the ESP has switched off.
�
When the voltage is above this value
again, the ESP is operational again.
�
If necessary, have the generator and
battery checked.
Display
Possible cause
Suggested solution
Page 276 of 376
276 Practical hintsWhat to do if …<
PASSENGER SEAT BELT
FASTEN SEAT BELT!
The display reminds you and your
passengers to fasten seat belts.
�
Fasten the seat belts.
_
STEERING WHEEL ADJUST
LOCK!
The steering column is not properly
locked .
�
Lock steering column (
�page 37).
POWER STEERING FLUID
VISIT WORKSHOP!
The steering gear oil level is too low.
There is a danger of steering gear
damage.
�
Have the system checked by an
authorized Mercedes-Benz Center.
Display
Possible cause
Suggested solution
Warning!
G
If the level of steering gear oil in reservoir is
too low, the steering power assistance could
fail. Much greater effort will then be needed
to turn the steering wheel.
Do not add steering oil without checking the
steering system.
Do not drive the vehicle. Have the system
checked at your authorized Mercedes-Benz
Center as soon as possible.
Page 277 of 376

277 Practical hints
What to do if …
Display
Possible cause
Suggested solution
L
TELE AID
VISIT WORKSHOP!
One or more main functions of the Tele
Aid system* are malfunctioning.
�
Have the Tele Aid system* checked by
an authorized Mercedes-Benz Center.
ì
FUNCTION
NOT AVAILABLE!
This display appears if button
ì
or
í
on the multifunction steering
wheel is pressed and the vehicle is not
equipped with a telephone*.
1
RESTRAINT SYSTEM
VISIT WORKSHOP!
The system is malfunctioning.
�
Drive with added caution to the
nearest authorized Mercedes-Benz
Center.
Warning!
G
In the event a malfunction of the SRS is indi-
cated as outlined above, the SRS may not be
operational. For your safety, we strongly
recommend that you visit an authorized
Mercedes-Benz Center immediately to have
the system checked; otherwise the SRS may
not be activated when needed in an
accident, which could result in serious or
fatal injury, or it might deploy unexpectedly
and unnecessarily which could also result in
injury.
Page 279 of 376
279 Practical hints
Where will I find ...?
Where will I find ...?
First aid kit
The first aid kit is stored in the trunk on the
left side secured by a velcro strap.�
Unfasten velcro strap.
�
Remove first aid kit.
Vehicle tool kit
The following is included:�
Vehicle tool kit
�
Towing eye bolt
�
Wheel wrench
�
Alignment bolt
�
Vehicle jack
�
Wheel bolts
�
Special fuse extractor
�
Spare fusesRemoving the vehicle tool kit
Vehicles with full size tire spare wheel
The vehicle tool kit is stored in the space
underneath the trunk floor in the storage
tray (
�page 281).
Vehicles with Minispare wheel
�
Lift up the trunk floor cover.
�
Loosen retaining screw1 in the middle
of storage well casing2.
�
Remove storage well casing2.
1Retaining screw
2Storage well casing
iCheck expiration dates and contents
for completeness at least once a year
and replace missing/expired items.
��
Page 280 of 376

280 Practical hintsWhere will I find ...?�
Remove vehicle tool kit storage well
casing5.
3Arrow
4Minispare wheel
5Vehicle tool kit storage well casing
6Vehicle tool kit
Wheel wrench
Vehicle jackVehicle jackVehicles with full size tire spare wheel
The vehicle jack is stored in the space
underneath the trunk floor together with
the vehicle tool kit in the storage tray
(
�page 281).
Vehicles with Minispare wheel
The vehicle jack is stored in the space
underneath the trunk floor together with
the vehicle tool kit in the vehicle tool kit
storage well casing (
�page 279).
Storage position�
Remove the vehicle jack from its
compartment.
iArrow3 on vehicle tool kit storage well
casing5 must point in the direction of
travel. Otherwise you cannot place the
storage well casing on top and secure
the Minispare wheel with retaining
screw1 (
�page 279).
Warning!
G
The jack is designed exclusively for jacking
up the vehicle at the jack take-up brackets
built into both sides of the vehicle. To help
avoid personal injury, use the jack only to lift
the vehicle during a wheel change. Never
get beneath the vehicle while it is supported
by the jack. Keep hands and feet away from
the area under the lifted vehicle. Always
firmly set parking brake and block wheels
before raising vehicle with jack.
Do not disengage parking brake while the
vehicle is raised. Be certain that the jack is
always vertical (plumb line) when in use,
e s p e c i a l l y o n h i l l s . A l w a y s t r y t o u s e t h e j a c k
on level surface. Make sure that the jack
arm is fully seated in the jack take-up
bracket. Always lower the vehicle onto
sufficient capacity jackstands before
working under the vehicle.
��
Page 281 of 376
281 Practical hints
Where will I find ...?
�
Push the crank handle up.
Operational position�
Turn the crank handle clockwise until it
engages (operational position).
Before storing the vehicle jack in its
compartment:
�
The vehicle jack should be fully
collapsed.
�
The handle must be folded in (storage
position).
Spare wheel
Your vehicle is equipped with either a
spare wheel with full size tire or a
Minispare wheel. Full size spare tire has
marking “205/55 R16” or “225/45 R17”
on sidewall. Minispare has marking
“T 125/90 R16” on sidewall. Identify the
spare tire in your vehicle and follow
appropriate instructions.
Vehicles with full size tire spare wheel
The spare wheel is located in the
compartment underneath the trunk floor.�
Lift trunk floor cover and engage trunk
floor handle in upper edge of trunk.1Tool kit
2Spare wheel
3Storage tray
Removing the spare wheel
�
Remove tool kit1.
�
Turn storage tray3 counterclockwise.
�
Remove spare wheel2.
Page 282 of 376
282 Practical hintsWhere will I find ...?Storing the spare wheel�
Place spare wheel2 in wheel well.
�
Turn storage tray3 clockwise to its
stop to secure the spare wheel.
�
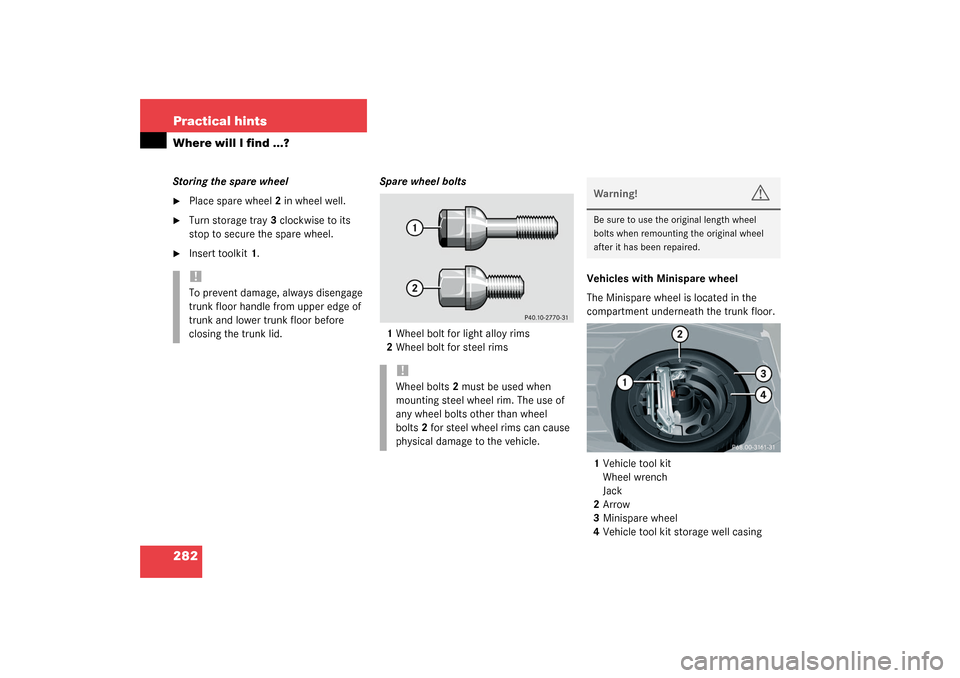
Insert toolkit1.Spare wheel bolts
1Wheel bolt for light alloy rims
2Wheel bolt for steel rimsVehicles with Minispare wheel
The Minispare wheel is located in the
compartment underneath the trunk floor.
1Vehicle tool kit
Wheel wrench
Jack
2Arrow
3Minispare wheel
4Vehicle tool kit storage well casing!To prevent damage, always disengage
trunk floor handle from upper edge of
trunk and lower trunk floor before
closing the trunk lid.
!Wheel bolts2 must be used when
mounting steel wheel rim. The use of
any wheel bolts other than wheel
bolts2 for steel wheel rims can cause
physical damage to the vehicle.
Warning!
G
Be sure to use the original length wheel
bolts when remounting the original wheel
after it has been repaired.