Page 202 of 376

202 Controls in detailLoadingLoading instructions
The total load weight including vehicle oc-
cupants and luggage/cargo should not ex-
ceed the vehicle capacity weight indicated
on the certification tag which can be found
on the left door pillar.
The handling characteristics of a fully load-
ed vehicle depend greatly on the load dis-
tribution. It is therefore recommended to
load the vehicle according to the illustra-
tions shown, with the heaviest items being
placed towards the front of the vehicle.Always place items being carried against
front or rear seat backrests, and fasten
them as securely as possible.
The heaviest portion of the cargo should al-
ways be kept as low as possible since it in-
fluences the handling characteristics of
the vehicle.
Warning!
G
Always fasten items being carried as secure-
ly as possible.
In an accident, during hard braking or sud-
den maneuvers, loose items will be thrown
around inside the vehicle and can cause in-
jury to vehicle occupants unless the items
are securely fastened in the vehicle.
To help avoid personal injury during a colli-
sion or sudden maneuver, exercise care
when transporting cargo.
Never drive vehicle with trunk open. Deadly
carbon monoxide (CO) gases may enter ve-
hicle interior resulting in unconsciousness
and death.iThe trunk is the preferred place to carry
objects.
The enlarged cargo area should only be
used for items which do not fit in the
trunk alone.
Page 203 of 376

203 Controls in detail
Useful features
Useful features
Interior storage spaces Glove box
1Glove box lid release
2Glove box
Opening the glove box
�
Pull lid release1.
The glove box lid opens downward.
Closing the glove box
�
Push lid up to close.Locking the glove box
�
Insert mechanical key (
�page 285)
into the glove box lock and turn it to
position2.
Unlocking the glove box
�
Turn mechanical key (
�page 285) in
the glove box lock to position1.
Warning!
G
To help avoid personal injury during a colli-
sion or sudden maneuver, exercise care
when stowing objects in the vehicle. Put lug-
g a g e o r c a r g o i n t h e t r u n k i f p o s s i b l e . D o n o t
pile luggage or cargo higher than the seat
backs. Do not place anything on the shelf
below the rear window.
Luggage nets cannot secure hard or heavy
objects.
Keep compartment lids closed. This will help
to prevent stored objects from being thrown
about and injuring vehicle occupants during
an accident.
iPrior to closing the glove box, close the
compartment for glasses first.
Page 207 of 376

207 Controls in detail
Useful features
Ashtrays
Center console ashtray
Opening ashtray�
Briefly touch cover plate1.
The ashtray opens automatically.Removing ashtray insert
�
Secure vehicle from movement by set-
ting the parking brake. Move the selec-
tor lever to positionN.
Now you have more room to take out
the insert.
�
Slide ashtray insert in direction of
arrow2 until it disengages.
�
Grip ashtray at indents (arrows3) and
remove insert from ashtray frame.
Reinstalling ashtray insert
�
Install insert by pushing back into
frame until it engages again.Rear seat ashtray
Opening ashtray
�
Pull at top of cover2 to open ashtray.
Removing ashtray insert
�
Press latch1 to disengage ashtray in-
sert and remove it.
Reinstalling the ashtray insert
�
Install ashtray insert.
�
Close the ashtray.
Warning!
G
Remove front ashtray only with vehicle
standing still. Set the parking brake to se-
cure vehicle from movement. Move gear se-
lector lever to positionN. With gear selector
lever in positionN, turn off the engine.
Page 230 of 376

230 OperationDriving instructionsPassenger compartmentDriving abroad
Abroad, there is a widely-spread
Mercedes-Benz service network at your
disposal. If you plan to drive into areas
which are not listed in the index of your
Mercedes-Benz Center directory, you
should request pertinent information from
your authorized Mercedes-Benz Center.Control and operation of radio trans-
mitter
COMAND*, radio and telephone*Telephones and two-way radios
Radio transmitters, such as a portable tele-
phone or a citizens band unit should only
be used inside the vehicle if they are con-
nected to an antenna that is installed on
the outside of the vehicle.
Refer to the radio transmitter operation in-
structions regarding use of an external an-
tenna.
Warning!
G
Always fasten items being carried as
securely as possible.
In an accident, during hard braking or sud-
den maneuvers, loose items will be thrown
around inside the vehicle, and cause injury
to vehicle occupants unless the items are
securely fastened in the vehicle.
The trunk is the preferred place to carry ob-
jects.
Warning!
G
Please do not forget that your primary re-
sponsibility is to drive the vehicle safely.
Only operate the COMAND (Cockpit Man-
agement and Data System), radio or tele-
phone
1 if road, weather and traffic
conditions permit.
Bear in mind that at a speed of just 30 mph
(approximately 50 km / h), your vehicle is
covering a distance of approximately
44 feet (approximately 13.5 m) every sec-
ond.
1Observe all legal requirements
Warning!
G
Never operate radio transmitters equipped
with a built-in or attached antenna (i.e. with-
out being connected to an external antenna)
from inside the vehicle while the engine is
running. Doing so could lead to a malfunc-
tion of the vehicle’s electronic system,
possibly resulting in an accident and
personal injury.
Page 279 of 376
279 Practical hints
Where will I find ...?
Where will I find ...?
First aid kit
The first aid kit is stored in the trunk on the
left side secured by a velcro strap.�
Unfasten velcro strap.
�
Remove first aid kit.
Vehicle tool kit
The following is included:�
Vehicle tool kit
�
Towing eye bolt
�
Wheel wrench
�
Alignment bolt
�
Vehicle jack
�
Wheel bolts
�
Special fuse extractor
�
Spare fusesRemoving the vehicle tool kit
Vehicles with full size tire spare wheel
The vehicle tool kit is stored in the space
underneath the trunk floor in the storage
tray (
�page 281).
Vehicles with Minispare wheel
�
Lift up the trunk floor cover.
�
Loosen retaining screw1 in the middle
of storage well casing2.
�
Remove storage well casing2.
1Retaining screw
2Storage well casing
iCheck expiration dates and contents
for completeness at least once a year
and replace missing/expired items.
��
Page 280 of 376

280 Practical hintsWhere will I find ...?�
Remove vehicle tool kit storage well
casing5.
3Arrow
4Minispare wheel
5Vehicle tool kit storage well casing
6Vehicle tool kit
Wheel wrench
Vehicle jackVehicle jackVehicles with full size tire spare wheel
The vehicle jack is stored in the space
underneath the trunk floor together with
the vehicle tool kit in the storage tray
(
�page 281).
Vehicles with Minispare wheel
The vehicle jack is stored in the space
underneath the trunk floor together with
the vehicle tool kit in the vehicle tool kit
storage well casing (
�page 279).
Storage position�
Remove the vehicle jack from its
compartment.
iArrow3 on vehicle tool kit storage well
casing5 must point in the direction of
travel. Otherwise you cannot place the
storage well casing on top and secure
the Minispare wheel with retaining
screw1 (
�page 279).
Warning!
G
The jack is designed exclusively for jacking
up the vehicle at the jack take-up brackets
built into both sides of the vehicle. To help
avoid personal injury, use the jack only to lift
the vehicle during a wheel change. Never
get beneath the vehicle while it is supported
by the jack. Keep hands and feet away from
the area under the lifted vehicle. Always
firmly set parking brake and block wheels
before raising vehicle with jack.
Do not disengage parking brake while the
vehicle is raised. Be certain that the jack is
always vertical (plumb line) when in use,
e s p e c i a l l y o n h i l l s . A l w a y s t r y t o u s e t h e j a c k
on level surface. Make sure that the jack
arm is fully seated in the jack take-up
bracket. Always lower the vehicle onto
sufficient capacity jackstands before
working under the vehicle.
��
Page 282 of 376
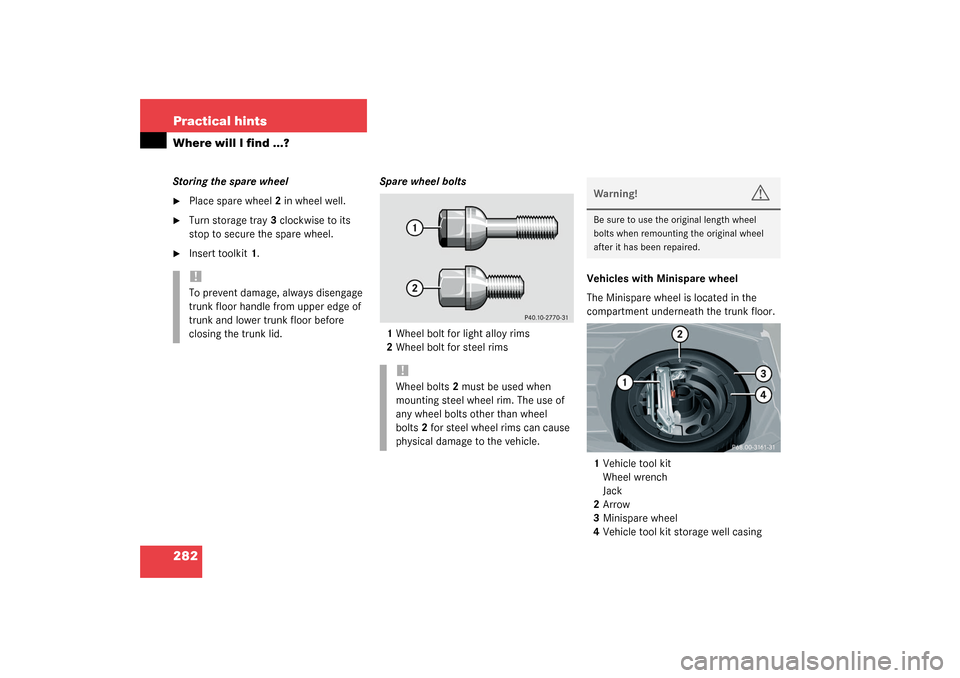
282 Practical hintsWhere will I find ...?Storing the spare wheel�
Place spare wheel2 in wheel well.
�
Turn storage tray3 clockwise to its
stop to secure the spare wheel.
�
Insert toolkit1.Spare wheel bolts
1Wheel bolt for light alloy rims
2Wheel bolt for steel rimsVehicles with Minispare wheel
The Minispare wheel is located in the
compartment underneath the trunk floor.
1Vehicle tool kit
Wheel wrench
Jack
2Arrow
3Minispare wheel
4Vehicle tool kit storage well casing!To prevent damage, always disengage
trunk floor handle from upper edge of
trunk and lower trunk floor before
closing the trunk lid.
!Wheel bolts2 must be used when
mounting steel wheel rim. The use of
any wheel bolts other than wheel
bolts2 for steel wheel rims can cause
physical damage to the vehicle.
Warning!
G
Be sure to use the original length wheel
bolts when remounting the original wheel
after it has been repaired.
Page 283 of 376
 in the")
283 Practical hints
Where will I find ...?
Removing the Minispare wheel�
Lift trunk floor cover and engage trunk
floor handle in upper edge of trunk.
�
Loosen the retaining screw
(�page 279) in the middle of storage
well casing.
�
Remove the storage well casing.
�
Remove vehicle tool kit storage well
casing4.
�
Remove Minispare wheel3.
Storing the Minispare wheel
�
Place Minispare wheel3 in wheel well.
�
Place vehicle tool kit storage well
casing4 over the Minispare wheel. Be
sure that the arrow2 on storage well
casing4 points in the direction of
travel.
�
Place storage well casing (
�page 279)
over the vehicle tool kit storage well
casing4 and turn the retaining screw
(
�page 279) clockwise to its stop to
secure the Minispare wheel.
iThe arrow2 on vehicle tool kit storage
well casing4 must point in the
direction of travel, otherwise you
cannot place the storage well casing
(�page 279) on top and secure the
Minispare wheel with the retaining
screw (
�page 279).
!To prevent damage, always disengage
trunk floor handle from upper edge of
trunk and lower trunk floor before
closing the trunk lid.
Warning!
G
The dimensions of the Minispare wheel are
different from those of the road wheels. As
a result, the vehicle handling characteristics
change when driving with a Minispare wheel
mounted.
The Minispare wheel should only be used
temporarily, and should be replaced with a
regular road wheel as quickly as possible.