Page 7 of 225

Contents
Driving on a non-digitized road . . . 168
Interrupt route guidance during a jour-
ney . . . . . . . . . . . . . . . . . . . . . . . . 169
Arriving at destination . . . . . . . . . 170
Activating audio system . . . . . . . . 171
Activating audio functions . . . . . . 171
Canceling route guidance . . . . . . . 173
Destination memory . . . . . . . . . . . . . . 174
Retrieving a destination from the desti-
nation memory . . . . . . . . . . . . . . . 174
Saving the current destination . . . 175
Saving the current vehicle
location . . . . . . . . . . . . . . . . . . . . . 177
Sorting destination memory . . . . . 178
Deleting a destination. . . . . . . . . . 179
Settings . . . . . . . . . . . . . . . . . . . . . . . 180
Entering the vehicle location . . . . 180
Calibration . . . . . . . . . . . . . . . . . . 181
Info Services/System settings. . . . 183
Info Services*. . . . . . . . . . . . . . . . . . . 184
Requesting and displaying
Info Services . . . . . . . . . . . . . . . . . 184
System settings . . . . . . . . . . . . . . . . . 187
Activating the main settings menu 187
Adjusting the brightness. . . . . . . . 188
Activating settings menu . . . . . . . 188
Selecting the language . . . . . . . . . 189
Setting date and time . . . . . . . . . . 190
Switching beep tones on and off . 197
Setting the display dimming characteri-
stics (day and night display) . . . . . 198
Resetting all settings to the
factory settings . . . . . . . . . . . . . . . 199Auxiliary audio source . . . . . . . . . . . . 200
Connecting . . . . . . . . . . . . . . . . . . 200
Switching auxiliary audio source
on . . . . . . . . . . . . . . . . . . . . . . . . . 200
Switching auxiliary audio source
off . . . . . . . . . . . . . . . . . . . . . . . . . 202
Glossary . . . . . . . . . . . . . . . . . . . . . . 203Index . . . . . . . . . . . . . . . . . . . . . . . . . 205
Page 17 of 225
9 At a glance
COMAND control unit
Screen displays include:�
Main system menus, e.g. the main ra-
dio menu
�
Lists for the selection of entries,
e.g. the city list (
�page 19)
�
Input menus, e.g. during destination
input (
�page 18)
�
Selection menus, e.g. during route
calculation (
�page 20)
�
Symbol display (
�page 20) or map
(
�page 132) in navigation
�
Pop-up windows (
�page 171)Main menu structure
Main radio menu1Status line, displays active system
2Station frequency and function that
has been switched on
3Menu fields to call further menus or
functions
4Symbol barStatus line and symbol bar
Screen displays
P82.85-9059-31
1
23
4
Symbols
Status line
FM1
AM, WB
CD, TEL
NAV, SVC
SYS, AUX
Symbol bar
>
M
Meaning
The radio is switched on in
FM Band; the current sta-
tion has been saved in me-
mory location 1 in the FM
preset menu
AM or Weather Band WB
The corresponding system
is active
Reception strength of the
mobile phone
Incoming SMS message
1
1 if available from carrier
Page 19 of 225
11 At a glance
Multifunction display
Multifunction display
The starter switch must be in position 1 or
2. Refer to vehicle operating instructions.
You can operate the following systems
with steering wheel buttons 4 and 5:
�
Radio
�
CD (CD changer and CD drive)
�
Auxiliary audio source, e.g. tape recor-
der (
�page 200)
�
Telephone
For more detailed information, refer to
“Multifunction display” in the chapters dis-
cussing the radio, CD, telephone opera-
tion.
1
2
5
3
4
P82.85-9290-31
Function
1
Multifunction display in speedo-
meterOperating the control system
2
Adjusting the volume
I lowers the volume
J raises the volume
3
Making a call
K Accept incoming call or
starts dialing
L End a call or end Tele Aid
4
Switching between menu sys-
tems
E next system
H previous system
5
Moving within a menu system
F next display
G previous displayFunction
Page 71 of 225

63 Audio
Sound settings
Sound settings
COMAND is equipped with a standard am-
plifier.
You can set �
the sound Bass/Treble individually
�
the sound-center (Fader and Balance)
�
select predefined sound optimization.
See individual audio mode descriptions for
instructions on this feature.
Adjustments to the sound have a different
effect on the audio and service sources.
The predefined sound optimizations are
available for the audio sources only.Audio sources include:
�
Radio FM, AM, WB
�
CD (CD drive, CD changer)
�
auxiliary audio source, e.g. tape deck (if
connected)
You can activate the main Sound menu in
the audio sources through the menu field
“Sound”.
Service sources include:
�
Telephone
�
Voice output in the navigation
�
Voice recognition system
See separate operating instructions for te-
lephone and voice recognition system.
You can activate the main Sound menu in
the “NAVI Settings” menu (
�page 181),
through the menu field “Sound”. Activating the main sound menu
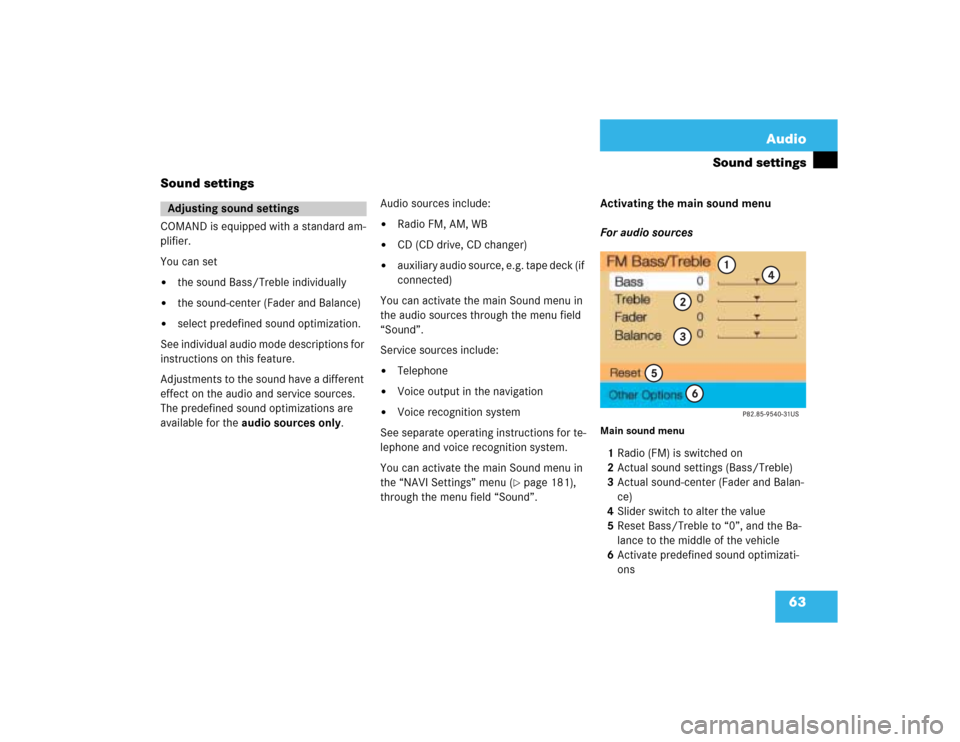
For audio sources
Main sound menu1Radio (FM) is switched on
2Actual sound settings (Bass/Treble)
3Actual sound-center (Fader and Balan-
ce)
4Slider switch to alter the value
5Reset Bass/Treble to “0”, and the Ba-
lance to the middle of the vehicle
6Activate predefined sound optimizati-
ons
Adjusting sound settings
Page 72 of 225

64 AudioSound settings�
Turn the right-hand rotary/push-button
v to highlight “Sound“ in the main
menu for radio or CD operation and
press to confirm.
The main sound menu will appear dis-
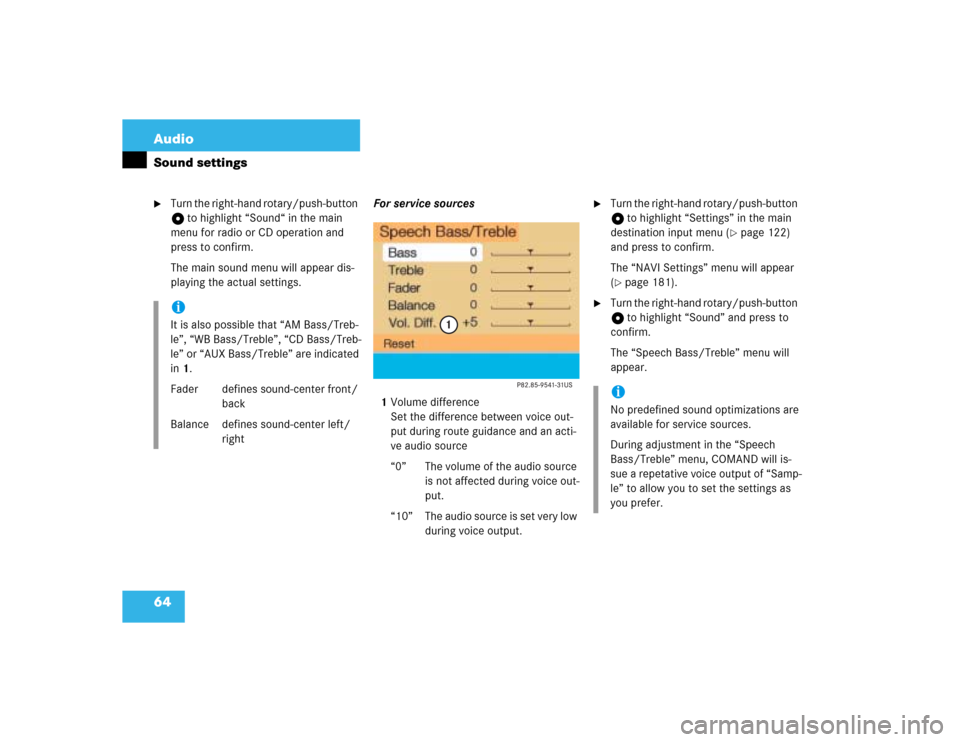
playing the actual settings.For service sources
1Volume difference
Set the difference between voice out-
put during route guidance and an acti-
ve audio source
“0” The volume of the audio source
is not affected during voice out-
put.
“10” The audio source is set very low
during voice output.
�
Turn the right-hand rotary/push-button
v to highlight “Settings” in the main
destination input menu (
�page 122)
and press to confirm.
The “NAVI Settings” menu will appear
(
�page 181).
�
Turn the right-hand rotary/push-button
v to highlight “Sound” and press to
confirm.
The “Speech Bass/Treble” menu will
appear.
iIt is also possible that “AM Bass/Treb-
le”, “WB Bass/Treble”, “CD Bass/Treb-
le” or “AUX Bass/Treble” are indicated
in 1.
Fader defines sound-center front/
back
Balance defines sound-center left/
right
iNo predefined sound optimizations are
available for service sources.
During adjustment in the “Speech
Bass/Treble” menu, COMAND will is-
sue a repetative voice output of “Samp-
le” to allow you to set the settings as
you prefer.
Page 191 of 225
183
Info Services/System settings
Info Services*
System settings
Auxiliary audio source
Page 192 of 225

184Info Services/System settingsInfo Services*
Info Services*In chapter “Info Services/System set-
tings” you will find detailed information on
the following topics:�
Requesting and displaying Info Services
�
Adjusting the brightness
�
Selecting the language for the menu
text displays and the voice output
�
Setting the date and time
�
Selecting beep tones
�
Setting the display dimming characteri-
stics (day and night display)
�
Resetting all settings to the factory set-
tings
�
Switching an auxiliary audio source on
and offIf you have not done so already, please fa-
miliarize yourself with these functions by
reading the chapter “At a glance”
(
�page 6).
When you subscribe to Info Services, you
can download information directly to your
COMAND. You can select from news, wea-
ther, sports, stocks, and calendar remin-
ders.
To personalize your selections visit
�
www.MBUSA.com or call
�
1-800-FOR-MERCedes.
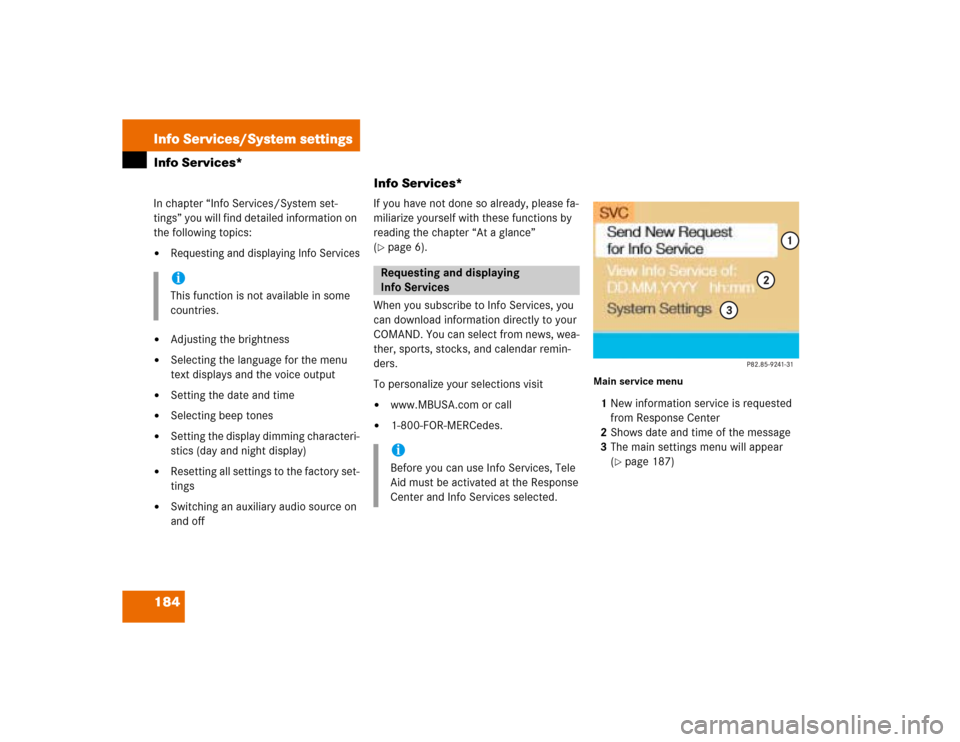
Main service menu1New information service is requested
from Response Center
2Shows date and time of the message
3The main settings menu will appear
(
�page 187)
iThis function is not available in some
countries.
Requesting and displaying
Info ServicesiBefore you can use Info Services, Tele
Aid must be activated at the Response
Center and Info Services selected.
Page 195 of 225
187
Info Services/System settings
System settings
System settings
6Displays the new message
7Switches back to the main menu
There is more than one message�
Press the right-hand rotary/push-
button v to move to the next page.
Activating the main service menu
�
Press *.
Switching back to e.g. radio main menu
�
Turn the right-hand rotary/push-button
v to highlight “No” and press to con-
firm.
Main system settings menu1Date and time
You can select the time format
(
�page 196)
2Adjusting the brightness
3Activating “Settings” menu
4Switching an auxiliary audio source on
(�page 200)
5Country setting, with a time zone
(�page 192)
�
Press (.
The main service menu will appear.
�
Turn the right-hand rotary/push-button
v to highlight “System Settings” and
press to confirm.
The main system settings menu will ap-
pear.
Activating the main settings menu
iYou will see information 5 if the clock
has been set to GPS reception and if a
country, e.g. USA and a time zone was
selected.