Page 77 of 275
3-20
Knowing Your Mazda
Doors and Locks
Form No. 8Q94-EA-02G
�Slide Operation
To open to any position, press the rear of
the slide switch.
To close, press the front of the slide
switch.
�Sunshade
The sunshade can be opened and closed
by hand.
The sunshade opens automatically when
the sunroof is opened, but must be closed
by hand.
Open
Close
Sunshade
The sunshade doesn’t tilt. To avoid
damaging the sunshade, don’t push up
on it.
CAUTION
J39L_EA.book Page 20 Saturday, June 8, 2002 5:35 PM
Page 78 of 275

3-21
Knowing Your Mazda
Doors and Locks
Form No. 8Q94-EA-02G
The front cross bar is fixed in place.
The rear cross bar can be adjusted by
sliding it.
Roof Rack
Rear cross bar
Front cross bar
•The roof rack is not designed for
direct placement of objects or loads.
A special attachment kit is
necessary. Consult an Authorized
Mazda Dealer.
•The maximum load on the roof rack
is 75 kg (165 lb). Do not overload.
•Because the bolts and screws may
loosen initially, retighten them.
Periodically check bolts for
looseness approximately every 100
km (62 miles).
•Avoid turning sharply and jamming
on the brakes while the roof rack
installed. Doing so may cause an
accident or the luggage may fall off.
•Road conditions (especially steep
curves or rough roads) and weather
changes (strong cross wind, head
wind, rain, snow, or fog) can change
vehicle operating characteristics
greatly when the vehicle is
equipped with the roof rack. To
cope with these conditions, drive at
a slower speed.
•When driving in a tunnel or parking
garage or any place with height
restrictions with the roof rack
installed, be aware that the roof rack
will raise the total clearance of the
vehicle.
•If the vehicle is washed in an
automatic car wash with the roof
rack installed, the roof rack or the
roof of the vehicle can be damaged.
Before washing the vehicle in an
automatic car wash, always remove
the roof rack.
CAUTION
J39L_EA.book Page 21 Saturday, June 8, 2002 5:35 PM
Page 79 of 275
3-22
Knowing Your Mazda
Doors and Locks
Form No. 8Q94-EA-02G
�Roof Rack Adjustment
1. Loosen the screw at both ends of the
rear cross bar, then remove the rear
cross bar covers.
2. Loosen the bolt at both ends of the rear
cross bar, then slide the rear cross bar
to the desired position.3. Tighten the bolt at both ends of the rear
cross bar alternately and evenly.
4. Install the rear cross bar cover by
inserting the clips into the square hole
of the rear cross bar until they click,
then tighten the screw.
NOTE
Roof racks increase wind turbulence
which can result in noise. This does
not indicate an abnormality. The roof
rack can be removed when it is not
needed.
Screw
Rear cross bar coverRear cross bar
Bolt
NOTE
•If only one bolt is tightened, the
cross bar will lean to one side.
•Tighten the bolts with tightening
torque of 11—12 Nm {110—120
kgfcm}.
Bolt
Screw
Rear cross bar
cover
Rear cross bar
J39L_EA.book Page 22 Saturday, June 8, 2002 5:35 PM
Page 80 of 275

3-23
Knowing Your Mazda
Form No. 8Q94-EA-02G
Steering Wheel and Mirrors
�Tilt Steering Wheel
To change the angle of the steering wheel,
stop the vehicle, pull the tilt wheel release
lever under the steering column down,
adjust the wheel, then push the release
lever up to lock the column.
After adjusting, push the wheel up and
down to be certain it’s locked before
driving.
�Outside Mirrors
Check the mirrors’ angles before driving.
Manual control mirror
To adjust, move the mirror’s control lever,
just inside the door.
Steering Wheel
Adjusting the Steering Wheel:
Adjusting the steering wheel while the
vehicle is moving is dangerous.
Moving it can very easily cause the
driver to abruptly turn to the left or
right. This can lead to loss of control
or an accident. Never adjust the
steering wheel while the vehicle is
moving.
WARNING
Tilt wheel release
lever
Mirrors
Convex Mirror (Passenger Side):
Changing lanes without taking into
account the actual distance of the
vehicle in the convex mirror is
dangerous. You could have a serious
accident. What you see in the convex
mirror is closer than it appears. Be
sure to look over your shoulder or to
check your inside mirror before
changing lanes.
WARNING
Control lever
J39L_EA.book Page 23 Saturday, June 8, 2002 5:35 PM
Page 88 of 275
4-5
Before Driving Your Mazda
Form No. 8Q94-EA-02G
Before Starting the Engine
•Be sure the windows, outside mirror
(s), and outside lights are clean.
•Inspect inflation pressures and
condition of tires.
•Look under the vehicle for any sign of
a leak.
•If you plan to back up, make sure
nothing will be in your way.•Are all doors closed and locked?
•Are the inside and outside mirrors
adjusted?
•Is everyone’s seat belt fastened?
•Do all the lights work?
•Check all gauges.
•Check all warning lights when the
ignition switch is turned to the ON
position.
•Release the parking brake and make
sure the parking brake warning light
goes off.
Always be thoroughly familiar with your
Mazda.
Before Getting In
NOTE
Engine oil, engine coolant, brake/
clutch fluid, washer fluid, and other
fluid levels should be inspected daily,
weekly, or at refueling, depending on
the fluid. See Maintenance, Section 8.
After Getting In
J39L_EA.book Page 5 Saturday, June 8, 2002 5:35 PM
Page 91 of 275

4-8
Before Driving Your Mazda
Driving Tips
Form No. 8Q94-EA-02G
•Carry emergency gear, including tire
chains, window scraper, flares, a small
shovel, jumper cables, and a small bag
of sand or salt.
Ask a Mazda dealer to perform the
following precautions:
•Have the proper ratio of antifreeze in
the radiator.
•Inspect the battery and its cables. Cold
reduces battery capacity.
•Use only cold-weather engine oil
(page 8-9).
•Inspect the ignition system for damage
and loose connections.
•Use washer fluid made with
antifreeze—but don’t use engine
coolant antifreeze for washer fluid
(page 8-18).
•Don’t use the parking brake in freezing
weather as the parking brake may
freeze. Instead, shift to P with an
automatic transaxle and to 1 or R with
a manual transaxle. Block the rear
wheels.
�Snow Tires
Use snow tires on all four wheels
Your vehicle is originally equipped with
all season radials designed to be used all
year around. In some extreme climates
you may find it necessary to replace them
with snow tires during the winter months
to further improve traction on snow and
ice covered roads.
Don’t go faster than 120 km/h (75 mph).
Inflate snow tires 30 kPa (0.3 kgf/cm
2, 4.3
psi) more than recommended on the tire
pressure label (driver’s door), but never
more than the maximum cold-tire
pressure shown on the tires.
Winter Driving
Mixing Tire Types:
Using tires different in size or type is
dangerous. Your vehicle’s handling
could be greatly affected and result in
an accident. Use only the same size
and type tires (snow, radial, or non-
radial) on all four wheels.
Check local regulations before using
studded tires.
WARNING
CAUTION
J39L_EA.book Page 8 Saturday, June 8, 2002 5:35 PM
Page 98 of 275

5-3
Driving Your Mazda
Starting and Driving
Form No. 8Q94-EA-02G
ACC (Accessory)
The steering wheel unlocks and some
electrical accessories will operate.
ON
This is the normal running position after
the engine is started. The warning lights
(except brakes) should be inspected
before the engine is started (page 5-27).
START
The engine is started in this position. It
will crank until you release the key; then
it returns to the ON position. The brake
warning light can be checked after the
engine is started (page 5-27).
�Ignition Key Reminder
If the ignition switch is in the LOCK or
ACC position, a beep will sound when
any door is opened.1. Occupants should fasten their seat
belts.
2. Make sure the parking brake is on.
3. Depress the brake pedal.
4. (Manual transaxle)
Depress the clutch pedal all the way
and shift into neutral.
Keep the pedal depressed while
cranking the engine.
(Automatic transaxle)
Put the vehicle in park (P). If you must
restart the engine while the vehicle is
moving, shift into neutral (N).
NOTE
If turning the key is difficult, jiggle the
steering wheel from side to side.
Starting the Engine
NOTE
Engine-starting is controlled by the
spark ignition system.
This system meets all Canadian
Interference-Causing Equipment
Standard requirements regulating the
impulse electrical field strength of
radio noise.
NOTE
The starter will not operate if the
clutch pedal is not
pushed down all the
way.
NOTE
The starter will not operate if the shift
lever is not
in P or N.
J39L_EA.book Page 3 Saturday, June 8, 2002 5:35 PM
Page 119 of 275
5-24
Driving Your Mazda
Instrument Cluster and Indicators
Form No. 8Q94-EA-02G
�Speedometer
The speedometer indicates the speed of
the vehicle.
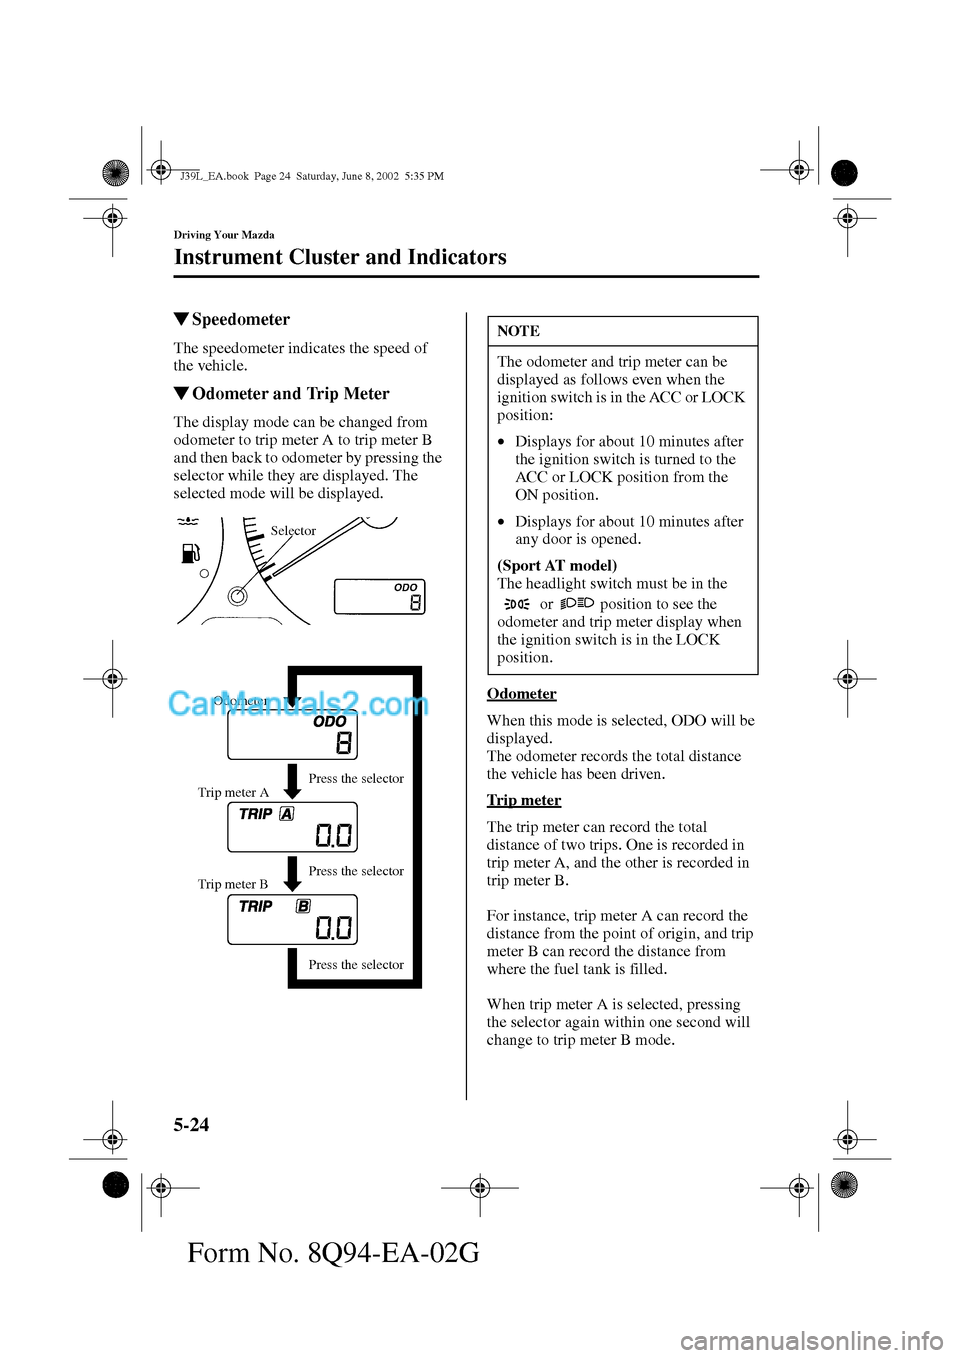
�Odometer and Trip Meter
The display mode can be changed from
odometer to trip meter A to trip meter B
and then back to odometer by pressing the
selector while they are displayed. The
selected mode will be displayed.
Odometer
When this mode is selected, ODO will be
displayed.
The odometer records the total distance
the vehicle has been driven.
Tr i p m e t e r
The trip meter can record the total
distance of two trips. One is recorded in
trip meter A, and the other is recorded in
trip meter B.
For instance, trip meter A can record the
distance from the point of origin, and trip
meter B can record the distance from
where the fuel tank is filled.
When trip meter A is selected, pressing
the selector again within one second will
change to trip meter B mode.
Selector
Odometer
Trip meter A Press the selector
Press the selector
Press the selector Trip meter B
NOTE
The odometer and trip meter can be
displayed as follows even when the
ignition switch is in the ACC or LOCK
position:
•Displays for about 10 minutes after
the ignition switch is turned to the
ACC or LOCK position from the
ON position.
•Displays for about 10 minutes after
any door is opened.
(Sport AT model)
The headlight switch must be in the
or position to see the
odometer and trip meter display when
the ignition switch is in the LOCK
position.
J39L_EA.book Page 24 Saturday, June 8, 2002 5:35 PM


