Page 63 of 256

3-25
Knowing Your Mazda
Doors and Locks
Form No. 8R09-EA-02G
�Installing the Detachable
Hardtop
1. Park the vehicle on a level surface and
firmly set the parking brake.
2. Lower the side windows, then turn off the ignition.
3. Pull down the sunvisors.
4. Unlock the top latches and the side latches on the hardtop.
•
Be careful not to strike the body
with any of the protruding hardtop
latches.
• Use extreme care when carrying the
hardtop to prevent scratching or
other damage to it.NOTE
Points to remember when storing the
detachable hardtop.
•Do not place the hardtop on a hard
surface, such as concrete or asphalt.
Place it on a cushioning material,
such as an old blanket.
• Be sure the top and side latches are
locked.
• Do not lean the hardtop against a
wall or stand it in an unstable way.
• Store the hardtop in a dry clean
area, and cover it with a soft
material, such as an old blanket.
Do not attempt to install the hardtop
with the convertible top also up.
Lower the convertible top before
installing the hardtop, otherwise
damage will occur to the convertible
top.
CAUTION
CAUTION
NOTE
• Be sure to place the convertible top
latches in the locked position.
• Make sure the convertible top is
completely lowered before
installing the hardtop. Also confirm
that the rear window defroster
coupler is disconnected.
Sunvisor
Sunvisor
Top latch assembly
Slide latch assembly
J07R_8R09_EA_02G_Edition4.book Page 25 Monday, February 3, 2003 1:16 PM
Page 64 of 256
3-26
Knowing Your Mazda
Doors and Locks
Form No. 8R09-EA-02G
5. Align the rear deck latches with the rear deck studs and set the hardtop
squarely onto the body.
6. Slide the hardtop forward while pressing down on the rear deck latches
to lock the latches, and then verify that
they are secure by attempting to lift the
rear of the hardtop. 7. Push each top latch up with the palm of
your hand until the lock buttons click
and the latches are locked.
Rear deck stud
Hardtop
Rear deck latch
Rear deck latch
Rear deck latch
• Be careful not to strike the body
with any of the protruding hardtop
latches.
• The rear defogger grid and the
defogger cord could be damaged
when removing or installing the top.
Make sure the rear defogger grid
isn
’t folded and the defogger cord
isn ’t caught between the vehicle ’s
body and the top.
CAUTION
J07R_8R09_EA_02G_Edition4.book Page 26 Monday, February 3, 2003 1:16 PM
Page 66 of 256

3-28
Knowing Your Mazda
Form No. 8R09-EA-02G
Security System
The optional immobilizer system allows
the engine to start only with a key the
system recognizes.
If someone attempts to start the engine
with an unrecognized key, the engine will
not start, thereby helping to prevent the
theft of your vehicle.
�Immobilizer System Warning
Light
If the immobilizer system is working
properly, the light will come on when the
ignition switch is turned to the ON or
START position. The light will go out
when confirmation by the immobilizer
system is completed.
If the light flashes rapidly, fails to come
on, or comes on and stays on, it indicates
a system malfunction. If any of these
occur, contact an Authorized Mazda
Dealer as soon as possible.
Immobilizer System
Changes or modifications not
expressly approved by the party
responsible for compliance could void
the user
’s authority to operate the
equipment.
NOTE
This device complies with part 15 of
the FCC Rules and with RSS-210 of
Industry Canada. Operation is subject
to the following two conditions: (1)
This device may not cause harmful
interference, and (2) this device must
accept any interference received,
including interference that may cause
undesired operation. (Outside
transmissions may momentarily
interfere with the device’ s operation.)
CAUTION
J07R_8R09_EA_02G_Edition4.book Page 28 Monday, February 3, 2003 1:16 PM
Page 67 of 256

3-29
Knowing Your Mazda
Security System
Form No. 8R09-EA-02G
�Maintenance
If you have a problem with the
immobilizer system or the key, consult an
Authorized Mazda Dealer.
NOTE
• If the warning light comes on and
stays on when the ignition switch is
turned to the ON position, the
engine will not start.
• Signals from a TV or radio station,
or from a transceiver or a mobile
telephone, could interfere with your
immobilizer system. If you are
using the proper key and your
engine fails to start, check the
warning light. If it is flashing,
remove the ignition key and wait 2
seconds or more, then reinsert it and
try starting the engine again. If it
doesn
’t start after 3 or more tries,
contact an Authorized Mazda
Dealer.
• If the warning light flashes
continuously while you are driving,
don’
t shut off the engine. Go to an
Authorized Mazda Dealer and have
it checked. If you shut off the
engine while the light is flashing
you won ’t be able to restart it.
• To avoid damage to the key, do not:
Drop the key.
Get the key wet.
Expose the key to any kind of
magnetic field.
Expose the key to high
temperatures on places such as
the dashboard or hood, under
direct sunlight.
• When starting the engine, do not let
the following materials touch or
come near the key grip. The engine
may not start:
Spare keys.
Keys for other vehicles equipped
with an immobilizer system.
Metal objects that touch or pass
through the hole in the key.
Devices for electronic purchases,
and security passage.
CAUTION
J07R_8R09_EA_02G_Edition4.book Page 29 Monday, February 3, 2003 1:16 PM
Page 79 of 256

4-9
Before Driving Your Mazda
Driving Tips
Form No. 8R09-EA-02G
�Tire Chains
Check local regulations before using tire
chains.
Install the chains on the rear tires.
Don
’t use chains on the front tires.
Use only SAE Class "S" chains, and make
sure they fit.
Installing the chains
1. Remove the wheel covers, or the chain bands will scratch them.
2. Secure the chains on the rear tires as tightly as possible. Always follow the
chain manufacturer ’s instructions.
3. Retighten the chains after driving 1/2—1 km (1/4 —1/2 mile).
•
Chains may scratch or chip
aluminum wheels. Install tire chains
on steel wheels only.
• Chains may affect handling.
• Don
’t go faster than 50 km/h (30
mph) or the chain manufacturer ’s
recommended limit, whichever is
lower.
• Drive carefully and avoid bumps,
holes, and sharp turns.
• Avoid locked-wheel braking.
• Don
’t use chains on the temporary
tire; it may result in damage to the
vehicle and to the tire.
• Don
’t use chains on roads that are
free of snow or ice. The tires and
chains could be damaged.
CAUTION
Driving In Flooded Area
Driving with Wet Brakes:
Driving with wet brakes is dangerous.
Increased stopping distance or the
vehicle pulling to one side when
braking could result in a serious
accident. Light braking will indicate
whether the brakes have been
affected. Dry the brakes by driving
very slowly and applying the brakes
lightly until brake performance
returns to normal.
Make sure water does not enter the
vehicle interior or the engine area. The
vehicle interior could become wet or
the engine could be damaged.
WARNING
CAUTION
J07R_8R09_EA_02G_Edition4.book Page 9 Monday, February 3, 2003 1:16 PM
Page 97 of 256
.
3.")
5-15
Driving Your Mazda
Starting and Driving
Form No. 8R09-EA-02G
�To Set Speed
1. Activate the cruise control system.
2. Accelerate to the desired speed, which
must be more than 40 km/h (25 mph).
3. Turn the control knob to SET/COAST and release it at the speed you want.
Release the accelerator at the same
time.
Don ’t continue to hold the knob. Until
you release it, speed will continue to
drop (unless you continue to
accelerate) and you ’ll miss the desired
speed.
� To Increase Cruising Speed
Follow either of these procedures.
• Turn the control knob to RESUME/
ACCEL and hold it. Your vehicle will
accelerate.
Release the knob at the speed you
want.
• Accelerate to the desired speed.
Turn the control knob to SET/COAST
and release it immediately.
NOTE
•The SET function can
’t be activated
until about 2 seconds after the
CRUISE MAIN switch has been
engaged.
• On a steep grade, the vehicle may
momentarily slow down going up or
speed up while going down.
Control knob
NOTE
Accelerate if you want to speed up
temporarily when the cruise control is
on. Greater speed will not interfere
with it or change the set speed.
Take your foot off the accelerator to
return to the set speed.
Control knob
Control knob
J07R_8R09_EA_02G_Edition4.book Page 15 Monday, February 3, 2003 1:16 PM
Page 99 of 256
5-17
Driving Your Mazda
Form No. 8R09-EA-02G
Instrument Cluster and Indicators
1 Speedometer .............................................................................................................5-18
2 Odometer and Trip Meter .........................................................................................5-18
3 Tachometer ...............................................................................................................5-19
4 Engine Coolant Temperature Gauge .........................................................................5-19
5 Fuel Gauge ................................................................................................................5-20
6 Engine Oil Pressure Gauge .......................................................................................5-20
Meters and Gauges
J07R_8R09_EA_02G_Edition4.book Page 17 Monday, February 3, 2003 1:16 PM
Page 101 of 256
5-19
Driving Your Mazda
Instrument Cluster and Indicators
Form No. 8R09-EA-02G
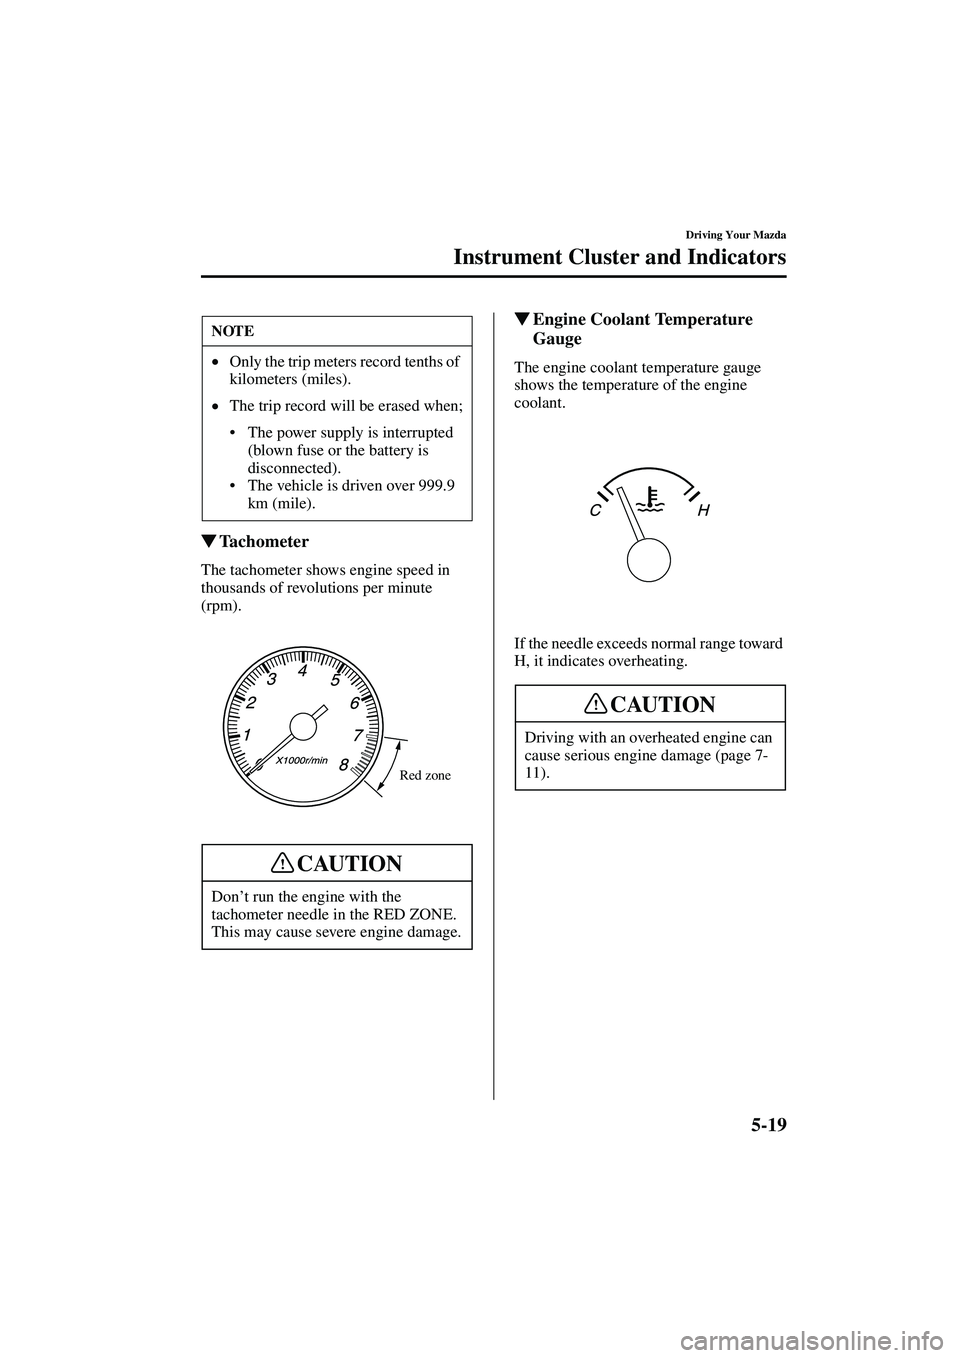
�Tachometer
The tachometer shows engine speed in
thousands of revolutions per minute
(rpm).
� Engine Coolant Temperature
Gauge
The engine coolant temperature gauge
shows the temperature of the engine
coolant.
If the needle exceeds normal range toward
H, it indicates overheating.
NOTE
• Only the trip meters record tenths of
kilometers (miles).
• The trip record will be erased when;
The power supply is interrupted
(blown fuse or the battery is
disconnected).
The vehicle is driven over 999.9
km (mile).
Don ’t run the engine with the
tachometer needle in the RED ZONE.
This may cause severe engine damage.
Red zone
CAUTION
Driving with an overheated engine can
cause serious engine damage (page 7-
11).
CAUTION
J07R_8R09_EA_02G_Edition4.book Page 19 Monday, February 3, 2003 1:16 PM