Page 165 of 280

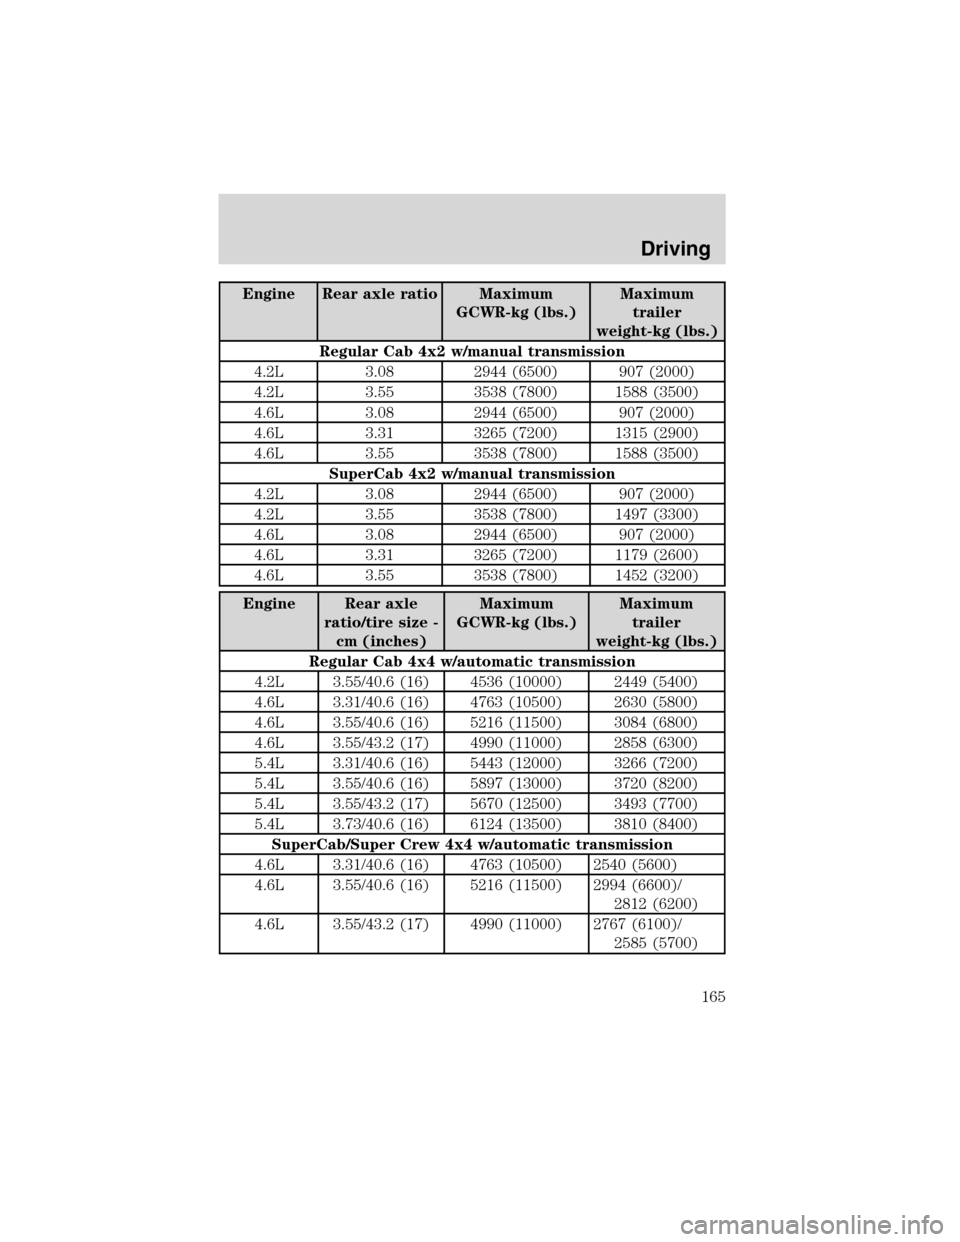
Engine Rear axle ratio Maximum
GCWR-kg (lbs.)Maximum
trailer
weight-kg (lbs.)
Regular Cab 4x2 w/manual transmission
4.2L 3.08 2944 (6500) 907 (2000)
4.2L 3.55 3538 (7800) 1588 (3500)
4.6L 3.08 2944 (6500) 907 (2000)
4.6L 3.31 3265 (7200) 1315 (2900)
4.6L 3.55 3538 (7800) 1588 (3500)
SuperCab 4x2 w/manual transmission
4.2L 3.08 2944 (6500) 907 (2000)
4.2L 3.55 3538 (7800) 1497 (3300)
4.6L 3.08 2944 (6500) 907 (2000)
4.6L 3.31 3265 (7200) 1179 (2600)
4.6L 3.55 3538 (7800) 1452 (3200)
Engine Rear axle
ratio/tire size -
cm (inches)Maximum
GCWR-kg (lbs.)Maximum
trailer
weight-kg (lbs.)
Regular Cab 4x4 w/automatic transmission
4.2L 3.55/40.6 (16) 4536 (10000) 2449 (5400)
4.6L 3.31/40.6 (16) 4763 (10500) 2630 (5800)
4.6L 3.55/40.6 (16) 5216 (11500) 3084 (6800)
4.6L 3.55/43.2 (17) 4990 (11000) 2858 (6300)
5.4L 3.31/40.6 (16) 5443 (12000) 3266 (7200)
5.4L 3.55/40.6 (16) 5897 (13000) 3720 (8200)
5.4L 3.55/43.2 (17) 5670 (12500) 3493 (7700)
5.4L 3.73/40.6 (16) 6124 (13500) 3810 (8400)
SuperCab/Super Crew 4x4 w/automatic transmission
4.6L 3.31/40.6 (16) 4763 (10500) 2540 (5600)
4.6L 3.55/40.6 (16) 5216 (11500) 2994 (6600)/
2812 (6200)
4.6L 3.55/43.2 (17) 4990 (11000) 2767 (6100)/
2585 (5700)
Driving
165
Page 166 of 280

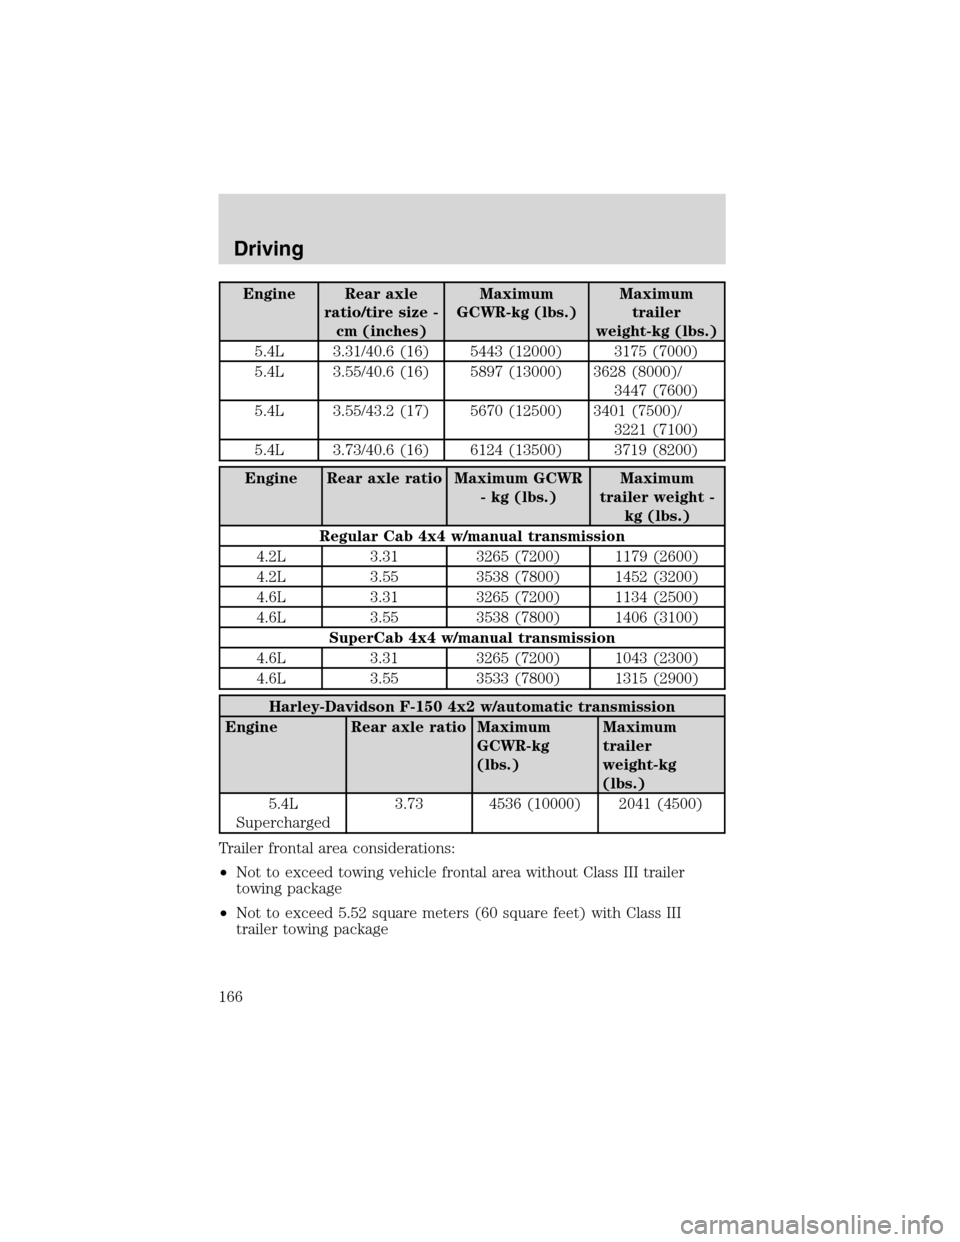
Engine Rear axle
ratio/tire size -
cm (inches)Maximum
GCWR-kg (lbs.)Maximum
trailer
weight-kg (lbs.)
5.4L 3.31/40.6 (16) 5443 (12000) 3175 (7000)
5.4L 3.55/40.6 (16) 5897 (13000) 3628 (8000)/
3447 (7600)
5.4L 3.55/43.2 (17) 5670 (12500) 3401 (7500)/
3221 (7100)
5.4L 3.73/40.6 (16) 6124 (13500) 3719 (8200)
Engine Rear axle ratio Maximum GCWR
- kg (lbs.)Maximum
trailer weight -
kg (lbs.)
Regular Cab 4x4 w/manual transmission
4.2L 3.31 3265 (7200) 1179 (2600)
4.2L 3.55 3538 (7800) 1452 (3200)
4.6L 3.31 3265 (7200) 1134 (2500)
4.6L 3.55 3538 (7800) 1406 (3100)
SuperCab 4x4 w/manual transmission
4.6L 3.31 3265 (7200) 1043 (2300)
4.6L 3.55 3533 (7800) 1315 (2900)
Harley-Davidson F-150 4x2 w/automatic transmission
Engine Rear axle ratio Maximum
GCWR-kg
(lbs.)Maximum
trailer
weight-kg
(lbs.)
5.4L
Supercharged3.73 4536 (10000) 2041 (4500)
Trailer frontal area considerations:
•Not to exceed towing vehicle frontal area without Class III trailer
towing package
•Not to exceed 5.52 square meters (60 square feet) with Class III
trailer towing package
Driving
166
Page 168 of 280

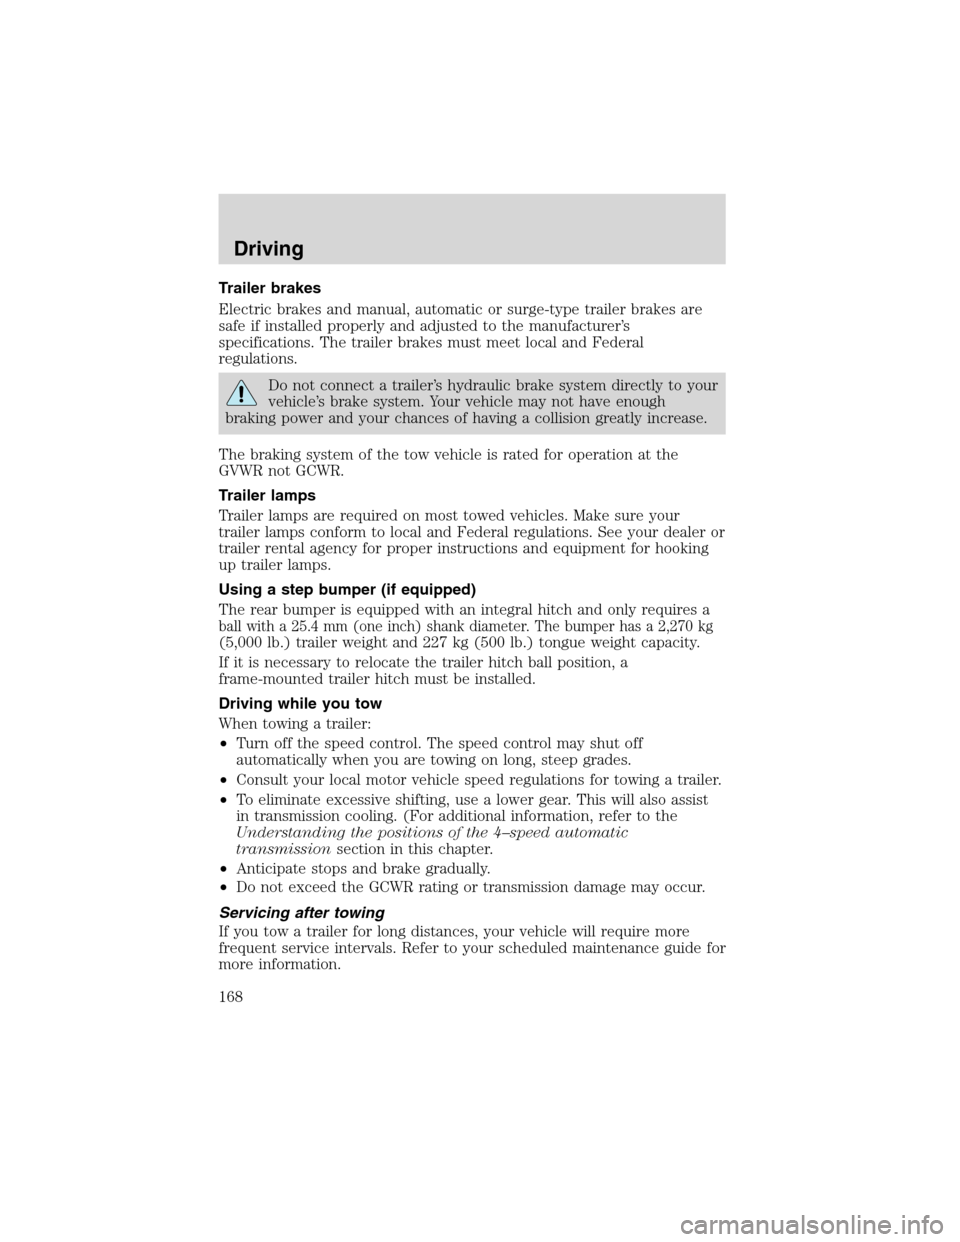
Trailer brakes
Electric brakes and manual, automatic or surge-type trailer brakes are
safe if installed properly and adjusted to the manufacturer’s
specifications. The trailer brakes must meet local and Federal
regulations.
Do not connect a trailer’s hydraulic brake system directly to your
vehicle’s brake system. Your vehicle may not have enough
braking power and your chances of having a collision greatly increase.
The braking system of the tow vehicle is rated for operation at the
GVWR not GCWR.
Trailer lamps
Trailer lamps are required on most towed vehicles. Make sure your
trailer lamps conform to local and Federal regulations. See your dealer or
trailer rental agency for proper instructions and equipment for hooking
up trailer lamps.
Using a step bumper (if equipped)
The rear bumper is equipped with an integral hitch and only requires a
ball with a 25.4 mm (one inch) shank diameter. The bumper has a 2,270 kg
(5,000 lb.) trailer weight and 227 kg (500 lb.) tongue weight capacity.
If it is necessary to relocate the trailer hitch ball position, a
frame-mounted trailer hitch must be installed.
Driving while you tow
When towing a trailer:
•Turn off the speed control. The speed control may shut off
automatically when you are towing on long, steep grades.
•Consult your local motor vehicle speed regulations for towing a trailer.
•To eliminate excessive shifting, use a lower gear. This will also assist
in transmission cooling. (For additional information, refer to the
Understanding the positions of the 4–speed automatic
transmissionsection in this chapter.
•Anticipate stops and brake gradually.
•Do not exceed the GCWR rating or transmission damage may occur.
Servicing after towing
If you tow a trailer for long distances, your vehicle will require more
frequent service intervals. Refer to your scheduled maintenance guide for
more information.
Driving
168
Page 169 of 280

Trailer towing tips
•Practice turning, stopping and backing up before starting on a trip to
get the feel of the vehicle trailer combination. When turning, make
wider turns so the trailer wheels will clear curbs and other obstacles.
•Allow more distance for stopping with a trailer attached.
•The trailer tongue weight should be 10–15% of the loaded trailer
weight.
•After you have traveled 80 km (50 miles), thoroughly check your
hitch, electrical connections and trailer wheel lug nuts.
•To aid in engine/transmission cooling and A/C efficiency during hot
weather while stopped in traffic, place the gearshift lever in P (Park)
(automatic transmission) or N (Neutral) (manual transmissions).
•Vehicles with trailers should not be parked on a grade. If you must
park on a grade, place wheel chocks under the trailer’s wheels.
Launching or retrieving a boat
Disconnect the wiring to the trailer before backing the trailer
into the water. Reconnect the wiring to the trailer after the
trailer is removed from the water.
When backing down a ramp during boat launching or retrieval:
•do not allow the static water level to rise above the bottom edge of
the rear bumper.
•do not allow waves to break higher than 15 cm (6 inches) above the
bottom edge of the rear bumper.
Exceeding these limits may allow water to enter vehicle components:
•causing internal damage to the components.
•affecting driveability, emissions and reliability.
Replace the rear axle lubricant any time the axle has been submerged in
water. Rear axle lubricant quantities are not to be checked or changed
unless a leak is suspected or repair required.
RECREATIONAL TOWING (ALL WHEELS ON THE GROUND)
An example of recreational towing would be towing your vehicle behind
a motorhome. Follow these guidelines if you have the need for
recreational towing your vehicle with all four wheels on the ground.
These guidelines are designed to ensure that your transmission is not
damaged.
Driving
169
Page 187 of 280
Tire change procedure
To prevent the vehicle from moving when you change a tire, be
sure the parking brake is set, then block (in both directions) the
wheel that is diagonally opposite (other side and end of the vehicle) to
the tire being changed.
If the vehicle slips off the jack, you or someone else could be
seriously injured.
Refer to the instruction sheet (located with the jack) for detailed tire
change instructions.
1. Park on a level surface, activate
hazard flashers and set the parking
brake.
2. Place gearshift lever in P (Park)
(automatic transmission) or in the
reverse gear (manual
transmission)and turn engine OFF.
3. Block the diagonally opposite
wheel.
4. Obtain the spare tire and jack
from their storage locations.
5. Use the tip of the lug wrench to
remove any wheel trim.
Roadside Emergencies
187
Page 188 of 280
6. Loosen each wheel lug nut
one-half turn counterclockwise but
do not remove them until the wheel
is raised off the ground.
7. Position the jack according to the following guides and turn the jack
handle clockwise until the wheel is completely off the ground.
When one of the rear wheels is off the ground, the transmission
alone will not prevent the vehicle from moving or slipping off the
jack, even if the transmission is in P (Park) or in the reverse gear
(manual transmission). To prevent the vehicle from moving when you
change the tire, be sure that the parking brake is set and the
diagonally opposite wheel is blocked. If the vehicle slips off the jack,
someone could be seriously injured.
•Front (4x2)
Roadside Emergencies
188
Page 216 of 280

SERVICE RECOMMENDATIONS
To help you service your vehicle:
•We highlight do-it-yourself items in the engine compartment for easy
location.
•We provide a scheduled maintenance guide which makes tracking
routine service easy.
If your vehicle requires professional service, your dealership can provide
the necessary parts and service. Check yourWarranty Guide/Owner
Information Guideto find out which parts and services are covered.
Use only recommended fuels, lubricants, fluids and service parts
conforming to specifications. Motorcraft parts are designed and built to
provide the best performance in your vehicle.
PRECAUTIONS WHEN SERVICING YOUR VEHICLE
•Do not work on a hot engine.
•Make sure that nothing gets caught in moving parts.
•Do not work on a vehicle with the engine running in an enclosed
space, unless you are sure you have enough ventilation.
•Keep all open flames and other burning (cigarettes) material away
from the battery and all fuel related parts.
Working with the engine off
•Automatic transmission:
1. Set the parking brake and shift to P (Park).
2. Turn off the engine and remove the key.
3. Block the wheels.
•Manual transmission:
1. Set the parking brake, depress the clutch and place the gearshift in 1
(First).
2. Turn off the engine and remove the key.
3. Block the wheels.
Maintenance and Specifications
216
Page 217 of 280
Working with the engine on
•Automatic transmission:
1. Set the parking brake and shift to P (Park).
2. Block the wheels.
•Manual transmission:
1. Set the parking brake, depress the clutch and place the gearshift in N
(Neutral).
2. Block the wheels.
Note:Do not start your engine with the air cleaner removed and do not
remove it while the engine is running.
OPENING THE HOOD
1. Inside the vehicle, pull the hood
release handle located under the
bottom of the instrument panel.
2. Go to the front of the vehicle and
release the auxiliary latch that is
located under the front center of
the hood.
3. Lift the hood until the lift
cylinders hold it open.
BRAKE
HOOD
Maintenance and Specifications
217