Page 1 of 288
Introduction 4
Instrument Cluster 10
Warning and control lights 10
Gauges 15
Entertainment Systems 18
AM/FM stereo cassette with CD 18
AM/FM stereo with CD 27
Climate Controls 41
Electronic automatic temperature control 41
Lights 50
Headlamps 50
Turn signal control 55
Bulb replacement 56
Driver Controls 65
Windshield wiper/washer control 65
Power windows 70
Mirrors 73
Speed control 76
Message center 86
Locks and Security 103
Keys 103
Locks 103
Anti-theft system 103
Table of Contents
1
Page 10 of 288

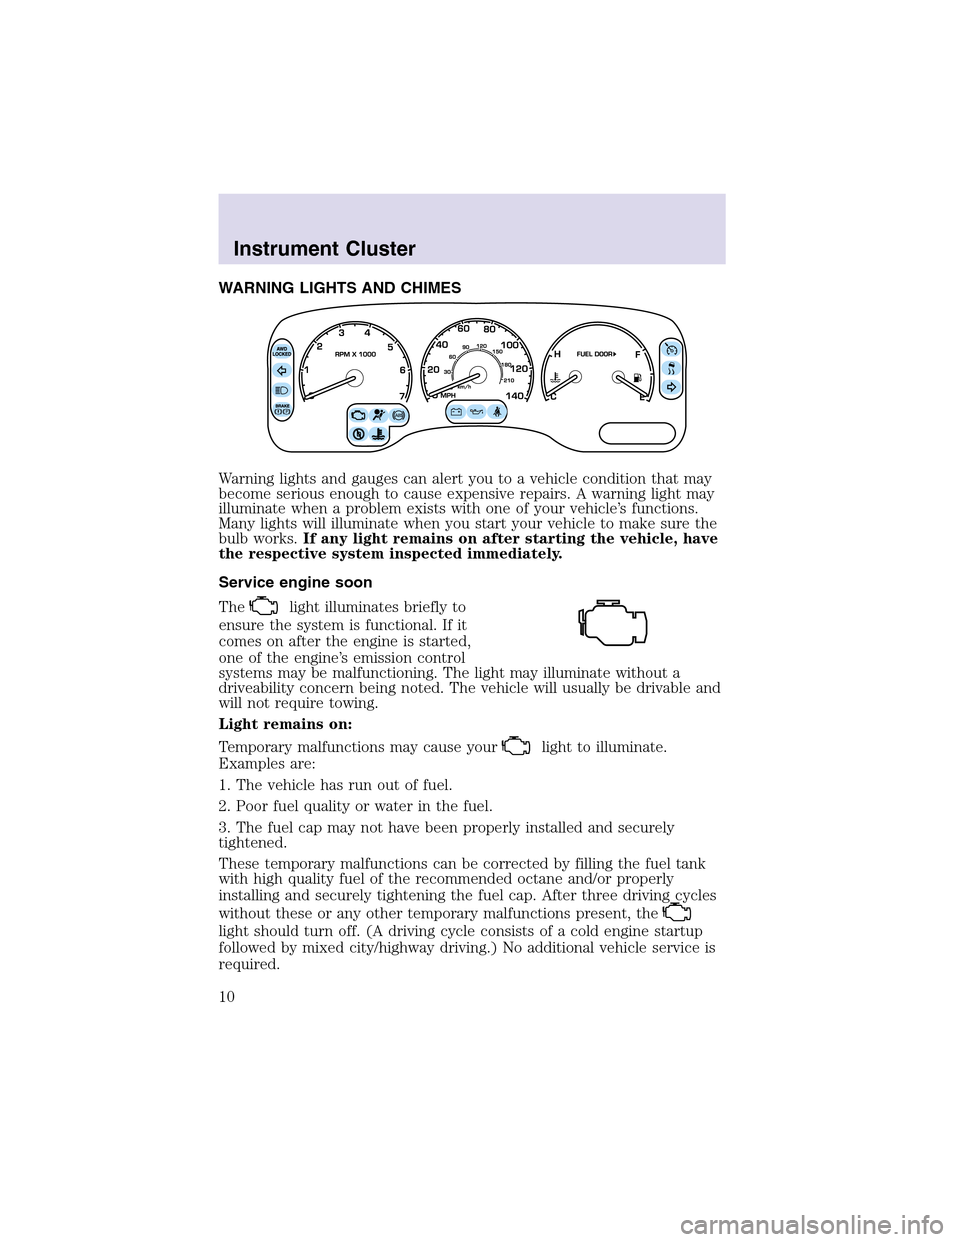
WARNING LIGHTS AND CHIMES
Warning lights and gauges can alert you to a vehicle condition that may
become serious enough to cause expensive repairs. A warning light may
illuminate when a problem exists with one of your vehicle’s functions.
Many lights will illuminate when you start your vehicle to make sure the
bulb works.If any light remains on after starting the vehicle, have
the respective system inspected immediately.
Service engine soon
The
light illuminates briefly to
ensure the system is functional. If it
comes on after the engine is started,
one of the engine’s emission control
systems may be malfunctioning. The light may illuminate without a
driveability concern being noted. The vehicle will usually be drivable and
will not require towing.
Light remains on:
Temporary malfunctions may cause your
light to illuminate.
Examples are:
1. The vehicle has run out of fuel.
2. Poor fuel quality or water in the fuel.
3. The fuel cap may not have been properly installed and securely
tightened.
These temporary malfunctions can be corrected by filling the fuel tank
with high quality fuel of the recommended octane and/or properly
installing and securely tightening the fuel cap. After three driving cycles
without these or any other temporary malfunctions present, the
light should turn off. (A driving cycle consists of a cold engine startup
followed by mixed city/highway driving.) No additional vehicle service is
required.
Instrument Cluster
10
Page 13 of 288

AdvanceTrac�(if equipped)
Flashes when the AdvanceTrac�
system is active. If the light remains
on, have the system serviced
immediately.
For more information, refer to the
Drivingchapter.
Engine oil pressure
Illuminates when the oil pressure
falls below the normal range. Check
the oil level and add oil if needed.
Refer toEngine oilin the
Maintenance and specificationschapter.
Speed control
Illuminates when the speed control
is activated.
Engine coolant temperature
Illuminates when the engine coolant
temperature is high. Stop the
vehicle as soon as safely possible,
switch off the engine and let it cool.
Never remove the coolant recovery capwhile the engine is
running or hot.
Refer toEngine coolantin theMaintenance and specifications
chapter. If light stays on or continues to turn on after the vehicle warms
up, have your vehicle serviced.
Turn signals
Illuminates when the turn signals or
the hazard lights are turned on. If
the lights stay on continuously or
flash faster, check for a burned-out bulb.
Instrument Cluster
13
Page 31 of 288

If there are fewer than six strong stations available on the frequency
band, the remaining memory preset controls will all store the last strong
station available.
To deactivate autoset and return to your audio system’s manually set
memory stations, press the AM/FM control again.
CD select
CD mode may be entered by
pressing the CD control. The first
track of the disc will begin playing.
After that, CD play will begin where
it stopped last.
If an alternative CD is desired, press the corresponding preset control
(1–6) of a loaded CD, or press the TUNE control to access the other
loaded CDs.
NO CD will display if the CD control is activated when there is not a CD
present in the audio system.
If the CD control is pressed followed by with a preset number and that
particular slot is empty, NO CD will display and the system will begin to
play the next available disc.
Display description
Six circles are always lit in the digital display. These signify the six CD
slots in the audio system. When a disc is loaded into a particular slot
(1–6), the number inside that specific circle lights. If the circle is empty,
there is no CD in that particular slot.
Load
The load feature allows you to load
single CDs into the player internal
to the radio.
This six discCD player is equipped with a CD door. Compact
discs should only be inserted into the player after the CD door
has been opened by the player. Do not attempt to force the door
open. Compact discs should only be loaded by pressing the LOAD
control.
Press the LOAD control. (You can choose which slot will be loaded by
pressing the desired preset number. If you do not choose a slot, the
system will choose the next available one.) Wait until the CD door opens.
Load the CD into the player. LOADING CD# is displayed. When the CD
CD AM
FM
LOAD
Entertainment Systems
31
Page 40 of 288
•Terrain.Hills, mountains and tall buildings between your vehicle’s
antenna and the radio station signal can cause FM reception problems.
Static can be caused on AM stations by power lines, electric fences,
traffic lights and thunderstorms. Moving away from an interfering
structure (out of its “shadow”) returns your reception to normal.
•Station overload.Weak signals are sometimes captured by stronger
signals when you pass a broadcast tower. A stronger signal may
temporarily overtake a weaker signal and play while the weak station
frequency is displayed.
The audio system automatically switches to single channel reception if it
will improve the reception of a station normally received in stereo.
AUDIO SYSTEM WARRANTIES AND SERVICE
Refer to theWarranty Guidefor audio system warranty information.
If service is necessary, see your dealer or a qualified technician.
Entertainment Systems
40
Page 48 of 288
Controls the direction of the airflow
in the rear of the vehicle. When
Floor is selected, airflow will be
directed through the floor registers.
When Panel is selected, airflow is
directed through the overhead registers.
Press the mode selector once to
select air distribution through the
overhead vents. The
icon will
illuminate on the temperature
selector.
Press the mode selector again to select air distribution through the floor
vents. The
icon will illuminate on the temperature selector. Only the
auxiliary control head (front or rear) that is active will have the indicator
lights functioning.
FLOOR CONSOLE CLIMATE CONTROLS
The floor console climate control system allows the rear passengers to
manually enable or disable airflow through the floor console. However,
air temperature and fan speed are controlled by the main climate control
system and by the auxiliary climate control system.
3 2 1 0REAR
Climate Controls
48
Page 50 of 288
HEADLAMP CONTROL
Rotate the headlampcontrol
clockwise to the first position to
turn on the parking lamps. Rotate
clockwise to the second position to
also turn on the headlamps.
Foglamp control
The headlampcontrol also operates
the foglamps. The foglamps can be
turned on only when the headlamp
control is in the
,or
position and the high beams are not
turned on.
Pull headlampcontrol towards you
to turn foglamps on. The foglamp
indicator light
will illuminate if
the ignition is in the Run and Key
On position.
Autolamp control
The autolampsystem provides light
sensitive automatic on-off control of
the exterior lights normally
controlled by the headlampcontrol.
The autolampsystem also keeps the
lights on for approximately 20
seconds after the ignition switch is
turned to the OFF position.
•To turn autolamps on, rotate the
control counterclockwise.
•To turn autolamps off, rotate the control clockwise to the OFF
position.
Lights
50
Page 51 of 288

Autolamp exit time delay, manual sequence
This option allows you to change the length of the autolamp exit delay.
To program the auto lamp exit time delay:
1. Start with the ignition in OFF and the autolamps selected.
2. Deselect the auto lamps.
3. Put the ignition on RUN.
4. Put the ignition in OFF.
5. Select the autolamps.
•NOTE:Steps 2 through 5 must be performed within a 10 second
period.
•At this point, the headlamps and park lamps will turn on.
6. Deselect the auto lamps after the desired auto lamp delay time
(maximum of 3 minutes).
•At this point, the headlamps and park lamps will turn off.
The default for autolampexit delay time is 20 seconds. Following a
vehicle battery disconnect/reconnect auto lampdelay exit time will be
retained.
Autolamp exit time delay, message center sequence
This option allows you to change the length of time of the autolamp exit
delay using the message center. You will have the ability to change the
autolampexit delay time of the autolampON time when the instrument
cluster (IC) message center is enabled (ignition in run or accessory
position).
There are 8 distinct and separate set points or values for auto lamp delay
exit time in seconds. The following are predefined set points or auto
lampexit delay time values: 0, 10, 20, 30, 60, 90, 120, 180, seconds (i.e.
0 to 3 minutes).
The following steps are used to program the autolamp exit time delay
using the message center:
1. The message center will display the last autolamp exit delay time in
seconds.
2. You can respond to this message by 1 of 4 methods:
•No Response- The message center then times out after 4 seconds
and displays it’s normal text information.
•Press the info button- The message center then displays its normal
text information.
Lights
51