Page 117 of 483
COMFORT ADJUSTMENT
104
Folding up third seats
Stow the rear seat belt buckles as shown above.
� Seat belt hanger
For the outer seat belts, use the seat belt hangers to
prevent the belts from being tangled.
For the center seat belt, stow the seat belt tabs into the
cover of the roof as shown above.
Make sure the tabs are securely locked in the cover.
To release the concave end tab, see page 127 for instructions.
Page 118 of 483
COMFORT ADJUSTMENT
105
NOTICE
The seat belts and the buckles must be stowed before
you fold up the seats.
1. Lower the outside head restraints to the lowest position
and remove the center head restraint.
2. Unfasten the zippers behind the right side seatback and
stow the center head restraint into the seatback.
3. Unlock the seatbacks by pushing the lock release
levers forward and fold them down.
Page 119 of 483
COMFORT ADJUSTMENT
106
4. Unlock the seat legs by pulling the seat leg lock release
knobs, and lift the whole seats sideward.
5. Retract the seat legs, then take the holding straps out
and hang the straps to the assist grips. Pull the straps on
the free end to secure the seats.
CAUTION
When folding up the third seats, fix the seats securely
by adjusting the length of the holding strap. Failure to
do so may cause an unexpected injury in the event of
emergency braking or collision.
When the third seat to its original position, stow the holding
straps into the holders facing the direction shown in the
illustration.
To return them to the original positions, reverse the steps
above.
Page 120 of 483
COMFORT ADJUSTMENT
107
CAUTION
When returning the seats to their original position,
observe the following precautions in order to prevent
personal injury in a collision or sudden stop:
�Be careful not get your hands or feet pinched in the
seat.
� Make sure the seats are securely locked by pushing
forward and rearward on the top of the seatbacks or
by trying to pull up the edge of the bottom cushions.
Failure to do so will prevent the seat belt from
operating properly.
� Make sure the seat belts are not twisted or caught
under the seat and are arranged in their proper
position and are ready to use.
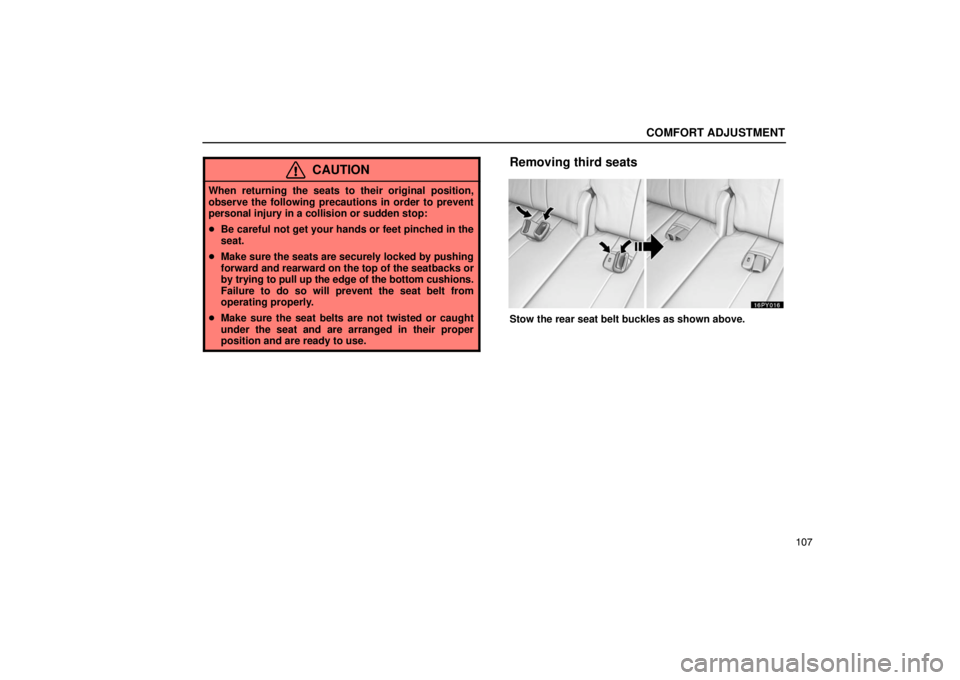
Removing third seats
Stow the rear seat belt buckles as shown above.
Page 121 of 483
COMFORT ADJUSTMENT
108
� Seat belt hanger
For the outer seat belts, use the seat belt hangers to
prevent the belts from being tangled.
For the center seat belt, stow the seat belt tabs into the
cover of the roof as shown above.
Make sure the tabs are securely locked in the cover.
To release the concave end tab, see page 127 for instructions.
NOTICE
The seat belts and the buckles must be stowed before
you remove the seats.
1. Lower the outside head restraints to the lowest position
and remove the center head restraint.
Page 122 of 483
COMFORT ADJUSTMENT
109
2. Unfasten the zippers behind the right side seatback and
stow the center head restraint into the seatback.
3. Unlock the seatbacks by pushing the lock release
levers forward and fold them down.
4. Unlock the seat legs by pulling the seat leg lock release
knobs, and lift the whole seats. Retract the seat legs, then
place the seats on the floor.
5. Remove the seat lock cover and push the seat lock
release knobs, then pull up the whole seats and remove
them. After removing the seats, reinstall the seat lock
cover.
Page 125 of 483
COMFORT ADJUSTMENT
11 2
Second and third seats
To raise the head restraint, pull it up. To lower it, press the
lock release button and push the head restraint down.
Second center head restraint: When an occupant sits on the
second center seat, always pull up the head restraint to the lock
position.
The head restraint is most effective when it is close to your
head. Therefore, using a cushion on the seatback is not
recommended.
CAUTION
� Adjust the center of the head restraint so that it is
closest to the top of your ears.
� After adjusting the head restraint, make sure it is
locked in position.
� Do not drive with the head restraints removed.
Stowing the third center head restraint
The third center head restraint can be stowed in the right
side third seatback when they are not in use.
To stow the head restraint, unfasten the zippers behind
the seatback and stow it into the seatback.
Page 132 of 483
 COMFORT ADJUSTMENT
11 9
Compass
The compass indicates the direction in which the vehicle
is heading. The illustration shown above indicates the
vehicle is heading north.
Push the “COMP” switch to")
COMFORT ADJUSTMENT
11 9
Compass
The compass indicates the direction in which the vehicle
is heading. The illustration shown above indicates the
vehicle is heading north.
Push the “COMP” switch to turn the compass system on
and off.
If the ignition switch was turned off with the system on, the
system will automatically turn back on when the ignition switch
is turned on. Displays
Directions
N
NE E
SE S
SW W
NWNorth
Northeast East
Southeast South
Southwest West
Northwest
The compass may not show the correct direction in the
following conditions:
� The vehicle is stopped immediately after turning.
The compass does not adjust while the vehicle is stopped.
� The ignition switch is turned off immediately after turning.
� The vehicle is on an inclined surface.
� The vehicle is in a place where the earth’s magnetic field is
subject to interference by artificial magnetic fields
(underground parking, under a steel tower, between
buildings, roof parking, near a crossing, near a large vehicle,
etc.).
� The vehicle is magnetized. (There is a magnet or a metal
object on or near the inside rear view mirror.)
� The battery has been disconnected.
Your vehicle is out of the set zone. Refer to the “Calibrating the
compass” in this section to set the zone number.
The compass works to calibrate the direction automatically
while the vehicle is in motion, if deviation is small.

 COMFORT ADJUSTMENT
105
NOTICE
The seat belts and the buckles must be stowed before
you fold up the seats.
1. Lower the outside head restraints to the lowest position
and remove the center head restrai")
 COMFORT ADJUSTMENT
106
4. Unlock the seat legs by pulling the seat leg lock release
knobs, and lift the whole seats sideward.
5. Retract the seat legs, then take the holding straps out
and hang the st")

 COMFORT ADJUSTMENT
109
2. Unfasten the zippers behind the right side seatback and
stow the center head restraint into the seatback.
3. Unlock the seatbacks by pushing the lock release
levers forward a")
 COMFORT ADJUSTMENT
11 2
Second and third seats
To raise the head restraint, pull it up. To lower it, press the
lock release button and push the head restraint down.
Second center head restraint: Whe")