Page 119 of 483
COMFORT ADJUSTMENT
106
4. Unlock the seat legs by pulling the seat leg lock release
knobs, and lift the whole seats sideward.
5. Retract the seat legs, then take the holding straps out
and hang the straps to the assist grips. Pull the straps on
the free end to secure the seats.
CAUTION
When folding up the third seats, fix the seats securely
by adjusting the length of the holding strap. Failure to
do so may cause an unexpected injury in the event of
emergency braking or collision.
When the third seat to its original position, stow the holding
straps into the holders facing the direction shown in the
illustration.
To return them to the original positions, reverse the steps
above.
Page 120 of 483
COMFORT ADJUSTMENT
107
CAUTION
When returning the seats to their original position,
observe the following precautions in order to prevent
personal injury in a collision or sudden stop:
�Make sure the seats are securely locked by pushing
forward and rearward on the top of the seatbacks or
by trying to pull up the edge of the bottom cushions.
Failure to do so will prevent the seat belt from
operating properly.
� Make sure the seat belts are not twisted or caught
under the seat and are arranged in their proper
position and are ready to use.
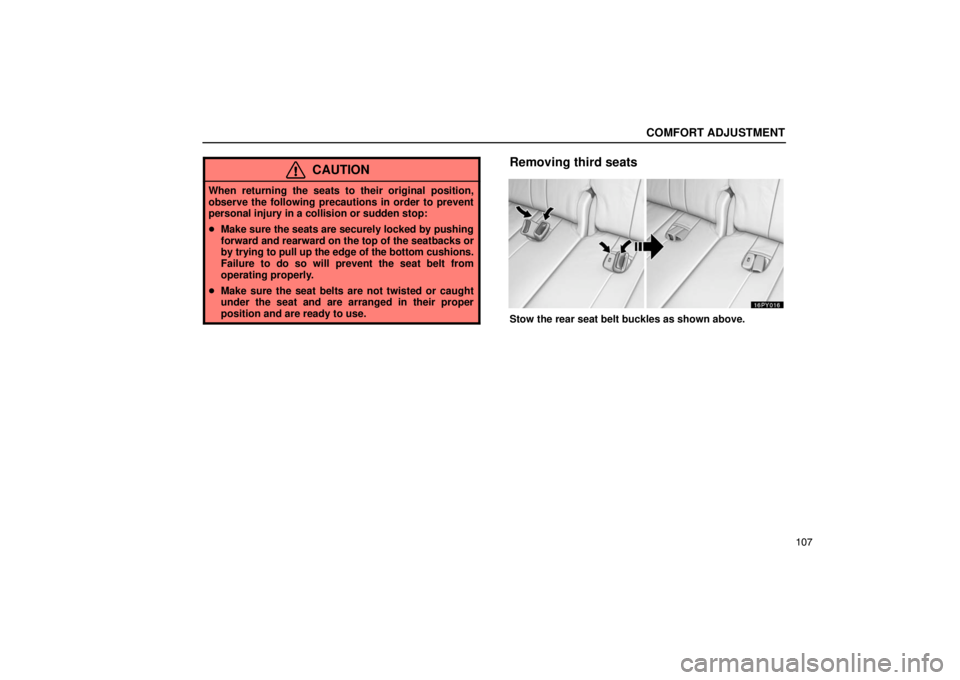
Removing third seats
Stow the rear seat belt buckles as shown above.
Page 123 of 483
 COMFORT ADJUSTMENT
11 0
NOTICE
Avoid putting heavy loads on the removed seats. The
metallic tips of the seat legs may be damaged and the
seats cannot be reinstalled.
To return them to the original po")
COMFORT ADJUSTMENT
11 0
NOTICE
Avoid putting heavy loads on the removed seats. The
metallic tips of the seat legs may be damaged and the
seats cannot be reinstalled.
To return them to the original positions, reverse the steps
above.
CAUTION
When removing or reinstalling the seats, observe the
following to prevent personal injury:
�Do not remove or reinstall the seats while the vehicle
is moving.
� Be careful not to get your hands or feet pinched in the
seats.
� Be careful not to hit the removed seats against a
person or drop it on yourself.
� Do not try to sit on or place anything on the removed
seat.
To prevent personal injury in a collision or sudden stop:
�Do not sit on or place anything on the folded seatback
while driving.
� Do not leave the removed seat loose in the vehicle.
� After reinstalling the seats, make sure the seats are
securely locked by pushing forward and rearward on
the top of the seatbacks or by trying to pull up the
edge of the bottom cushions. Failure to do so will
prevent the seat belt from operating properly.
� Install each seat in the same position from which it
was removed. Failure to do so will prevent third seat
occupants from using seat belts properly.
� Make sure the seat belts are not twisted or caught
under the seat and are arranged in their proper
position and are ready to use.
Page 126 of 483
COMFORT ADJUSTMENT
11 3
ARMRESTS
Front seats
To use the armrest, lower the armrest to the lowest
position and raise it to the desired angle. Raising the
armrest to the highest position unlocks the armrest to let
you return it to the lowest position.
NOTICE
To prevent damage to the armrest, avoid putting heavy
loads on it.
Second seat
To use the armrest, pull it down as shown above.
NOTICE
To prevent damage to the armrest, avoid putting heavy
loads on it.
Page 128 of 483
 COMFORT ADJUSTMENT
11 5
Auto tilt away*
When the ignition key is removed, the steering column
moves forward away from the driver and also tilts up for
easy exit and entry.
When the key is inserted in")
COMFORT ADJUSTMENT
11 5
Auto tilt away*
When the ignition key is removed, the steering column
moves forward away from the driver and also tilts up for
easy exit and entry.
When the key is inserted in the ignition switch, the steering
column returns to the previously set position.NOTE:
*This feature can be deactivated.
Ask your Lexus dealer for details.
OUTSIDE REAR VIEW MIRRORS
Adjust the mirror so that you can just see the side of your
vehicle in the mirror.
Be careful when judging the size or distance of any object seen
in the outside rear view mirror on the passenger’s side. It is a
convex mirror with a curved surface. Any object seen in a
convex mirror will look smaller and farther away than if seen in
a normal flat mirror.
When you push the outside rear view mirror defogger switch,
the heater panels in the outside rear view mirrors will quickly
clear the mirror surface. (See “Outside rear view mirror
defogger switch” on page 32.)
The rear view mirrors are rain clearing mirrors that clear the
driver’s rear view when it rains. (For details, see “Rain clearing
mirrors” on page 466.)
Page 129 of 483
 COMFORT ADJUSTMENT
11 6
CAUTION
�Do not adjust the mirror while the vehicle is moving.
Doing so may cause the driver to mishandle the
vehicle and an accident may occur , resulting in death
or serious")
COMFORT ADJUSTMENT
11 6
CAUTION
�Do not adjust the mirror while the vehicle is moving.
Doing so may cause the driver to mishandle the
vehicle and an accident may occur , resulting in death
or serious injuries.
� Since the mirror surfaces can get hot, do not touch
them when the outside rear view mirror defogger
switch is on.
Power rear view mirror control
� 1 Master switch 2 Control switch
To adjust the power rear view mirror, first place the master
switch at “L” (left) or “R” (right), and push the contro\
l
switch on the desired side.
The power rear view mirrors can be adjusted when the key is
in the “ACC” or “ON” position.
When the automatic transmission selector lever is shifted
into “R” position with the master switch in the “L” or “R\
”
position, the rear view mirrors automatically down to help
backing up.
The mirrors return to the previous position in the following
operations.
� Shift the transmission lever out of “R” position.
� Place the master switch in the neutral position.
Page 131 of 483
 COMFORT ADJUSTMENT
11 8
INSIDE REAR VIEW MIRROR
Adjust the mirror so that you can just see the rear of your
vehicle in the mirror.
Pushing the “MIRROR” switch changes the mode
between AUTO and DAY")
COMFORT ADJUSTMENT
11 8
INSIDE REAR VIEW MIRROR
Adjust the mirror so that you can just see the rear of your
vehicle in the mirror.
Pushing the “MIRROR” switch changes the mode
between AUTO and DAY.
The indicator comes on when the AUTO mode is selected.
DAY mode: The mirror surface is normal.
AUTO mode: If the mirror detects light from the headlights
of the vehicle behind you, the mirror surface darkens
slightly to reduce the reflected light.
When the ignition key is inserted and turned on, the inside rear
view mirror always turns on in the AUTO mode. When the outside air temperature is low, it may take a little
longer for the mirror to darken in response to the detection of
headlights.
CAUTION
Do not adjust the mirror while the vehicle is moving.
Doing so may cause the
driver to mishandle the vehicle
and an accident may occur resulting in death or serious
injuries.
To ensure correct functioning of an anti�glare mirror
sensor located on the back side of the mirror, do not touch
or cover the sensor with your finger or a piece of cloth, etc.
Page 132 of 483
 COMFORT ADJUSTMENT
11 9
Compass
The compass indicates the direction in which the vehicle
is heading. The illustration shown above indicates the
vehicle is heading north.
Push the “COMP” switch to")
COMFORT ADJUSTMENT
11 9
Compass
The compass indicates the direction in which the vehicle
is heading. The illustration shown above indicates the
vehicle is heading north.
Push the “COMP” switch to turn the compass system on
and off.
If the ignition switch was turned off with the system on, the
system will automatically turn back on when the ignition switch
is turned on. Displays
Directions
N
NE E
SE S
SW W
NWNorth
Northeast East
Southeast South
Southwest West
Northwest
The compass may not show the correct direction in the
following conditions:
� The vehicle is stopped immediately after turning.
The compass does not adjust while the vehicle is stopped.
� The ignition switch is turned off immediately after turning.
� The vehicle is on an inclined surface.
� The vehicle is in a place where the earth’s magnetic field is
subject to interference by artificial magnetic fields
(underground parking, under a steel tower, between
buildings, roof parking, near a crossing, near a large vehicle,
etc.).
� The vehicle is magnetized. (There is a magnet or a metal
object on or near the inside rear view mirror.)
� The battery has been disconnected.
Your vehicle is out of the set zone. Refer to the “Calibrating the
compass” in this section to set the zone number.
The compass works to calibrate the direction automatically
while the vehicle is in motion, if deviation is small.
 COMFORT ADJUSTMENT
106
4. Unlock the seat legs by pulling the seat leg lock release
knobs, and lift the whole seats sideward.
5. Retract the seat legs, then take the holding straps out
and hang the st")
 COMFORT ADJUSTMENT
11 3
ARMRESTS
Front seats
To use the armrest, lower the armrest to the lowest
position and raise it to the desired angle. Raising the
armrest to the highest position unlocks the ar")