2003 JEEP GRAND CHEROKEE Breather crankcase
[x] Cancel search: Breather crankcasePage 1315 of 2199

(13) Disconnect the engine block heater power
cable from the block heater.
(14) Lower vehicle.
(15) Remove throttle body resonator assembly and
inlet hose.
(16) Disconnect throttle and speed control cables.
(17) Disconnect tube from both the left and right
side crankcase breathers, then remove the breathers
(Fig. 5).
(18) Discharge A/C system (Refer to 24 - HEAT-
ING & AIR CONDITIONING/PLUMBING - STAN-
DARD PROCEDURE).(19) Remove radiator fan (Refer to 7 - COOLING/
ENGINE/RADIATOR FAN - REMOVAL) and acces-
sory drive belt (Refer to 7 - COOLING/ACCESSORY
DRIVE/DRIVE BELTS - REMOVAL).
(20) Remove A/C compressor (Refer to 24 - HEAT-
ING & AIR CONDITIONING/PLUMBING/A/C COM-
PRESSOR - REMOVAL).
(21) Disconnect transmission oil cooler lines at the
radiator.
(22) Disconnect radiator lower hose at the thermo-
stat housing.
(23) Remove A/C condenser (Refer to 24 - HEAT-
ING & AIR CONDITIONING/PLUMBING/A/C CON-
DENSER - REMOVAL).
(24) Remove radiator (Refer to 7 - COOLING/EN-
GINE/RADIATOR - REMOVAL).
(25) Remove generator (Refer to 8 - ELECTRICAL/
CHARGING/GENERATOR - REMOVAL).
(26) Disconnect the two heater hoses from the tim-
ing chain cover.
(27) Disconnect engine harness at the following
points :
²Intake air temperature (IAT) sensor (Fig. 6)
²Fuel Injectors
²Throttle Position (TPS) Switch
²Idle Air Control (IAC) Motor
²Engine Oil Pressure Switch
²Engine Coolant Temperature (ECT) Sensor
²Manifold absolute pressure (MAP) Sensor
²Camshaft Position (CMP) Sensor
²Coil Over Plugs
(28) Release fuel rail pressure (Refer to 14 - FUEL
SYSTEM/FUEL DELIVERY - STANDARD PROCE-
DURE) then disconnect the fuel supply quick connect
fitting at the fuel rail (Refer to 14 - FUEL SYSTEM/
FUEL DELIVERY/QUICK CONNECT FITTING -
STANDARD PROCEDURE).
(29) Remove power steering pump and position out
of the way.
(30) Disconnect ground straps from the left side of
the engine.
(31) Install Engine Lifting Fixture Special Tool
8347 (Fig. 7)following these steps.
²Holding the lifting fixture at a slight angle, slide
the large bore in the front plate over the hex portion
of the lifting stud.
²Position the two remaining fixture arms onto
the two lifting studs in the cylinder heads.
²Pull foward and upward on the lifting fixture so
that the lifting stud rest in the slotted area below the
large bore.
²Secure the lifting fixture to the three studs
using three 7/16 ± 14 N/C locknuts.
²Make sure the lifting loop in the lifting fixture is
in the last hole (closest to the throttle body) to min-
imize the angle of engine during removal.
Fig. 4 Crankshaft Position Sensor
1 - CRANKSHAFT POSITION SENSOR
2 - CYLINDER HEAD COVER
3 - CAMSHAFT POSITION SENSOR
4 - RIGHT SIDE CYLINDER BLOCK
Fig. 5 Crankcase Breather Connection Points
1 - CRANKCASE BREATHERS
9 - 72 ENGINE - 4.7LWJ
ENGINE - 4.7L (Continued)
Page 1317 of 2199

²Camshaft Position (CMP) Sensor
²Coil Over Plugs
(10) Install generator (Refer to 8 - ELECTRICAL/
CHARGING/GENERATOR - INSTALLATION).
(11) Install radiator (Refer to 7 - COOLING/EN-
GINE/RADIATOR - INSTALLATION).
(12) Install A/C condenser (Refer to 24 - HEATING
& AIR CONDITIONING/PLUMBING/A/C CON-
DENSER - INSTALLATION).
(13) Connect radiator lower hose at the thermostat
housing.
(14) Connect the transmission oil cooler lines to
the radiator.
(15) Install A/C compressor. (Refer to 24 - HEAT-
ING & AIR CONDITIONING/PLUMBING/A/C COM-
PRESSOR - INSTALLATION).
(16) Install accessory drive belt (Refer to 7 -
COOLING/ACCESSORY DRIVE/DRIVE BELTS -
INSTALLATION) and radiator fan (Refer to 7 -
COOLING/ENGINE/RADIATOR FAN - INSTALLA-
TION).
(17) Install breathers, then connect tube to both
crankcase breathers (Fig. 5).
(18) Connect throttle and speed control cables.
(19) Install throttle body resonator assembly and
inlet hose.
(20) Raise vehicle.
(21) Connect two ground straps on the lower left
hand side of the engine and one ground strap on the
lower right side.
(22) Install torque converter bolts.
(23) Connect crankshaft position sensor (Fig. 4).
(24) Install starter.
(25) Install rubber splash shield.
CAUTION: The structural cover requires a specific
torque sequence. Failure to follow this sequence
may cause severe damage to the cover.
(26) Install structural cover (Refer to 9 - ENGINE/
ENGINE BLOCK/STRUCTURAL COVER - INSTAL-
LATION).
(27) Install exhaust crossover pipe.
(28) Install engine block heater power cable, If
equipped.
(29) Lower vehicle.
(30) Check and fill engine oil (Refer to LUBRICA-
TION & MAINTENANCE/FLUID TYPES - SPECIFI-
CATIONS).
(31) Recharge the A/C system (Refer to 24 - HEAT-
ING & AIR CONDITIONING/PLUMBING - STAN-
DARD PROCEDURE).
(32) Refill the engine cooling system (Refer to 7 -
COOLING - STANDARD PROCEDURE).
(33) Connect the battery negative cable.
(34) Start engine and check for leaks.SPECIFICATIONS
4.7L ENGINE
DESCRIPTION SPECIFICATION
GENERAL SPECIFICATIONS
Engine Type 90É SOHC V-8 16-Valve
Displacement 4.7 Liters / 4701cc
(287 Cubic Inches)
Bore 93.0 mm (3.66 in.)
Stroke 86.5 mm (3.40 in.)
Compression Ratio 9.0:1
Horsepower 235 BHP @ 4800 RPM
Torque 295 LB-FT @ 3200 RPM
Lead Cylinder #1 Left Bank
Firing Order 1-8-4-3-6-5-7-2
CYLINDER BLOCK
Cylinder Block Cast Iron
Bore Diameter 93.010 .0075 mm
(3.6619 0.0003 in.)
Out of Round (MAX) 0.076 mm (0.003 in.)
Taper (MAX) 0.051 mm (0.002 in.)
PISTONS
Material Aluminum Alloy
Diameter 92.975 mm (3.6605 in.)
Weight 367.5 grams (12.96 oz)
Ring Groove Diameter
No. 1 83.73 - 83.97 mm
(3.296 - 3.269 in.)
No. 2 82.833 - 83.033 mm
(3.261 - 3.310 in.)
No. 3 83.88 - 84.08 mm
(3.302 - 3.310 in.)
PISTON PINS
Type Pressed Fit
Clearance In Piston 0.010 - 0.019 mm
(0.0004 - 0.0008 in.)
Diameter 24.013 - 24.016 mm
(0.9454 - 0.9456 in.)
9 - 74 ENGINE - 4.7LWJ
ENGINE - 4.7L (Continued)
Page 1347 of 2199
CYLINDER HEAD COVER(S) -
RIGHT
DESCRIPTION
The cylinder head covers are made of die cast mag-
nesium, and are not interchangeable from side-to-
side. It is imperative that nothing rest on the
cylinder head covers. Prolonged contact with other
items may wear a hole in the cylinder head cover.
REMOVAL - RIGHT SIDE
(1) Disconnect battery negative cable.
(2) Remove air cleaner assembly, resonator assem-
bly and air inlet hose.
(3) Drain cooling system (Refer to 7 - COOLING -
STANDARD PROCEDURE).
(4) Remove accessory drive belt (Refer to 7 -
COOLING/ACCESSORY DRIVE/DRIVE BELTS -
REMOVAL).
(5) Remove air conditioning compressor retaining
bolts and move compressor to the left.
(6) Remove heater hoses.
(7) Disconnect injector and ignition coil connectors.
(8) Disconnect and remove positive crankcase ven-
tilation (PCV) hose.
(9) Remove oil fill tube.
(10) Un-clip injector and ignition coil harness and
move away from cylinder head cover.
(11) Remove right rear breather tube and filter
assembly.
(12) Remove cylinder head cover retaining bolts.
(13) Remove cylinder head cover.
NOTE: The gasket may be used again, provided no
cuts, tears, or deformation has occurred.
CLEANING
Clean cylinder head cover gasket surface.
Clean head rail, if necessary.
INSTALLATION - RIGHT SIDE
CAUTION: Do not use harsh cleaners to clean the
cylinder head covers. Severe damage to covers
may occur.
CAUTION: DO NOT allow other components includ-
ing the wire harness to rest on or against the
engine cylinder head cover. Prolonged contact with
other objects may wear a hole in the cylinder head
cover.
(1) Clean cylinder head cover and both sealing sur-
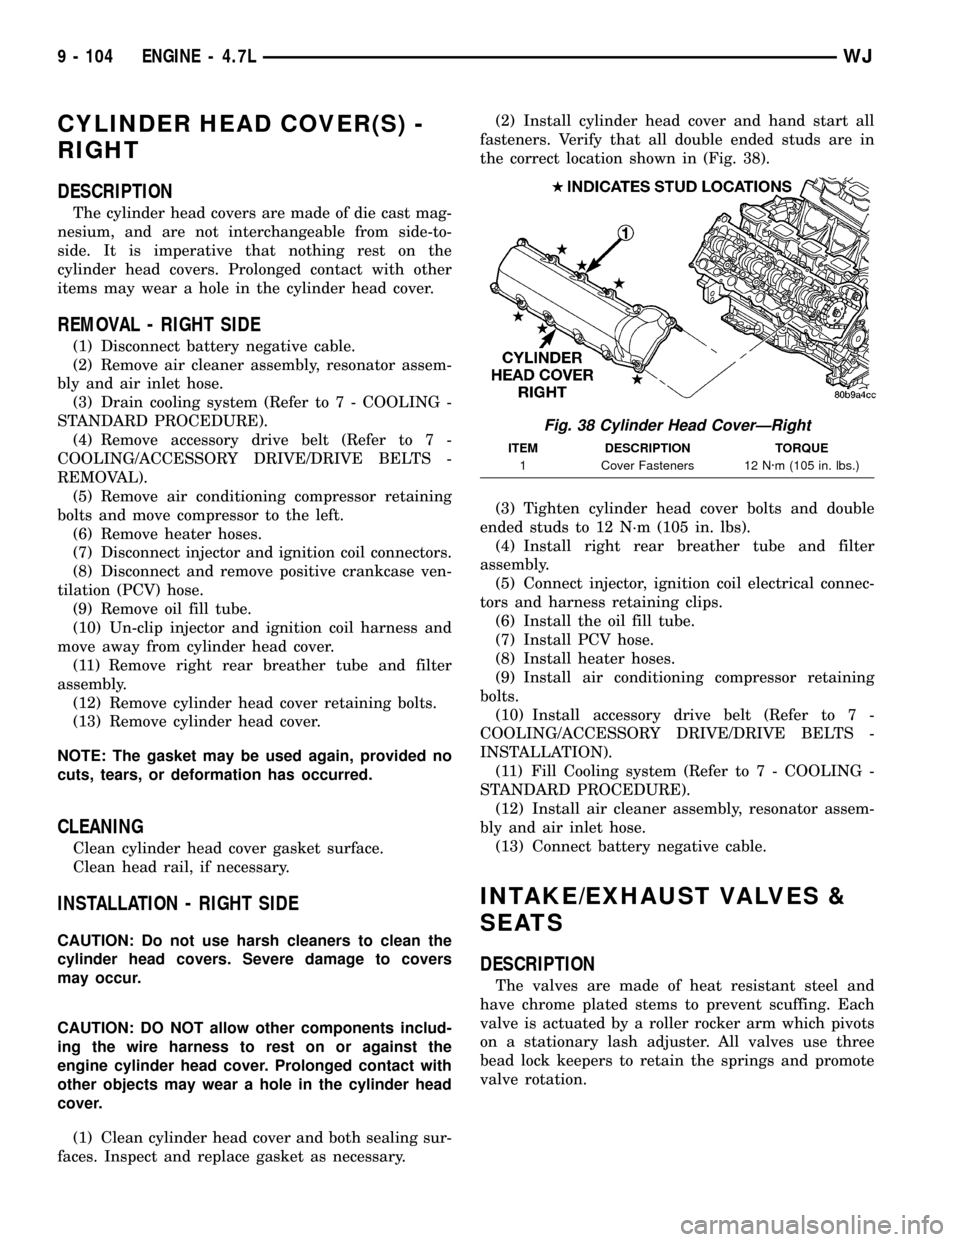
faces. Inspect and replace gasket as necessary.(2) Install cylinder head cover and hand start all
fasteners. Verify that all double ended studs are in
the correct location shown in (Fig. 38).
(3) Tighten cylinder head cover bolts and double
ended studs to 12 N´m (105 in. lbs).
(4) Install right rear breather tube and filter
assembly.
(5) Connect injector, ignition coil electrical connec-
tors and harness retaining clips.
(6) Install the oil fill tube.
(7) Install PCV hose.
(8) Install heater hoses.
(9) Install air conditioning compressor retaining
bolts.
(10) Install accessory drive belt (Refer to 7 -
COOLING/ACCESSORY DRIVE/DRIVE BELTS -
INSTALLATION).
(11) Fill Cooling system (Refer to 7 - COOLING -
STANDARD PROCEDURE).
(12) Install air cleaner assembly, resonator assem-
bly and air inlet hose.
(13) Connect battery negative cable.
INTAKE/EXHAUST VALVES &
SEATS
DESCRIPTION
The valves are made of heat resistant steel and
have chrome plated stems to prevent scuffing. Each
valve is actuated by a roller rocker arm which pivots
on a stationary lash adjuster. All valves use three
bead lock keepers to retain the springs and promote
valve rotation.
Fig. 38 Cylinder Head CoverÐRight
ITEM DESCRIPTION TORQUE
1 Cover Fasteners 12 N´m (105 in. lbs.)
9 - 104 ENGINE - 4.7LWJ
Page 2180 of 2199
NOTE: The evaporative system uses specially man-
ufactured lines/hoses. If replacement becomes nec-
essary, only use fuel resistant, low permeation
hose.
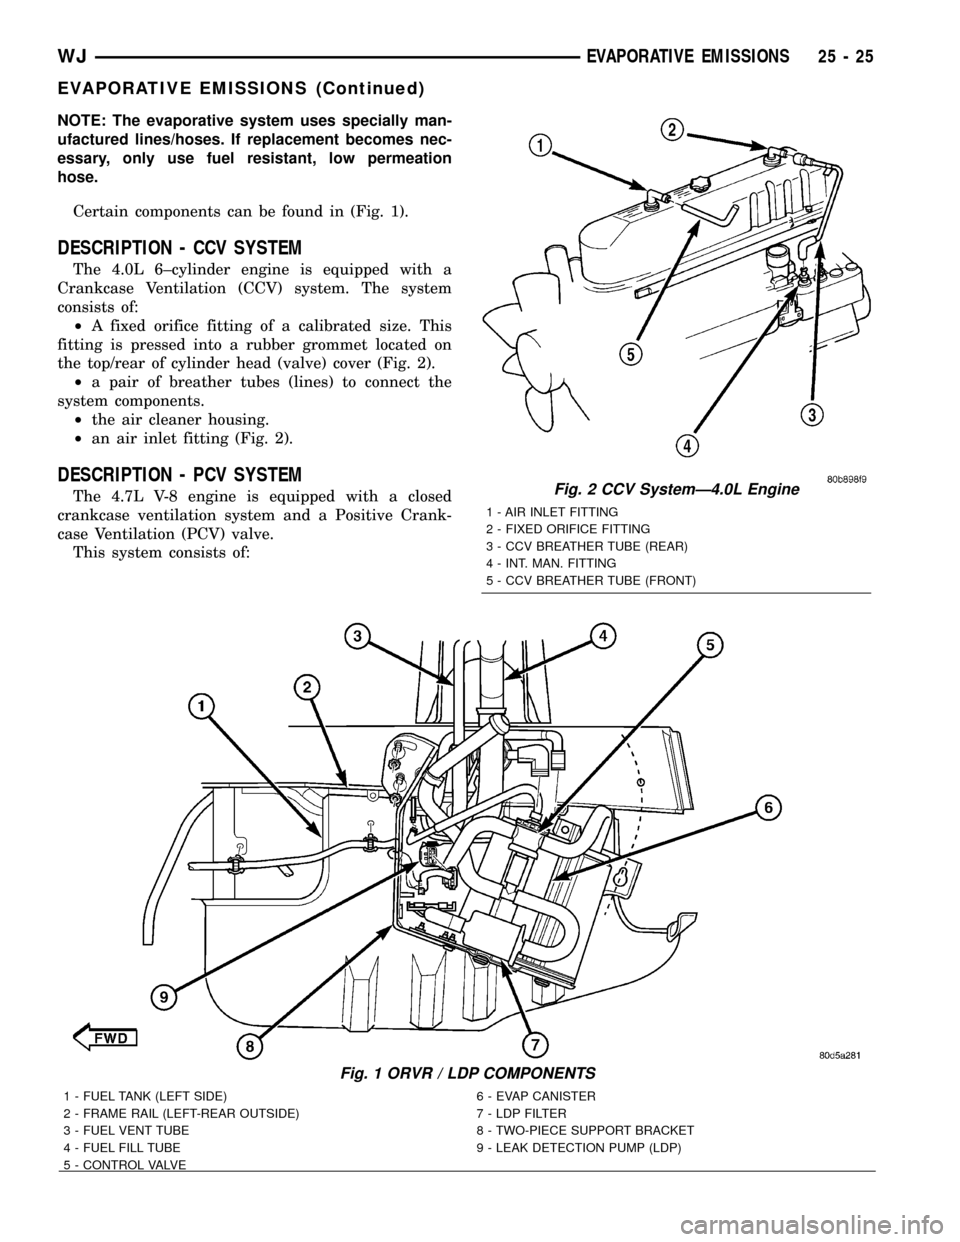
Certain components can be found in (Fig. 1).
DESCRIPTION - CCV SYSTEM
The 4.0L 6±cylinder engine is equipped with a
Crankcase Ventilation (CCV) system. The system
consists of:
²A fixed orifice fitting of a calibrated size. This
fitting is pressed into a rubber grommet located on
the top/rear of cylinder head (valve) cover (Fig. 2).
²a pair of breather tubes (lines) to connect the
system components.
²the air cleaner housing.
²an air inlet fitting (Fig. 2).
DESCRIPTION - PCV SYSTEM
The 4.7L V-8 engine is equipped with a closed
crankcase ventilation system and a Positive Crank-
case Ventilation (PCV) valve.
This system consists of:
Fig. 1 ORVR / LDP COMPONENTS
1 - FUEL TANK (LEFT SIDE) 6 - EVAP CANISTER
2 - FRAME RAIL (LEFT-REAR OUTSIDE) 7 - LDP FILTER
3 - FUEL VENT TUBE 8 - TWO-PIECE SUPPORT BRACKET
4 - FUEL FILL TUBE 9 - LEAK DETECTION PUMP (LDP)
5 - CONTROL VALVE
Fig. 2 CCV SystemÐ4.0L Engine
1 - AIR INLET FITTING
2 - FIXED ORIFICE FITTING
3 - CCV BREATHER TUBE (REAR)
4 - INT. MAN. FITTING
5 - CCV BREATHER TUBE (FRONT)
WJEVAPORATIVE EMISSIONS 25 - 25
EVAPORATIVE EMISSIONS (Continued)
Page 2181 of 2199
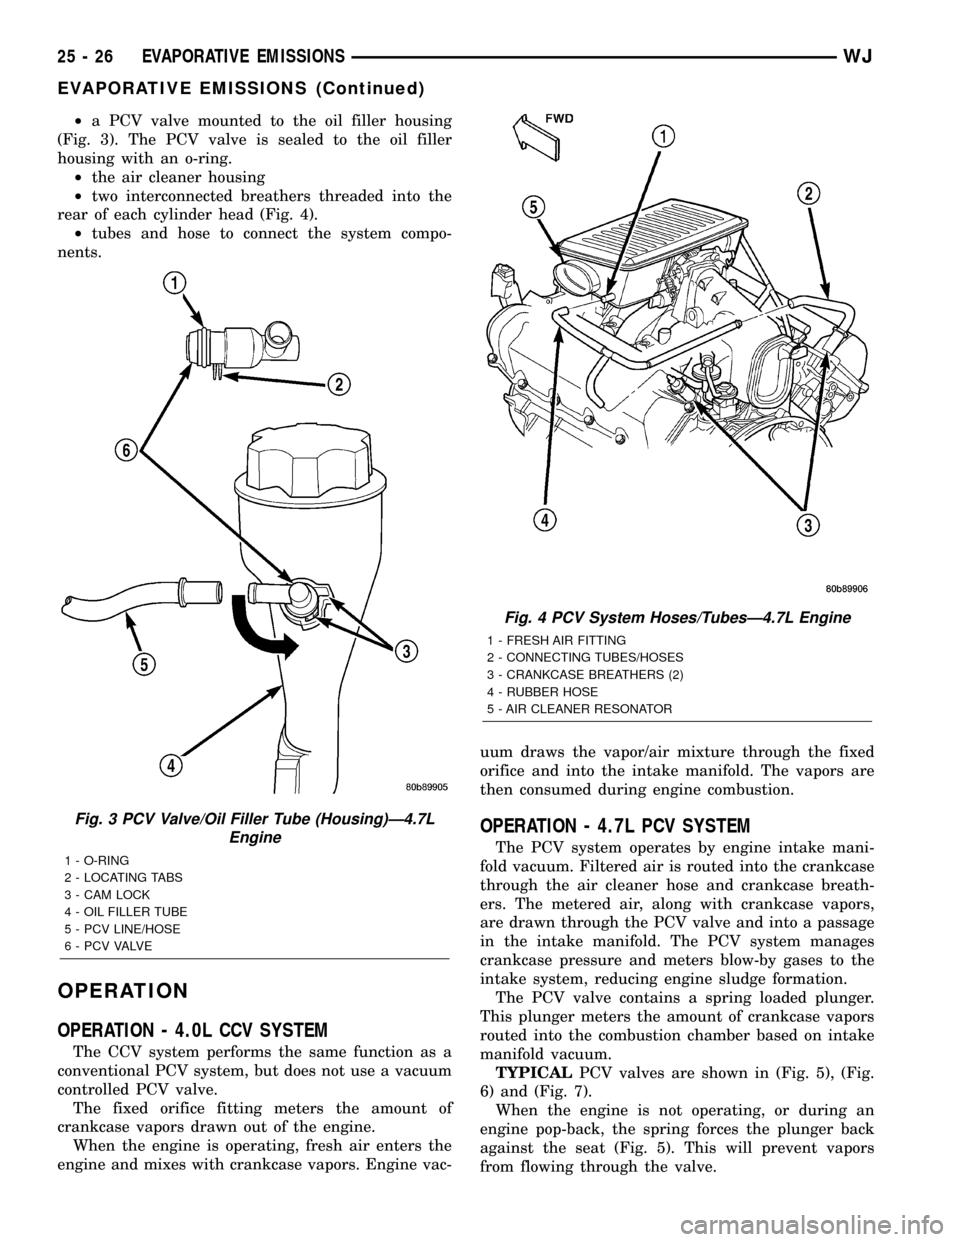
²a PCV valve mounted to the oil filler housing
(Fig. 3). The PCV valve is sealed to the oil filler
housing with an o-ring.
²the air cleaner housing
²two interconnected breathers threaded into the
rear of each cylinder head (Fig. 4).
²tubes and hose to connect the system compo-
nents.
OPERATION
OPERATION - 4.0L CCV SYSTEM
The CCV system performs the same function as a
conventional PCV system, but does not use a vacuum
controlled PCV valve.
The fixed orifice fitting meters the amount of
crankcase vapors drawn out of the engine.
When the engine is operating, fresh air enters the
engine and mixes with crankcase vapors. Engine vac-uum draws the vapor/air mixture through the fixed
orifice and into the intake manifold. The vapors are
then consumed during engine combustion.
OPERATION - 4.7L PCV SYSTEM
The PCV system operates by engine intake mani-
fold vacuum. Filtered air is routed into the crankcase
through the air cleaner hose and crankcase breath-
ers. The metered air, along with crankcase vapors,
are drawn through the PCV valve and into a passage
in the intake manifold. The PCV system manages
crankcase pressure and meters blow-by gases to the
intake system, reducing engine sludge formation.
The PCV valve contains a spring loaded plunger.
This plunger meters the amount of crankcase vapors
routed into the combustion chamber based on intake
manifold vacuum.
TYPICALPCV valves are shown in (Fig. 5), (Fig.
6) and (Fig. 7).
When the engine is not operating, or during an
engine pop-back, the spring forces the plunger back
against the seat (Fig. 5). This will prevent vapors
from flowing through the valve.
Fig. 3 PCV Valve/Oil Filler Tube (Housing)Ð4.7L
Engine
1 - O-RING
2 - LOCATING TABS
3 - CAM LOCK
4 - OIL FILLER TUBE
5 - PCV LINE/HOSE
6 - P C V VA LV E
Fig. 4 PCV System Hoses/TubesÐ4.7L Engine
1 - FRESH AIR FITTING
2 - CONNECTING TUBES/HOSES
3 - CRANKCASE BREATHERS (2)
4 - RUBBER HOSE
5 - AIR CLEANER RESONATOR
25 - 26 EVAPORATIVE EMISSIONSWJ
EVAPORATIVE EMISSIONS (Continued)
Page 2182 of 2199
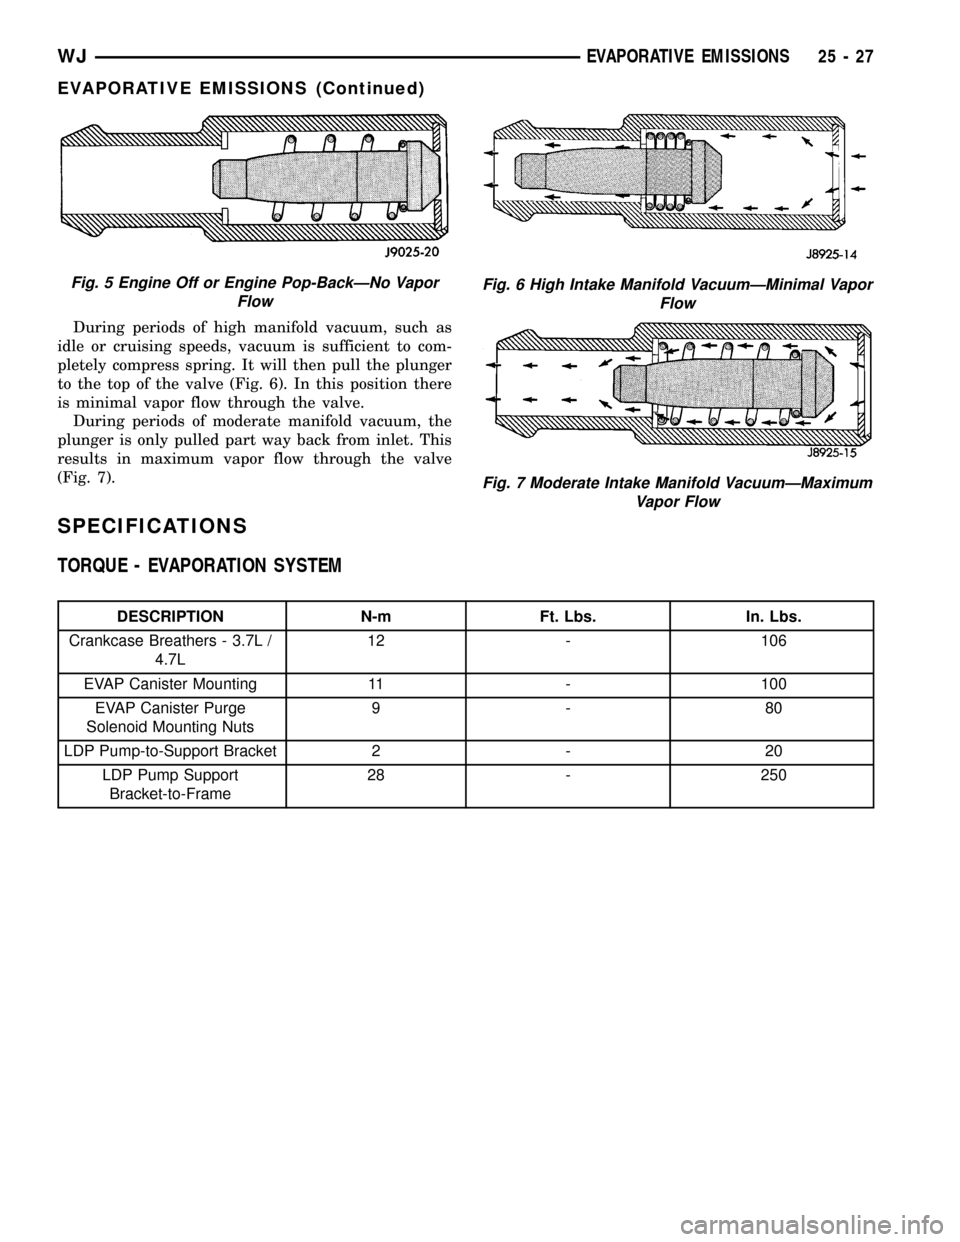
During periods of high manifold vacuum, such as
idle or cruising speeds, vacuum is sufficient to com-
pletely compress spring. It will then pull the plunger
to the top of the valve (Fig. 6). In this position there
is minimal vapor flow through the valve.
During periods of moderate manifold vacuum, the
plunger is only pulled part way back from inlet. This
results in maximum vapor flow through the valve
(Fig. 7).
SPECIFICATIONS
TORQUE - EVAPORATION SYSTEM
DESCRIPTION N-m Ft. Lbs. In. Lbs.
Crankcase Breathers - 3.7L /
4.7L12 - 106
EVAP Canister Mounting 11 - 100
EVAP Canister Purge
Solenoid Mounting Nuts9- 80
LDP Pump-to-Support Bracket 2 - 20
LDP Pump Support
Bracket-to-Frame28 - 250
Fig. 5 Engine Off or Engine Pop-BackÐNo Vapor
FlowFig. 6 High Intake Manifold VacuumÐMinimal Vapor
Flow
Fig. 7 Moderate Intake Manifold VacuumÐMaximum
Vapor Flow
WJEVAPORATIVE EMISSIONS 25 - 27
EVAPORATIVE EMISSIONS (Continued)
Page 2183 of 2199
CCV HOSE
DIAGNOSIS AND TESTING - CCV SYSTEM -
4.0L
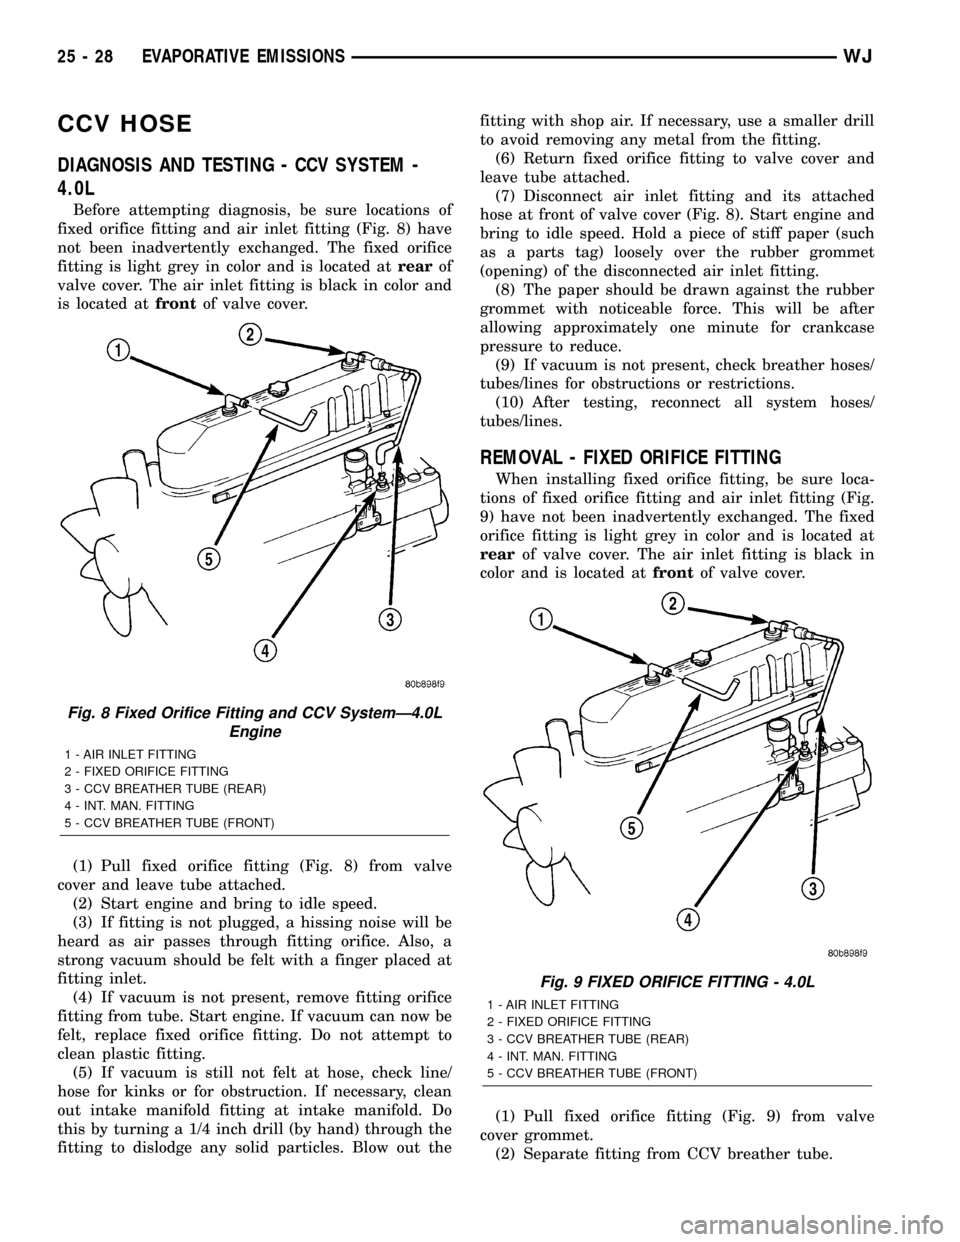
Before attempting diagnosis, be sure locations of
fixed orifice fitting and air inlet fitting (Fig. 8) have
not been inadvertently exchanged. The fixed orifice
fitting is light grey in color and is located atrearof
valve cover. The air inlet fitting is black in color and
is located atfrontof valve cover.
(1) Pull fixed orifice fitting (Fig. 8) from valve
cover and leave tube attached.
(2) Start engine and bring to idle speed.
(3) If fitting is not plugged, a hissing noise will be
heard as air passes through fitting orifice. Also, a
strong vacuum should be felt with a finger placed at
fitting inlet.
(4) If vacuum is not present, remove fitting orifice
fitting from tube. Start engine. If vacuum can now be
felt, replace fixed orifice fitting. Do not attempt to
clean plastic fitting.
(5) If vacuum is still not felt at hose, check line/
hose for kinks or for obstruction. If necessary, clean
out intake manifold fitting at intake manifold. Do
this by turning a 1/4 inch drill (by hand) through the
fitting to dislodge any solid particles. Blow out thefitting with shop air. If necessary, use a smaller drill
to avoid removing any metal from the fitting.
(6) Return fixed orifice fitting to valve cover and
leave tube attached.
(7) Disconnect air inlet fitting and its attached
hose at front of valve cover (Fig. 8). Start engine and
bring to idle speed. Hold a piece of stiff paper (such
as a parts tag) loosely over the rubber grommet
(opening) of the disconnected air inlet fitting.
(8) The paper should be drawn against the rubber
grommet with noticeable force. This will be after
allowing approximately one minute for crankcase
pressure to reduce.
(9) If vacuum is not present, check breather hoses/
tubes/lines for obstructions or restrictions.
(10) After testing, reconnect all system hoses/
tubes/lines.
REMOVAL - FIXED ORIFICE FITTING
When installing fixed orifice fitting, be sure loca-
tions of fixed orifice fitting and air inlet fitting (Fig.
9) have not been inadvertently exchanged. The fixed
orifice fitting is light grey in color and is located at
rearof valve cover. The air inlet fitting is black in
color and is located atfrontof valve cover.
(1) Pull fixed orifice fitting (Fig. 9) from valve
cover grommet.
(2) Separate fitting from CCV breather tube.
Fig. 8 Fixed Orifice Fitting and CCV SystemÐ4.0L
Engine
1 - AIR INLET FITTING
2 - FIXED ORIFICE FITTING
3 - CCV BREATHER TUBE (REAR)
4 - INT. MAN. FITTING
5 - CCV BREATHER TUBE (FRONT)
Fig. 9 FIXED ORIFICE FITTING - 4.0L
1 - AIR INLET FITTING
2 - FIXED ORIFICE FITTING
3 - CCV BREATHER TUBE (REAR)
4 - INT. MAN. FITTING
5 - CCV BREATHER TUBE (FRONT)
25 - 28 EVAPORATIVE EMISSIONSWJ
Page 2193 of 2199
(8)Do not attempt to clean the old PCV valve.
(9) Return PCV valve back to oil filler tube by
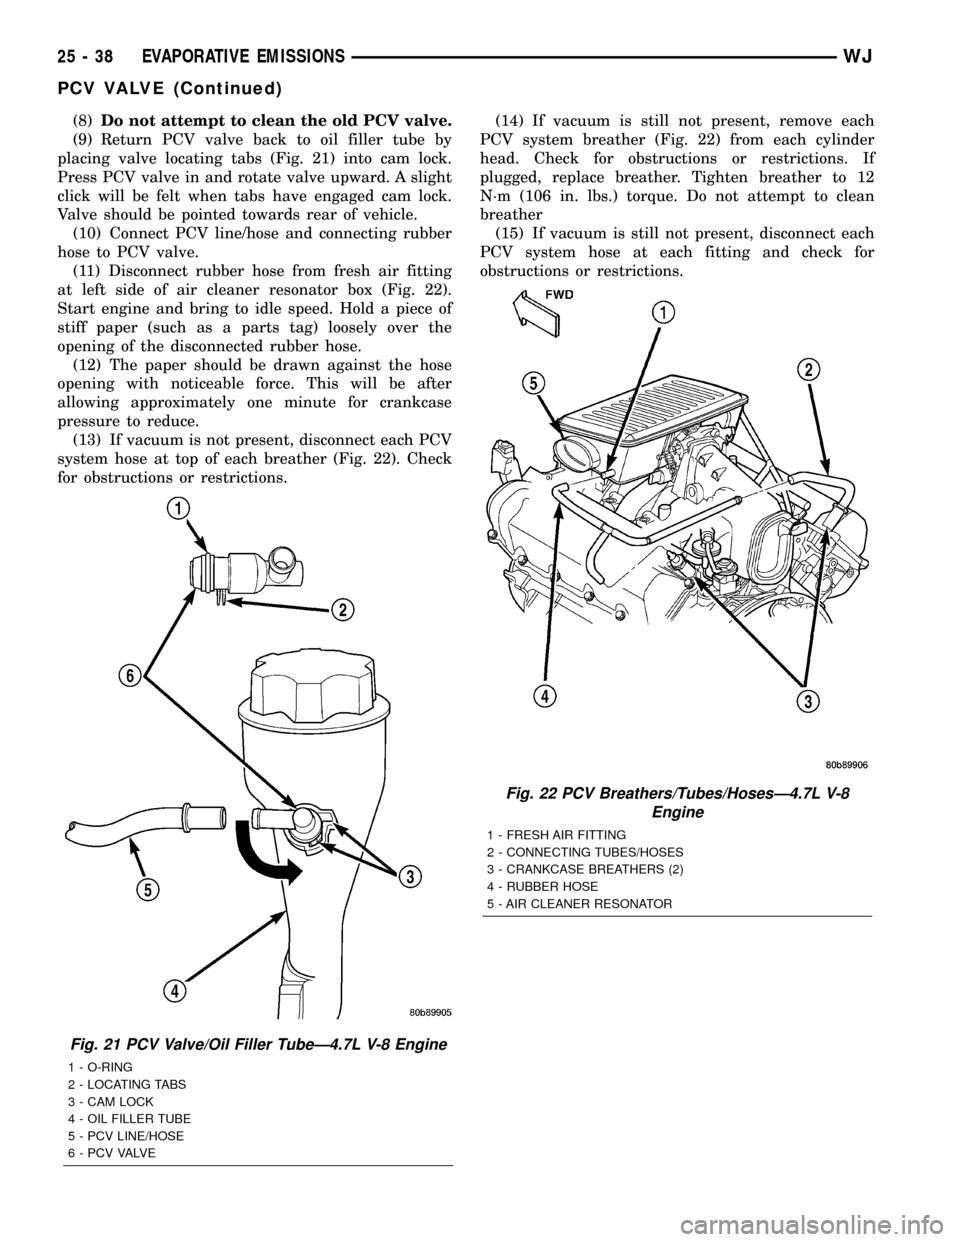
placing valve locating tabs (Fig. 21) into cam lock.
Press PCV valve in and rotate valve upward. A slight
click will be felt when tabs have engaged cam lock.
Valve should be pointed towards rear of vehicle.
(10) Connect PCV line/hose and connecting rubber
hose to PCV valve.
(11) Disconnect rubber hose from fresh air fitting
at left side of air cleaner resonator box (Fig. 22).
Start engine and bring to idle speed. Hold a piece of
stiff paper (such as a parts tag) loosely over the
opening of the disconnected rubber hose.
(12) The paper should be drawn against the hose
opening with noticeable force. This will be after
allowing approximately one minute for crankcase
pressure to reduce.
(13) If vacuum is not present, disconnect each PCV
system hose at top of each breather (Fig. 22). Check
for obstructions or restrictions.(14) If vacuum is still not present, remove each
PCV system breather (Fig. 22) from each cylinder
head. Check for obstructions or restrictions. If
plugged, replace breather. Tighten breather to 12
N´m (106 in. lbs.) torque. Do not attempt to clean
breather
(15) If vacuum is still not present, disconnect each
PCV system hose at each fitting and check for
obstructions or restrictions.
Fig. 21 PCV Valve/Oil Filler TubeÐ4.7L V-8 Engine
1 - O-RING
2 - LOCATING TABS
3 - CAM LOCK
4 - OIL FILLER TUBE
5 - PCV LINE/HOSE
6 - P C V VA LV E
Fig. 22 PCV Breathers/Tubes/HosesÐ4.7L V-8
Engine
1 - FRESH AIR FITTING
2 - CONNECTING TUBES/HOSES
3 - CRANKCASE BREATHERS (2)
4 - RUBBER HOSE
5 - AIR CLEANER RESONATOR
25 - 38 EVAPORATIVE EMISSIONSWJ
PCV VALVE (Continued)