2003 JEEP GRAND CHEROKEE liftgate latch
[x] Cancel search: liftgate latchPage 651 of 2199

REMOVAL
NOTE: The notched retainer end of the wiper ele-
ment should always be oriented towards the end of
the wiper blade that is nearest to the wiper motor
output shaft.
(1) Disengage the rear wiper arm support from the
rubber rear wiper arm park ramp on the right side of
the liftgate just below the liftgate glass.
(2) Lift the rear wiper arm to engage the arm
hinge in its over-center position with the wiper blade
and element off of the liftgate and the glass.
(3) To remove the wiper blade from the wiper arm,
push the pivot block latch release tab under the tip
of the arm and slide the blade away from the tip
towards the pivot end of the arm far enough to dis-
engage the pivot block from the hook (Fig. 11).
(4) Extract the hook formation on the tip of the
wiper arm from the opening in the wiper blade
superstructure ahead of the wiper blade pivot block/
latch unit.
CAUTION: Do not allow the wiper arm to spring
back against the liftgate or the glass without the
wiper blade in place or they may be damaged.
(5) Gently lower the wiper arm and place the arm
support in the park ramp.
INSTALLATION
NOTE: The notched retainer end of the wiper ele-
ment should always be oriented towards the end of
the wiper blade that is nearest to the wiper motor
output shaft.
(1) Lift the rear wiper arm off of the liftgate park
ramp.
(2) Position the rear wiper blade near the hook for-
mation on the tip of the arm with the notched
retainer for the wiper element oriented towards theend of the wiper arm that is nearest to the wiper
motor output shaft.
(3) Insert the hook formation on the tip of the
wiper arm through the opening in the wiper blade
superstructure ahead of the wiper blade pivot block/
latch unit far enough to engage the pivot block with
the hook (Fig. 11).
(4) Slide the wiper blade pivot block/latch up into
the hook formation on the tip of the wiper arm until
the latch release tab snaps into its locked position.
(5) Gently lower the wiper arm and place the arm
support in the park ramp.
REAR WIPER MODULE
DESCRIPTION
The rear wiper module is concealed within the lift-
gate, below the liftgate glass and behind the liftgate
trim panel (Fig. 12). The end of the motor output
shaft that protrudes through the liftgate outer panel
to drive the rear wiper arm and blade is the only vis-
ible component of the rear wiper module. A rubber
gasket, a bezel, and a nut seal and secure the motor
output shaft to the liftgate outer panel. A molded
plastic nut cover snaps onto the bezel to conceal the
nut and improve appearance. The rear wiper module
consists of the following major components:
²Bracket- The rear wiper module bracket con-
sists of a stamped steel mounting plate for the wiper
Fig. 11 Wiper Blade Remove/Install - Typical
1 - PIVOT BLOCK LATCH RELEASE TAB
Fig. 12 Rear Wiper Module
1 - KEYED SLOTS
2 - LIFTGATE WIRE HARNESS CONNECTOR
3 - REAR WIPER MODULE
4 - NUT (2)
5 - LIFTGATE INNER PANEL
8R - 44 REAR WIPERS/WASHERSWJ
REAR WIPER BLADE (Continued)
Page 1241 of 2199

FuseandBatteryin the index in this service man-
ual for the location of additional service information
covering the ignition-off draw fuse and the battery.
FUSE COVER
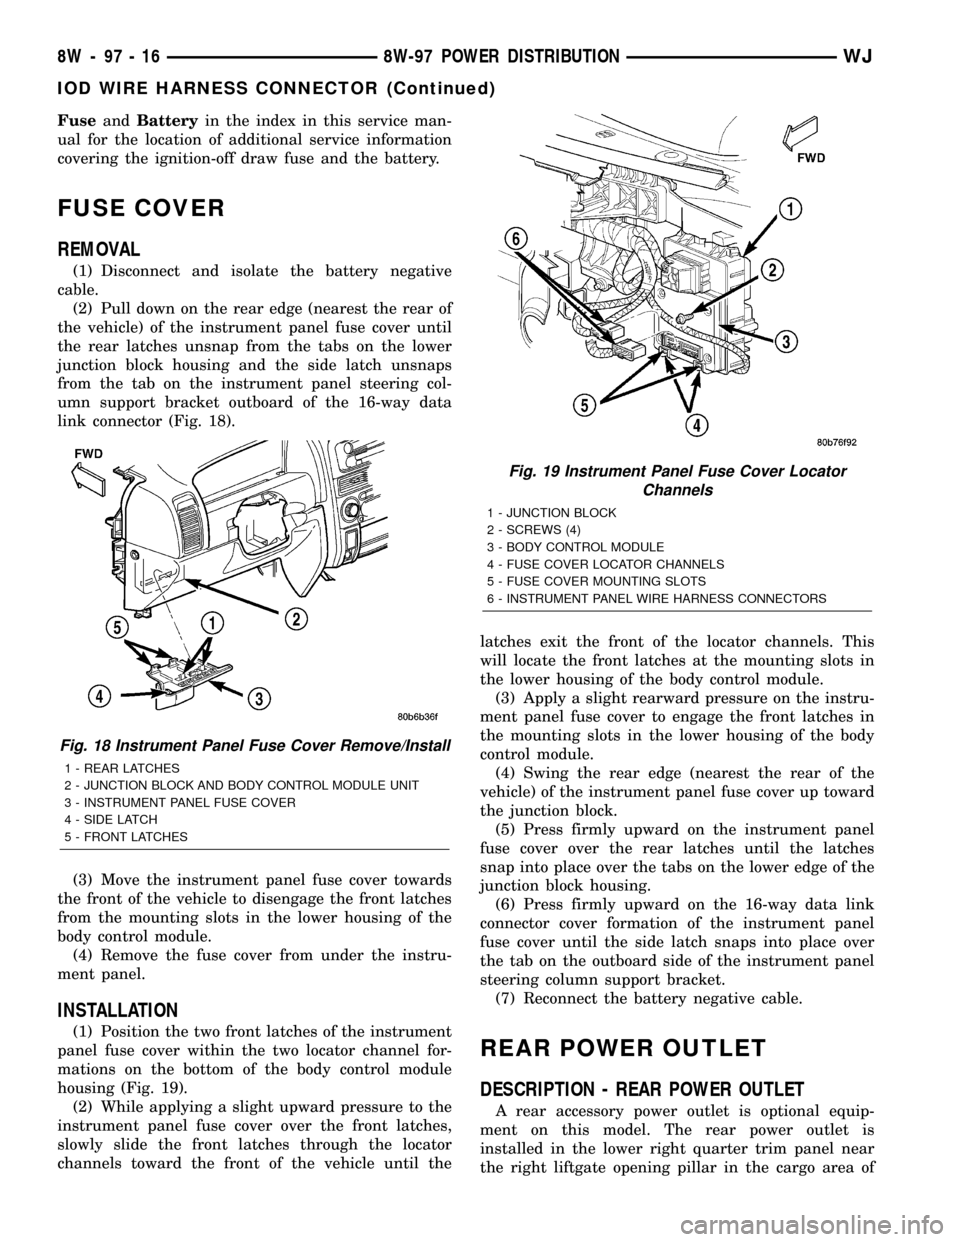
REMOVAL
(1) Disconnect and isolate the battery negative
cable.
(2) Pull down on the rear edge (nearest the rear of
the vehicle) of the instrument panel fuse cover until
the rear latches unsnap from the tabs on the lower
junction block housing and the side latch unsnaps
from the tab on the instrument panel steering col-
umn support bracket outboard of the 16-way data
link connector (Fig. 18).
(3) Move the instrument panel fuse cover towards
the front of the vehicle to disengage the front latches
from the mounting slots in the lower housing of the
body control module.
(4) Remove the fuse cover from under the instru-
ment panel.
INSTALLATION
(1) Position the two front latches of the instrument
panel fuse cover within the two locator channel for-
mations on the bottom of the body control module
housing (Fig. 19).
(2) While applying a slight upward pressure to the
instrument panel fuse cover over the front latches,
slowly slide the front latches through the locator
channels toward the front of the vehicle until thelatches exit the front of the locator channels. This
will locate the front latches at the mounting slots in
the lower housing of the body control module.
(3) Apply a slight rearward pressure on the instru-
ment panel fuse cover to engage the front latches in
the mounting slots in the lower housing of the body
control module.
(4) Swing the rear edge (nearest the rear of the
vehicle) of the instrument panel fuse cover up toward
the junction block.
(5) Press firmly upward on the instrument panel
fuse cover over the rear latches until the latches
snap into place over the tabs on the lower edge of the
junction block housing.
(6) Press firmly upward on the 16-way data link
connector cover formation of the instrument panel
fuse cover until the side latch snaps into place over
the tab on the outboard side of the instrument panel
steering column support bracket.
(7) Reconnect the battery negative cable.
REAR POWER OUTLET
DESCRIPTION - REAR POWER OUTLET
A rear accessory power outlet is optional equip-
ment on this model. The rear power outlet is
installed in the lower right quarter trim panel near
the right liftgate opening pillar in the cargo area of
Fig. 18 Instrument Panel Fuse Cover Remove/Install
1 - REAR LATCHES
2 - JUNCTION BLOCK AND BODY CONTROL MODULE UNIT
3 - INSTRUMENT PANEL FUSE COVER
4 - SIDE LATCH
5 - FRONT LATCHES
Fig. 19 Instrument Panel Fuse Cover Locator
Channels
1 - JUNCTION BLOCK
2 - SCREWS (4)
3 - BODY CONTROL MODULE
4 - FUSE COVER LOCATOR CHANNELS
5 - FUSE COVER MOUNTING SLOTS
6 - INSTRUMENT PANEL WIRE HARNESS CONNECTORS
8W - 97 - 16 8W-97 POWER DISTRIBUTIONWJ
IOD WIRE HARNESS CONNECTOR (Continued)
Page 1874 of 2199

BODY
TABLE OF CONTENTS
page page
BODY
DIAGNOSIS AND TESTING
WATER LEAKS........................1
WIND NOISE..........................2
STANDARD PROCEDURE
STANDARD PROCEDURE - BODY
LUBRICATION.........................2
STANDARD PROCEDURE - DRILLING AND
WELDING............................3
SPECIFICATIONS
BODY LUBRICANTS....................3
SPECIFICATIONS - TORQUE.............4
SPECIAL TOOLS
BODY...............................4DECKLID/HATCH/LIFTGATE/TAILGATE........5
DOOR - FRONT.........................11
DOORS - REAR.........................19
EXTERIOR.............................25
HOOD.................................33
INSTRUMENT PANEL SYSTEM.............36
INTERIOR..............................69
PAINT.................................81
SEATS................................83
STATIONARY GLASS.....................93
SUNROOF.............................96
WEATHERSTRIP/SEALS..................105
BODY STRUCTURE.....................112
BODY
DIAGNOSIS AND TESTING
WATER LEAKS
Water leaks can be caused by poor sealing,
improper body component alignment, body seam
porosity, missing plugs, or blocked drain holes. Cen-
trifugal and gravitational force can cause water to
drip from a location away from the actual leak point,
making leak detection difficult. All body sealing
points should be water tight in normal wet-driving
conditions. Water flowing downward from the front of
the vehicle should not enter the passenger or luggage
compartment. Moving sealing surfaces will not
always seal water tight under all conditions. At
times, side glass or door seals will allow water to
enter the passenger compartment during high pres-
sure washing or hard driving rain (severe) condi-
tions. Overcompensating on door or glass
adjustments to stop a water leak that occurs under
severe conditions can cause premature seal wear and
excessive closing or latching effort. After completing
a repair, water test vehicle to verify leak has stopped
before returning vehicle to use.
VISUAL INSPECTION BEFORE WATER LEAK TESTS
Verify that floor and body plugs are in place, body
drains are clear, and body components are properly
aligned and sealed. If component alignment or seal-
ing is necessary, refer to the appropriate section of
this group for proper procedures.
WATER LEAK TESTS
WARNING: DO NOT USE ELECTRIC SHOP LIGHTS
OR TOOLS IN WATER TEST AREA. PERSONAL
INJURY CAN RESULT.
When the conditions causing a water leak have
been determined, simulate the conditions as closely
as possible.
²If a leak occurs with the vehicle parked in a
steady light rain, flood the leak area with an open-
ended garden hose.
²If a leak occurs while driving at highway speeds
in a steady rain, test the leak area with a reasonable
velocity stream or fan spray of water. Direct the
spray in a direction comparable to actual conditions.
²If a leak occurs when the vehicle is parked on an
incline, hoist the end or side of the vehicle to simu-
late this condition. This method can be used when
the leak occurs when the vehicle accelerates, stops or
turns. If the leak occurs on acceleration, hoist the
front of the vehicle. If the leak occurs when braking,
hoist the back of the vehicle. If the leak occurs on left
turns, hoist the left side of the vehicle. If the leak
occurs on right turns, hoist the right side of the vehi-
cle. For hoisting recommendations refer to Group 0,
Lubrication and Maintenance, General Information
section.
WATER LEAK DETECTION
To detect a water leak point-of-entry, do a water
test and watch for water tracks or droplets forming
on the inside of the vehicle. If necessary, remove inte-
rior trim covers or panels to gain visual access to the
WJBODY 23 - 1
Page 1876 of 2199

(2) Apply silicone lubricant to a cloth and wipe it
on door seals to avoid over-spray that can soil pas-
senger's clothing.
(3) Before applying lubricant, the component
should be wiped clean. After lubrication, any excess
lubricant should be removed.
(4) The hood latch, latch release mechanism, latch
striker, and safety latch should be lubricated period-
ically.
(5) The door lock cylinders should be lubricated
twice each year (preferably autumn and spring).
(a) Spray a small amount of lock cylinder lubri-
cant directly into the lock cylinder.
(b) Apply a small amount to the key and insert
it into the lock cylinder.
(c) Rotate it to the locked position and then back
to the unlocked position several times.(d) Remove the key. Wipe the lubricant from it
with a clean cloth to avoid soiling of clothing.
STANDARD PROCEDURE - DRILLING AND
WELDING
When holes must be drilled or punched in an inner
body panel, verify depth of space to the outer body
panel, electrical wiring, or other components. Dam-
age to vehicle can result.
Do not weld exterior panels unless combustible
material on the interior of vehicle is removed from
the repair area. Fire or hazardous conditions, can
result.
Always have a fire extinguisher ready for use when
welding.
SPECIFICATIONS
BODY LUBRICANTS
COMPONENT SERVICE INTERVAL LUBRICANT
Door Hinges As RequiredMulti-Purpose Grease NLGI GC-LB
(Water Resistant) (1)
Door Latches As RequiredMulti-Purpose Grease NLGI GC-LB
(Water Resistant) (1)
Hood Latch, Release Mechanism and
Safety LatchAs Required
(When Performing Other
Underhood Service)Multi-Purpose Grease NLGI GC-LB 2
EP (2)
Hood Hinges As Required Engine Oil
Seat Track and Release Mechanism As RequiredMulti-Purpose Grease NLGI GC-LB 2
EP (2)
Liftgate Hinge As RequiredMulti-Purpose Grease NLGI GC-LB 2
EP (2)
Liftgate Support Arms As Required Engine Oil
Liftgate Latches As Required White Spray Lubricant (3)
Liftgate Release Handle (Pivot and Slide
Contact Surfaces)As RequiredMulti-Purpose Grease NLGI GC-LB 2
EP (2)
Window System Components As Required White Spray Lubricant (3)
Lock Cylinders Twice a Year Lock-Cylinder Lubricant (4)
Parking Brake Mechanism As RequiredMulti-Purpose Grease NLGI GC-LB 2
EP (1)
1 = Mopar Wheel Bearing Grease (High
Temp)
2 = Mopar Multi-Mileage Lubricant
3 = Mopar Spray White Lube
4 = Mopar Lock Cylinder Lubricant
WJBODY 23 - 3
BODY (Continued)
Page 1878 of 2199

DECKLID/HATCH/LIFTGATE/TAILGATE
TABLE OF CONTENTS
page page
EXTERIOR HANDLE
REMOVAL.............................5
INSTALLATION..........................5
FLIP-UP GLASS
REMOVAL.............................5
INSTALLATION..........................6
FLIP-UP GLASS LATCH
REMOVAL.............................6
INSTALLATION..........................6
FLIP-UP GLASS LATCH STRIKER
REMOVAL.............................7
INSTALLATION..........................7
FLIP-UP GLASS SWITCH
REMOVAL.............................7
INSTALLATION..........................7
HINGE
REMOVAL.............................7
INSTALLATION..........................7
LATCH
REMOVAL.............................8
INSTALLATION..........................8LATCH STRIKER
REMOVAL.............................8
INSTALLATION..........................8
LIFTGATE
REMOVAL.............................9
INSTALLATION..........................9
ADJUSTMENTS
LIFTGATE ADJUSTMENT................9
TRIM PANEL
REMOVAL
REMOVAL - LIFTGATE TRIM PANEL........9
REMOVAL - LOWER LIFTGATE OPENING
TRIM PANEL.........................10
INSTALLATION
INSTALLATION - LIFTGATE TRIM PANEL . . . 10
INSTALLATION - LOWER LIFTGATE
OPENING TRIM PANEL.................10
LIFTGATE INSULATOR
REMOVAL.............................10
INSTALLATION.........................10
EXTERIOR HANDLE
REMOVAL
(1) Remove the liftgate trim panel refer to (Refer
to 23 - BODY/DECKLID/HATCH/LIFTGATE/TAIL-
GATE/TRIM PANEL - REMOVAL).
(2) Remove the latch, outside handle linkage, and
power lock connector.
(3) Remove the fasteners attaching the outside
handle to the liftgate.
(4) Remove the outside handle from the liftgate.
INSTALLATION
(1) Position the outside handle on the liftgate.
(2) Install the fasteners attaching outside handle
to liftgate.
(3) Connect outside handle link and power lock
connector.
(4) Install liftgate trim panel, refer to (Refer to 23
- BODY/DECKLID/HATCH/LIFTGATE/TAILGATE/
TRIM PANEL - INSTALLATION).
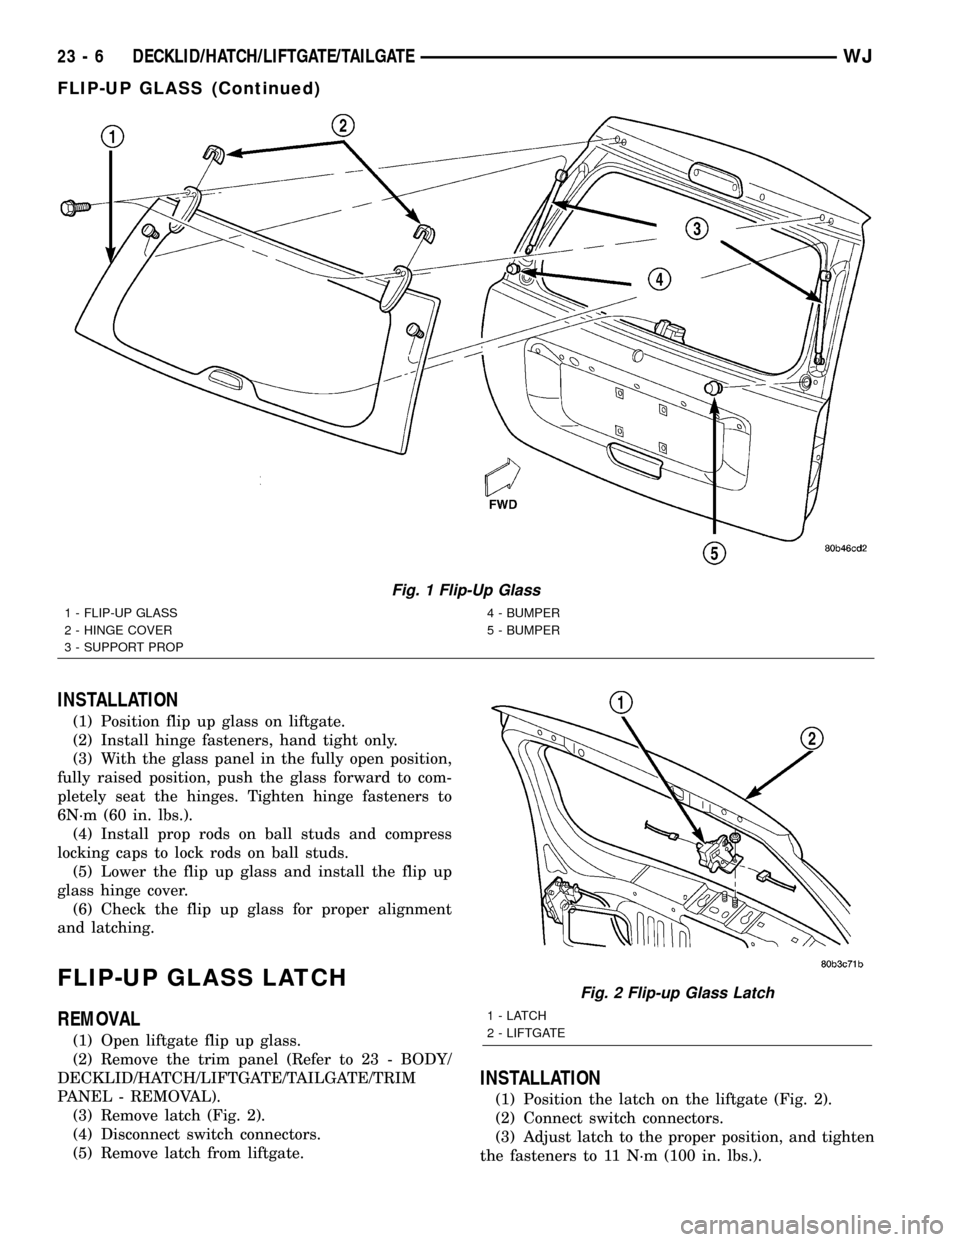
FLIP-UP GLASS
REMOVAL
CAUTION: DO NOT DISCONNECT THE PROP ROD
CYLINDERS WITH THE LIFTGATE FLIP UP GLASS
CLOSED. THE PROP ROD PISTONS ARE OPER-
ATED BY HIGH PRESSURE GAS. THIS PRESSURE
COULD CAUSE DAMAGE AND/OR PERSONAL
INJURY IF THEY ARE REMOVED WHILE THE PIS-
TONS ARE COMPRESSED.
(1) Using a trim stick or other suitable device, sep-
arate the flip up glass hinge cover from the hinge on
the liftgate (Fig. 1).
(2) Open liftgate flip up glass. Support the glass
for ease of repair.
(3) Using a small flat blade or equivalent tool, gen-
tly pry open the locking caps on the end of the prop
rods.
(4) Remove prop rod cylinders from ball studs.
(5) Lower the flip up glass.
(6) Remove hinge fasteners from liftgate.
(7) Separate flip up glass from liftgate.
WJDECKLID/HATCH/LIFTGATE/TAILGATE 23 - 5
Page 1879 of 2199

INSTALLATION
(1) Position flip up glass on liftgate.
(2) Install hinge fasteners, hand tight only.
(3) With the glass panel in the fully open position,
fully raised position, push the glass forward to com-
pletely seat the hinges. Tighten hinge fasteners to
6N´m (60 in. lbs.).
(4) Install prop rods on ball studs and compress
locking caps to lock rods on ball studs.
(5) Lower the flip up glass and install the flip up
glass hinge cover.
(6) Check the flip up glass for proper alignment
and latching.
FLIP-UP GLASS LATCH
REMOVAL
(1) Open liftgate flip up glass.
(2) Remove the trim panel (Refer to 23 - BODY/
DECKLID/HATCH/LIFTGATE/TAILGATE/TRIM
PANEL - REMOVAL).
(3) Remove latch (Fig. 2).
(4) Disconnect switch connectors.
(5) Remove latch from liftgate.
INSTALLATION
(1) Position the latch on the liftgate (Fig. 2).
(2) Connect switch connectors.
(3) Adjust latch to the proper position, and tighten
the fasteners to 11 N´m (100 in. lbs.).
Fig. 1 Flip-Up Glass
1 - FLIP-UP GLASS
2 - HINGE COVER
3 - SUPPORT PROP4 - BUMPER
5 - BUMPER
Fig. 2 Flip-up Glass Latch
1-LATCH
2 - LIFTGATE
23 - 6 DECKLID/HATCH/LIFTGATE/TAILGATEWJ
FLIP-UP GLASS (Continued)
Page 1880 of 2199

(4) Close flip up glass panel and verify proper
operation.
(5)
Install liftgate trim panel, refer to (Refer to 23 -
BODY/DECKLID/HATCH/LIFTGATE/TAILGATE/TRIM
PANEL - INSTALLATION).
FLIP-UP GLASS LATCH
STRIKER
REMOVAL
(1) Raise flip up glass panel.
(2) Mark the position of the handle/striker on the
glass panel.
(3) Remove the screws attaching the handle/striker
to the glass.
INSTALLATION
(1) Position the handle/striker on the glass panel
and align the reference marks.
(2) Install the screws attaching the handle/striker
to the glass panel. Tighten the fasteners to 6 N´m (60
in. lbs.).
FLIP-UP GLASS SWITCH
REMOVAL
(1) Remove license plate lamp housing/trim panel
from liftgate, refer to (Refer to 8 - ELECTRICAL/
LAMPS/LIGHTING - EXTERIOR/LICENSE PLATE
LAMP UNIT - REMOVAL).
(2) Squeeze the locking tabs inward to release the
switch from the housing.
(3) Disconnect the switch harness connector,
remove the switch from the housing.
INSTALLATION
(1) Install switch harness connector.(2) Position switch in housing, snap switch into
place.
(3) Install license plate lamp housing/trim panel
onto liftgate, refer to (Refer to 8 - ELECTRICAL/
LAMPS/LIGHTING - EXTERIOR/LICENSE PLATE
LAMP UNIT - INSTALLATION).
HINGE
REMOVAL
NOTE: It is not necessary to remove the liftgate to
replace one or both hinges. The hinges can be
replaced one at a time.
(1) Open the liftgate. Support the liftgate for ease
of repair.
(2) Remove the liftgate header trim panel.
(3) Mark the hinge location with a grease pencil or
other suitable device.
(4) Remove the hinge screws (Fig. 5).
(5) Remove hinge.
INSTALLATION
NOTE: It is not necessary to remove the liftgate to
replace one or both hinges. The hinges can be
replaced one at a time.
(1) Position the hinge on the roof panel and on the
liftgate. (Use 3MŸ Fast and Firm or equivalent on
the hinge to body mating surfaces as a sealant.
(2) Install and tighten hinge screws at roof panel
to 28N´m (21 ft. lbs.).
(3) Install hinge screws at liftgate. Tighten screws
to 28N´m (21 ft. lbs.).
(4) Install liftgate header trim panel.
(5) Check the liftgate for proper alignment and
operation.
WJDECKLID/HATCH/LIFTGATE/TAILGATE 23 - 7
FLIP-UP GLASS LATCH (Continued)
Page 1881 of 2199

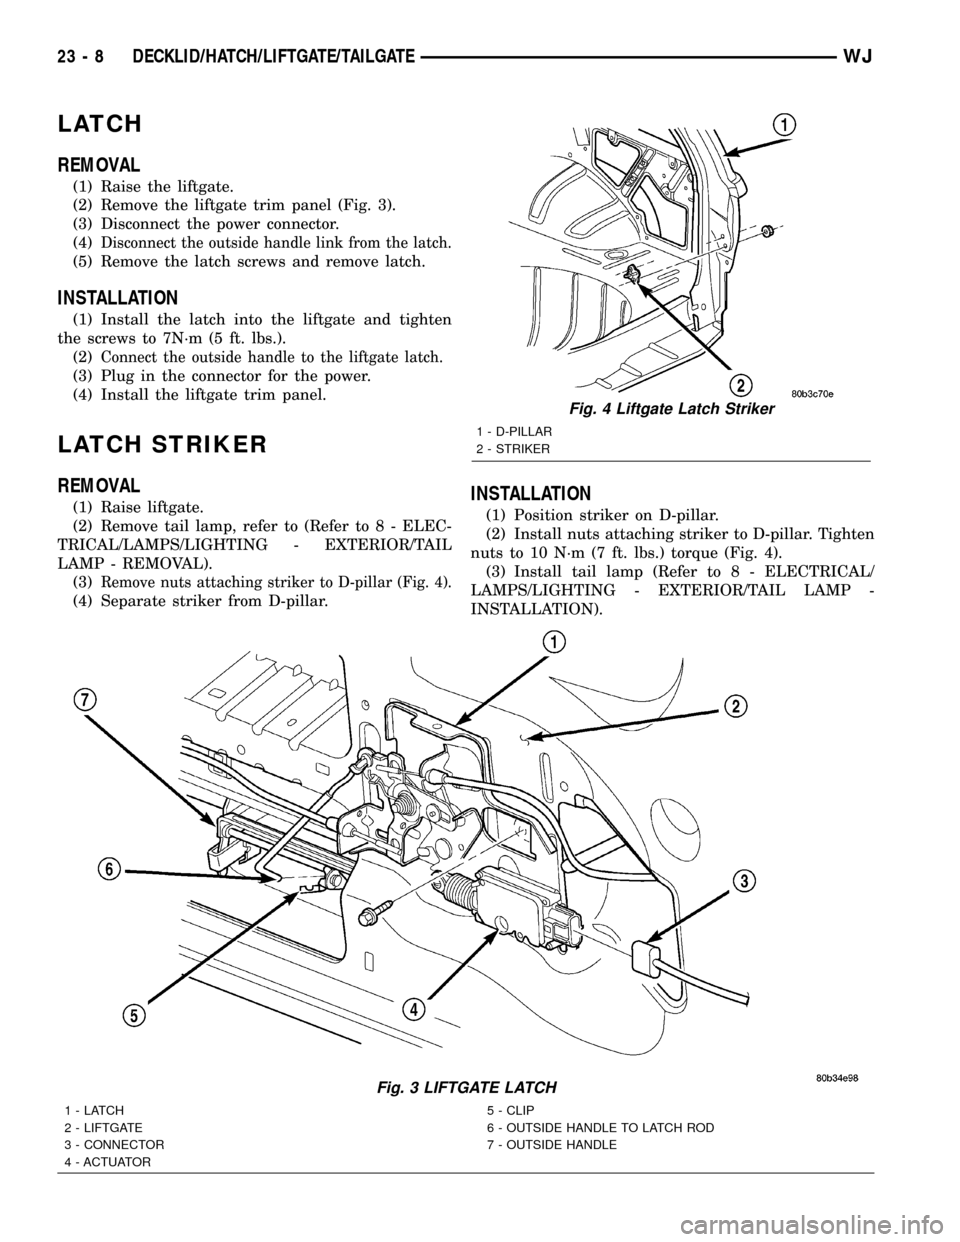
LATCH
REMOVAL
(1) Raise the liftgate.
(2) Remove the liftgate trim panel (Fig. 3).
(3) Disconnect the power connector.
(4)
Disconnect the outside handle link from the latch.
(5) Remove the latch screws and remove latch.
INSTALLATION
(1) Install the latch into the liftgate and tighten
the screws to 7N´m (5 ft. lbs.).
(2)
Connect the outside handle to the liftgate latch.
(3) Plug in the connector for the power.
(4) Install the liftgate trim panel.
LATCH STRIKER
REMOVAL
(1) Raise liftgate.
(2) Remove tail lamp, refer to (Refer to 8 - ELEC-
TRICAL/LAMPS/LIGHTING - EXTERIOR/TAIL
LAMP - REMOVAL).
(3)
Remove nuts attaching striker to D-pillar (Fig. 4).
(4) Separate striker from D-pillar.
INSTALLATION
(1) Position striker on D-pillar.
(2) Install nuts attaching striker to D-pillar. Tighten
nuts to 10 N´m (7 ft. lbs.) torque (Fig. 4).
(3) Install tail lamp (Refer to 8 - ELECTRICAL/
LAMPS/LIGHTING - EXTERIOR/TAIL LAMP -
INSTALLATION).
Fig. 3 LIFTGATE LATCH
1-LATCH
2 - LIFTGATE
3 - CONNECTOR
4 - ACTUATOR5 - CLIP
6 - OUTSIDE HANDLE TO LATCH ROD
7 - OUTSIDE HANDLE
Fig. 4 Liftgate Latch Striker
1 - D-PILLAR
2 - STRIKER
23 - 8 DECKLID/HATCH/LIFTGATE/TAILGATEWJ