2003 INFINITI G35 trunk
[x] Cancel search: trunkPage 14 of 256
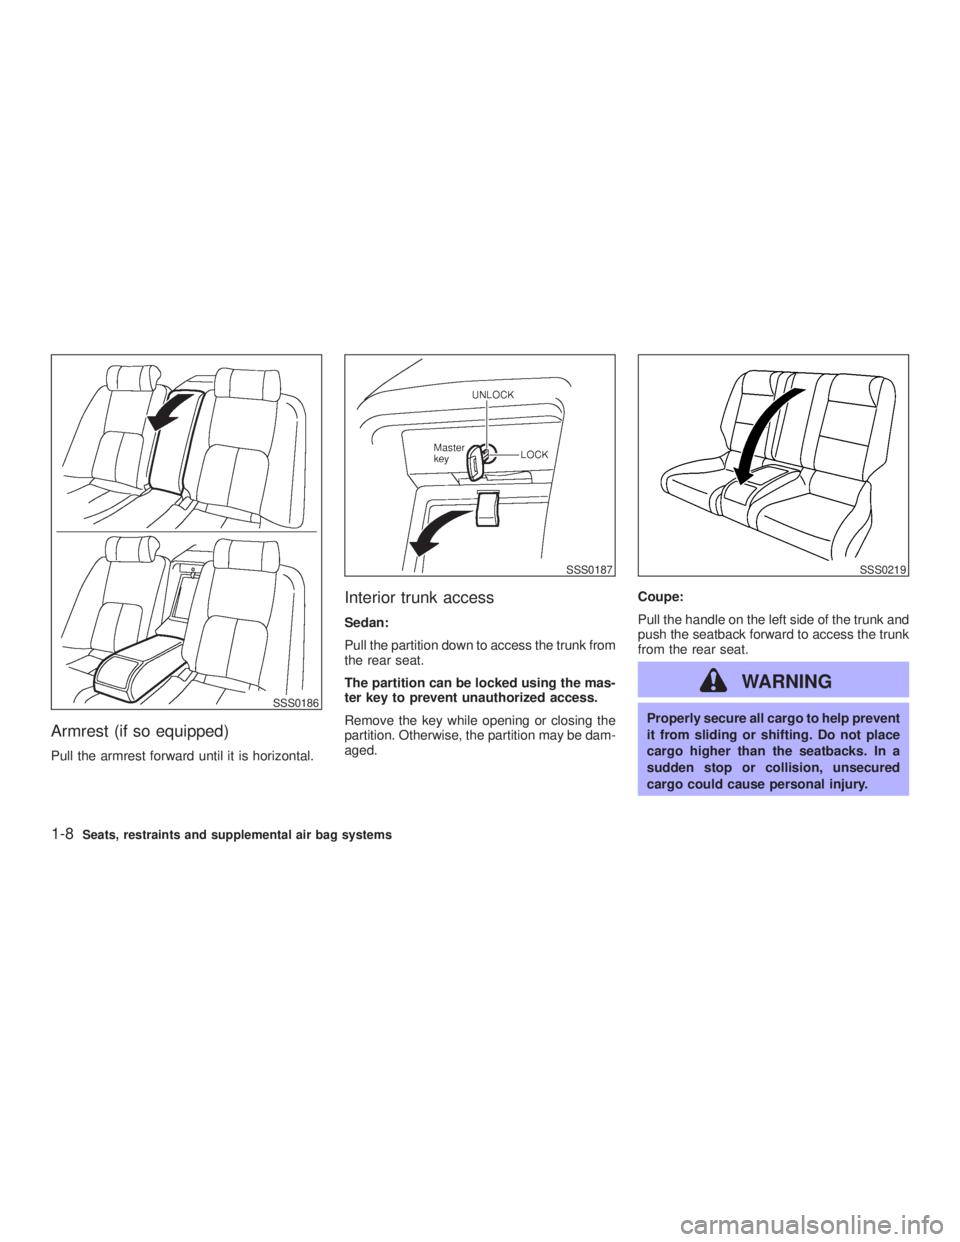
Armrest (if so equipped) Pull the armrest forward until it is horizontal. Interior trunk access Sedan:
Pull the partition down to access the trunk from
the rear seat.
The partition can be locked using the mas-
ter key to prevent unauthorized access.
Remove the key while opening or closing the
partition. Otherwise, the partition may be dam-
aged. Coupe:
Pull the handle on the left side of the trunk and
push the seatback forward to access the trunk
from the rear seat.
WARNING Properly secure all cargo to help prevent
it from sliding or shifting. Do not place
cargo higher than the seatbacks. In a
sudden stop or collision, unsecured
cargo could cause personal injury.SSS0186 SSS0187 SSS0219
1-8 Seats, restraints and supplemental air bag systems
Z 02.7.29/V35-D/V5.0
X
Page 40 of 256
Vehicle Safety Standard 213 or Canadian
Motor Vehicle Safety Standard 213.
O Check the child restraint in your vehicle to
be sure it is compatible with the vehicle's
seat and seat belt system.
O If the child restraint is compatible with your
vehicle, place your child in the child re-
straint and check the various adjustments
to be sure the child restraint is compatible
with your child. Always follow all recom-
mended procedures.
All US states and Canadian provinces re-
quire that infants and small children be
restrained in approved child restraints at
all times while the vehicle is being oper-
ated.
WARNINGO Improper use of a child restraint can
result in increased injuries for both
the infant or child and other occu-
pants in the vehicle.
O Follow all of the child restraint manu-
facturer's instructions for installation
and use. When purchasing a child restraint, be sure to select one which
will fit your child and vehicle. It may
not be possible to properly install
some types of child restraints in your
vehicle.
O If the child restraint is not anchored
properly, the risk of a child being
injured in a collision or a sudden stop
greatly increases.
O Adjustable seatbacks should be posi-
tioned to fit the child restraint, but as
upright as possible.
O After attaching the child restraint,
test it before you place the child in it.
Tilt it from side to side. Try to tug it
forward and check to see if the belt
holds the restraint in place. The child
restraint should not move more than
1 inch. If the restraint is not secure,
tighten the belt as necessary, or put
the restraint in another seat and test
it again.
O For a front facing child restraint,
check to make sure the shoulder belt
does not go in front of the child's face or neck. If it does, put the shoulder
belt behind the child restraint. If you-
must install a front facing child re-
straint in the front seat, see instruc-
tions later in this section.
O When your child restraint is not in
use, store it in the trunk or keep it
secured with a seat belt to prevent it
from being thrown around in case of
a sudden stop or accident.
CAUTION Remember that a child restraint left in a
closed vehicle can become very hot.
Check the seating surface and buckles
before placing your child in the child
restraint.
1-34 Seats, restraints and supplemental air bag systems
Z 02.11.1/V35-D/V5.0
X
Page 55 of 256
Sunroof (if so equipped) ......................................... 2-33
Automatic sunroof .............................................. 2-33
Interior light ............................................................. 2-35
Interior light......................................................... 2-35
Map light ............................................................. 2-35
Rear personal light ............................................. 2-36
Vanity mirror light (if so equipped) .......................... 2-36
Trunk light ............................................................... 2-37
HomeLink
Universal Transceiver
(if so equipped) ....................................................... 2-37 Programming HomeLink
................................... 2-38
Programming HomeLink
for Canadian
customers ........................................................... 2-39
Operating the HomeLink
Universal
Transceiver ......................................................... 2-39
Programming trouble diagnosis.......................... 2-39
Clearing the programmed information................ 2-40
Reprogramming a single HomeLink
button...... 2-40
If your vehicle is stolen ...................................... 2-40
Z 02.7.29/V35-D/V5.0
X
Page 56 of 256

1. Headlight, fog light and turn signal switch
(P.2-17)
2. Steering switch for audio control (P.4-16)
3. Driver supplemental air bag (P.1-8)/Horn
(P.2-21)
4. Meters/gauges (P.2-3) 5. Cruise control main/set switch (P.5-11)
6. Windshield wiper/washer switch (P.2-16)
7. Center ventilator (P.4-2)
8. Center display - Compass (P.2-6), Air con-
ditioner (P.2-6), Ambient temperature
(P.2-6) 9. Rear window and outside mirror (if so
equipped) defogger switch (P.2-16)
10. Heater/air conditioner control (P.4-3)
11. Clock (P.2-23)
12. Navigation system* (if so equipped)
13. Security indicator light (P.2-14)
14. Passenger supplemental air bag (P.1-8)
15. Upper glove box (Except for Navigation
system equipped models) (P.2-26)
16. Side window defroster
17. Side ventilator (P.4-2)
18. Hood lock release handle (P.3-9)
19. Instrument brightness control switch
(P.2-19)
20. Trunk lid release switch (P.3-11)
21. VDC (Vehicle Dynamics Control) OFF
switch (P.2-22)
22. Outside mirror remote control (P.3-15)
23. Fuse box (P.8-20)
24. Tilting steering wheel lock lever (P.3-14)
25. Ignition switch/steering lock (P.5-4)
26. Cigarette lighter (P.2-24)
27. Ashtray (P.2-24)/Pocket
28. Radio/cassette player (P.4-8)/CD player
(P.4-8)
29. Hazard warning flasher switch (P.2-20)
30. Heated seat switch (P.2-21)
31. Power outlet
32. Glove box (P.2-26) SIC2023INSTRUMENT PANEL
2-2 Instruments and controls
Z 02.7.29/V35-D/V5.0
X
Page 68 of 256

How to activate the vehicle security
system 1. Close all windows.
The system can be activated even if the
windows are open.
2. Remove the key from the ignition switch.
3. Close and lock all doors, hood and trunk lid.
Lock all doors by pressing the LOCK button
on the keyfob. When using the keyfob, the
hazard indicators flash twice to indicate all
doors are locked. 4. Confirm that the SECURITY indicator light
comes on. The SECURITY indicator light
glows for about 30 seconds and then blinks.
The system is now activated. If, during this
30 second time period, the door is unlocked
by the key or the keyfob, or the ignition key
is turned to ACC or ON, the system will not
activate.
Even when the driver and/or passengers
are in the vehicle, the system will activate
with all doors, hood and trunk lid locked
and ignition key off. Turn the ignition key to
ACC to turn off the system.
Vehicle security system operation The security system will give the following
alarm:
O The headlights blink and the horn sounds
intermittently.
O The alarm automatically turns off after ap-
proximately 1 minute. However, the alarm
reactivates if the vehicle is tampered with
again. The alarm can be shut off by unlock-
ing a door with the key, or by pressing the
UNLOCK button on the keyfob.
The alarm is activated by:
O Opening the door without using the key or
keyfob. O Opening the trunk lid without using the key
or keyfob.
O Opening the hood.
How to stop alarm The alarm will stop only by unlocking a door
with the key, or by pressing the UNLOCK
button on keyfob. The alarm will not stop if the
ignition switch is turned to ACC or ON.
If the system does not operate as de-
scribed above, have it checked by your
INFINITI retailer.
INFINITI VEHICLE IMMOBILIZER
SYSTEM The Infiniti Vehicle Immobilizer System will not
allow the engine to start without the use of the
registered Infiniti Vehicle Immobilizer System
key.
If the engine fails to start using the registered
Infiniti Vehicle Immobilizer System key, it may
be due to interference caused by another
Infiniti Vehicle Immobilizer System key, an
automated toll road device or automated pay-
ment device on the key ring. Restart the en-
gine using the following procedures:
1. Leave the ignition switch in the ON position
for approximately 5 seconds.SIC1442
2-14 Instruments and controls
Z 02.7.29/V35-D/V5.0
X
Page 83 of 256
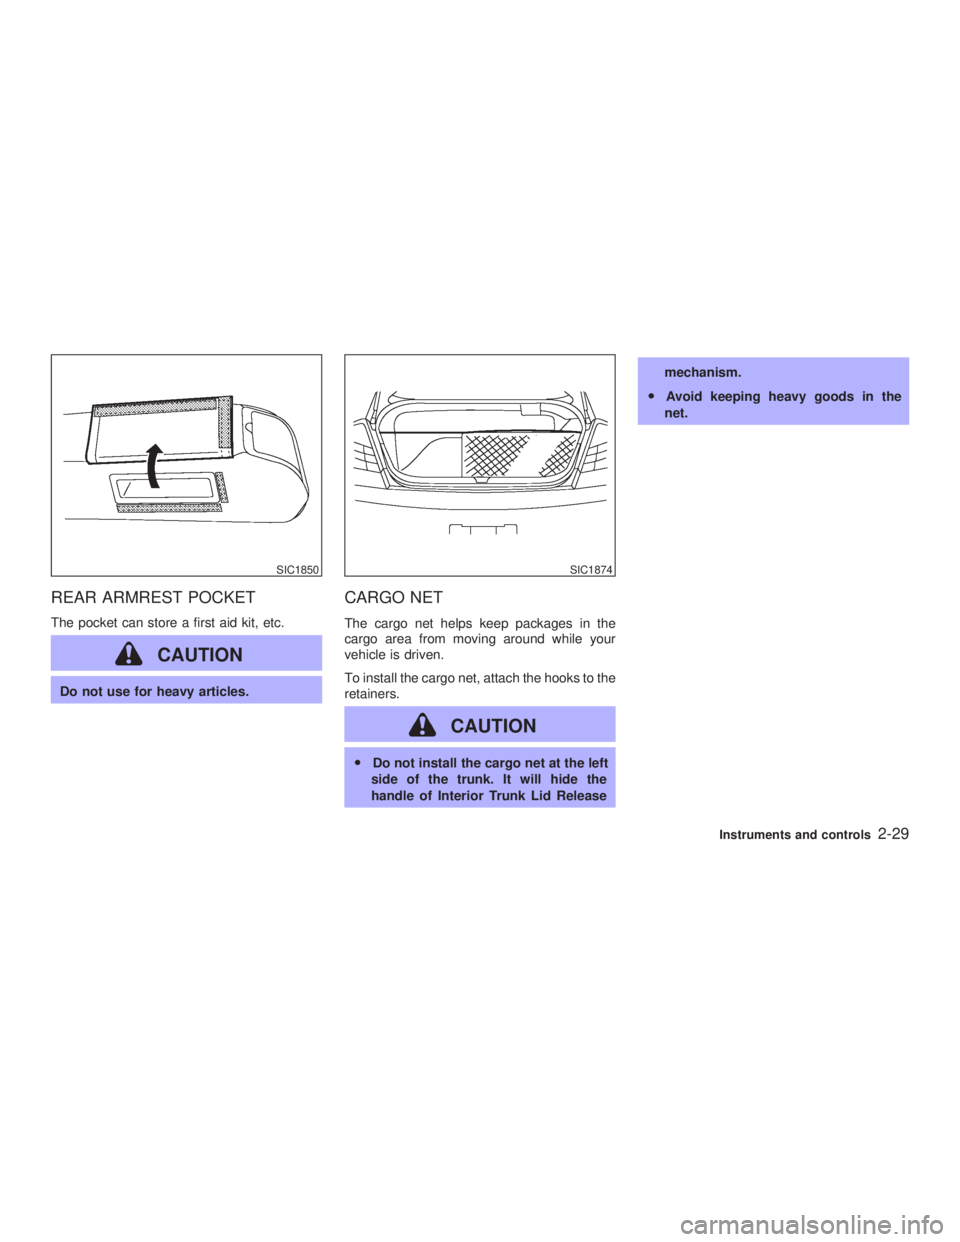
REAR ARMREST POCKET The pocket can store a first aid kit, etc.
CAUTIONDo not use for heavy articles.
CARGO NET The cargo net helps keep packages in the
cargo area from moving around while your
vehicle is driven.
To install the cargo net, attach the hooks to the
retainers.
CAUTION O Do not install the cargo net at the left
side of the trunk. It will hide the
handle of Interior Trunk Lid Release mechanism.
O Avoid keeping heavy goods in the
net.
SIC1850 SIC1874
Instruments and controls
2-29
Z 02.7.29/V35-D/V5.0
X
Page 84 of 256
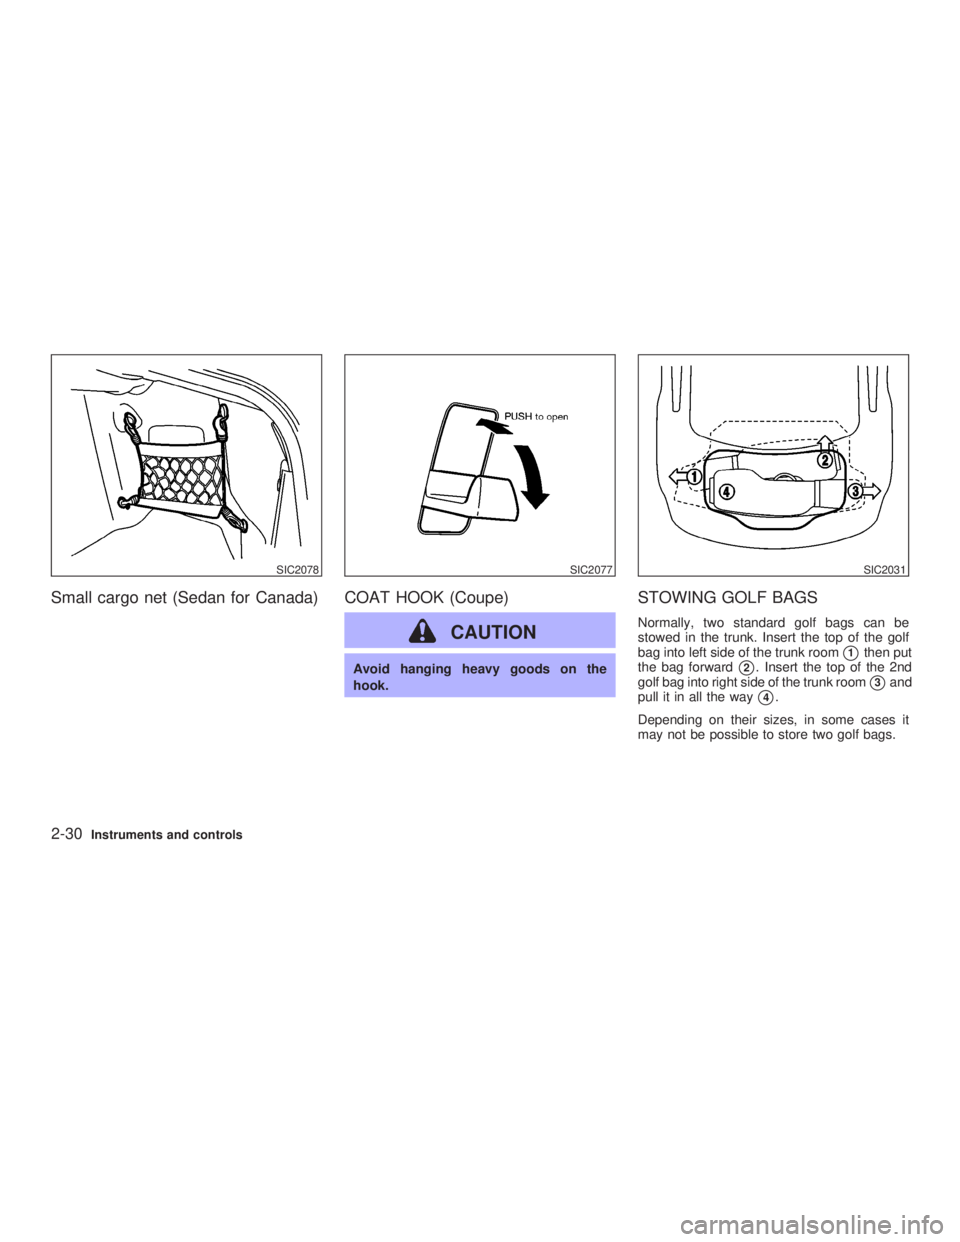
Small cargo net (Sedan for Canada) COAT HOOK (Coupe)
CAUTION Avoid hanging heavy goods on the
hook.
STOWING GOLF BAGS Normally, two standard golf bags can be
stowed in the trunk. Insert the top of the golf
bag into left side of the trunk room
j 1
then put
the bag forward
j 2
. Insert the top of the 2nd
golf bag into right side of the trunk room
j 3
and
pull it in all the way
j 4
.
Depending on their sizes, in some cases it
may not be possible to store two golf bags.SIC2078 SIC2077 SIC2031
2-30 Instruments and controls
Z 02.7.29/V35-D/V5.0
X
Page 91 of 256
The light illuminates when the trunk lid is
opened. When the trunk lid is closed, the light
will go off. The HomeLink Universal Transceiver pro-
vides a convenient way to consolidate the
functions of up to three individual hand-held
transmitters into one built-in device.
HomeLink Universal Transceiver:
O Will operate most Radio Frequency (RF)
devices such as garage doors, gates, home
and office lighting, entry door locks and
security systems.
O Is powered by your vehicle's battery. No
separate batteries are required. If the vehi-
cle's battery is discharged or is discon-
nected, HomeLink will retain all program-
ming.
Once the HomeLink Universal Transceiver
is programmed, retain the original trans-
mitter for future programming procedures
(i.e., new vehicle purchases). Upon sale of
the vehicle, the programmed HomeLink
Universal Transceiver buttons should be
erased for security purposes. For addi-
tional information, refer to ªProgramming
HomeLink º later in this section. WARNING O Do not use the HomeLink Universal
Transceiver with any garage door
opener that lacks safety stop and
reverse features as required by fed-
eral safety standards. (These stan-
dards became effective for opener
models manufactured after April 1,
1982). A garage door opener which
cannot detect an object in the path of
a closing garage door and then auto-
matically stop and reverse, does not
meet current federal safety stan-
dards. Using a garage door opener
without these features increases the
risk of serious injury or death.
O During programming, your garage
door or gate may open or close. Make
sure that people and objects are clear
of the garage door or gate that you
are programming.
O Your vehicle's engine should be
turned off while programming the
HomeLink
Universal Transceiver.TRUNK LIGHT
HomeLink UNIVERSAL
TRANSCEIVER (if so equipped)
Instruments and controls
2-37
Z 02.7.29/V35-D/V5.0
X