2003 INFINITI G35 fuel cap
[x] Cancel search: fuel capPage 66 of 256

on, the cruise control system is operational.
Cruise set switch indicator
lightThe light comes on while the vehicle speed is
controlled by the cruise control system. If the
light blinks while the engine is running, it may
indicate the cruise control system is not func-
tioning properly. Have the system checked by
your INFINITI retailer.
High beam indicator light
(Blue)This light comes on when the headlight high
beam is on and goes out when the low beam is
selected.
Malfunction indicator lamp
(MIL)If the malfunction indicator lamp comes on
steady or blinks while the engine is running, it
may indicate a potential emission control mal-
function.
The malfunction indicator lamp may also come
on steady if the fuel filler cap is loose or
missing, or if the vehicle runs out of fuel.
Check to make sure the fuel filler cap is
installed and closed tightly, and that the ve- hicle has at least three gallons (14 liters) of fuel
in the fuel tank.
After a few driving trips, the lamp should
turn off if no other potential emission control
system malfunction exists.
Operation
The malfunction indicator lamp will come on in
one of two ways:
O Malfunction indicator lamp on steady Ð An
emission control system malfunction has
been detected. Check the fuel filler cap. If
the fuel filler cap is loose or missing, tighten
or install the cap and continue to drive the
vehicle. The lamp should turn off after
a few driving trips. If the lamp does
not turn off after a few driving trips, have the
vehicle inspected by an authorized
INFINITI retailer. You do not need to have
your vehicle towed to the retailer.
O Malfunction indicator lamp blinking Ð An
engine misfire has been detected which
may damage the emission control system.
To reduce or avoid emission control system
damage:
a) Do not drive at speeds above 45 MPH
(72 km/h).
b) Avoid hard acceleration or deceleration.
c) Avoid steep uphill grades. d) If possible, reduce the amount of cargo
being hauled or towed.
The malfunction indicator lamp may stop
blinking and come on steady.
Have the vehicle inspected by an autho-
rized INFINITI retailer. You do not need to
have your vehicle towed to the retailer.
CAUTION Continued vehicle operation without
having the emission control system
checked and repaired as necessary
could lead to poor driveability, reduced
fuel economy, and possible damage to
the emission control system.
Slip indicator light This indicator will blink when the VDC system
or the traction control system is operating, thus
alerting the driver to the fact that the road
surface is slippery and the vehicle is nearing
its traction limits.
Vehicle dynamics control off
indicator light The light comes on when the vehicle dynamics
2-12 Instruments and controls
Z 02.7.29/V35-D/V5.0
X
Page 95 of 256

3 Pre-driving checks and adjustments Keys .......................................................................... 3-2
Doors ......................................................................... 3-3
Locking with key (Driver's side) ........................... 3-3
Windows open/close with key .............................. 3-3
Locking with inside lock knob............................... 3-4
Locking with power door lock switch.................... 3-4
Child safety rear door lock ................................... 3-5
Remote keyless entry system ................................... 3-5
How to use remote keyless entry system ............ 3-5
Battery replacement ............................................. 3-8
Hood ........................................................................ 3-10
Trunk lid .................................................................. 3-10
Opener operation ............................................... 3-11
Interior trunk lid release ..................................... 3-12
Secondary trunk lid release ............................... 3-13 Fuel filler lid ............................................................. 3-14
Opening the filler lid ........................................... 3-14
Fuel filler cap ...................................................... 3-14
Steering wheel ........................................................ 3-16
Tilt operation....................................................... 3-16
Sun visors ............................................................... 3-16
Mirrors ..................................................................... 3-17
Automatic anti-glare inside mirror (if so
equipped)............................................................ 3-17
Outside mirrors ................................................... 3-18
Automatic seat positioner (if so equipped) ............. 3-19
Automatic seat positioner operation ................... 3-19
Procedure for storing memory............................ 3-19
Cancel switch ..................................................... 3-21
Z 02.7.29/V35-D/V5.0
X
Page 108 of 256

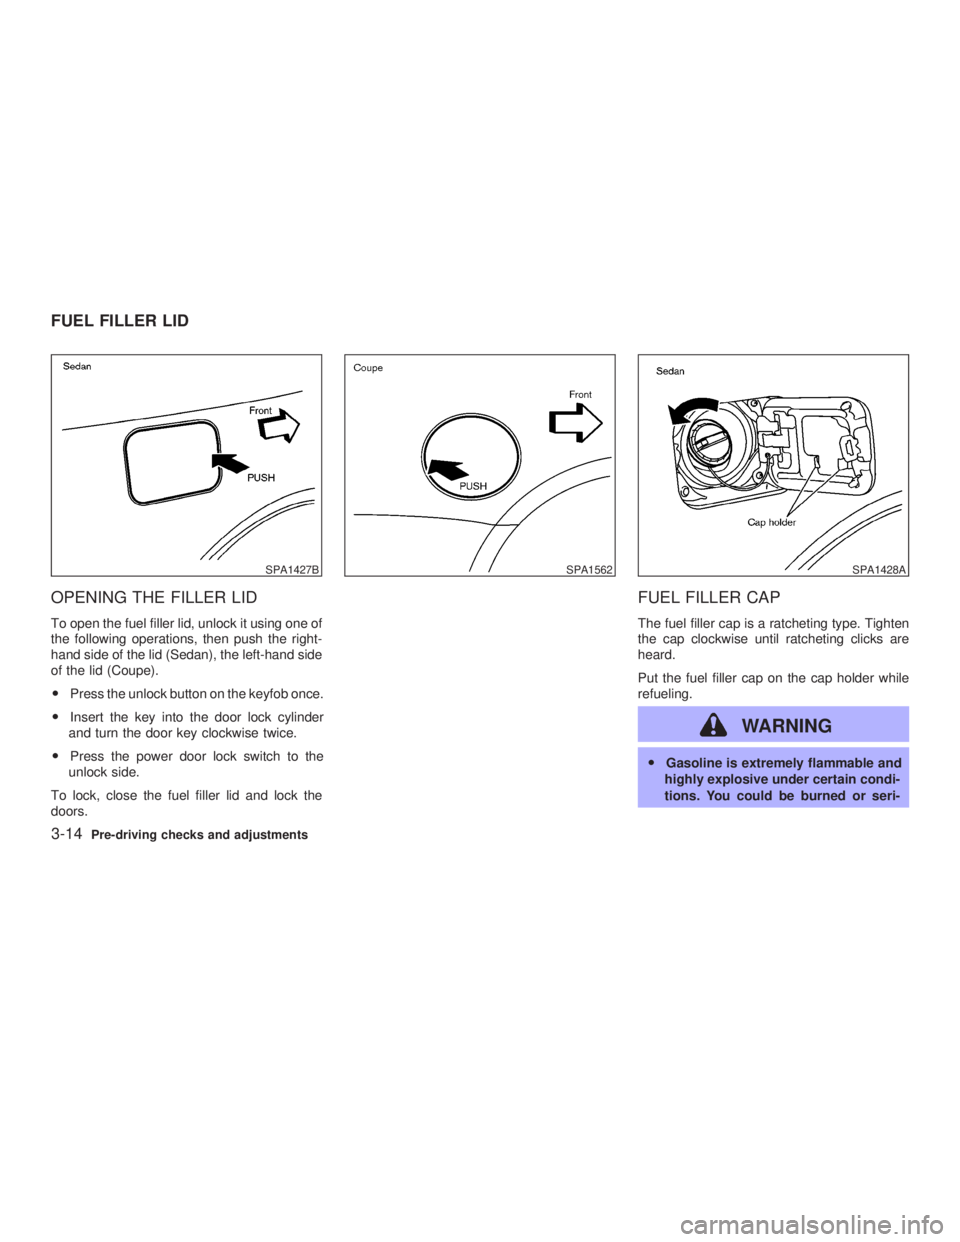
OPENING THE FILLER LID To open the fuel filler lid, unlock it using one of
the following operations, then push the right-
hand side of the lid (Sedan), the left-hand side
of the lid (Coupe).
O Press the unlock button on the keyfob once.
O Insert the key into the door lock cylinder
and turn the door key clockwise twice.
O Press the power door lock switch to the
unlock side.
To lock, close the fuel filler lid and lock the
doors. FUEL FILLER CAP The fuel filler cap is a ratcheting type. Tighten
the cap clockwise until ratcheting clicks are
heard.
Put the fuel filler cap on the cap holder while
refueling.
WARNING O Gasoline is extremely flammable and
highly explosive under certain condi-
tions. You could be burned or seri-SPA1427B SPA1562 SPA1428A
FUEL FILLER LID
3-14 Pre-driving checks and adjustments
Z 02.7.29/V35-D/V5.0
X
Page 109 of 256

ously injured if it is misused or mis-
handled. Always stop the engine and
do not smoke or allow open flames or
sparks near the vehicle when refuel-
ing.
O Fuel may be under pressure. Turn the
cap a quarter turn, and wait for any
hissing sound to stop to prevent fuel
from spraying out and possible per-
sonal injury. Then remove the cap.
O Do not attempt to top off the fuel tank after the fuel pump nozzle shuts off
automatically.
Continued refueling may cause fuel
overflow, resulting in fuel spray and
possibly a fire.
O Use only an original equipment type
fuel filler cap as a replacement. It has
a built-in safety valve needed for
proper operation of the fuel system
and emission control system. An in-
correct cap can result in a serious
malfunction and possible injury. It
could also cause the malfunc-
tion indicator lamp to come on.
O Do not fill a portable fuel container in
the vehicle or trailer. Static electricity
can cause an explosion of flammable
liquid, vapor or gas in any vehicle or
trailer. To reduce the risk of serious
injury or death when filling portable
fuel containers:
Ð Always place the container on the
ground when filling.
Ð Do not use electronic devices
while filling.
Ð Keep the pump nozzle in contact
with the container while you are
filling it. Ð Use only approved portable fuel
containers for flammable liquid.
O Never pour fuel into the throttle body
to attempt to start your vehicle.
CAUTION O If fuel is spilled on the car body, flush
it away with water to avoid paint dam-
age.
O Tighten until the fuel filler cap clicks.
Failure to tighten the fuel filler cap
properly may cause the
mal-
function indicator lamp (MIL) to illu-
minate. If the
lamp illuminates
because the fuel filler cap is loose or
missing, tighten or install the cap and
continue to drive the vehicle. The
lamp should turn off after a few
driving trips. If the
lamp does
not turn off after a few driving trips,
have the vehicle inspected by an au-
thorized INFINITI retailer.SPA1563
Pre-driving checks and adjustments
3-15
Z 02.7.29/V35-D/V5.0
X
Page 122 of 256

up easily when operating the heater or air
conditioning system. The air conditioning system in your INFINITI
vehicle is charged with a refrigerant designed
with the environment in mind. This refrigerant
will not harm the earth's ozone layer. How-
ever, special charging equipment and lubricant
are required when servicing your NISSAN air
conditioner. Using improper refrigerants or lu-
bricants will cause severe damage to your air
conditioning system. See ªCapacities and rec-
ommended fuel/lubricantsº in the ª10. Techni-
cal and consumer informationº section for air
conditioning system refrigerant and lubricant
recommendations.
Your INFINITI retailer will be able to service
your environmentally friendly air conditioning
system.
WARNING The air conditioner system contains re-
frigerant under high pressure. To avoid
personal injury, any air conditioner ser-
vice should be done only by an experi-
enced technician with proper equip-
ment. Turn the ignition key to ACC or ON and press
the POWER, FM or AM button to turn on the
radio. If you listen to the radio with the engine
not running, the key should be turned to the
ACC position.
Radio reception is affected by station signal
strength, distance from radio transmitter, build-
ings, bridges, mountains and other external
influences. Intermittent changes in reception
quality normally are caused by these external
influences.
Using a cellular phone in or near the ve-
hicle may influence radio reception quality.
Radio reception Your radio system is equipped with state-of-
the-art electronic circuits to enhance radio
reception. These circuits are designed to ex-
tend reception range, and to enhance the
quality of that reception.
However there are some general characteris-
tics of FM, AM and satellite radio signals that
can affect radio reception quality in a moving
vehicle, even when the finest equipment is
used. These characteristics are completely
normal in a given reception area, and do not
indicate any malfunction in your radio system.
Remember that a moving vehicle is not the
ideal place to listen to a radio. Because of theSERVICING AIR CONDITIONER AUDIO SYSTEM
4-6 Heater, air conditioner and audio systems
Z 02.7.29/V35-D/V5.0
X
Page 180 of 256

When performing any inspection or mainte-
nance work on your vehicle, always take care
to prevent serious accidental injury to yourself
or damage to the vehicle. The following are
general precautions which should be closely
observed.
WARNINGO Park the vehicle on a level surface,
apply the parking brake securely and
block the wheels to prevent the ve-
hicle from moving. For a manual
transmission, move the shift lever to
N (Neutral) position. For an automatic
transmission, move the selector lever
to P (Park) position.
O Be sure the ignition key is OFF or
LOCK when performing any parts re-
placement or repairs.
O If you must work with the engine
running, keep your hands, clothing,
hair and tools away from moving
fans, belts and any other moving
parts.
O It is advised to secure or remove any loose clothing and any jewelry, such
as rings, watches, etc. before work-
ing on your vehicle.
O Always wear eye protection when-
ever you work on your vehicle.
O If you must run the engine in an
enclosed space such as a garage, be
sure there is proper ventilation for
exhaust gases to escape.
O Never get under the vehicle while it is
supported only by a jack. If it is nec-
essary to work under the vehicle,
support it with safety stands.
O Keep smoking materials, flame and
sparks away from fuel and the bat-
tery.
O On gasoline engine models with the
Multiport Fuel Injection (MFI) System,
the fuel filter or fuel lines should be
serviced by an INFINITI retailer be-
cause the fuel lines are under high
pressure even when the engine is off. CAUTION O Do not work under the hood while the
engine is hot. Turn off the engine and
wait until it cools down.
O Never connect or disconnect either
the battery or any transistorized com-
ponent connector while the ignition
key is on.
O Never leave any engine or automatic
transmission related component har-
ness connector disconnected while
the ignition key is on.
O Avoid direct contact with used engine
oil and coolant. Improperly disposed
engine oil, engine coolant and/or
other vehicle fluids can hurt the envi-
ronment. Always conform to local
regulations for disposal of vehicle
fluid.
This ª8. Do-it-yourselfº section gives instruc-
tions regarding only those items which are
relatively easy for an owner to perform.
A genuine INFINITI Service Manual is alsoMAINTENANCE PRECAUTIONS
8-2 Do-it-yourself
Z 02.7.29/V35-D/V5.0
X
Page 187 of 256

O Check your local regulations.
4. Loosen the oil filter with an oil filter wrench.
Remove the oil filter by turning it by hand.
5. Wipe the engine oil filter mounting surface
with a clean rag.
Be sure to remove any old rubber gasket
remaining on the mounting surface of
the engine.
6. Coat the gasket on the new filter with clean
engine oil.
7. Screw in the oil filter clockwise until a slight
resistance is felt, then tighten additionally
more than 2/3 turn.
Oil filter tightening torque:
11 to 15 ft-lb
(14.7 to 20.5 N z m)
8. Clean and re-install the drain plug with a
new washer. Securely tighten the drain plug
with a wrench.
Drain plug tightening torque:
22 to 29 ft-lb
(29 to 39 N z m)
Do not use excessive force.
9. Refill engine with recommended oil and
install the cap securely. CAUTION The dipstick must be inserted in place to
prevent oil spillage from the dipstick
hole while filling the engine with oil.
See ªCapacities and recommended fuel/
lubricantsº in the ª9. Technical and con-
sumer informationº section for drain and
refill capacity. The drain and refill capacity
depends on the oil temperature and drain
time. Use these specifications for reference
only. Always use the dipstick to determine
the proper amount of oil in the engine.
CAUTION When filling oil, do not pull out the
dipstick.
10.Start the engine and check for leakage
around the drain plug and the oil filter.
Correct as required.
11.Turn the engine off and wait more than 10
minutes. Check the oil level with the dip-
stick. Add engine oil if necessary. After the operation 1. Install the engine undercover into position
as the following steps.
a. Pull the center of the small plastic clip out.
b. Hold the engine undercover into position.
c. Insert the clip through the undercover into
the hole in the frame, then push the center
of the clip in to lock the clip in place.
d. Install the other bolts that hold the under-
cover in place. Be careful not to strip the
bolts or over-tighten them.
2. Lower the vehicle carefully to the ground.
3. Dispose of waste oil and filter properly.
WARNING O Prolonged and repeated contact with
used engine oil may cause skin can-
cer.
O Try to avoid direct skin contact with
used oil. If skin contact is made, wash
thoroughly with soap or hand cleaner
as soon as possible.
Do-it-yourself
8-9
Z 02.7.29/V35-D/V5.0
X
Page 223 of 256

10 Technical and consumer information Capacities and recommended fuel/lubricants/
fluids ........................................................................ 10-2
Fuel recommendation ......................................... 10-3
Engine oil and oil filter recommendation ............ 10-5
Recommended SAE viscosity number ............... 10-6
Air conditioning system refrigerant and lubricant
recommendations ............................................... 10-6
Specifications .......................................................... 10-7
Engine ................................................................ 10-7
Wheels and tires ................................................ 10-8
Dimensions and weights .................................... 10-8
When traveling or registering your vehicle in
another country ....................................................... 10-9
Vehicle identification ............................................... 10-9
Vehicle identification number (VIN) plate ........... 10-9
Vehicle identification number
(Chassis number) ............................................... 10-9
Engine serial number ....................................... 10-10
F.M.V.S.S. certification label ............................ 10-10
Emission control information label ................... 10-11
Tire placard ...................................................... 10-11
Air conditioner specification label ..................... 10-12
Installing front bumper cover................................. 10-12
Installing front license plate................................... 10-13 Vehicle loading information ................................... 10-14
Terms ............................................................... 10-14
Determining vehicle load capacity.................... 10-14
Loading tips ...................................................... 10-15
Towing a trailer ..................................................... 10-15
Maximum load limits ......................................... 10-16
Towing safety ................................................... 10-17
Uniform tire quality grading ................................... 10-19
Emission control system warranty ........................ 10-20
Reporting safety defects (US only) ....................... 10-21
Readiness for inspection/maintenance (I/M) test
(US only) ............................................................... 10-21
Owner's Manual/Service Manual order
information............................................................. 10-22
In the event of a collision ................................. 10-22
Z 02.7.29/V35-D/V5.0
X