2003 Hyundai Sonata ECO mode
[x] Cancel search: ECO modePage 15 of 205

FEATURES OF YOUR HYUNDAI 1- 3
B010E01A-AATGasolines for Cleaner AirTo help contribute to cleaner air, Hyundai rec-
ommends that you use gasolines treated with
detergent additives, which help prevent deposit
formation in the engine. These gasolines will
help the engine run cleaner and the Emission
Control System performance.
B020A01S-AATBREAKING IN YOUR NEW HYUNDAI
During the First 1,200 Miles (2,000 Km)
No formal "break-in" procedure is required with
your new Hyundai. However, you can contrib-
ute to the economical operation and durability of
your Hyundai by observing the following recom-
mendations during the first 1,200 miles (2,000
km).
o Don't drive faster than 55 MPH (88 km/h).
o While driving, keep your engine speed (rpm,
or revolutions per minute) between 2,000
rpm and 4,000 rpm.
o Use moderate acceleration. Don't start
quickly or depress the accelerator pedal
fully.
o For the first 200 miles (300 km), try to avoid
hard stops.
o Don't lug the engine (in other words, don't
drive so slowly in too high a gear that the
engine "bucks"-shift to a lower gear).
B030A01Y-AATKEYS
B030B01A-AAT
Record Your Key Number
o Whether going fast or slow, vary your speed
from time to time.
o Don't let the engine idle longer than 3 minutes
at one time.
o Don't tow a trailer during the first 1,200 miles
(2,000 km) of operation.
A code number is stamped on the number plate
that came with the keys to your Hyundai. This
key number plate should not be left with the keys
but kept in a safe place, not in the vehicle. The
key number should also be recorded in a place
where it can be found in an emergency.
If you need additional keys, or if you should lose
your keys, your authorized Hyundai dealer can
make new keys if you can supply the key
number. For greater convenience, your Hyundai has
two master keys and a sub key. The master
keys will open all locks on your vehicle. The sub
key will only function in the ignition and the door
locks.
Leaving your sub key with a parking attendant
will ensure that your vehicle's trunk, trunk lid
release, glovebox compartment and rear trunk
access may not be unlocked in your absence.NOTE:Before leaving your sub key with a parking
attendant, make sure that the lock levers of
the rear seat back lock and the trunk lid lock
are switched to the "LOCK" position.
B030A01YB030B01B
Master key Sub key
Page 31 of 205
FEATURES OF YOUR HYUNDAI 1- 19
!
B190A01Y-AAT
SEAT BELTS-Front Passenger and Rear
Seat 3-Point System with Combination
Locking Retractor
To Fasten Your Belt
Combination retractor type seat belts are in-
stalled in the rear seat positions to help accom-
modate the installation of child restraint sys-
tems. Although a combination retractor is also
installed in the front passenger seat position,
Hyundai strongly recommends that children
always be seated in the rear seat. NEVER place
any infant restraint system in the front seat of the
vehicle.
This type of seat belt combines the features of
both an emergency locking retractor seat belt
and an automatic locking retractor seat belt. To
fasten your seat belt, pull it out of the retractor
and insert the metal tab into the buckle. There
will be an audible "click" when the tab locks into
the buckle. When not securing a child restraint,
the seat belt operates in the same way as the
driver's seat belt (Emergency Locking Retrac-tor Type). It automatically adjusts to the proper
length only after the lap belt portion of the seat
belt is adjusted manually so that it fits snugly
around your hips. When the seat belt is fully
extended from the retractor to allow the instal-
lation of a child restraint system, the seat belt
operation changes to allow the belt to retract, but
not to extend. (Automatic Locking Retractor
Type). See page 1-24.
NOTE:Although the combination retractor pro-
vides the same level of protection for seated
passengers in either emergency or auto-
matic locking modes, it is recommended
that seated passengers use the emergency
locking feature for improved convenience.
The automatic locking function is intended
to facilitate child restraint installation. To
convert from the automatic locking feature
to the emergency locking operation mode,
allow the unbuckled seat belt to fully re-
tract.
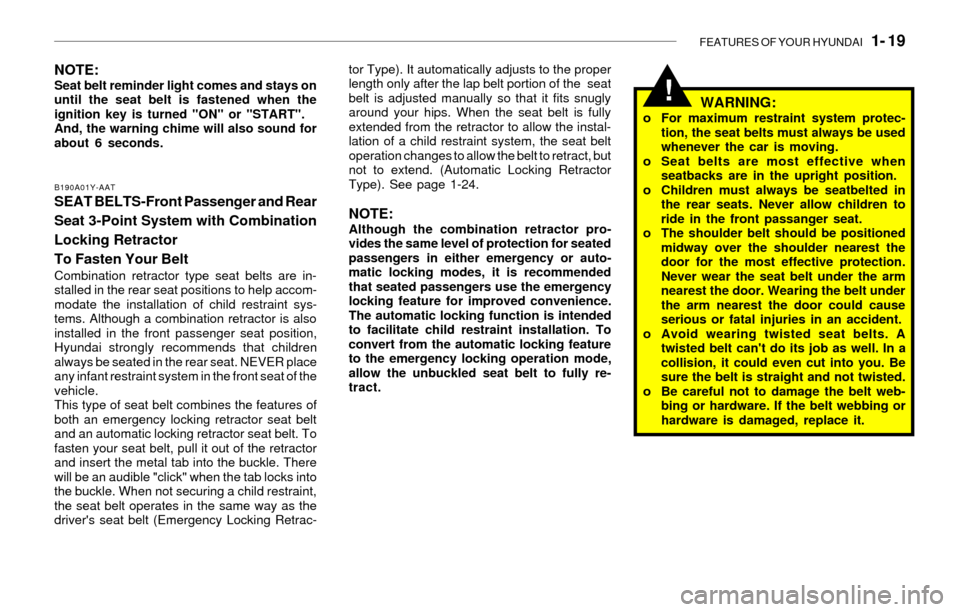
WARNING:o For maximum restraint system protec-
tion, the seat belts must always be used
whenever the car is moving.
o Seat belts are most effective when
seatbacks are in the upright position.
o Children must always be seatbelted in
the rear seats. Never allow children to
ride in the front passanger seat.
o The shoulder belt should be positioned
midway over the shoulder nearest the
door for the most effective protection.
Never wear the seat belt under the arm
nearest the door. Wearing the belt under
the arm nearest the door could cause
serious or fatal injuries in an accident.
o Avoid wearing twisted seat belts. A
twisted belt can't do its job as well. In a
collision, it could even cut into you. Be
sure the belt is straight and not twisted.
o Be careful not to damage the belt web-
bing or hardware. If the belt webbing or
hardware is damaged, replace it.
NOTE:Seat belt reminder light comes and stays on
until the seat belt is fastened when the
ignition key is turned "ON" or "START".
And, the warning chime will also sound for
about 6 seconds.
Page 52 of 205
1- 40 FEATURES OF YOUR HYUNDAI
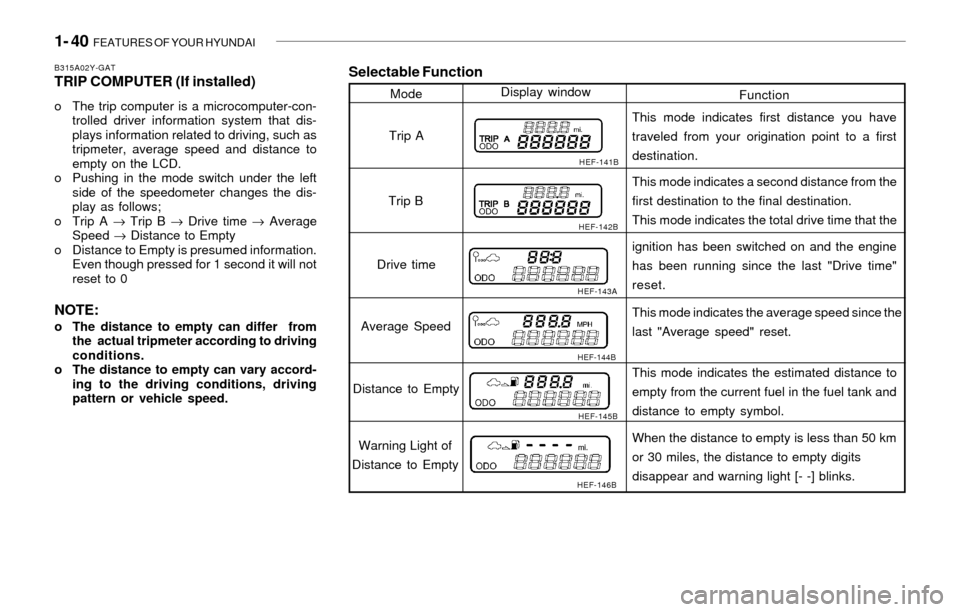
Selectable Function
Function ModeDisplay window
HEF-141B
HEF-142B
HEF-143A
HEF-144B
HEF-145B
HEF-146B
Trip A
Trip B
Drive time
Average Speed
Distance to Empty
Warning Light of
Distance to EmptyThis mode indicates first distance you have
traveled from your origination point to a first
destination.
This mode indicates a second distance from the
first destination to the final destination.
This mode indicates the total drive time that the
ignition has been switched on and the engine
has been running since the last "Drive time"
reset.
This mode indicates the average speed since the
last "Average speed" reset.
This mode indicates the estimated distance to
empty from the current fuel in the fuel tank and
distance to empty symbol.
When the distance to empty is less than 50 km
or 30 miles, the distance to empty digits
disappear and warning light [- -] blinks.
B315A02Y-GATTRIP COMPUTER (If installed)
o The trip computer is a microcomputer-con-
trolled driver information system that dis-
plays information related to driving, such as
tripmeter, average speed and distance to
empty on the LCD.
o Pushing in the mode switch under the left
side of the speedometer changes the dis-
play as follows;
o Trip A ® Trip B ® Drive time ® Average
Speed ® Distance to Empty
o Distance to Empty is presumed information.
Even though pressed for 1 second it will not
reset to 0
NOTE:o The distance to empty can differ from
the actual tripmeter according to driving
conditions.
o The distance to empty can vary accord-
ing to the driving conditions, driving
pattern or vehicle speed.
Page 54 of 205
1- 42 FEATURES OF YOUR HYUNDAI
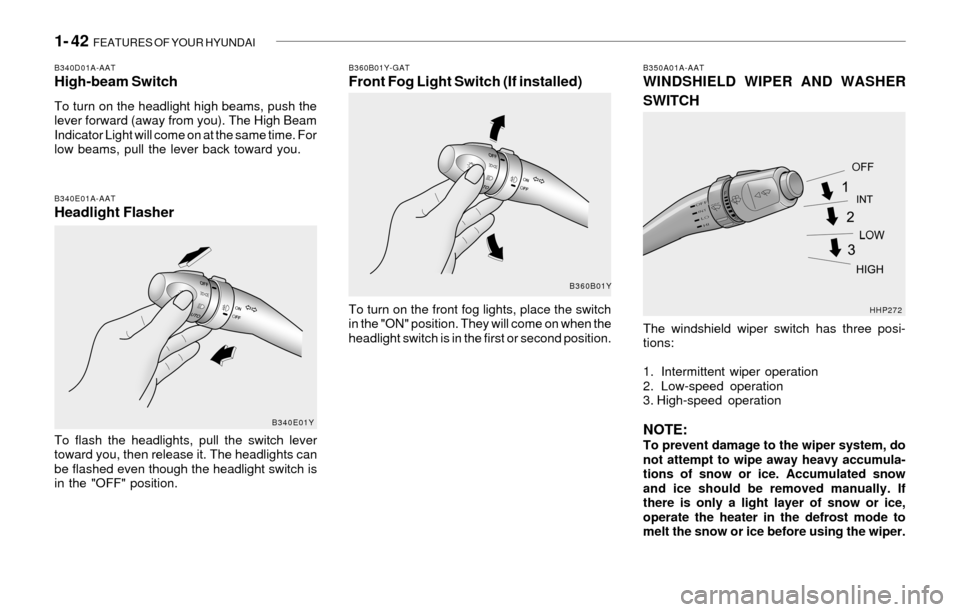
B340D01A-AATHigh-beam Switch
To turn on the headlight high beams, push the
lever forward (away from you). The High Beam
Indicator Light will come on at the same time. For
low beams, pull the lever back toward you.
B340E01A-AATHeadlight Flasher
To flash the headlights, pull the switch lever
toward you, then release it. The headlights can
be flashed even though the headlight switch is
in the "OFF" position.
B350A01A-AATWINDSHIELD WIPER AND WASHER
SWITCH
The windshield wiper switch has three posi-
tions:
1. Intermittent wiper operation
2. Low-speed operation
3. High-speed operation
NOTE:To prevent damage to the wiper system, do
not attempt to wipe away heavy accumula-
tions of snow or ice. Accumulated snow
and ice should be removed manually. If
there is only a light layer of snow or ice,
operate the heater in the defrost mode to
melt the snow or ice before using the wiper.
B360B01Y-GATFront Fog Light Switch (If installed)
To turn on the front fog lights, place the switch
in the "ON" position. They will come on when the
headlight switch is in the first or second position.
B340E01YB360B01Y
HHP272
Page 79 of 205
FEATURES OF YOUR HYUNDAI 1- 67
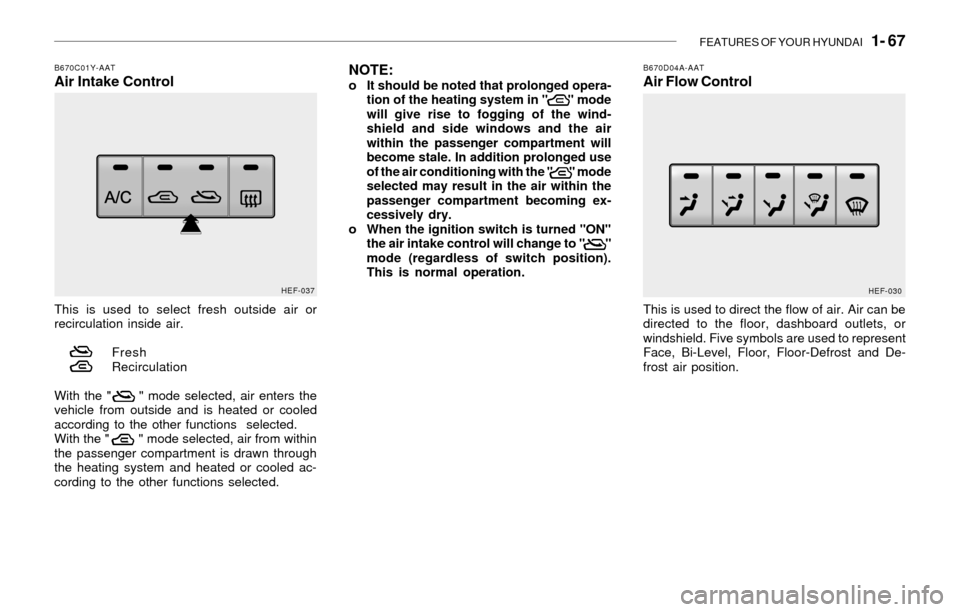
B670C01Y-AATAir Intake Control
This is used to select fresh outside air or
recirculation inside air.
Fresh
Recirculation
With the " " mode selected, air enters the
vehicle from outside and is heated or cooled
according to the other functions selected.
With the " " mode selected, air from within
the passenger compartment is drawn through
the heating system and heated or cooled ac-
cording to the other functions selected.
NOTE:o It should be noted that prolonged opera-
tion of the heating system in " " mode
will give rise to fogging of the wind-
shield and side windows and the air
within the passenger compartment will
become stale. In addition prolonged use
of the air conditioning with the " " mode
selected may result in the air within the
passenger compartment becoming ex-
cessively dry.
o When the ignition switch is turned "ON"
the air intake control will change to " "
mode (regardless of switch position).
This is normal operation.
B670D04A-AATAir Flow Control
This is used to direct the flow of air. Air can be
directed to the floor, dashboard outlets, or
windshield. Five symbols are used to represent
Face, Bi-Level, Floor, Floor-Defrost and De-
frost air position.
HEF-037
HEF-030
Page 85 of 205

FEATURES OF YOUR HYUNDAI 1- 73
B970C03L-AATAutomatic Operation
The FATC (Full Automatic Temperature Con-
trol) system automatically controls heating and
cooling as follows:
1. Push the "AUTO" switch. The indicator light
will illuminate confirming that the Face, Floor
and/or Bi-Level modes as well as the blower
speed and, air conditioner will be controlled
automatically.2. Push the "TEMP" button to set the desired
temperature.
The temperature will increase to the maxi-
mum 90°F(32°C) by pushing on the button.
Each push of the button will cause the tem-
perature to increase by 1°F(0.5°C).
The temperature will decrease to the mini-
mum 62°F(17°C) by pushing on the button.
Each push of the button will cause the tem-
perature to decrease by 1°F(0.5°C).
NOTE:If the battery has been discharged or dis-
connected, the temperature mode will reset
to centigrade degrees.
This is a normal condition and you can
change the temperature mode from centi-
grade to fahrenheit as follows;
Press the TEMP down ( ) button 3 seconds
or more with the AMB button held down.
The display shows that the unit of tempera-
ture is adjusted to centigrade or fahrenheit
(°C
® ®® ®
® °F or °F
® ®® ®
® °C).
NOTE:Never place anything over the sensor which
is located on the instrument panel to en-
sure better control of the heating and cool-
ing system.
HEF-040HEF-033
HEF-237
Photo Sensor
Page 87 of 205
FEATURES OF YOUR HYUNDAI 1- 75
With the "Recirculation" mode selected, and air
from within the passenger compartment will be
drawn through the heating system and heated
or cooled according to the function selected.
NOTE:o It should be noted that prolonged opera-
tion of the heating system in "recircula-
tion" mode will give rise to fogging of the
windshield and side windows and the air
within the passenger compartment will
become stale. In addition, prolonged
use of the air conditioning with the "Re-
circulation" mode selected may result in
the air within the passenger compart-
ment becoming excessively dry.
o When the ignition switch is turned "ON"
the air intake control will change to " "
mode (regardless of switch position).
This is normal operation. The air intake
control operates in "AUTO" mode when
turning the ignition to the ON position if
the "AUTO" mode was used before shut-
ting off the engine.
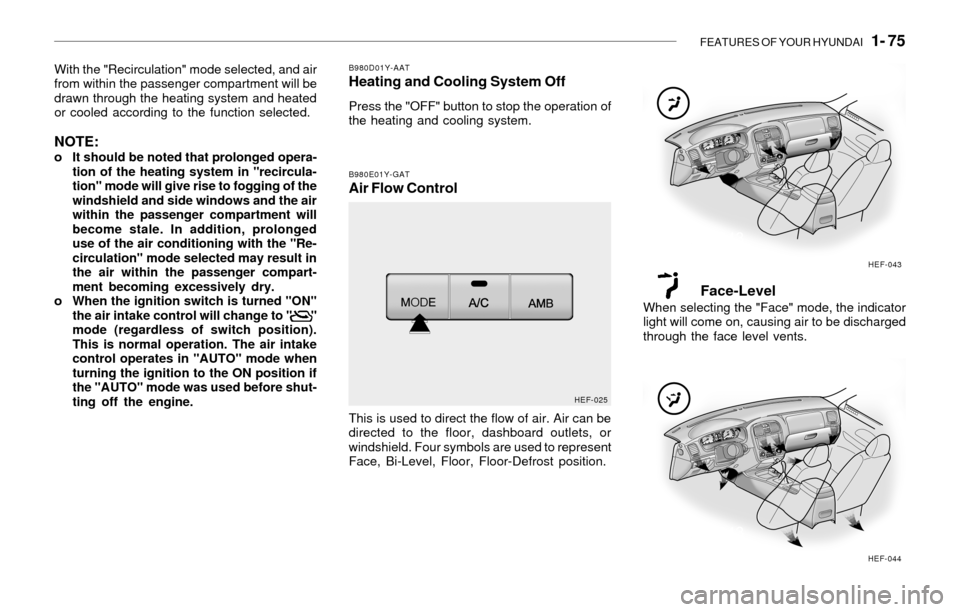
B980D01Y-AATHeating and Cooling System Off
Press the "OFF" button to stop the operation of
the heating and cooling system.
B980E01Y-GATAir Flow Control
This is used to direct the flow of air. Air can be
directed to the floor, dashboard outlets, or
windshield. Four symbols are used to represent
Face, Bi-Level, Floor, Floor-Defrost position.
Face-LevelWhen selecting the "Face" mode, the indicator
light will come on, causing air to be discharged
through the face level vents.
HEF-025HEF-043
HEF-044
Page 93 of 205

FEATURES OF YOUR HYUNDAI 1- 81
H240B03O-GAT1. POWER ON-OFF Control Knob
The radio unit may be operated when the ignition
key is in the "ACC" or "ON" position. Press the
knob to switch the power on. The LCD shows
the radio frequency in the radio mode or the tape
direction indicator in the tape mode. To switch
the power off, press the knob again.
VOLUME Control
Rotate the knob clockwise to increase the
volume and turn the knob counterclockwise to
reduce the volume.
2. BASS Control Knob
Press to pop the knob out and turn to the left or
right for the desired bass tone.
BAL (Balance Control) Knob
Pull the bass control knob further out. Turn the
control knob clockwise to emphasize right
speaker sound. (Left speaker sound will be
attenuated)
When the control knob is turned counterclock-
wise, left speaker sound will be emphasized.
(Right speaker sound will be attenuated)
3. TREB (Treble Control) Knob
Press to pop the knob out and turn to the left or
right for the desired treble tone.
FAD (Fader Control) Knob
Pull the treble control knob further out.
Turn the control knob counterclockwise to
emphasize front speaker sound. (Rear speaker
sound will be attenuated)
When the control knob is turned clockwise, rear
speaker sound will be emphasized.
(Front speaker sound will be attenuated)
4. TUNE (Manual) Select Button
Press the side or side to increase or to decrease
the frequency. Press either button and hold
down to continuously scroll. Release button
once the desired station is reached.
SEEK Operation
(Automatic Channel Selection)
Press the TUNE select button 1 sec or
more.Releasing will automatically tune to the
next available station with a beep sound.
When the ( ) side is pressed longer than 1
second, releasing will automatically tune to the
next higher frequency and when the ( ) side
is pressed longer than 1 second, releasing will
automatically tune to the next lower frequency.
5. BAND Selector
Pressing the button changes the AM, FM1
and FM2 bands. The mode selected is dis-
played on LCD.
6. PRESET STATION SELECT Button
Six (6) stations for AM, FM and FM2 respec-
tively can be preset in the electronic memory
circuit on this unit.
HOW TO PRESET STATIONS
Six AM and twelve FM stations may be pro-
grammed into the memory of the radio. Then, by
simply pressing the band select button and/or
one of the six station select buttons, you may
recall any of these stations instantly. To pro-
gram the stations, follow these steps:
o Press band selector to set the band for AM,
FM, or FM2.
o Select the desired station to be stored by
seek or manual tuning.
o Determine the preset station select button
you wish to use to access that station.
FM/AM