2003 Hyundai Sonata clock
[x] Cancel search: clockPage 103 of 205

FEATURES OF YOUR HYUNDAI 1- 91
H290B03E-GAT1. POWER ON-OFF Control Knob
The radio unit may be operated when the ignition
key is in the "ACC" or "ON" position. Press the
button to switch the power on. The display
shows the radio frequency in the radio mode,
the tape direction indicator in the tape mode or
CD track in either the CD mode or CD AUTO
CHANGER mode. To switch the power off,
press the button again.
VOLUME Control
Rotate the knob clockwise to increase the
volume and turn the knob counterclockwise to
reduce the volume.
2. BASS/BALANCE Control Knob
BASS Control Knob
Press to pop the knob out. To increase the bass,
rotate the knob clockwise, while to decrease the
bass, rotate the knob counterclockwise.
BALANCE Control knob
Pull the Bass control knob out further. Rotate the
knob clockwise to emphasize right speaker
sound. (Left speaker sound will be attenuated)
When the control knob is turned counterclock-
wise, left speaker sound will be emphasized
(Right speaker sound will be attenuated).
3. TREBLE/FAD Knob
TREBLE Control Knob
Press to pop the knob out and turn to the left or
right for the desired treble tone.
FAD (Fader Control) Knob
Pull the Bass control knob out further. Turn the
control knob counterclockwise to emphasize
front speaker sound. (Rear speaker sound will
be attenuated) When the control knob is turned
clockwise, rear speaker sound will be empha-
sized. (Front speaker sound will be attenuated)
4. TUNE (Manual) Select Button
Press the ( ) side or ( ) side to increase or to
decrease the frequency. Press either button
and hold down to continuously scroll, Release
button once the desired station is reached.
SEEK Operation (Automatic Channel
Selection)
Press the TUNE select button for 0.5 sec or
more. Releasing it will automatically tune to the
next available station with a beep sound.
When the ( ) side is pressed longer than 0.5
second, releasing will automatically tune to the
next higher frequency and when the ( ) side is
pressed longer than 0.5 second, releasing will
automatically tune to the next lower frequency.
5. PRESET STATION Select Buttons
Six (6) stations for AM, FM and FM2 respec-
tively can be preset in the electronic memory
circuit.
HOW TO PRESET STATIONS
Six AM and twelve FM stations may be pro-
grammed into the memory of the radio. Then, by
simply pressing the band select button and/or
one of the six station select buttons, you may
recall any of these stations instantly. To pro-
gram the stations, follow these steps:
o Press band selector to set the band for AM,
FM or FM2.
o Select the desired station to be stored by
seek or manual tuning.
o Determine the preset station select button
you wish to use to access that station.
o Press the station select button for more than
two seconds. A select button indicator will
show in the display indicating which select
button you have depressed. The frequency
display will flash after it has been stored into
the memory with a beep sound. You should
then release the button, and proceed to
program the next desired station. A total of
18 stations can be programmed by selecting
one AM and two FM station per button.
o When completed, any preset station may be
recalled by selecting AM, FM or FM2 band
and the appropriate station button.
Page 112 of 205
1- 100 FEATURES OF YOUR HYUNDAI
B870A01A-AATANTENNA
Fixed Rod Antenna (If installed)B870B01Y-AATPower Antenna (If installed)
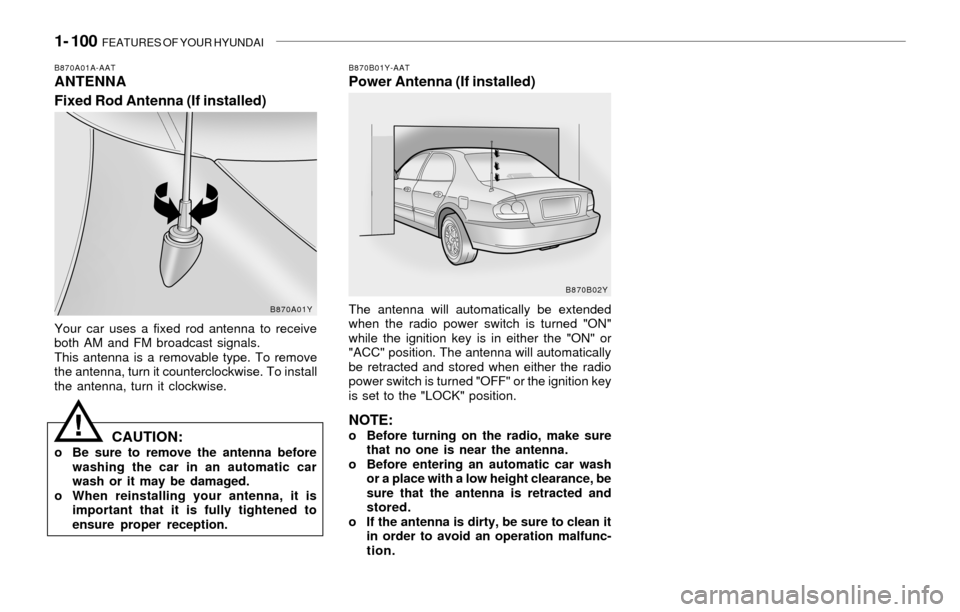
Your car uses a fixed rod antenna to receive
both AM and FM broadcast signals.
This antenna is a removable type. To remove
the antenna, turn it counterclockwise. To install
the antenna, turn it clockwise.The antenna will automatically be extended
when the radio power switch is turned "ON"
while the ignition key is in either the "ON" or
"ACC" position. The antenna will automatically
be retracted and stored when either the radio
power switch is turned "OFF" or the ignition key
is set to the "LOCK" position.
NOTE:o Before turning on the radio, make sure
that no one is near the antenna.
o Before entering an automatic car wash
or a place with a low height clearance, be
sure that the antenna is retracted and
stored.
o If the antenna is dirty, be sure to clean it
in order to avoid an operation malfunc-
tion.CAUTION:o Be sure to remove the antenna before
washing the car in an automatic car
wash or it may be damaged.
o When reinstalling your antenna, it is
important that it is fully tightened to
ensure proper reception.
!
B870A01YB870B02Y
Page 116 of 205
2- 4 DRIVING YOUR HYUNDAI
!
C070C02A-AATTo Remove the Ignition KeyC050A01A-AATSTARTING o "ACC"With the key in the "ACC" position, radio and
other accessories may be operated. If you open
the driver's door with the key in the "ACC" or
"LOCK" position, the chime will sound to remind
you that the key should be removed.
o "LOCK"
The key can be removed or inserted in this
position. Steering is locked by removing the
key. When unlocking the steering, insert the
key, and then turn the steering wheel and key
simultaneously.
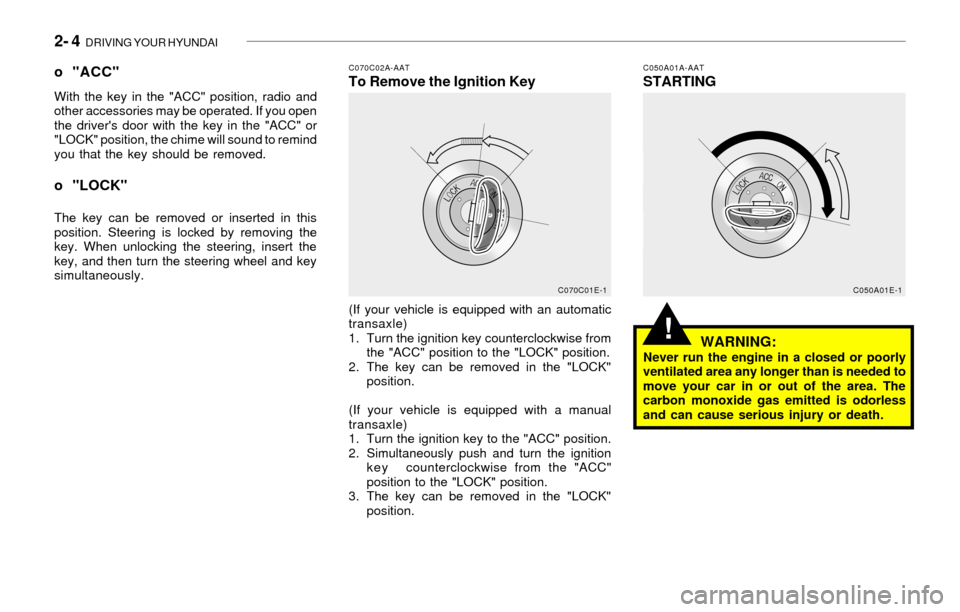
(If your vehicle is equipped with an automatic
transaxle)
1. Turn the ignition key counterclockwise from
the "ACC" position to the "LOCK" position.
2. The key can be removed in the "LOCK"
position.
(If your vehicle is equipped with a manual
transaxle)
1. Turn the ignition key to the "ACC" position.
2. Simultaneously push and turn the ignition
key counterclockwise from the "ACC"
position to the "LOCK" position.
3. The key can be removed in the "LOCK"
position.
WARNING:Never run the engine in a closed or poorly
ventilated area any longer than is needed to
move your car in or out of the area. The
carbon monoxide gas emitted is odorless
and can cause serious injury or death.
C070C01E-1
C050A01E-1
Page 137 of 205
WHAT TO DO IN AN EMERGENCY 3- 7
D060D02A-AAT3. Loosen Wheel NutsD060E01A-AAT4. Put the Jack in Place
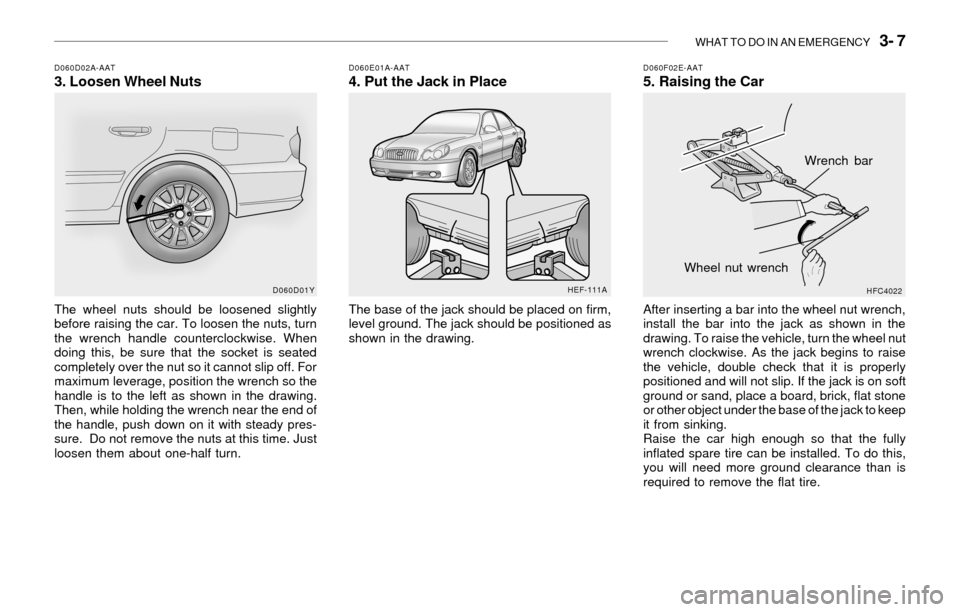
The wheel nuts should be loosened slightly
before raising the car. To loosen the nuts, turn
the wrench handle counterclockwise. When
doing this, be sure that the socket is seated
completely over the nut so it cannot slip off. For
maximum leverage, position the wrench so the
handle is to the left as shown in the drawing.
Then, while holding the wrench near the end of
the handle, push down on it with steady pres-
sure. Do not remove the nuts at this time. Just
loosen them about one-half turn.The base of the jack should be placed on firm,
level ground. The jack should be positioned as
shown in the drawing.
D060F02E-AAT5. Raising the Car
After inserting a bar into the wheel nut wrench,
install the bar into the jack as shown in the
drawing. To raise the vehicle, turn the wheel nut
wrench clockwise. As the jack begins to raise
the vehicle, double check that it is properly
positioned and will not slip. If the jack is on soft
ground or sand, place a board, brick, flat stone
or other object under the base of the jack to keep
it from sinking.
Raise the car high enough so that the fully
inflated spare tire can be installed. To do this,
you will need more ground clearance than is
required to remove the flat tire.
D060D01Y
HFC4022
Wrench bar
Wheel nut wrench
HEF-111A
Page 139 of 205

WHAT TO DO IN AN EMERGENCY 3- 9
D080A01A-AATIF YOUR CAR MUST BE TOWEDD060I01Y-AAT8. Lower Vehicle and Tighten NutsD060J01A-AATAfter Changing Wheels
Lower the car to the ground by turning the jack
handle counterclockwise. Then position the
wrench as shown in the drawing and tighten the
wheel nuts. Be sure the socket is seated com-
pletely over the nut. Do not stand on the wrench
handle or use an extension pipe over the wrench
handle.
Go around the wheel tightening every other nut
until they are all tight. Then double-check each
nut for tightness and reinstall the wheel cover.
After changing wheels, have a technician tighten
the wheel nuts to their proper torque as soon as
possible.
Wheel nut tightening torque:Steel wheel & aluminium alloy wheel:
65-80 lb.ft (900-1,100 kg.cm)If you have a tire gauge, remove the valve cap
and check the air pressure. If the pressure is
lower than recommended, drive slowly to the
nearest service station and inflate to the correct
pressure. If it is too high, adjust it until it is correct.
Always reinstall the valve cap after checking or
adjusting tire pressure. If the cap is not re-
placed, air may leak from the tire. If you lose a
valve cap, buy another and install it as soon as
possible.
After you have changed wheels, always secure
the flat tire in its place in the trunk and return the
jack, jack handle, and tools to their proper
storage locations.
CAUTION:Your car can be damaged if towed incor-
rectly!
If your car has to be towed, it should be done by
your Hyundai dealer or a commercial tow truck
service. This will help assure that your car is not
damaged in towing. Also, professionals are
generally aware of state and local laws govern-
ing towing. In any case, rather than risk damage
to your car, it is suggested that you show this
information to the tow truck operator. Be sure
that a safety chain system is used and that all
state and local laws are observed.
!
o OK FOR AUTOMATIC OR MANUAL
TRANSAXLE EQUIPPED VEHICLE
D060D02Y
D040B01YHEF-209
Page 161 of 205
6- 6 DO-IT-YOURSELF MAINTENANCE
!WARNING:Be very careful when draining the engine oil
as it may be hot enough to burn you!
G040A02A-AATCHANGING THE OIL AND FILTERG030D01A-AATAdding Oil
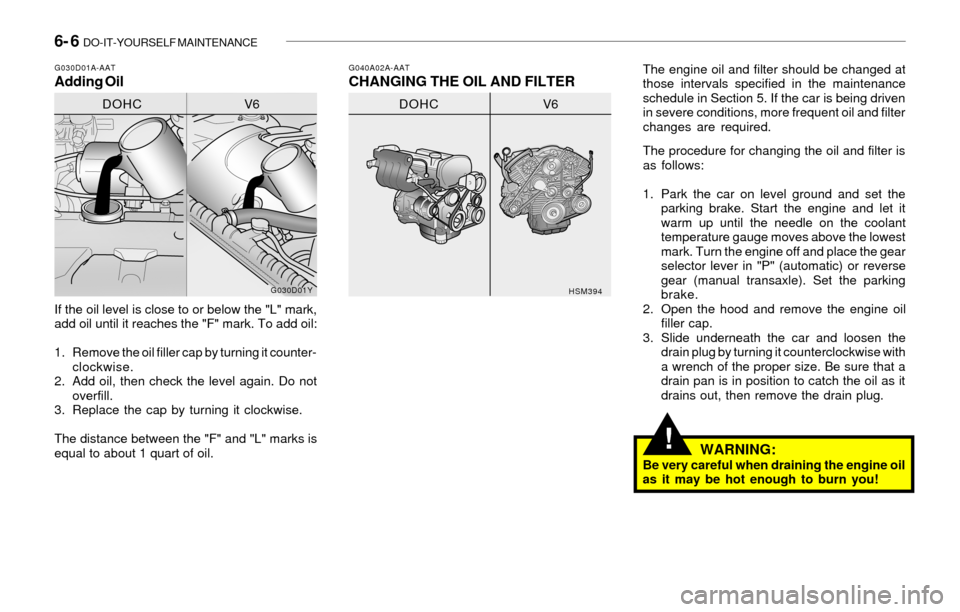
If the oil level is close to or below the "L" mark,
add oil until it reaches the "F" mark. To add oil:
1. Remove the oil filler cap by turning it counter-
clockwise.
2. Add oil, then check the level again. Do not
overfill.
3. Replace the cap by turning it clockwise.
The distance between the "F" and "L" marks is
equal to about 1 quart of oil.The engine oil and filter should be changed at
those intervals specified in the maintenance
schedule in Section 5. If the car is being driven
in severe conditions, more frequent oil and filter
changes are required.
The procedure for changing the oil and filter is
as follows:
1. Park the car on level ground and set the
parking brake. Start the engine and let it
warm up until the needle on the coolant
temperature gauge moves above the lowest
mark. Turn the engine off and place the gear
selector lever in "P" (automatic) or reverse
gear (manual transaxle). Set the parking
brake.
2. Open the hood and remove the engine oil
filler cap.
3. Slide underneath the car and loosen the
drain plug by turning it counterclockwise with
a wrench of the proper size. Be sure that a
drain pan is in position to catch the oil as it
drains out, then remove the drain plug.
G030D01Y
HSM394
DOHC V6DOHC V6
Page 162 of 205
DO-IT-YOURSELF MAINTENANCE 6- 7
!
!
4. When the oil has stopped draining, replace
the drain plug using a new washer and
retighten by turning it clockwise.
Tightening torque is: 3.5 ~ 4.5 kgf.m
5. Remove the oil filter by turning it counter-
clockwise with a oil filter wrench of the proper
size. A certain amount of oil will come out
when you remove the filter. So be sure to
have your drain pan in place underneath it.
6. Install a new oil filter in accordance with the
instructions on the carton or on the filter itself.
Do not over-tighten.
Tightening torque is: 1.2 ~ 1.6 kgf.m
Be sure that the mounting surface on the
engine is clean and that the old gasket is
removed completely. Lubricate the new
gasket on the filter with clean engine oil
before installation.
7. Refill the crankcase with the recommended
engine oil. Refer to the specification in chap-
ter 9 for engine oil capacity.
8. Start the engine and check to be sure no oil
is leaking from the drain plug or oil filter.
9. Shut off the engine and recheck the oil level.G050A01A-AATCHECKING AND CHANGING THE EN-
GINE COOLANT
WARNING:
Do not remove the radiator cap when the
engine is hot. When the engine is hot, the
engine coolant is under pressure and may
erupt through the opening if the cap is
removed. You could be seriously burned if
you do not observe this precaution. Do not
remove the radiator cap until the radiator is
cool to the touch.
NOTE:Always dispose of used engine oil in an
environmentally acceptable manner. It is
suggested that it be placed in a sealed
container and taken to a service station for
reclamation. Do not pour the oil on the
ground or put it into the household trash.
WARNING:Used motor oil may cause irritation or can-
cer of the skin if left in contact with the skin
for prolonged periods of time. Wash your
hands thoroughly with soap and warm
water as soon as possible after handling
used oil.
Page 164 of 205

DO-IT-YOURSELF MAINTENANCE 6- 9
!
4. Turn the radiator cap counterclockwise with-
out pressing down on it, until it stops. This
relieves any pressure remaining in the cool-
ing system. And remove the radiator cap by
pushing down and turning counterclock-
wise.
Now fill the radiator with clean demineralized
or distilled water. Continue to add clean
demineralized or distilled water in small quan-
tities until the fluid level stays up in the
radiator neck.
5. Start the engine, top off the radiator with
water and then add coolant to the reservoir
until the level is between "L" and "F".
6. Replace the radiator and reservoir caps and
check to be sure the drain cocks are fully
closed and not leaking.G060A02Y-AATSPARK PLUGS
Your engine was originally equipped with plati-
num-tipped spark plugs.
Platinum-tipped spark plugs will last longer than
conventional type spark plugs and can be
identified by blue lines on the ceramic shell.
NOTE:Do not clean or regap platinum-tipped spark
plugs.
WARNING:The cooling fan is controlled by engine
coolant temperature and may sometimes
operate even when the engine is not run-
ning. Use extreme caution when working
near the blades of the coolant fan so that
you are not injured by a rotating fan blade.
As the engine coolant temperature de-
creases, the fan will automatically shut off.
This is a normal condition.
HSM392G060B04Y-AAT
Replacing the Spark PlugsThe spark plugs should be changed at the
intervals specified in the vehicle maintenance
schedule in Section 5 or whenever engine
performance indicates they should be changed.
Symptoms that suggest poor spark plug perfor-
mance include engine misfiring under load, loss
of fuel economy, poor acceleration, etc. When
spark plugs are replaced, always use spark
plugs recommended by Hyundai. The use of
other spark plugs can result in loss of perfor-
mance, radio interference or engine damage.
NOTE:When replacing the spark plugs, always use
the genuine parts recommended.
Recommended Spark Plugs:
Type
RN10PYP4 (CHAMPION)
PGR5C-11 (NGK)
RC10PYB4 (CHAMPION)
PFR5N-11 (NGK)Remark
For 2.4L only
For 2.7L only
DOHC V6
0.1~1.1 mm 0.1~1.1 mm