2003 Hyundai Sonata buttons
[x] Cancel search: buttonsPage 57 of 205
FEATURES OF YOUR HYUNDAI 1- 45
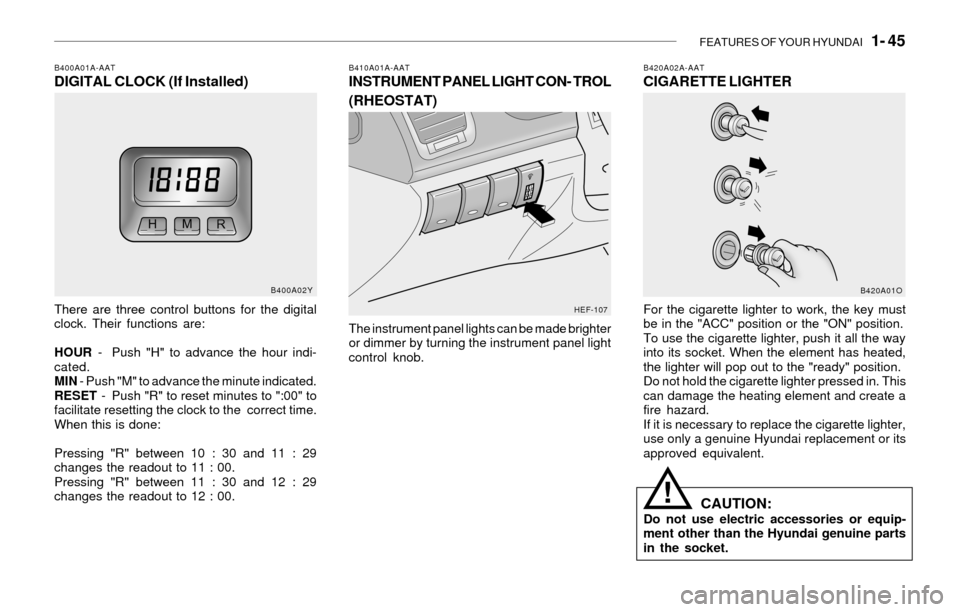
B420A02A-AATCIGARETTE LIGHTER
For the cigarette lighter to work, the key must
be in the "ACC" position or the "ON" position.
To use the cigarette lighter, push it all the way
into its socket. When the element has heated,
the lighter will pop out to the "ready" position.
Do not hold the cigarette lighter pressed in. This
can damage the heating element and create a
fire hazard.
If it is necessary to replace the cigarette lighter,
use only a genuine Hyundai replacement or its
approved equivalent.
CAUTION:Do not use electric accessories or equip-
ment other than the Hyundai genuine parts
in the socket.
!
B410A01A-AATINSTRUMENT PANEL LIGHT CON- TROL
(RHEOSTAT)
The instrument panel lights can be made brighter
or dimmer by turning the instrument panel light
control knob.
B400A01A-AATDIGITAL CLOCK (If Installed)
There are three control buttons for the digital
clock. Their functions are:
HOUR - Push "H" to advance the hour indi-
cated.
MIN - Push "M" to advance the minute indicated.
RESET - Push "R" to reset minutes to ":00" to
facilitate resetting the clock to the correct time.
When this is done:
Pressing "R" between 10 : 30 and 11 : 29
changes the readout to 11 : 00.
Pressing "R" between 11 : 30 and 12 : 29
changes the readout to 12 : 00.
B400A02Y
HEF-107B420A01O
Page 61 of 205
FEATURES OF YOUR HYUNDAI 1- 49
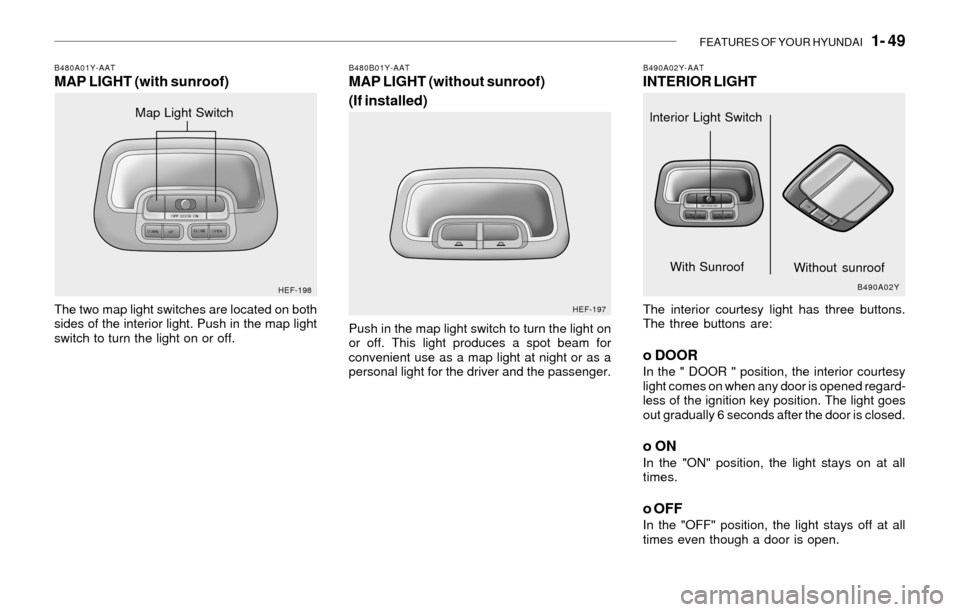
B490A02Y-AATINTERIOR LIGHT
The interior courtesy light has three buttons.
The three buttons are:
o DOORIn the " DOOR " position, the interior courtesy
light comes on when any door is opened regard-
less of the ignition key position. The light goes
out gradually 6 seconds after the door is closed.
o ONIn the "ON" position, the light stays on at all
times.
o OFFIn the "OFF" position, the light stays off at all
times even though a door is open.
B480B01Y-AATMAP LIGHT (without sunroof)
(If installed)
Push in the map light switch to turn the light on
or off. This light produces a spot beam for
convenient use as a map light at night or as a
personal light for the driver and the passenger.
B480A01Y-AATMAP LIGHT (with sunroof)
The two map light switches are located on both
sides of the interior light. Push in the map light
switch to turn the light on or off.
HEF-198
HEF-197B490A02Y
Map Light Switch
lnterior Light Switch
With Sunroof
Without sunroof
Page 65 of 205

FEATURES OF YOUR HYUNDAI 1- 53
Indicator Light
B520C01L-GATHOMELINK MIRROR (If installed)
Your new vehicle may be equipped with an
automatic night vision mirror. During nighttime
driving, this feature will automatically detect and
reduce dangerous rearview mirror glare.
Your new mirror also comes with an integrated
HomeLink Universal Transceiver, which allows
you to program the mirror to activate your
garage door(s), estate gate, home lighting, etc.
The mirror actually learns the codes from your
various existing transmitters.
Automatic-Dimming Function
To assist you during nighttime driving, your
mirror will automatically dim upon detecting
glare from the vehicles behind you.
Press the button to turn the automatic-
dimming function off. The mirror indicator light
will turn off.
Press the button to turn the automatic-
dimming function on. The mirror indicator light
will illuminate.
NOTE:The mirror defaults to the "on" position
each time the vehicle is started.
B520C01LB520C01L
Glare Detection
Homelink buttons
Automatic-dimming mirror
function buttons
!
!
HOMELINK PROGRAMMING
CAUTION:
o Make sure people and/or objects are out
of the way of any garage doors or gates
you may be operating during the pro-
gramming procedures.
o Keep original transmitters for potential
future programming needs, or in case
you sell the vehicle.
o In the event you do sell your vehicle, it's
recommended you erase your pro-
grammed HomeLink mirror buttons.
WARNING:Do not use HomeLink with any garage door
opener that lacks the safety stop and re-
verse feature as required by federal safety
standards (includes garage doors manu-
factured before April 1, 1982), as these
doors can increase the risk of serious injury
or death. Call 1-800-355-3515 or visit
www.homelink.com for more information.
NOTE:If programming a garage door opener or
gate, it is advised to unplug the device
during the "cycling" process to prevent
possible motor burnout.
Page 66 of 205
1- 54 FEATURES OF YOUR HYUNDAI
Flashing
Programming
Your vehicle may require that the ignition switch
to be turned to the "ACC" position to program
and/or operate HomeLink system. It is also
recommended that a new battery be placed in
the handheld transmitter of the device being
programmed to HomeLink for quicker program-
ming and accurate transmission of the radio-
frequency.
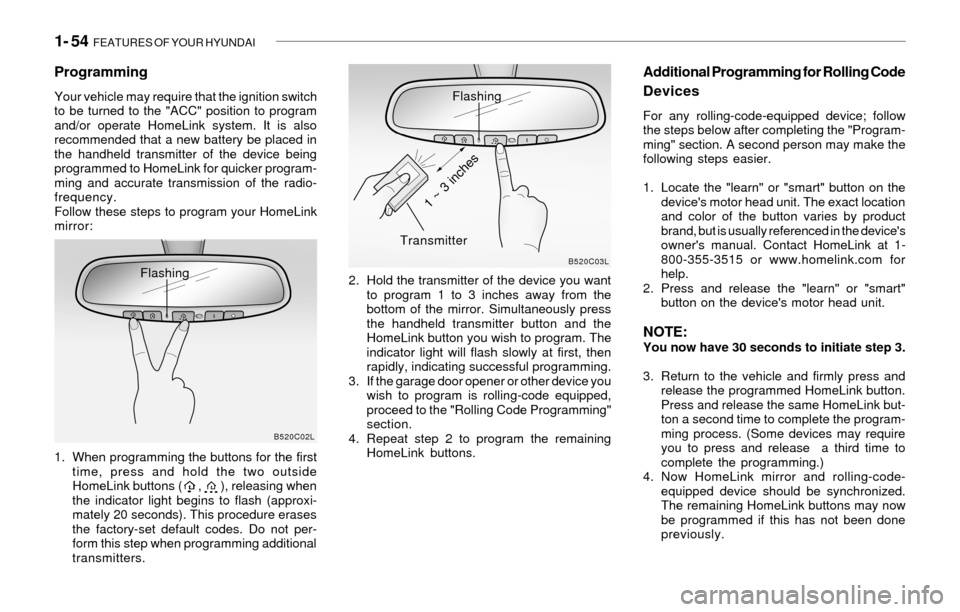
Follow these steps to program your HomeLink
mirror:
1. When programming the buttons for the first
time, press and hold the two outside
HomeLink buttons ( , ), releasing when
the indicator light begins to flash (approxi-
mately 20 seconds). This procedure erases
the factory-set default codes. Do not per-
form this step when programming additional
transmitters.2. Hold the transmitter of the device you want
to program 1 to 3 inches away from the
bottom of the mirror. Simultaneously press
the handheld transmitter button and the
HomeLink button you wish to program. The
indicator light will flash slowly at first, then
rapidly, indicating successful programming.
3. If the garage door opener or other device you
wish to program is rolling-code equipped,
proceed to the "Rolling Code Programming"
section.
4. Repeat step 2 to program the remaining
HomeLink buttons.
Additional Programming for Rolling Code
Devices
For any rolling-code-equipped device; follow
the steps below after completing the "Program-
ming" section. A second person may make the
following steps easier.
1. Locate the "learn" or "smart" button on the
device's motor head unit. The exact location
and color of the button varies by product
brand, but is usually referenced in the device's
owner's manual. Contact HomeLink at 1-
800-355-3515 or www.homelink.com for
help.
2. Press and release the "learn" or "smart"
button on the device's motor head unit.
NOTE:You now have 30 seconds to initiate step 3.
3. Return to the vehicle and firmly press and
release the programmed HomeLink button.
Press and release the same HomeLink but-
ton a second time to complete the program-
ming process. (Some devices may require
you to press and release a third time to
complete the programming.)
4. Now HomeLink mirror and rolling-code-
equipped device should be synchronized.
The remaining HomeLink buttons may now
be programmed if this has not been done
previously.
B520C02LB520C03L
Flashing
Transmitter
1 ~ 3 inches
Page 67 of 205
FEATURES OF YOUR HYUNDAI 1- 55
Operating HomeLink
Simply press the appropriate HomeLink button
to activate the trained product (garage door,
security system, entry door lock, estate gate,
lighting, etc.). The original handheld transmit-
ters may also be used at any time.
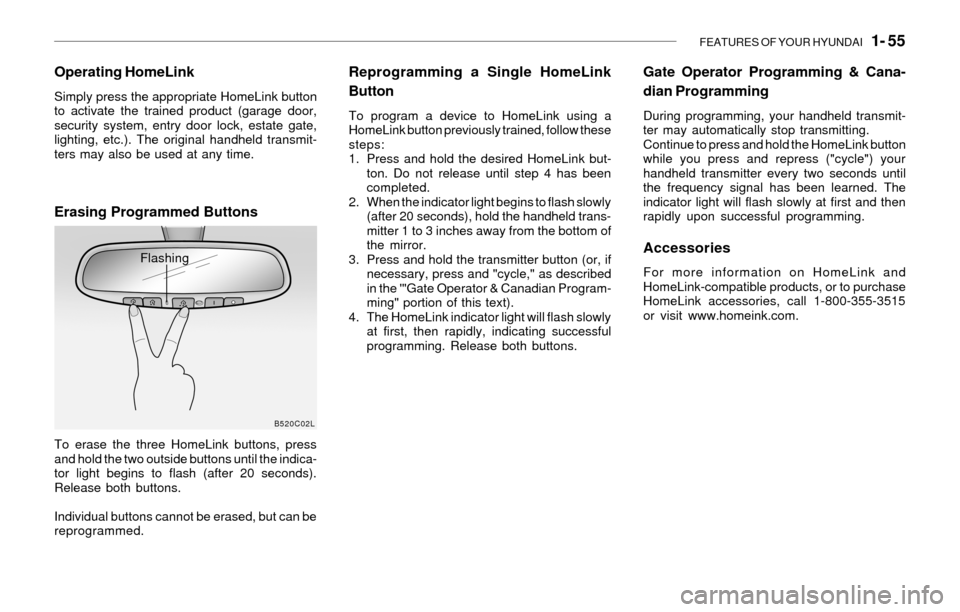
Erasing Programmed Buttons
To erase the three HomeLink buttons, press
and hold the two outside buttons until the indica-
tor light begins to flash (after 20 seconds).
Release both buttons.
Individual buttons cannot be erased, but can be
reprogrammed.
Reprogramming a Single HomeLink
Button
To program a device to HomeLink using a
HomeLink button previously trained, follow these
steps:
1. Press and hold the desired HomeLink but-
ton. Do not release until step 4 has been
completed.
2. When the indicator light begins to flash slowly
(after 20 seconds), hold the handheld trans-
mitter 1 to 3 inches away from the bottom of
the mirror.
3. Press and hold the transmitter button (or, if
necessary, press and "cycle," as described
in the '"Gate Operator & Canadian Program-
ming" portion of this text).
4. The HomeLink indicator light will flash slowly
at first, then rapidly, indicating successful
programming. Release both buttons.
B520C02L
Flashing
Gate Operator Programming & Cana-
dian Programming
During programming, your handheld transmit-
ter may automatically stop transmitting.
Continue to press and hold the HomeLink button
while you press and repress ("cycle") your
handheld transmitter every two seconds until
the frequency signal has been learned. The
indicator light will flash slowly at first and then
rapidly upon successful programming.
Accessories
For more information on HomeLink and
HomeLink-compatible products, or to purchase
HomeLink accessories, call 1-800-355-3515
or visit www.homeink.com.
Page 86 of 205
1- 74 FEATURES OF YOUR HYUNDAI
HEF-024
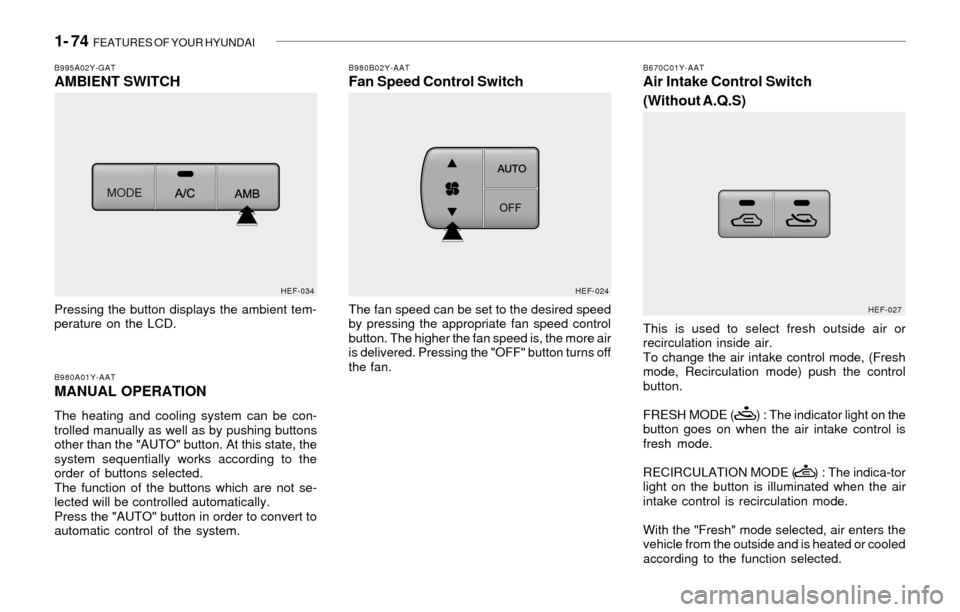
B980B02Y-AATFan Speed Control Switch
The fan speed can be set to the desired speed
by pressing the appropriate fan speed control
button. The higher the fan speed is, the more air
is delivered. Pressing the "OFF" button turns off
the fan.
B670C01Y-AATAir Intake Control Switch
(Without A.Q.S)
This is used to select fresh outside air or
recirculation inside air.
To change the air intake control mode, (Fresh
mode, Recirculation mode) push the control
button.
FRESH MODE ( ) : The indicator light on the
button goes on when the air intake control is
fresh mode.
RECIRCULATION MODE ( ) : The indica-tor
light on the button is illuminated when the air
intake control is recirculation mode.
With the "Fresh" mode selected, air enters the
vehicle from the outside and is heated or cooled
according to the function selected.
B995A02Y-GATAMBIENT SWITCH
B980A01Y-AATMANUAL OPERATION
The heating and cooling system can be con-
trolled manually as well as by pushing buttons
other than the "AUTO" button. At this state, the
system sequentially works according to the
order of buttons selected.
The function of the buttons which are not se-
lected will be controlled automatically.
Press the "AUTO" button in order to convert to
automatic control of the system. Pressing the button displays the ambient tem-
perature on the LCD.
HEF-034
HEF-027
Page 92 of 205
1- 80 FEATURES OF YOUR HYUNDAI
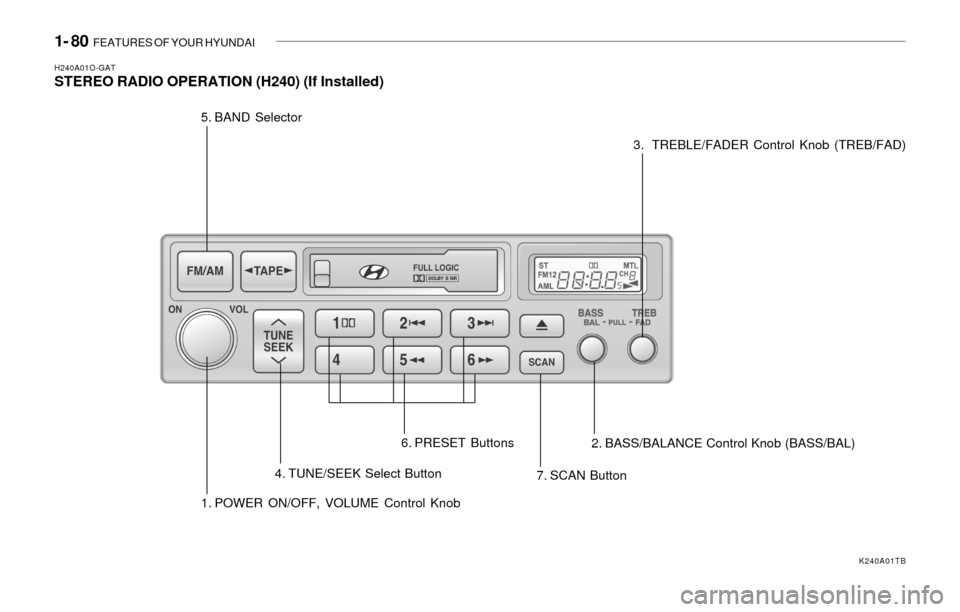
H240A01O-GATSTEREO RADIO OPERATION (H240) (If Installed)
1. POWER ON/OFF, VOLUME Control Knob 5. BAND Selector
4. TUNE/SEEK Select Button
7. SCAN Button 6. PRESET Buttons
2. BASS/BALANCE Control Knob (BASS/BAL)3. TREBLE/FADER Control Knob (TREB/FAD)
K240A01TB
Page 93 of 205

FEATURES OF YOUR HYUNDAI 1- 81
H240B03O-GAT1. POWER ON-OFF Control Knob
The radio unit may be operated when the ignition
key is in the "ACC" or "ON" position. Press the
knob to switch the power on. The LCD shows
the radio frequency in the radio mode or the tape
direction indicator in the tape mode. To switch
the power off, press the knob again.
VOLUME Control
Rotate the knob clockwise to increase the
volume and turn the knob counterclockwise to
reduce the volume.
2. BASS Control Knob
Press to pop the knob out and turn to the left or
right for the desired bass tone.
BAL (Balance Control) Knob
Pull the bass control knob further out. Turn the
control knob clockwise to emphasize right
speaker sound. (Left speaker sound will be
attenuated)
When the control knob is turned counterclock-
wise, left speaker sound will be emphasized.
(Right speaker sound will be attenuated)
3. TREB (Treble Control) Knob
Press to pop the knob out and turn to the left or
right for the desired treble tone.
FAD (Fader Control) Knob
Pull the treble control knob further out.
Turn the control knob counterclockwise to
emphasize front speaker sound. (Rear speaker
sound will be attenuated)
When the control knob is turned clockwise, rear
speaker sound will be emphasized.
(Front speaker sound will be attenuated)
4. TUNE (Manual) Select Button
Press the side or side to increase or to decrease
the frequency. Press either button and hold
down to continuously scroll. Release button
once the desired station is reached.
SEEK Operation
(Automatic Channel Selection)
Press the TUNE select button 1 sec or
more.Releasing will automatically tune to the
next available station with a beep sound.
When the ( ) side is pressed longer than 1
second, releasing will automatically tune to the
next higher frequency and when the ( ) side
is pressed longer than 1 second, releasing will
automatically tune to the next lower frequency.
5. BAND Selector
Pressing the button changes the AM, FM1
and FM2 bands. The mode selected is dis-
played on LCD.
6. PRESET STATION SELECT Button
Six (6) stations for AM, FM and FM2 respec-
tively can be preset in the electronic memory
circuit on this unit.
HOW TO PRESET STATIONS
Six AM and twelve FM stations may be pro-
grammed into the memory of the radio. Then, by
simply pressing the band select button and/or
one of the six station select buttons, you may
recall any of these stations instantly. To pro-
gram the stations, follow these steps:
o Press band selector to set the band for AM,
FM, or FM2.
o Select the desired station to be stored by
seek or manual tuning.
o Determine the preset station select button
you wish to use to access that station.
FM/AM