2003 Hyundai Santa Fe BELOW
[x] Cancel search: BELOWPage 8 of 221
A100A03A-AATGuide to Hyundai Genuine Parts1. What are Hyundai Genuine Parts?
Hyundai Genuine Parts are the same parts
used by Hyundai Motor Company to manu-
facture vehicles. They are designed and
tested for the optimum safety, performance,
and reliability to our customers.
2. Why should you use genuine parts?
Hyundai Genuine Parts are engineered and
built to meet rigid original manufacturing
requirements. Using imitation, counterfeit or
used salvage parts is not covered under the
Hyundai New Vehicle Limited Warranty or
any other Hyundai warranty. In addition, any
damage to or failure of Genuine Hyundai
Parts caused by the installation or failure ofan imitation, counterfeit or used salvage part
is not covered by any Hyundai Warranty.
3. How can you tell if you are purchasing
Hyundai Genuine Parts?
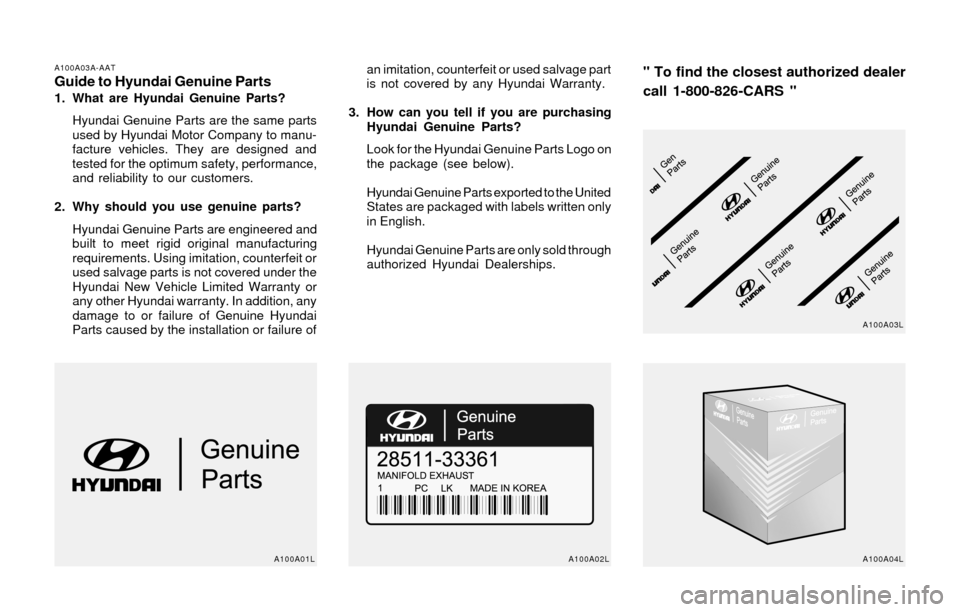
Look for the Hyundai Genuine Parts Logo on
the package (see below).
Hyundai Genuine Parts exported to the United
States are packaged with labels written only
in English.
Hyundai Genuine Parts are only sold through
authorized Hyundai Dealerships.
" To find the closest authorized dealer
call 1-800-826-CARS "
A100A01L A100A02L A100A04LA100A03L
Page 19 of 221
FEATURES OF YOUR HYUNDAI 1- 7
B040G01O-AATCentral Door Locks (If installed)
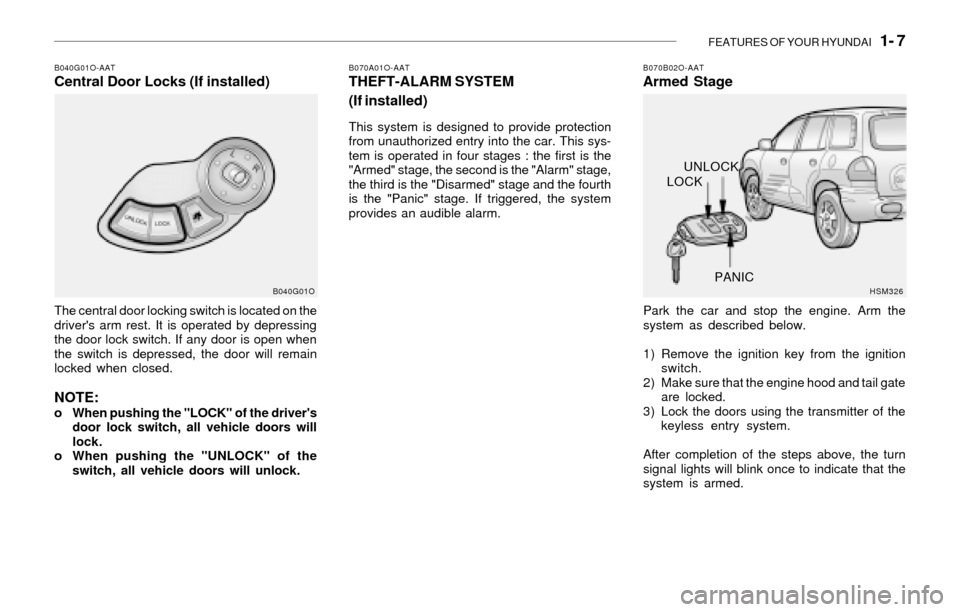
The central door locking switch is located on the
driver's arm rest. It is operated by depressing
the door lock switch. If any door is open when
the switch is depressed, the door will remain
locked when closed.
NOTE:o When pushing the "LOCK" of the driver's
door lock switch, all vehicle doors will
lock.
o When pushing the "UNLOCK" of the
switch, all vehicle doors will unlock.
B040G01O
B070A01O-AATTHEFT-ALARM SYSTEM
(If installed)
This system is designed to provide protection
from unauthorized entry into the car. This sys-
tem is operated in four stages : the first is the
"Armed" stage, the second is the "Alarm" stage,
the third is the "Disarmed" stage and the fourth
is the "Panic" stage. If triggered, the system
provides an audible alarm.
B070B02O-AATArmed Stage
Park the car and stop the engine. Arm the
system as described below.
1) Remove the ignition key from the ignition
switch.
2) Make sure that the engine hood and tail gate
are locked.
3) Lock the doors using the transmitter of the
keyless entry system.
After completion of the steps above, the turn
signal lights will blink once to indicate that the
system is armed.
HSM326
LOCKUNLOCK
PANIC
Page 42 of 221
1- 30 FEATURES OF YOUR HYUNDAI
!
!
WARNING:
WARNING:o If the airbags deploy, they must be re-
placed by an authorized Hyundai dealer.
o Do not tamper with or disconnect SRS
wiring, or other components of the SRS
system. Doing so could result in injury,
due to accidental firing of the airbags or
by rendering the SRS inoperative.
o Do not install a child restraint system in
the front passenger seat position. A
child restraint system must never be
placed in the front seat. The infant or
child could be severely injured or killed
by an airbag deployment in case of an
accident. Do not allow children to ride in
the front passanger seat. If older chil-
dren (teenagers and older) must ride in
the front seat, make sure they are always
propely belted and that the seat is moved
back as far as possible.
o For maximum safety protection in all
types of crashes, all occupants includ-
ing the driver should always wear their
seat belts whether or not an airbag is
also provided at their seating position to
minimize the risk of severe injury or
death in the event of a crash. Do not sit
or lean unnecessarily close to the airbag
while the vehicle is in motion.
B240D01O
Side impactRear impact
Rollover
NOTE:Be sure to read information about the SRS
on the labels provided on the backside of
the sun visor and in the glove box.
WARNING:o As its name implies, the SRS is designed
to work with, and be supplemental to,
the driver's and the passenger's three
point seat belt systems and is not a
substitute for them. Therefore, your seat
belts must be worn at all times while the
vehicle is in motion. The airbags deploy
only in certain frontal impact conditions
severe enough to likely cause signifi-
cant injury to the vehicle occupants.
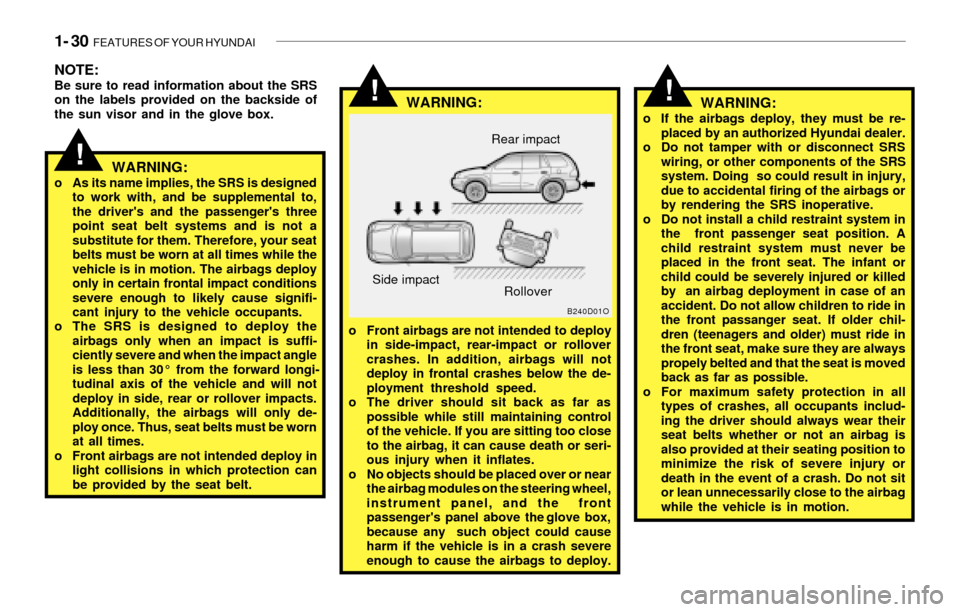
o The SRS is designed to deploy the
airbags only when an impact is suffi-
ciently severe and when the impact angle
is less than 30° from the forward longi-
tudinal axis of the vehicle and will not
deploy in side, rear or rollover impacts.
Additionally, the airbags will only de-
ploy once. Thus, seat belts must be worn
at all times.
o Front airbags are not intended deploy in
light collisions in which protection can
be provided by the seat belt.o Front airbags are not intended to deploy
in side-impact, rear-impact or rollover
crashes. In addition, airbags will not
deploy in frontal crashes below the de-
ployment threshold speed.
o The driver should sit back as far as
possible while still maintaining control
of the vehicle. If you are sitting too close
to the airbag, it can cause death or seri-
ous injury when it inflates.
o No objects should be placed over or near
the airbag modules on the steering wheel,
instrument panel, and the front
passenger's panel above the glove box,
because any such object could cause
harm if the vehicle is in a crash severe
enough to cause the airbags to deploy.
!
Page 51 of 221

FEATURES OF YOUR HYUNDAI 1- 39
B260L01Y-AATDoor Ajar Warning Light
and Chime
The door ajar warning light warns you that a door
is not completely closed and the chime warns
you that driver's side front door is not completely
closed.
NOTE:To remind you not to lock the key inside the
car, the warning light comes on whenever
the key is in the "LOCK" position and a door
is open. The warning chime only sounds
whenever the key is in the "LOCK" position
and driver's side front door is open. The
chime sounds and the light remains on
until the key is removed from the ignition.
!
B260M01A-AATLow Fuel Level Warning Light
The low fuel level warning light comes on when
the fuel tank is approaching empty. When it
comes on, you should add fuel as soon as
possible. Driving with the fuel level warning light
on or with the fuel level below "E" can cause the
engine to misfire and damage the catalytic
converter.
B260N01A-AATMalfunction Indicator Light
This light illuminates when there is a malfunction
of an exhaust gas related component, and the
system is not functioning properly so that the
exhaust gas regulation values are not satisfied.
This light will also illuminate when the ignition key
is turned to the "ON" position, and will go out in
a few seconds. If it illuminates while driving, or
does not illuminate when the ignition key is
turned to the "ON" position, take your car to your
nearest authorized Hyundai dealer and have
the system checked.
B260P02Y-GATABS Service Reminder
Indicator (If installed)
When the key is turned to the "ON" position, the
Anti-Lock Brake System will come on and then
go off in a few seconds. If the ABS SRI remains
on, comes on while driving, or does not come on
when the key is turned to the "ON" position, this
indicates that there may be a problem with the
ABS.
If this occurs, have your vehicle checked by
your Hyundai dealer as soon as possible. The
normal braking system will still be operational,
but without the assistance of the anti-lock brake
system.
WARNING:If both ABS SRI and Parking Brake/Brake
fluid level warning lights remain "ON" or
come on while driving, there may be a
problem with E.B.D (Electronic Brake Force
Distribution).
If this occurs, avoid sudden stops and have
your vehicle checked by your Hyundai dealer
as soon as possible.
B260C01O-GATTraction Control Indicator
Light (If installed)
The traction control indicator change operation
according to the ignition switch position and
whether or not the system is in operation.
They will also illuminate when the ignition key is
turned to the "ON" position, but should go out
after the engine starts. If the TCS indicator stays
on, take your car to your authorized Hyundai
dealer and have the system checked. See
section 2 for more information about the TCS.
Page 69 of 221
FEATURES OF YOUR HYUNDAI 1- 57
Flashing
Programming
Your vehicle may require that the ignition switch
to be turned to the "ACC" position to program
and/or operate HomeLink system. It is also
recommended that a new battery be placed in
the handheld transmitter of the device being
programmed to HomeLink for quicker program-
ming and accurate transmission of the radio-
frequency.
Follow these steps to program your HomeLink
mirror:
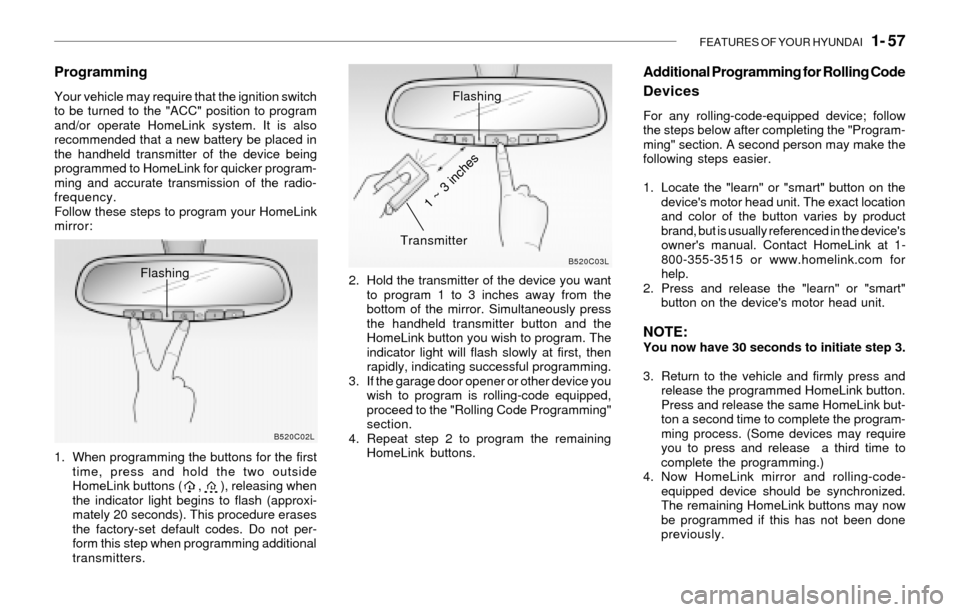
1. When programming the buttons for the first
time, press and hold the two outside
HomeLink buttons ( , ), releasing when
the indicator light begins to flash (approxi-
mately 20 seconds). This procedure erases
the factory-set default codes. Do not per-
form this step when programming additional
transmitters.2. Hold the transmitter of the device you want
to program 1 to 3 inches away from the
bottom of the mirror. Simultaneously press
the handheld transmitter button and the
HomeLink button you wish to program. The
indicator light will flash slowly at first, then
rapidly, indicating successful programming.
3. If the garage door opener or other device you
wish to program is rolling-code equipped,
proceed to the "Rolling Code Programming"
section.
4. Repeat step 2 to program the remaining
HomeLink buttons.
B520C02LB520C03L
Flashing
Transmitter
1 ~ 3 inches
Additional Programming for Rolling Code
Devices
For any rolling-code-equipped device; follow
the steps below after completing the "Program-
ming" section. A second person may make the
following steps easier.
1. Locate the "learn" or "smart" button on the
device's motor head unit. The exact location
and color of the button varies by product
brand, but is usually referenced in the device's
owner's manual. Contact HomeLink at 1-
800-355-3515 or www.homelink.com for
help.
2. Press and release the "learn" or "smart"
button on the device's motor head unit.
NOTE:You now have 30 seconds to initiate step 3.
3. Return to the vehicle and firmly press and
release the programmed HomeLink button.
Press and release the same HomeLink but-
ton a second time to complete the program-
ming process. (Some devices may require
you to press and release a third time to
complete the programming.)
4. Now HomeLink mirror and rolling-code-
equipped device should be synchronized.
The remaining HomeLink buttons may now
be programmed if this has not been done
previously.
Page 95 of 221
FEATURES OF YOUR HYUNDAI 1- 83
When the "Defrost" button is pressed, the "Fresh"
mode will be automatically selected and the air
will be discharged through the windshield de-
froster nozzle, side defroster nozzle and side
ventilator.
To assist in defrosting, the air conditioning will
operate if ambient temperature is higher than
38.3°F(3.5°C) and automatically turns off if the
ambient temperature drops below
38.3°F(3.5°C).B740D01Y-AATOperation Tips
o If the interior of the car is hot when you first
get in, open the windows for a few minutes
to expel the hot air.
o When you are using the air conditioning
system, keep all windows closed to keep hot
air out.
o When moving slowly, as in heavy traffic, shift
to a lower gear. This increases engine speed,
which in turn increases the speed of the air
conditioning compressor.
o On steep grades, turn the air conditioning off
to avoid the possibility of the engine over-
heating.
o During winter months or in periods when the
air conditioning is not used regularly, run the
air conditioning once every month for a few
minutes. This will help circulate the lubri-
cants and keep your system in peak oper-
ating condition.
Page 103 of 221
FEATURES OF YOUR HYUNDAI 1- 91
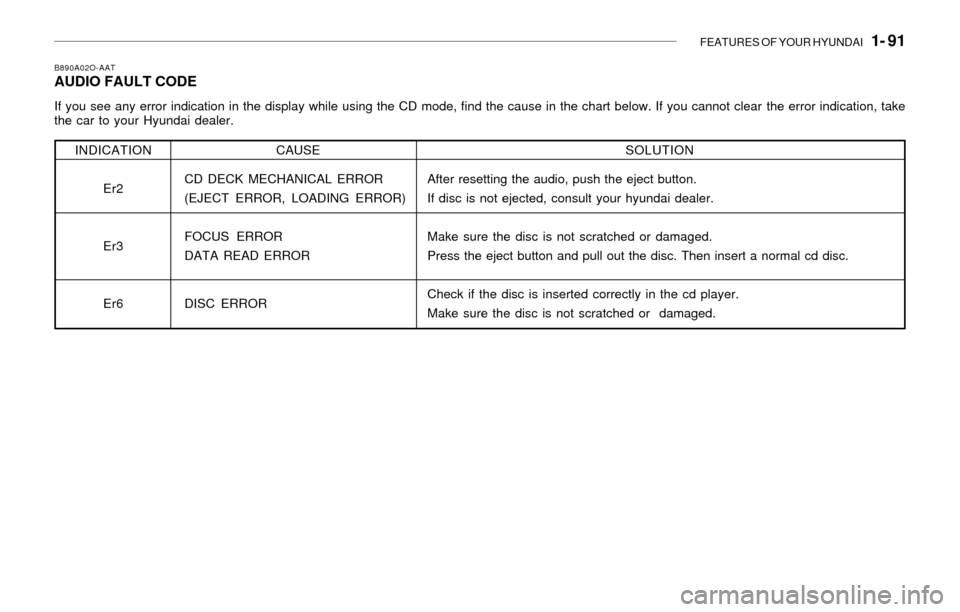
B890A02O-AATAUDIO FAULT CODE
If you see any error indication in the display while using the CD mode, find the cause in the chart below. If you cannot clear the error indication, take
the car to your Hyundai dealer.
SOLUTION
After resetting the audio, push the eject button.
If disc is not ejected, consult your hyundai dealer.
Make sure the disc is not scratched or damaged.
Press the eject button and pull out the disc. Then insert a normal cd disc.
Check if the disc is inserted correctly in the cd player.
Make sure the disc is not scratched or damaged. INDICATION
Er2
Er3
Er6CAUSE
CD DECK MECHANICAL ERROR
(EJECT ERROR, LOADING ERROR)
FOCUS ERROR
DATA READ ERROR
DISC ERROR
Page 131 of 221
DRIVING YOUR HYUNDAI 2- 9
!!
o Before driving away from a stop on a
slippery road, push the selector lever
forward into the +(UP) position. This
causes the transaxle to shift into 2nd
gear which is better for smooth driving
away on a slippery road. Push the selec-
tor lever to the -(DOWN) side to shift
back to 1st gear.
CAUTION:o In sports mode, The driver must execute
upward shifts in accordance with pre-
vailing road conditions, taking care to
keep the engine speed below the red
zone.
o For engine protection, upward shifts are
made automatically when the engine
rpm reaches the red zone.
o By rapidly moving the selector lever back-
wards (-) twice it is possible to skip one
gear, i.e., 3rd to 1st, 4th to 2nd. Since
sudden engine braking and/or rapid ac-
celeration can cause a loss of traction,
however, downshifts must be made care-
fully in accordance with the vehicle's
speed.
NOTE:o In sports mode, only the four forward
gears can be selected. To reverse or park
the vehicle, move the selector lever to
the "R" or "P" position as required.
o In sports mode, downward shifts are
made automatically when the vehicle
slows down. When the vehicle stops, 1st
gear is automatically selected.
o To maintain the required levels of ve-
hicle performance and safety, the sys-
tem may not execute certain gearshifts
when the selector lever is operated.
C090H01Y-AATNOTE:o For smooth and safe operation, depress
the brake pedal when shifting from "Neu-
tral" position or "Park" position to a
forward or reverse gear.
o The ignition key must be in the "ON"
position and the brake pedal fully de-
pressed in order to move the shift lever
from the "P" (Park) position to any of the
other positions.
o It is always possible to shift from "R",
"N", "D", "2", "3", L" position to "P"
position. The vehicle must be fully
stopped to avoid transaxle damage.
C090I01Y-AAT
CAUTION:o Shift into "R" and "P" position only when
the vehicle has completely stopped.
o Do not accelerate the engine in reverse
or any of the forward positions with the
brakes applied.
o Always apply the footbrake when shift-
ing from "P" or "N", to "R", "D", "2", "3"
or "L" position.
o Do not use the "P" (Park) position in
place of the parking brake. Always set
the parking brake, shift the transaxle
into "P" (Park) position and turn off the
ignition when you leave the vehicle, even
momentarily. Never leave the vehicle
unattended while the engine is running.
o Check the automatic transaxle fluid level
regularly, and add fluid as necessary.
See the maintenance for the proper fluid
recommendation.