2003 Hyundai Santa Fe Lever
[x] Cancel search: LeverPage 147 of 221
3- 2 WHAT TO DO IN AN EMERGENCY
!
!
D010A01A-AATIF THE ENGINE WILL NOT START
D010B02A-AATIf Engine Doesn't Turn Over or Turns
Over Slowly
D010C01Y-AATIf Engine Turns Over Normally but Does
Not Start
1. Check fuel level.
2. Check all connectors at ignition, coil and
spark plugs. Re-connect any that may be
disconnected or loose.
3. Check the fuel line in the engine room.
4. If engine still refuses to start, call a Hyundai
dealer or seek other qualified assistance.
D010D01A-AATIf Engine Stalls While Driving
1. Reduce your speed gradually, keeping a
straight line. Move cautiously off the road to
a safe place.
2. Turn on your emergency flashers.
3. Try to start the engine again. If your vehicle
will not start, contact a Hyundai dealer or
seek other qualified assistance.
WARNING:If the engine will not start, do not push or
pull the car to start it. This could result in a
collision or cause other damage. In addi-
tion, push or pull starting may cause the
catalytic converter to be overloaded and
create a fire hazard.
1. If your car has an automatic transaxle, be
sure the gear selector lever is in "N" or "P"
and the emergency brake is set.2. Check the battery connections to be sure
they are clean and tight.
3. Turn on the interior light. If the light dims or
goes out when you operate the starter, the
battery is discharged.
4. Check the starter connections to be sure
they are securely tightened.
5. Do not push or pull the vehicle to start it. See
instructions for "Jump Starting".
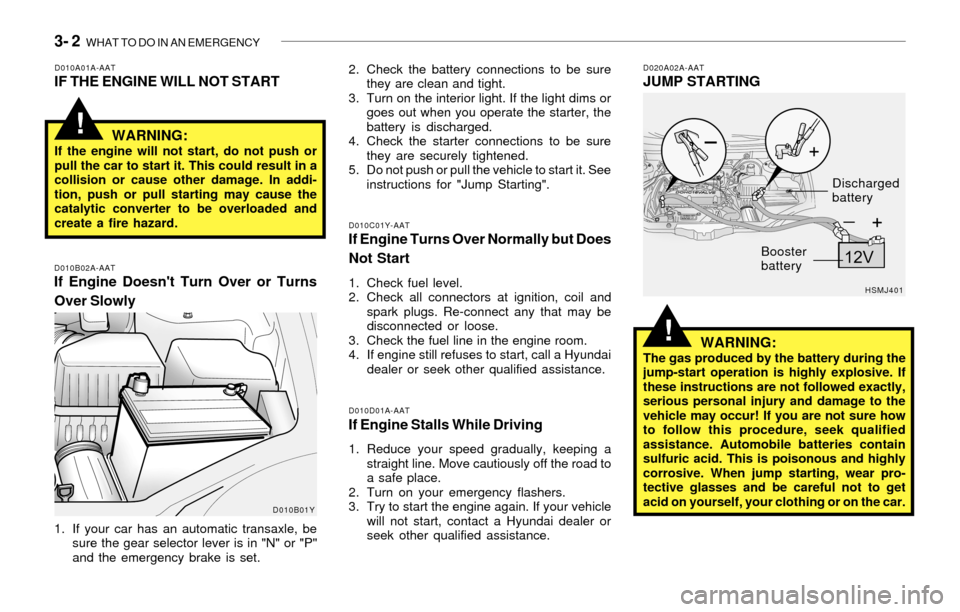
D020A02A-AATJUMP STARTING
WARNING:
The gas produced by the battery during the
jump-start operation is highly explosive. If
these instructions are not followed exactly,
serious personal injury and damage to the
vehicle may occur! If you are not sure how
to follow this procedure, seek qualified
assistance. Automobile batteries contain
sulfuric acid. This is poisonous and highly
corrosive. When jump starting, wear pro-
tective glasses and be careful not to get
acid on yourself, your clothing or on the car.
D010B01YHSMJ401
Booster
batteryDischarged
battery
Page 148 of 221
WHAT TO DO IN AN EMERGENCY 3- 3
o If you should accidentally get acid on your
skin or in your eyes, immediately remove
any contaminated clothing and flush the area
with clear water for at least 15 minutes. Then
promptly obtain medical attention. If you
must be transported to an emergency facil-
ity, continue to apply water to the affected
area with a sponge or cloth.
o The gas produced by the battery during the
jump-start operation is highly explosive. Do
not smoke or allow a spark or an open flame
in the vicinity.
o The battery being used to provide the jump
start must be 12-volt. If you cannot deter-
mine that it is a 12-volt battery, do not attempt
to use it for the jump start.
o To jump start a car with a discharged battery,
follow this procedure exactly:
1. If the booster battery is installed in another
vehicle, be sure the two vehicles are not
touching.
2. Turn off all unnecessary lights and acces-
sories in both vehicles.
3. Attach the clamps of the jumper cable in the
exact location shown on the illustration. First,
attach one clamp of the jumper cable to the
positive (+) post or cable of the discharged
battery. Then attach the other end of the
same cable to the positive (+) post or cable
of the booster battery. Next, using the other
cable, attach one clamp to the negative (-)
post or cable of the booster battery. Then
attach the other end of that cable to a solidmetal part of the engine away from the
battery. Do not connect the cable to any
moving part.
4. Start the engine in the car with the booster
battery and let it run for a few minutes. This
will help to assure that the booster battery is
fully charged. During the jumping operation,
run the engine in this vehicle at about 2,000
rpm.
5. Start the engine in the car with the dis-
charged battery using the normal starting
procedure. After the engine starts, leave the
jumper cables connected and let the engine
run at fast idle or about 2,000 rpm for several
minutes.
6. Carefully remove the jumper cables in the
reverse order of attachment.
If you do not know why your battery became
discharged (because the lights were left on,
etc.), have the charging system checked by
your Hyundai dealer.D030A01A-AATIF THE ENGINE OVERHEATS
If your temperature gauge indicates overheat-
ing, you experience a loss of power, or hear loud
pinging or knocking, the engine is probably too
hot. If this happens, you should:
1. Pull off the road and stop as soon as it is safe
to do so.
2. Place the gear selector lever in "P" (auto-
matic), or neutral (manual transaxle) and set
the parking brake. If the air conditioning is on,
turn it off.
3. If engine coolant is running out under the car
or steam is coming out from the hood, stop
the engine. Do not open the hood until the
coolant has stopped running or the steaming
has stopped. If there is no visible loss of
engine coolant and no steam, leave the
engine running and check to be sure the
engine cooling fan is operating. If the fan is
not running, turn the engine off.
4. Check to see if the water pump drive belt is
missing. If it is not missing, check to see that
it is tight. If the drive belt seems to be
satisfactory, check for coolant leaking from
the radiator, hoses or under the car. (If the
air conditioning had been in use, it is normal
for cold water to be draining from it when you
stop).
Page 151 of 221
3- 6 WHAT TO DO IN AN EMERGENCY
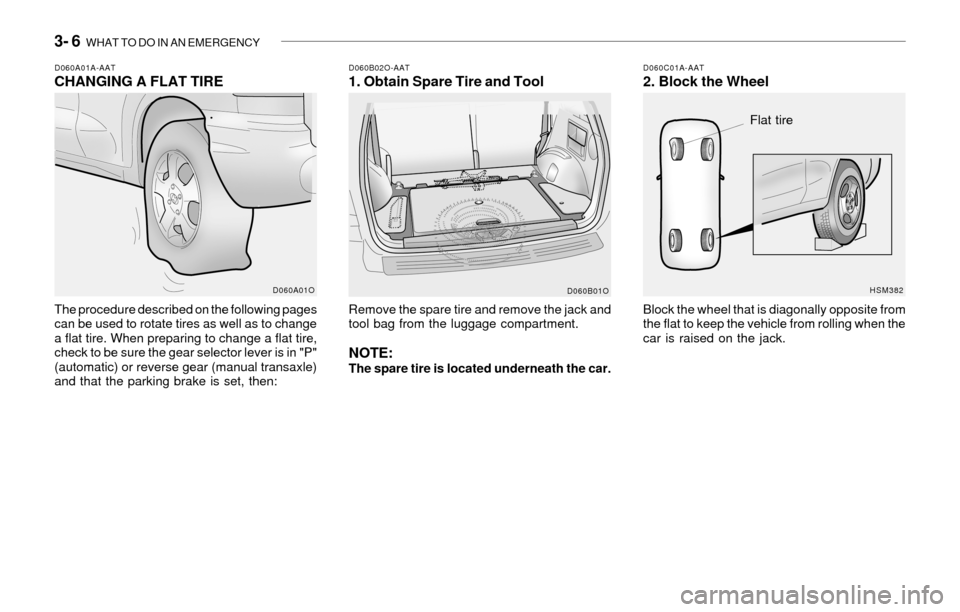
D060C01A-AAT2. Block the WheelD060B02O-AAT1. Obtain Spare Tire and ToolD060A01A-AATCHANGING A FLAT TIRE
The procedure described on the following pages
can be used to rotate tires as well as to change
a flat tire. When preparing to change a flat tire,
check to be sure the gear selector lever is in "P"
(automatic) or reverse gear (manual transaxle)
and that the parking brake is set, then:Remove the spare tire and remove the jack and
tool bag from the luggage compartment.
NOTE:The spare tire is located underneath the car.Block the wheel that is diagonally opposite from
the flat to keep the vehicle from rolling when the
car is raised on the jack.
D060A01O
D060B01OHSM382
Flat tire
Page 152 of 221
WHAT TO DO IN AN EMERGENCY 3- 7
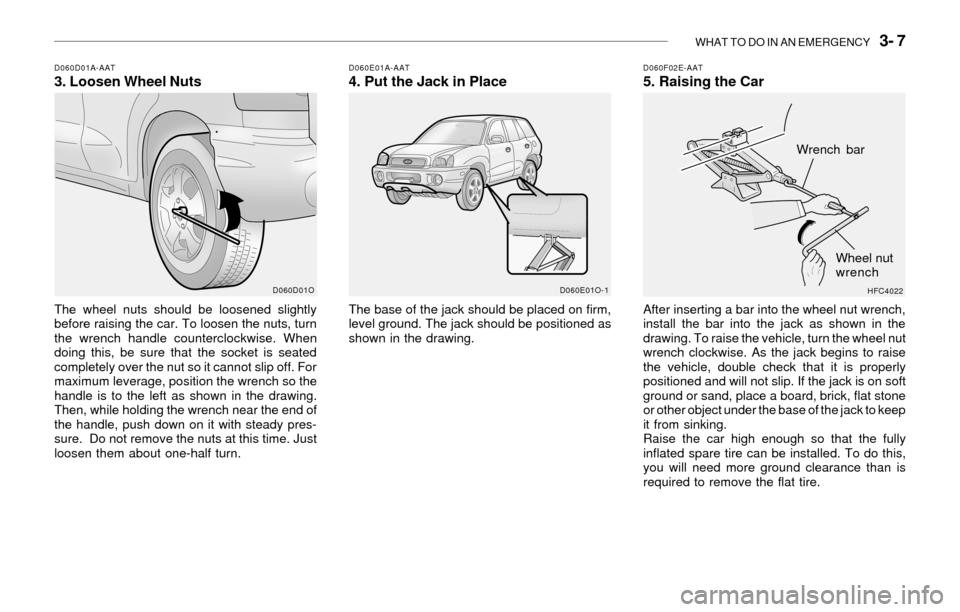
D060D01A-AAT3. Loosen Wheel NutsD060E01A-AAT4. Put the Jack in Place
The wheel nuts should be loosened slightly
before raising the car. To loosen the nuts, turn
the wrench handle counterclockwise. When
doing this, be sure that the socket is seated
completely over the nut so it cannot slip off. For
maximum leverage, position the wrench so the
handle is to the left as shown in the drawing.
Then, while holding the wrench near the end of
the handle, push down on it with steady pres-
sure. Do not remove the nuts at this time. Just
loosen them about one-half turn.The base of the jack should be placed on firm,
level ground. The jack should be positioned as
shown in the drawing.
D060F02E-AAT5. Raising the Car
After inserting a bar into the wheel nut wrench,
install the bar into the jack as shown in the
drawing. To raise the vehicle, turn the wheel nut
wrench clockwise. As the jack begins to raise
the vehicle, double check that it is properly
positioned and will not slip. If the jack is on soft
ground or sand, place a board, brick, flat stone
or other object under the base of the jack to keep
it from sinking.
Raise the car high enough so that the fully
inflated spare tire can be installed. To do this,
you will need more ground clearance than is
required to remove the flat tire.
D060D01O D060E01O-1
HFC4022
Wrench bar
Wheel nut
wrench
Page 169 of 221
5- 8 VEHICLE MAINTENANCE REQUIREMENTS
F070L01A-AATo Suspension Mounting Bolts
Check the suspension connections for loose-
ness or damage. Retighten to the specified
torque.
F070G02A-AATo Brake Fluid
Check brake fluid level in the brake fluid reser-
voir. The level should be between "MIN" and
"MAX" marks on the side of the reservoir. Use
only hydraulic brake fluid conforming to DOT 3
or DOT 4.
F070D01A-AATo Manual transaxle oil
Inspect the manual transaxle oil according to
the maintenance schedule.
NOTE:If the oil level is low, check for possible leaks
before adding oil. Do not overfill.
F070F01A-AATo Brake Hoses and Lines
Visually check for proper installation, chafing,
cracks, deterioration and any leakage. Replace
any deteriorated or damaged parts immedi-
ately.
F070E03A-AATo Automatic Transaxle Fluid and Filter
The fluid level should be in the "HOT" range of
the dipstick, after the engine and transaxle are
at normal operating temperature. Check the
automatic transaxle fluid level with the engine
running and the transaxle in neutral, with the
parking brake properly applied. Use GENUINE
HYUNDAI ATF or DIAMOND ATF SP-III or SK
ATF SP-III when adding or changing fluid.
F070K01A-AATo Exhaust Pipe and Muffler
Visually inspect the exhaust pipes, muffler and
hangers for cracks, deterioration, or damage.
Start the engine and listen carefully for any
exhaust gas leakage. Tighten connections or
replace parts as necessary.
F070J01A-AAT
o Brake Pads, Calipers and Rotors
Check the pads for excessive wear, discs for
run out and wear, and calipers for fluid leakage.
F070H01A-AAT
o Rear Brake Drums and Linings/
Parking Brake
Check the rear brake drums and linings for
scoring, burning, leaking fluid, broken parts,
and excessive wear. Inspect the parking brake
system including the parking brake lever and
cables. For detailed service procedures, refer
to the Shop Manual.
F070M01A-AATo Steering Gear Box, Linkage & Boots/
Lower Arm Ball Joint
With the vehicle stopped and engine off, check
for excessive free-play in the steering wheel.
Check the linkage for bends or damage. Check
the dust boots and ball joints for deterioration,
cracks, or damage. Replace any damaged
parts.
Page 177 of 221
DO-IT-YOURSELF MAINTENANCE 6- 7
!
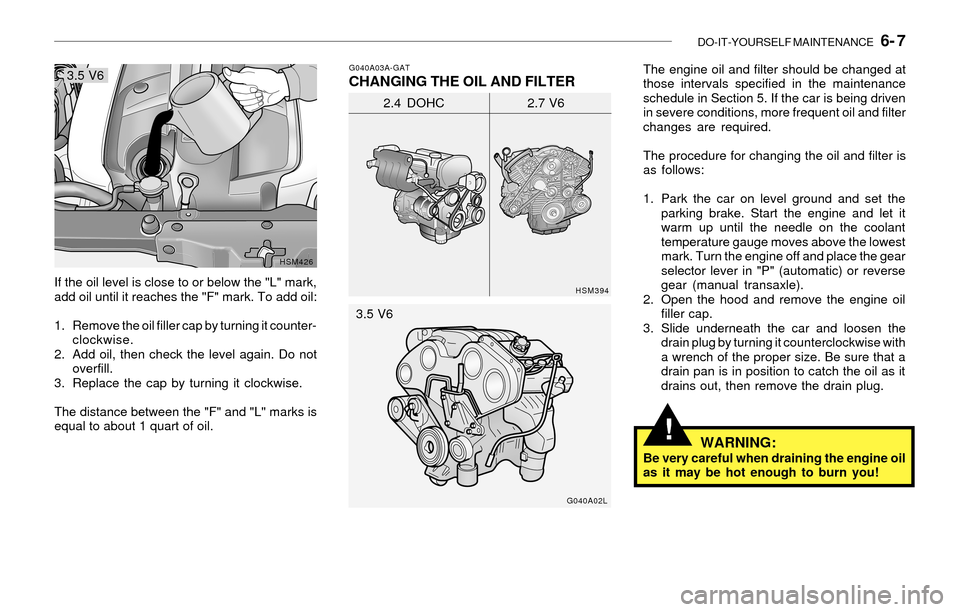
If the oil level is close to or below the "L" mark,
add oil until it reaches the "F" mark. To add oil:
1. Remove the oil filler cap by turning it counter-
clockwise.
2. Add oil, then check the level again. Do not
overfill.
3. Replace the cap by turning it clockwise.
The distance between the "F" and "L" marks is
equal to about 1 quart of oil.
HSM426G040A03A-GAT
CHANGING THE OIL AND FILTERThe engine oil and filter should be changed at
those intervals specified in the maintenance
schedule in Section 5. If the car is being driven
in severe conditions, more frequent oil and filter
changes are required.
The procedure for changing the oil and filter is
as follows:
1. Park the car on level ground and set the
parking brake. Start the engine and let it
warm up until the needle on the coolant
temperature gauge moves above the lowest
mark. Turn the engine off and place the gear
selector lever in "P" (automatic) or reverse
gear (manual transaxle).
2. Open the hood and remove the engine oil
filler cap.
3. Slide underneath the car and loosen the
drain plug by turning it counterclockwise with
a wrench of the proper size. Be sure that a
drain pan is in position to catch the oil as it
drains out, then remove the drain plug.
HSM394
2.4 DOHC 2.7 V6
G040A02L
WARNING:Be very careful when draining the engine oil
as it may be hot enough to burn you! 3.5 V6
3.5 V6
Page 182 of 221
6- 12 DO-IT-YOURSELF MAINTENANCE
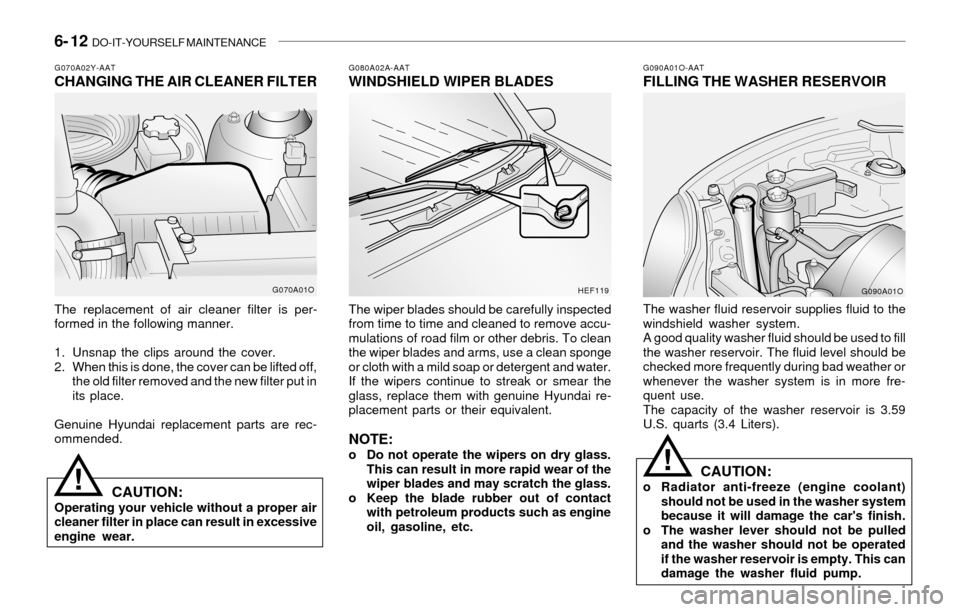
G080A02A-AATWINDSHIELD WIPER BLADES
The wiper blades should be carefully inspected
from time to time and cleaned to remove accu-
mulations of road film or other debris. To clean
the wiper blades and arms, use a clean sponge
or cloth with a mild soap or detergent and water.
If the wipers continue to streak or smear the
glass, replace them with genuine Hyundai re-
placement parts or their equivalent.
NOTE:o Do not operate the wipers on dry glass.
This can result in more rapid wear of the
wiper blades and may scratch the glass.
o Keep the blade rubber out of contact
with petroleum products such as engine
oil, gasoline, etc.
G090A01O-AATFILLING THE WASHER RESERVOIR
The washer fluid reservoir supplies fluid to the
windshield washer system.
A good quality washer fluid should be used to fill
the washer reservoir. The fluid level should be
checked more frequently during bad weather or
whenever the washer system is in more fre-
quent use.
The capacity of the washer reservoir is 3.59
U.S. quarts (3.4 Liters).
CAUTION:o Radiator anti-freeze (engine coolant)
should not be used in the washer system
because it will damage the car's finish.
o The washer lever should not be pulled
and the washer should not be operated
if the washer reservoir is empty. This can
damage the washer fluid pump.
HEF119
G090A01O
!
G070A02Y-AATCHANGING THE AIR CLEANER FILTER
The replacement of air cleaner filter is per-
formed in the following manner.
1. Unsnap the clips around the cover.
2. When this is done, the cover can be lifted off,
the old filter removed and the new filter put in
its place.
Genuine Hyundai replacement parts are rec-
ommended.
CAUTION:Operating your vehicle without a proper air
cleaner filter in place can result in excessive
engine wear.
G070A01O
!
Page 184 of 221
6- 14 DO-IT-YOURSELF MAINTENANCE
!
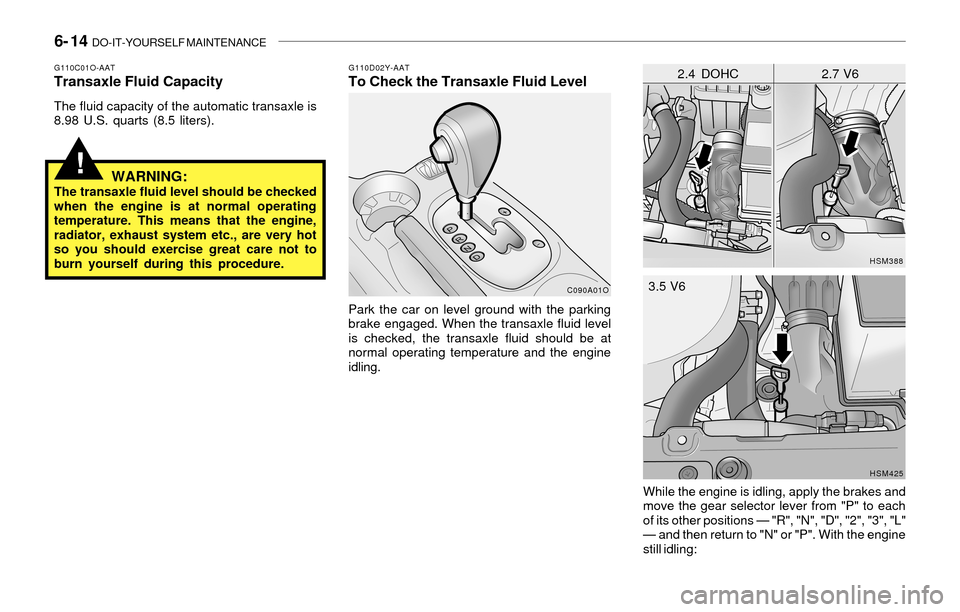
G110D02Y-AATTo Check the Transaxle Fluid Level
Park the car on level ground with the parking
brake engaged. When the transaxle fluid level
is checked, the transaxle fluid should be at
normal operating temperature and the engine
idling.
C090A01OHSM388
2.4 DOHC 2.7 V6G110C01O-AATTransaxle Fluid Capacity
The fluid capacity of the automatic transaxle is
8.98 U.S. quarts (8.5 liters).
WARNING:The transaxle fluid level should be checked
when the engine is at normal operating
temperature. This means that the engine,
radiator, exhaust system etc., are very hot
so you should exercise great care not to
burn yourself during this procedure.
HSM425
While the engine is idling, apply the brakes and
move the gear selector lever from "P" to each
of its other positions — "R", "N", "D", "2", "3", "L"
— and then return to "N" or "P". With the engine
still idling:3.5 V6