2003 Hyundai Santa Fe radio
[x] Cancel search: radioPage 114 of 221
1- 102 FEATURES OF YOUR HYUNDAI
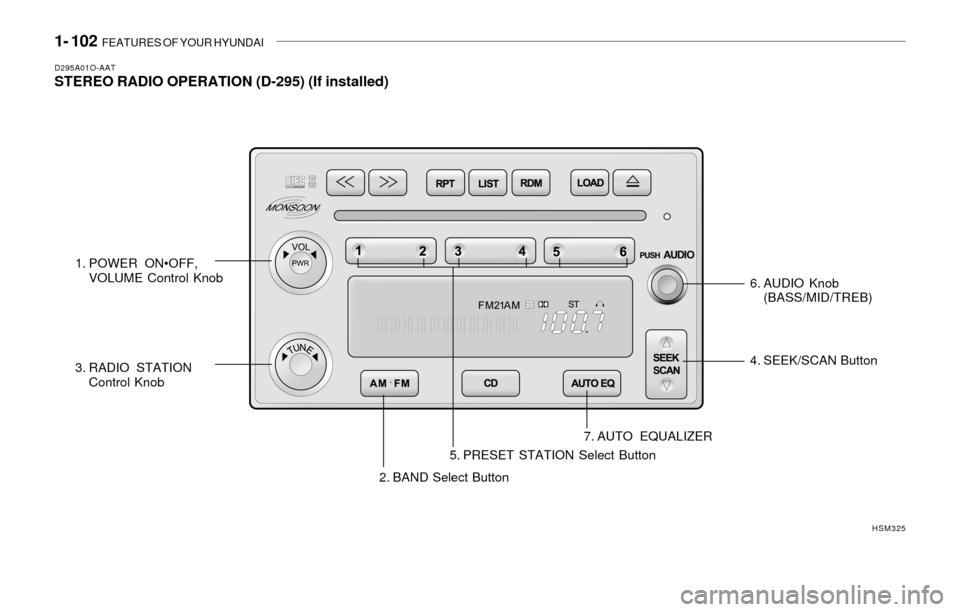
D295A01O-AATSTEREO RADIO OPERATION (D-295) (If installed)
2. BAND Select Button4. SEEK/SCAN Button
7. AUTO EQUALIZER
HSM325
1. POWER ON•OFF,
VOLUME Control Knob
3. RADIO STATION
Control Knob6. AUDIO Knob
(BASS/MID/TREB)
5. PRESET STATION Select Button
Page 115 of 221
FEATURES OF YOUR HYUNDAI 1- 103
D295B01O-AAT1. POWER ON
Press this knob to turn the system on and off.
VOLUME Control
To increase volume, turn the knob clockwise.
Turn it counterclockwise to decrease volume.
2. BAND Select Button
Press this button to switch between AM, FM1
and FM2. Then Display shows your selection.
3. RADIO STATION Control Knob
Turn this knob to select radio stations.
4. SEEK/SCAN Button
SEEK
Press the up or down arrow to go to the next
higher or lower station and stay there. The
sound will mute while seeking.
SCAN
Press and hold either SEEK/SCAN arrow for
two seconds until SCAN appears on the display
and you hear a beep. Use SCAN to listen to
stations for a few seconds. The radio will go to
a station, stop for a few seconds, then go to the
next station. Press either SEEK/SCAN arrow
again to stop scanning. If you press SEEK/
SCAN for more than four seconds, the radio will
change to preset scan mode. Then sound will
mute while scanning.
5. PRESET STATION Select Button
The six numbered pushbuttons let you return to
your favorite stations. You can set up to 18
stations (six AM, six FM1 and six FM2) by
performing the following steps:
1. Turn the radio on.
2. Press AM · FM to select the band.
3. Tune in the desired station.
4. Press AUTO EQ to select the equalization
that best suited type of station selected.
5. Press and hold one of the six numbered
buttons until you hear a beep. Whenever you
press that numbered button, the station you
set will return and the equalization that you
selected will also be automatically selected
for that button.
6. Repeat the above steps for each pushbutton.
PRESET SCAN
Press and hold either SEEK/SCAN arrow for
more than four seconds, PRESET SCAN will
appear on the display. You will hear a double
beep. Use PERSET SCAN to listen to each of
your preset stations for a few seconds. The
radio will go to a preset station stored on your
pushbuttons, stop for a few seconds, then go on
to the next preset stations. Press either SEEK/
SCAN arrow again to stop scanning presets.
6. AUDIO Knob
BASS
Press the AUDIO knob until BASS appears on
the display. Turn the knob to increase or de-
crease bass. When you use this control, the
radio's tone setting will switch to custom mode.
To set the bass to the middle position, select
BASS and press and hold the AUDIO knob. The
radio will produce one beep and set the display
level to zero. To set all tone and speaker
controls to the middle position, press and hold
the AUDIO knob when no tone or speaker
control is active. The radio will produce one
beep and CENTERED will appear on the dis-
play.
Page 116 of 221
1- 104 FEATURES OF YOUR HYUNDAI
MID
Press the AUDIO knob until MID appears on the
display. Turn the knob to increase or decrease
mid. When you use this control, the radio's tone
setting will switch to custom mode.
To set the mid to the middle position, select MID
and press and hold the AUDIO knob. The radio
will produce one beep and set the display level
to zero. To set all tone and speaker controls to
the middle position, press and hold the AUDIO
knob when no tone or speaker control is active.
Then radio will produce one beep and CEN-
TERED will appear on the display.
TREB
Press the AUDIO knob until TREB appears on
the display. Turn the knob to increase to de-
crease treble. When you use this control, the
radio's tone setting will switch to custom mode.
If a station is weak or noisy, you may want to
decrease the treble.
To set treble to the middle position, select TREB
and press and hold the AUDIO knob. The radio
will produce one beep and set the display level
to zero. To set all tone and speaker controls to
the middle position, press and hold the AUDIO
knob when no tone or speaker control is active.
The radio will produce one beep and CEN-
TERED will appear on the display.
7. AUTO EQUALIZER Button
This feature allows you to choose preset bass,
mid and treble equalization settings designed
for country, jazz, talk, pop, rock and classical
stations. The last setting will appear on the
display when you first press AUTO EQ. Each
time you press AUTO EQ, another setting will
appear on the display. Press AUTO EQ again
country disappear and CUSTOM will appear.
Tone control will return to the BASS, MID and
TREB. Also, if you alter BASS, MID, or TREB
while in an auto EQ setting, the radio will return
to CUSTOM. CUSTOM will appear on the dis-
play.
8. Adjusting the Speakers
BAL-FADE
The AUDIO knob adjusts balance and fade. To
adjust balance, press the AUDIO knob until BAL
appears on the display. Turn the knob to adjust
the sound to the left or right speakers. The
middle position balances the sound between the
speakers. To adjust fade, press and hold the
AUDIO knob until FAD appears on the display.
Turn the knob to adjust the sound to the front or
rear speakers. The middle position balances
the sound between the speakers.To set the balance and fade to the middle
position, select balance or fade and press and
hold the AUDIO knob.
The radio will beep once and will set the display
level to the middle position, To set all tone and
speaker controls to the middle position, press
and hold the AUDIO knob when tone or speaker
controls are not active. The radio will produce
one beep and CENTERED will appear on the
display.
Page 118 of 221
1- 106 FEATURES OF YOUR HYUNDAI
D295D01O-AAT1. LOAD Button
This compact disc playing will accommodate up
to six discs.
To insert one disc do the following:
1. Turn the ignition on.
2. Press and release the LOAD Button.
3. Wait for the light, located to the right of the slot,
to turn green.
4. Load a disc. Insert a disc partway into the slot,
label side up. The player will pull the disc in.
When the disc is inserted, the CD symbol will be
displayed. If you select an EQ setting for your
disc, it will be activated each time you play a disc.
If the radio is on or off, the disc will begin to play
automatically.
To inset multiple discs do the followings:
1. Turn the ignition on.
2. Press and hold the LOAD button for two
seconds.
You will then hear two beeps and the light,
located to the right of the slot, will begin to
flash.
3. Once the light stops flashing and turns
green. Load a disc. Insert a disc partway into
the slot, label side up.The player will pull the disc in.
Once the disc is loaded, the light will begin
flashing again. Once the light stop flashing
and turns green you can then load another
disc. The disc player takes up to six discs.
Do not try to load more than six.
When a disc is inserted, the CD symbol will
be displayed. If more than one disc has been
loaded, number for each disc will be dis-
played. If you select an EQ setting for your
disc, it will be activated each time you play a
disc.
If the radio is on or off, the last disc loaded will
begin to play automatically.
4. To load more than one disc but less than six,
complete Steps 1, 2 and 3. When you have
finished loading discs, with the radio on or off,
press LOAD to cancel the loading function.
The radio will begin to play the last CD loaded.
As each new track starts to play, the track
number will appear on the display.
Playing a Specific Loaded CD
For every CD loaded, a number will appear on
the radio display. To play a specific CD, first
press the CD select button to start playing a CD.
Then press the numbered button that corre-
sponds to the CD you want to play.
A small bar will appear under the CD number that
is playing, it could be due to one of the following
conditions:o The road is too rough. The disc should play
when the road is smoother.
o The disc is dirty, scratched, wet or upside
down.
o The air is very humid. If so, wait about an hour
and try again.
If any error occurs repeatedly or if an error can't
be corrected, please contact your dealer. If
your radio displays an error message, write it
down and provide it to your dealer when report-
ing the problem.
2. CD EJECT Button
This button will eject a disc or discs, if you have
multiple discs loaded. To eject a disc or discs
from the disc player perform one of the following
steps:
o Press and release the eject button to eject
the disc that is currently playing.
o To eject all of the discs, press this button for
two seconds, you will hear three beeps, and
the light will flash to let you know when a disc
is being ejected.
When the eject button is pressed, the receiver
will eject the disc and REMOVE CD will be
displayed. You can now remove the disc. If the
disc is not removed, after 25 seconds, the disc
will be automatically pulled back into the re-
ceiver, If you try to push the disc back into the
receiver, before the 25 second time period is
Page 120 of 221
1- 108 FEATURES OF YOUR HYUNDAI
9. BAND Select Button
Press this button to play the radio when a disc
is in the player.
10. Using Song List Mode
The integrated 6-disc CD changer has a feature
called song list. This feature is capable of saving
20 track selections.
To save tracks into SONG LIST perform the
following steps:
1. The disc player must be on with at least one
disc loaded. See "LOAD/EJECT" previously
for more information.
2. The disc changer must not be in song list
mode. S-LIST should not appear in the dis-
play. If S-LIST is present, press SONG LIST
to turn it off.
3. Select the desired disc by pressing the
numbered pushbutton and then use the
SEEK SCAN up arrow button to locate the
track that you want to save. The track will
begin to play.
4. Press and hold LIST for two or more sec-
onds to save the track into memory. When
LIST is pressed a beep will be heard imme-
diately. After two seconds of pressing LIST
continuously, two beeps will sound, to con-
firm that the track has been saved.
5. Repeat Steps 3 and 4 for saving other
selections.To play the song list, press LIST. One beep will
be heard and SLIST will appear on the display.
The recorded tracks will begin to play in the
order that they were saved.
You may seek through the song list by using the
SEEK SCAN arrows. Seeking past the last
saved track will return you to the first saved
track.
To delete tracks from SONG LIST perform the
following steps:
1. The disc player must be turned on.
2. Press SONG LIST to turn song list on. S-
LIST will appear on the display.
3. Press the SEEK SCAN arrows to select the
desired track to be deleted.
4. Press and hold the SONG LIST button for
two seconds. When pressing SONG LIST
one beep will be heard immediately. After two
seconds of pressing the SONG LIST button
continuously, two beeps will be heard, to
confirm that the track had been deleted.
5. To delete entire lists, press and hold LIST
button for > 4 seconds when pressing list,
one beep will be heard immediately. After two
seconds of pressing the LIST button con-
tinuously, two beeps will be heard. After 4
seconds, a beep would be heard to confirm
that all the tracks had been deleted and
display will show SLIST_EMPTY.
Page 126 of 221
2- 4 DRIVING YOUR HYUNDAI
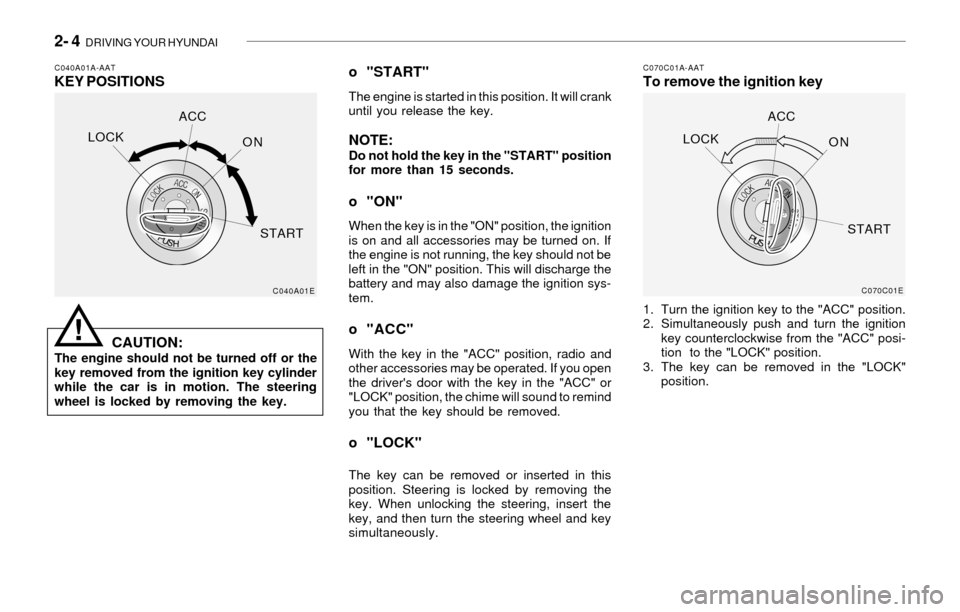
C040A01A-AATKEY POSITIONSC070C01A-AATTo remove the ignition key
CAUTION:
The engine should not be turned off or the
key removed from the ignition key cylinder
while the car is in motion. The steering
wheel is locked by removing the key.
o "START"
The engine is started in this position. It will crank
until you release the key.
NOTE:Do not hold the key in the "START" position
for more than 15 seconds.
o "ON"
When the key is in the "ON" position, the ignition
is on and all accessories may be turned on. If
the engine is not running, the key should not be
left in the "ON" position. This will discharge the
battery and may also damage the ignition sys-
tem.
o "ACC"
With the key in the "ACC" position, radio and
other accessories may be operated. If you open
the driver's door with the key in the "ACC" or
"LOCK" position, the chime will sound to remind
you that the key should be removed.
o "LOCK"
The key can be removed or inserted in this
position. Steering is locked by removing the
key. When unlocking the steering, insert the
key, and then turn the steering wheel and key
simultaneously.1. Turn the ignition key to the "ACC" position.
2. Simultaneously push and turn the ignition
key counterclockwise from the "ACC" posi-
tion to the "LOCK" position.
3. The key can be removed in the "LOCK"
position.
C040A01EC070C01E
LOCKACC
ON
STARTLOCKACC
ON
START
!
Page 145 of 221
FEATURES OF YOUR HYUNDAI 1- 111
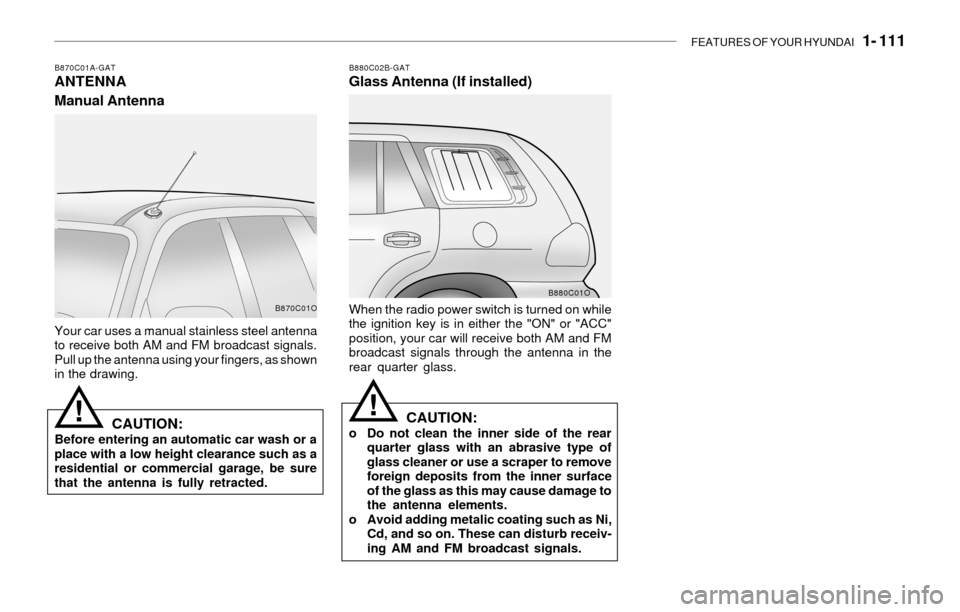
B870C01A-GATANTENNA
Manual AntennaB880C02B-GATGlass Antenna (If installed)
Your car uses a manual stainless steel antenna
to receive both AM and FM broadcast signals.
Pull up the antenna using your fingers, as shown
in the drawing.When the radio power switch is turned on while
the ignition key is in either the "ON" or "ACC"
position, your car will receive both AM and FM
broadcast signals through the antenna in the
rear quarter glass.
CAUTION:o Do not clean the inner side of the rear
quarter glass with an abrasive type of
glass cleaner or use a scraper to remove
foreign deposits from the inner surface
of the glass as this may cause damage to
the antenna elements.
o Avoid adding metalic coating such as Ni,
Cd, and so on. These can disturb receiv-
ing AM and FM broadcast signals.CAUTION:Before entering an automatic car wash or a
place with a low height clearance such as a
residential or commercial garage, be sure
that the antenna is fully retracted.
!!
B870C01OB880C01O
Page 180 of 221
6- 10 DO-IT-YOURSELF MAINTENANCE
!
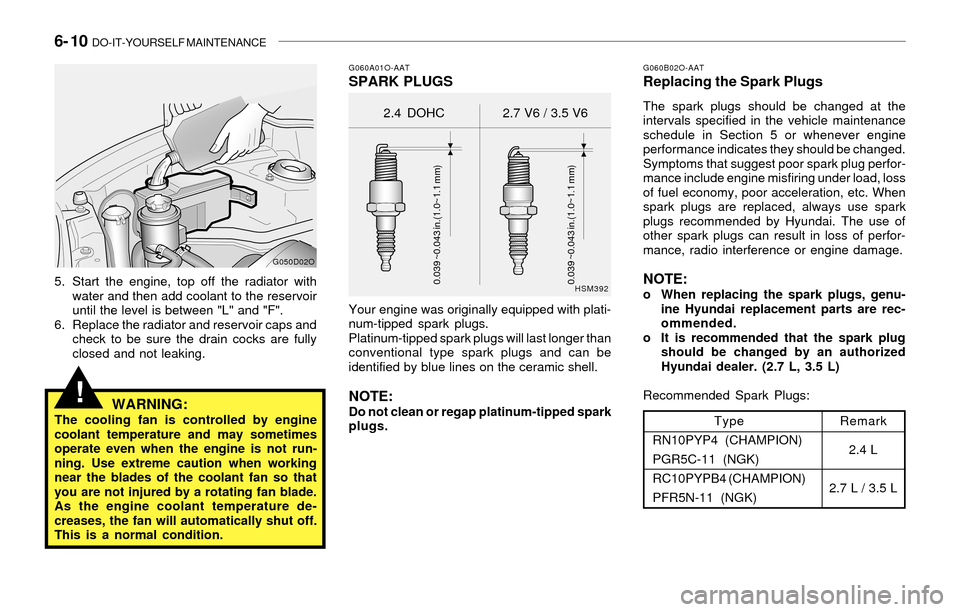
G060A01O-AATSPARK PLUGS
Your engine was originally equipped with plati-
num-tipped spark plugs.
Platinum-tipped spark plugs will last longer than
conventional type spark plugs and can be
identified by blue lines on the ceramic shell.
NOTE:Do not clean or regap platinum-tipped spark
plugs.
G060B02O-AATReplacing the Spark Plugs
The spark plugs should be changed at the
intervals specified in the vehicle maintenance
schedule in Section 5 or whenever engine
performance indicates they should be changed.
Symptoms that suggest poor spark plug perfor-
mance include engine misfiring under load, loss
of fuel economy, poor acceleration, etc. When
spark plugs are replaced, always use spark
plugs recommended by Hyundai. The use of
other spark plugs can result in loss of perfor-
mance, radio interference or engine damage.
NOTE:o When replacing the spark plugs, genu-
ine Hyundai replacement parts are rec-
ommended.
o It is recommended that the spark plug
should be changed by an authorized
Hyundai dealer. (2.7 L, 3.5 L)
Recommended Spark Plugs:
Type
RN10PYP4 (CHAMPION)
PGR5C-11 (NGK)
RC10PYPB4 (CHAMPION)
PFR5N-11 (NGK)Remark
2.4 L
2.7 L / 3.5 L
HSM392
2.4 DOHC 2.7 V6 / 3.5 V6
0.039 ~0.043 in.(1.0~1.1 mm)
0.039 ~0.043 in.(1.0~1.1 mm)5. Start the engine, top off the radiator with
water and then add coolant to the reservoir
until the level is between "L" and "F".
6. Replace the radiator and reservoir caps and
check to be sure the drain cocks are fully
closed and not leaking.
WARNING:The cooling fan is controlled by engine
coolant temperature and may sometimes
operate even when the engine is not run-
ning. Use extreme caution when working
near the blades of the coolant fan so that
you are not injured by a rotating fan blade.
As the engine coolant temperature de-
creases, the fan will automatically shut off.
This is a normal condition.
G050D02O