2003 Hyundai Santa Fe temp switch
[x] Cancel search: temp switchPage 88 of 221
1- 76 FEATURES OF YOUR HYUNDAI
B730A01FC-GATOperation Tips
o To keep dust or unpleasant fumes from
entering the car through the ventilation sys-
tem, temporarily set the air intake control
switch to the position. Be sure to return
the control switch to the position when
the irritation has passed to keep fresh air in
the vehicle. This will help keep the driver alert
and comfortable.
o Air for the heating/cooling system is drawn
in through the grilles just ahead of the wind-
shield. Care should be taken that these are
not blocked by leaves, snow, ice or other
obstructions.
o To prevent interior fog on the windshield, set
the air intake control switch to the fresh air
( ) position and fan speed to the desired
position.
o Adjust the fan control to the desired speed.
For greater cooling, turn the fan control to
one of the higher speeds or temporarily
select the recirculate ( ) position on the
air intake control switch.
B740C02O-AATDe-Humidified Heating
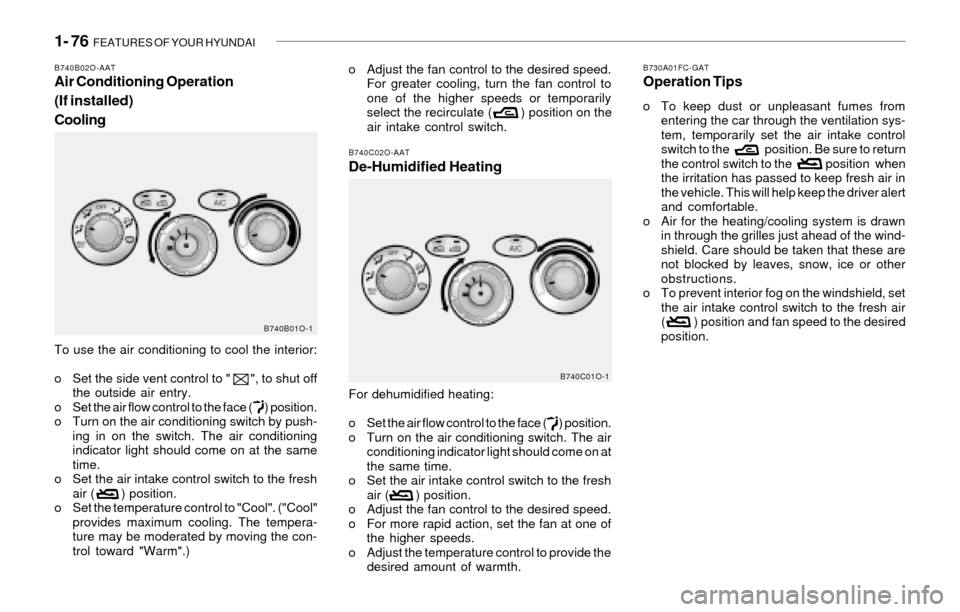
For dehumidified heating:
o Set the air flow control to the face ( ) position.
o Turn on the air conditioning switch. The air
conditioning indicator light should come on at
the same time.
o Set the air intake control switch to the fresh
air ( ) position.
o Adjust the fan control to the desired speed.
o For more rapid action, set the fan at one of
the higher speeds.
o Adjust the temperature control to provide the
desired amount of warmth.
B740C01O-1
To use the air conditioning to cool the interior:
o Set the side vent control to " ", to shut off
the outside air entry.
o Set the air flow control to the face ( ) position.
o Turn on the air conditioning switch by push-
ing in on the switch. The air conditioning
indicator light should come on at the same
time.
o Set the air intake control switch to the fresh
air ( ) position.
o Set the temperature control to "Cool". ("Cool"
provides maximum cooling. The tempera-
ture may be moderated by moving the con-
trol toward "Warm".)
B740B02O-AATAir Conditioning Operation
(If installed)
Cooling
B740B01O-1
Page 90 of 221

1- 78 FEATURES OF YOUR HYUNDAI
B970A01Y-AATAUTOMATIC HEATING AND COOLING
CONTROL SYSTEM (If installed)
Your Hyundai is equipped with an automatic
heating and cooling control system controlled
by simply setting the desired temperature.
B970B01O-AATHeating and Cooling Controls
1. Temperature Control Button
2. AUTO (Automatic Control) Switch
3. Display Window
4. Air Flow Control Switch
5. Blower Fan Speed Control Switch 6. OFF Switch
7. Air Conditioning Switch
8. Air Intake Control Switch
9. Defroster Switch
10. Inside Temperature Sensor
11. Ambient Switch
B970B01O
12 3 45
6 7 8 9 10 11
Page 91 of 221

FEATURES OF YOUR HYUNDAI 1- 79
B970C02O-AATAutomatic OperationNOTE:If the battery has been discharged or dis-
connected, the temperature mode will reset
to centigrade degree.
This is a normal condition and you can
adjust the temperature mode from centi-
grade to fahrenheit as follows;
Press the TEMP down ( ) button 3 seconds
or more with the AMB button held down.
The display shows that the unit of tempera-
ture is adjusted to centigrade or fahrenheit
(°C
® ®® ®
® °F or °F
® ®® ®
® °C).
The FATC (Full Automatic Temperature Con-
trol) system automatically controls the heating
and cooling by doing as follows:
1. Push the "AUTO" switch. The indicator light
will come on confirming that the Face, Floor
and/or Bi-Level modes as well as the blower
speed and, air conditioner will be controlled
automatically.
2. Push the "TEMP" button to set the desired
temperature.
The temperature will increase to the maxi-
mum 90°F(32°C) by pushing on the bu-
tton. Each push of the button will cause the
temperature to increase by 1°F(0.5°C).
The temperature will decrease to the mini-
mum 62°F(17°C) by pushing on the bu-
tton. Each push of the button will cause the
temperature to decrease by 1°F(0.5°C).
NOTE:Never place things on the sensor which is
located in the car on the instrument panel
to ensure better control of the heating and
cooling system.
B995A01O-GATAMBIENT SWITCH
Pressing the "AMB" button displays the ambient
temperature on display window.
B980A01Y-AATMANUAL OPERATION
The heating and cooling system can be con-
trolled manually as well as by pushing buttons
other than the "AUTO" button. At this state, the
system sequentially works according to the
order of buttons selected.
The function of the buttons which are not se-
lected will be controlled automatically.
Press the "AUTO" button in order to convert to
automatic control of the system.
B970C01O
HSM502B995A01O
Photo sensor
Page 102 of 221
1- 90 FEATURES OF YOUR HYUNDAI
B260D02O-AAT1. Playing CD
o Insert the CD with the label facing upward.
o Insert the CD to start CD playback, during
radio operation.
o When a disc is in the CD deck, if you press
the CD button, the CD player will begin
playing even if the radio is being used.
o The CD player can be used when the ignition
switch is in either the "ON" or "ACC" position.
2. FF/REW ( / )
If you want to fast forward or reverse through
the compact disc track, push and hold the FF
( ) or REW ( ) button.
When you release the button, the compact disc
player will resume playing.
3. TRACK UP/DOWN
o The desired track on the disc currently being
played can be selected using the track
number.
o Press once to skip forward to the beg-
inning of the next track. Press once to
skip back to the beginning of the track.
4. SCAN Button
o Press the SCAN button to playback the first
10 seconds of each track.
o Press the SCAN button again within 10 sec.
when you have reached the desired track.
5. REPEAT Button
o To repeat the track you are currently listen-
ing to, press the RPT button. To cancel ,
press again.
o If you do not release RPT operation when the
track ends, it will automatically be replayed.
This process will be continued until you push
the button again.
6. EJECT Button
When the EJECT button is pressed with a
CD loaded, the CD will eject.
NOTE:o If the CD does not operate properly or if
the ER2 fault code is displayed, use one
of two methods to reset the CD deck
function.
- Remove the audio fuse for 5 minutes.
Then, reinstall the audio fuse.
- Diconnect the negative terminal of the
battery and wait 5 minutes. Then re-
connect the negative battery terminal.
o To assure proper operation of the unit,
keep the vehicle interior temperature
within a normal range by using the
vehicle's air conditioning or heating
system.
o When replacing the fuse, replace it with
a fuse having the correct capacity.o The preset station frequencies are all
erased when the car battery is discon-
nected. Therefore, all data will have to be
set again if this should occur.
o Do not add any oil to the rotating parts.
Keep magnets, screwdrivers and other
metallic objects away from the tape
mechanism and head.
o This equipment is designed to be used
only in a 12 volt DC battery system with
negative ground.
o This unit is made of precision parts. Do
not attempt to disassemble or adjust
any parts.
o When driving your vehicle, be sure to
keep the volume of the unit set low
enough to allow you to hear sounds
coming from the outside.
o Do not expose this equipment (includ-
ing the speakers) to water or excessive
moisture.
Page 109 of 221
FEATURES OF YOUR HYUNDAI 1- 97
7. TAPE/CD Select Button
Press this button to play a tape when listening
to the radio. Press TAPE/CD to switch between
the tape and compact disc if both are loaded.
The inactive tape or CD will remain safe inside
the radio for future listening.
8. Cassette Tape EJECT Button
Press this button located to the right of the
cassette tape slot to eject a tape. The tape is
ejected with the radio off. Cassette tape may be
loaded with the radio off.
9. Cassette Tape Messages
CHECK TAPE
If this message appears on the radio display, the
tape won't play because of one of the following
errors.
o The tape is tight and the player can't turn the
tape hubs. Remove the tape. Hold the tape
with the open end down and try to turn the
right hub counterclockwise with a pencil.
Turn the tape over and repeat. If the hubs do
not turn easily, your tape may be damaged
and should not be used in the player. Try a
new tape to make sure your player is work-
ing properly.
o The tape is broken. Try a new tape.
o The tape is wrapped around the tape head.
Attempt to get the cassette out. Try a new
tape.
CLEAN
If this message appears on the display, the
cassette tape player needs to be cleaned. It will
still play tapes, but you should clean it as soon
as possible to prevent damage to the tapes and
player. See "Care of Your Cassette Tape Player"
in the Index.
If any error occurs repeatedly or if an error can't
be corrected, contact your dealer.
10. Care of Your Cassette Tape Player
A tape player that is not cleaned regularly can
cause reduced sound quality, reined cassettes
or a damaged mechanism. Cassette tapes
should be stored in their case away from con-
taminants, direct sunlight and extreme heat. If
they aren't they may not operate properly or
may cause failure of the tape player.
Your tape player should be cleaned regularly
after every 59 hours of use. Your radio may
display CLEAN to indicate that you have used
your tape player needs to be cleaned. It will still
play tapes, but you should clean it as soon as
possible to prevent damage to your tapes and
player. If you notice a reduction in sound quality,
try a known good cassette to see of it is the tape
or the tape player or fault. If this other cassette
has no improvement in sound quality, clean the
tape player.The recommended cleaning method for your
cassette tape player is the use of a scrubbing
action, non-abrasive cleaning cassette with
pads which scrub the tape head as the hubs of
the cleaner cassette turn. The recommended
cleaning cassette is available through your
dealer.
When cleaning the cassette tape player with the
recommended non-abrasive cleaning cassette,
it is possible that the cassette may eject, be-
cause the cut tape detection feature on your
radio may recognize it as a broken tape. To
prevent the cleaning cassette from being
ejected, use the following steps:
1. Turn the ignition to ON or ACC.
2. Turn the radio off.
3. Press and hold the TAPE/CD select button
for five seconds. READY will appear on the
display and a cassette symbol will flash for
five second.
4. Insert the scrubbing action cleaning cas-
sette.
5. Eject the cleaning cassette after the
manufacturer's recommended cleaning time.
When the cleaning cassette has been ejected,
the broken tape detection feature is active
again.
Page 136 of 221
2- 14 DRIVING YOUR HYUNDAI
When driving on a snow-covered road or a
slippery, muddy surface, make sure that
you keep a sufficient distance between your
vehicle and the one ahead of you.
(7) Since the driving torque is always applied to
the 4 wheels, the performance of the full-time
4WD vehicle is greatly affected by the con-
dition of the tires. Be sure to equip it with all
four tires of the same size and type.
o When replacement of any of the tires or
disc wheels is necessary, replace all of
them.
o Rotate the tires and check the tire pres-
sure at regular intervals.
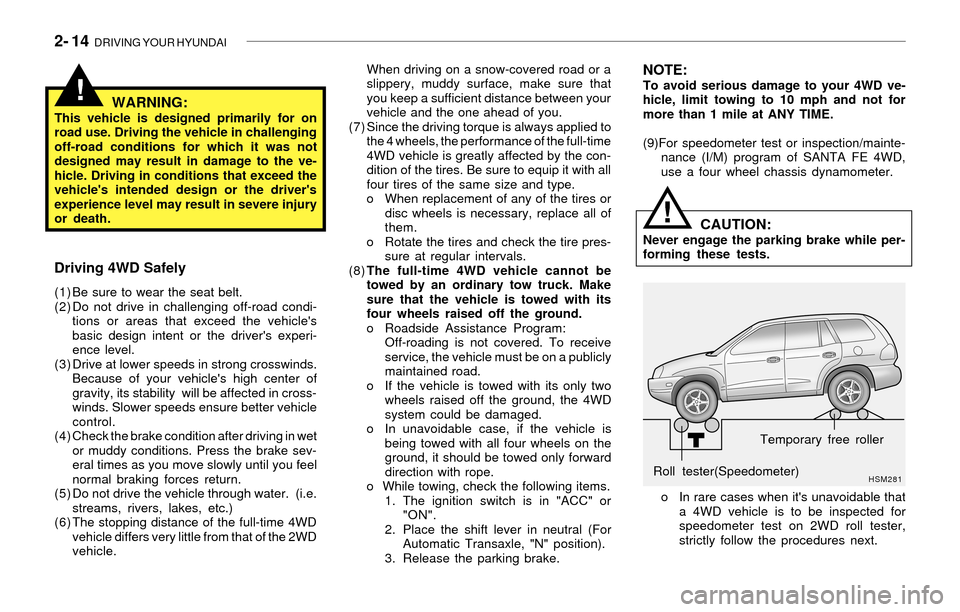
(8)The full-time 4WD vehicle cannot be
towed by an ordinary tow truck. Make
sure that the vehicle is towed with its
four wheels raised off the ground.
o Roadside Assistance Program:
Off-roading is not covered. To receive
service, the vehicle must be on a publicly
maintained road.
o If the vehicle is towed with its only two
wheels raised off the ground, the 4WD
system could be damaged.
o In unavoidable case, if the vehicle is
being towed with all four wheels on the
ground, it should be towed only forward
direction with rope.
o While towing, check the following items.
1. The ignition switch is in "ACC" or
"ON".
2. Place the shift lever in neutral (For
Automatic Transaxle, "N" position).
3. Release the parking brake.NOTE:To avoid serious damage to your 4WD ve-
hicle, limit towing to 10 mph and not for
more than 1 mile at ANY TIME.
(9)For speedometer test or inspection/mainte-
nance (I/M) program of SANTA FE 4WD,
use a four wheel chassis dynamometer.
HSM281Roll tester(Speedometer)Temporary free roller
o In rare cases when it's unavoidable that
a 4WD vehicle is to be inspected for
speedometer test on 2WD roll tester,
strictly follow the procedures next.
CAUTION:Never engage the parking brake while per-
forming these tests.
!
!WARNING:This vehicle is designed primarily for on
road use. Driving the vehicle in challenging
off-road conditions for which it was not
designed may result in damage to the ve-
hicle. Driving in conditions that exceed the
vehicle's intended design or the driver's
experience level may result in severe injury
or death.
Driving 4WD Safely
(1) Be sure to wear the seat belt.
(2) Do not drive in challenging off-road condi-
tions or areas that exceed the vehicle's
basic design intent or the driver's experi-
ence level.
(3) Drive at lower speeds in strong crosswinds.
Because of your vehicle's high center of
gravity, its stability will be affected in cross-
winds. Slower speeds ensure better vehicle
control.
(4) Check the brake condition after driving in wet
or muddy conditions. Press the brake sev-
eral times as you move slowly until you feel
normal braking forces return.
(5) Do not drive the vehicle through water. (i.e.
streams, rivers, lakes, etc.)
(6) The stopping distance of the full-time 4WD
vehicle differs very little from that of the 2WD
vehicle.
Page 191 of 221
DO-IT-YOURSELF MAINTENANCE 6- 21
!
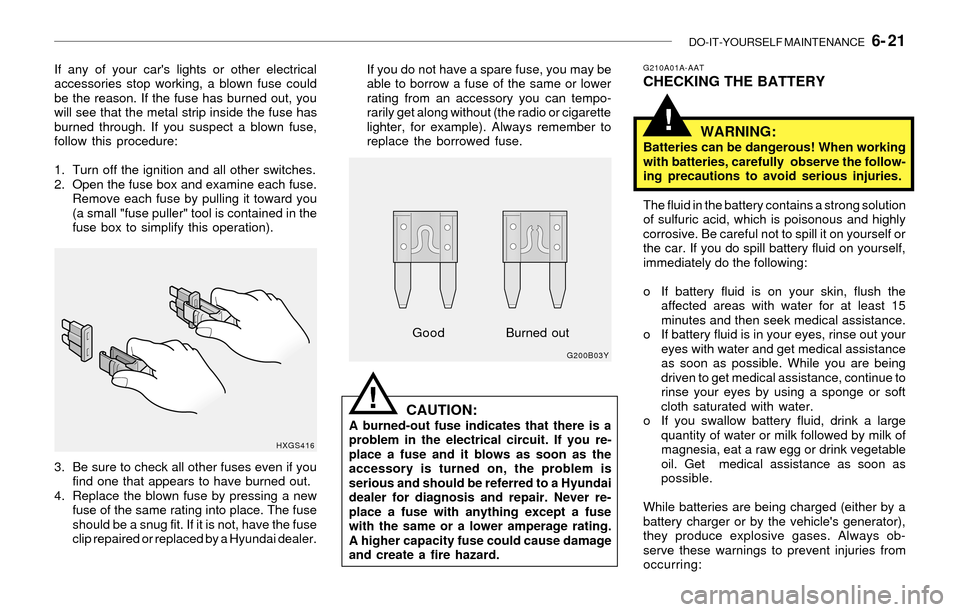
If any of your car's lights or other electrical
accessories stop working, a blown fuse could
be the reason. If the fuse has burned out, you
will see that the metal strip inside the fuse has
burned through. If you suspect a blown fuse,
follow this procedure:
1. Turn off the ignition and all other switches.
2. Open the fuse box and examine each fuse.
Remove each fuse by pulling it toward you
(a small "fuse puller" tool is contained in the
fuse box to simplify this operation).
3. Be sure to check all other fuses even if you
find one that appears to have burned out.
4. Replace the blown fuse by pressing a new
fuse of the same rating into place. The fuse
should be a snug fit. If it is not, have the fuse
clip repaired or replaced by a Hyundai dealer.
HXGS416
!
If you do not have a spare fuse, you may be
able to borrow a fuse of the same or lower
rating from an accessory you can tempo-
rarily get along without (the radio or cigarette
lighter, for example). Always remember to
replace the borrowed fuse.G210A01A-AATCHECKING THE BATTERY
WARNING:
Batteries can be dangerous! When working
with batteries, carefully observe the follow-
ing precautions to avoid serious injuries.
The fluid in the battery contains a strong solution
of sulfuric acid, which is poisonous and highly
corrosive. Be careful not to spill it on yourself or
the car. If you do spill battery fluid on yourself,
immediately do the following:
o If battery fluid is on your skin, flush the
affected areas with water for at least 15
minutes and then seek medical assistance.
o If battery fluid is in your eyes, rinse out your
eyes with water and get medical assistance
as soon as possible. While you are being
driven to get medical assistance, continue to
rinse your eyes by using a sponge or soft
cloth saturated with water.
o If you swallow battery fluid, drink a large
quantity of water or milk followed by milk of
magnesia, eat a raw egg or drink vegetable
oil. Get medical assistance as soon as
possible.
While batteries are being charged (either by a
battery charger or by the vehicle's generator),
they produce explosive gases. Always ob-
serve these warnings to prevent injuries from
occurring:
CAUTION:A burned-out fuse indicates that there is a
problem in the electrical circuit. If you re-
place a fuse and it blows as soon as the
accessory is turned on, the problem is
serious and should be referred to a Hyundai
dealer for diagnosis and repair. Never re-
place a fuse with anything except a fuse
with the same or a lower amperage rating.
A higher capacity fuse could cause damage
and create a fire hazard.
G200B03Y
GoodBurned out
Page 194 of 221
6- 24 DO-IT-YOURSELF MAINTENANCE
!
G260A01L-AATREPLACEMENT OF LIGHT BULBS
Before attempting to replace a light bulb, be sure
the switch is turned to the "OFF" position.
The next paragraph shows how to reach the
light bulbs so they may be changed. Be sure to
replace the burned-out bulb with one of the
same number and wattage rating.
See page 6-30 for the wattage description.
CAUTION:Keep the lamps out of contact with petro-
leum products, such as oil, gasoline, etc.
G270A01O-AATHeadlight and Front Turn Signal Light
1. Allow the bulb to cool. Wear eye protection.
2. Open the engine hood.
3. Always grasp the bulb by its plastic base,
avoid touching the glass.
4. Using a socket wrench of the correct size,
remove the headlight assembly mounting
bolts.
HSM353
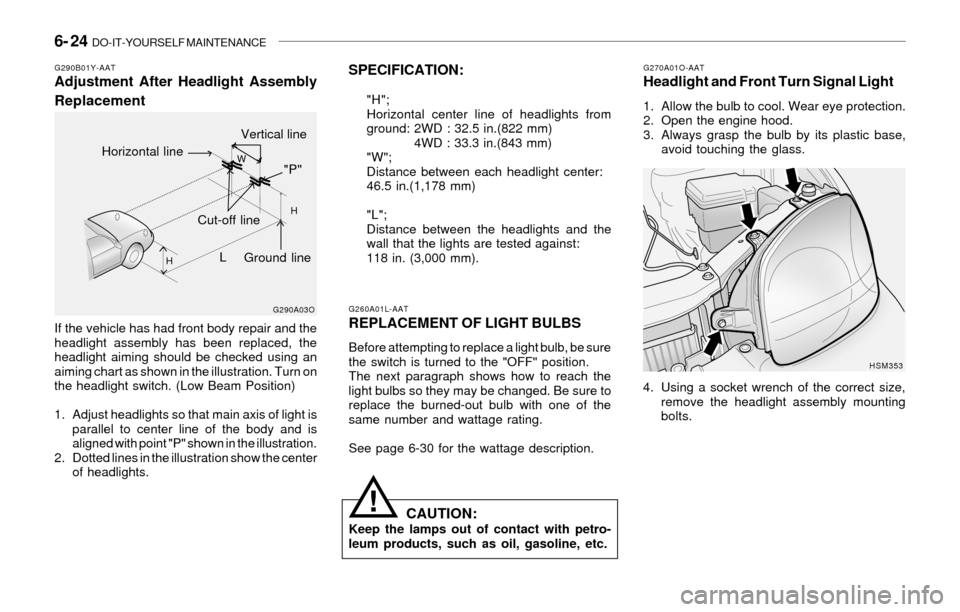
SPECIFICATION:
"H";
Horizontal center line of headlights from
ground: 2WD : 32.5 in.(822 mm)
4WD : 33.3 in.(843 mm)
"W";
Distance between each headlight center:
46.5 in.(1,178 mm)
"L";
Distance between the headlights and the
wall that the lights are tested against:
118 in. (3,000 mm).
G290B01Y-AATAdjustment After Headlight Assembly
Replacement
If the vehicle has had front body repair and the
headlight assembly has been replaced, the
headlight aiming should be checked using an
aiming chart as shown in the illustration. Turn on
the headlight switch. (Low Beam Position)
1. Adjust headlights so that main axis of light is
parallel to center line of the body and is
aligned with point "P" shown in the illustration.
2. Dotted lines in the illustration show the center
of headlights.
G290A03O
L
W
H
H
Cut-off line
Ground line
"P"
Horizontal line
Vertical line